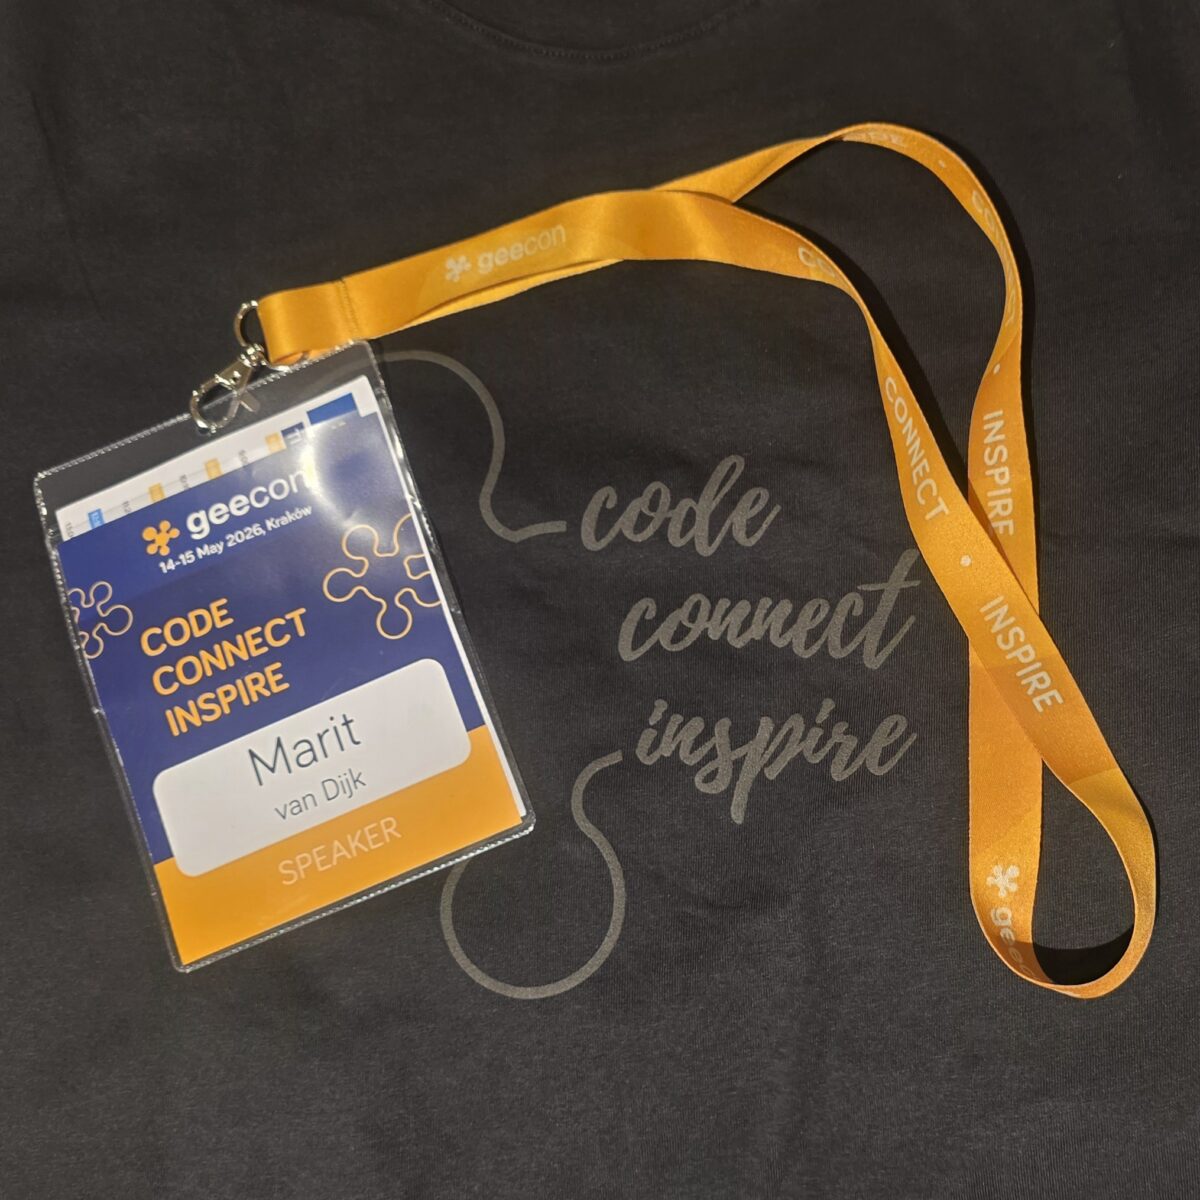
Just over a month ago, I had the pleasure of speaking at GeeCON 2026 in Kraków, Poland. GeeCON is one of my favourite Java conferences, and this year they invited me to join the Program Committee this year along with Marcin Grzejszczak.
Arriving in Kraków
Conferences are a great opportunity to see friends who live abroad. Since Kuba Marchwicki would land in Kraków shortly after me, we agreed to meet up at the airport. He had suggested I should have had a “Welcome to GeeCON” sign ready for him, and fortunately I was able to improvise one on the spot.
After checking into our respective hotels, we went for lunch at a ramen place which was delicious! Over the meal we had a very interesting conversation about how Kuba manages his “interns”, as he calls his AI agents. It’s interesting to hear how different people are managing their software development process these days.
Conference Day 1
Opening and keynote
The conference was opened by Adam Dudczak, followed by the opening keynote, How To Be a Rockstar Developer by Dylan Beattie, who delivered the entire keynote barefoot. As he described on his blog, a taxi had run over his foot on the way to the venue, and he was not able to put on his boots… Despite the injury, it was an excellent keynote, and he even managed to get the Polish audience to sing along at one point.
Meeting people
One of the best things about conferences is meeting people. It was nice to finally meet Marcin Grzejszczak in person; I wasn’t sure we had actually met face to face before, despite working together on the programme committee. I also got to meet Tom Akehurst, the creator of WireMock! It was also lovely to see former colleague Ida again, as well as many others… Conversations and connections are what make in person conferences so valuable.
Talks and panels
Generally I prioritize the hallway track over attending talks. One talk I managed to attend was Concurrency Testing on the JVM by Adam Warski. He covered Lincheck and Fray; two tools that instrument bytecode to give you more confidence in your concurrent code. It was really interesting, and I shared with my colleagues who work on Lincheck that he mentioned their tool, which they appreciated!
In the evening, Piotr and I met up beforehand and walked into town together before joining Kuba for the speaker dinner. We met a bunch of other speakers including Emanuel, one of Marcin’s mentees. It turned out Dylan was not done yet with his back luck; he managed to break some wine glasses at dinner… Other than that it was a wonderful evening with great food, excellent company and interesting conversations.
Conference Day 2
On day 2 it was time for our talk, Learning modern Java the playful way. This talk is one of my favorites. We usually try to localize it a little for the country where we are presenting. When speaking in Poland, we have a few extra Polish things that Piotr likes to add (see if you can spot them!). Even though I had updated my Polish progress bar, I realised midway during the talk that I had installed it on a different version of IntelliJ IDEA, so it failed to make an appearance this time… 🤦♀️
This time, I managed to catch François Martin‘s talk 82 Bugs I Collected in a Year You Won’t Believe Made It to Production, which I liked a lot. I always appreciate good stories about software bugs, and was very amused to hear that François had been collecting them for a while. In fact, I think I might need to do the same… 🤔
When talking to François afterwards, he mentioned he would have loved to join a panel. He suggested that next time we ask speakers before the conference who would be interested to join a panel on a specific topic. Since it turned out that we were short a panelist for the upcoming panel on AI coding, François was able to join that session.
Dinners, discussions and a silly idea
The GeeCON crew take good care of the speakers, so there was another dinner on the second day. This was another chance to hang out with folks, like Adrian, Adam, Łukasz, Rustam, Alex, and others. Based on Dylan’s keynote, Kuba and I had a silly idea; over dinner, several people ended up giving us some excellent input for this topic. (No spoilers yet, as I’m not sure how far we will take this idea…)
Exploring Kraków
Over the weekend, I had some time to explore in and around the beautiful city of Kraków.
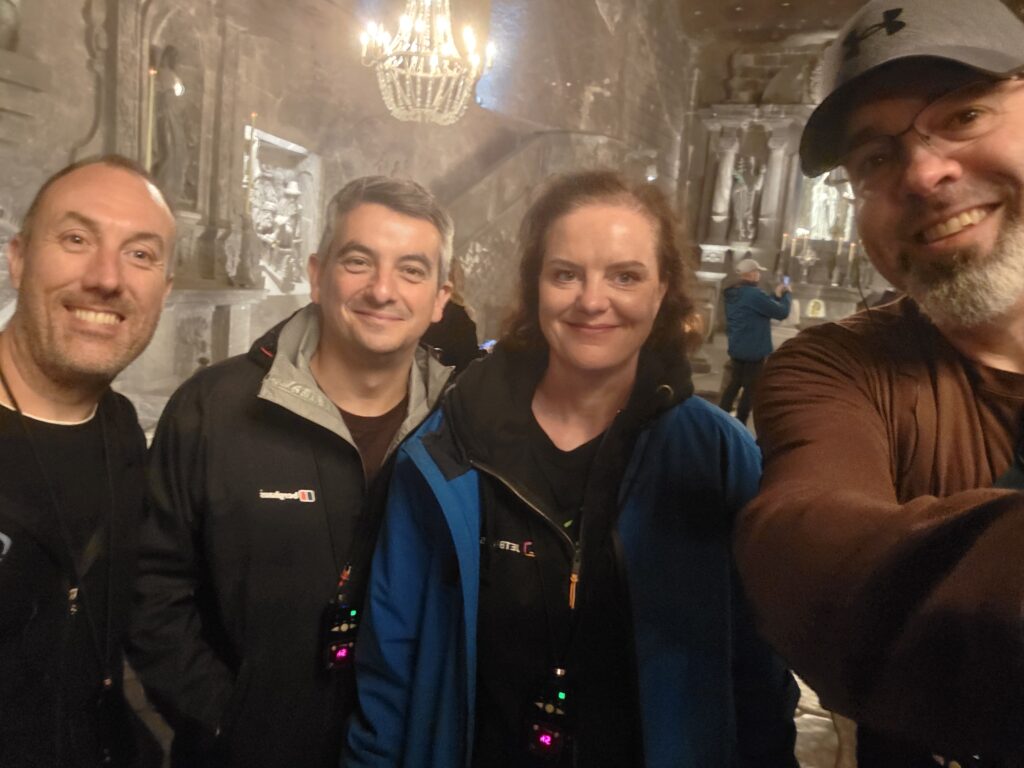
On Saturday, Spencer Gibb, Tom Akehurst, Jonathan Vila and I booked a guided excursion to the Wieliczka Salt Mine. While waiting for the bus to salt mine at the bus station, we saw a Kevlin Henney on the screen. Which was extra funny considering François’ talk about bugs, so I made sure to send him a picture.
The salt mine was a very impressive place to visit. My favorite were the chandeliers made entirely out of salt crystals. It did involve quite a bit of walking, so we were pretty tired by the end.
Spencer Gibb, Tom Akehurst, Jonathan Vila, Marit van Dijk and Spencer Gibb at Wieliczka Salt Mine.
For dinner that evening, Spencer and I had pierogi at a restaurant recommended by both a friend of mine and his hotel, which was an excellent tip. 🥟
Pierogi
On Sunday, I visited Wawel Castle and had more pierogi for lunch, before heading home.
Thank you!
Many thanks to Adam Dudczak, Adrian Nowak and the whole team of organisers, volunteers, sponsors, speakers and attendees for putting on another wonderful edition of GeeCON. And a special thank you to Adam and Adrian for having me on the Programme Committee; it was a privilege. It was great to see friends old and new, and I’m already looking forward to the next one!
In the mean time, have a look at the videos and photos from this year.
Two weeks ago I had an extremely busy week: speaking at three conferences in three different countries in four days — JCON (Cologne, Germany), Devoxx France (Paris) and Devoxx Greece (Athens). We had the opportunity to give our talk “Learning modern Java the playful way” three times! It was well worth it, as I got to see so many people and our talk was well received everywhere.
JCON Europe
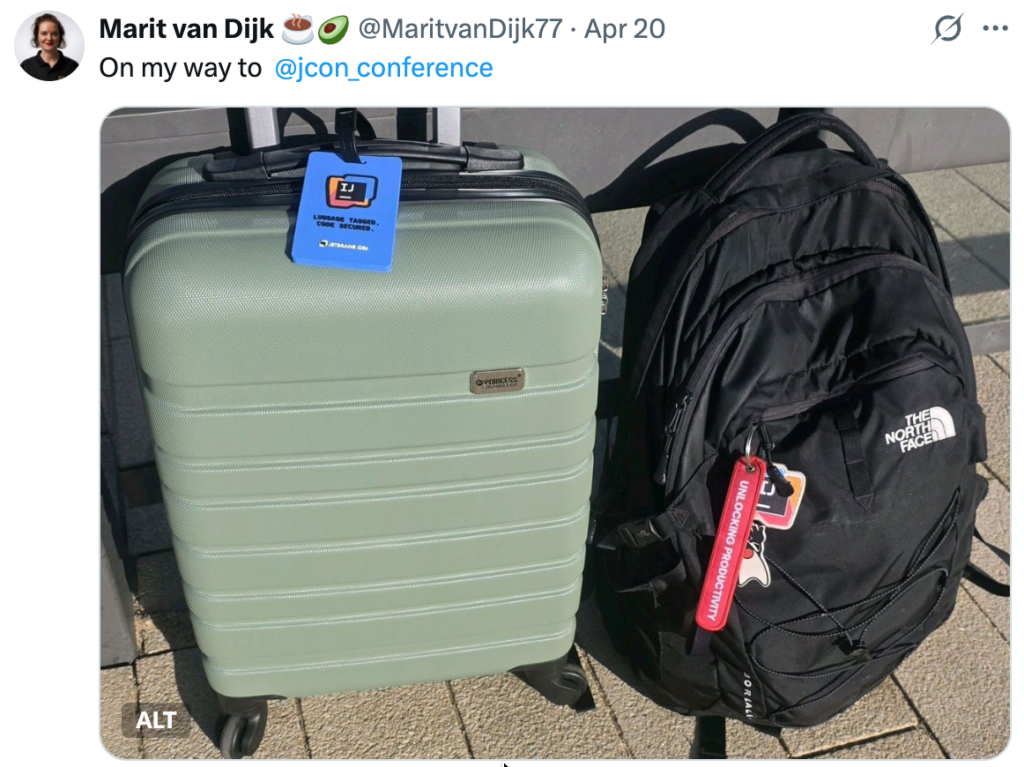
On Monday, I took the train to Cologne.
On my way to JCON
Java Luminaries Summit
In the afternoon, there was a Java Luminaries Summit @ JCON Europe, where folks active in the Java community discuss topics relevant to the language and ecosystem. This includes Java Champions, JUG leaders, speakers and other active members from the community, like Sharat Chander, Ana-Maria Mihalceanu, Andres Almiray, Brian Vermeer, Cay Horstmann, Kevin Wittek, Kevin Dubois and many more. Unfortunately, I wasn’t able to attend the whole summit, as I had some work to do first.
After the summit, there was a pizza session, which was a great opportunity to socialize with other speakers, like Tim te Beek and Rick Ossendrijver, and community members. Also, I got to see my colleague Marcin Mycek and introduce him to some people.
JCON conference day 1
On Tuesday morning, we first prepared our session. Even though we have done this talk before, we always update it to the latest Java version and make small tweaks to continuously improve it.
Before the conference, we also had the opportunity to sign up for interviews with Baruch Sodogursky which were livestreamed on YouTube.
During his interview, Piotr Przybył talked about our talk:
Baruch and I had a lovely conversation about reading code in the age of AI:
This is a topic dear to my heart, as I have been talking about Reading Code for a while — and I still think it’s important no matter who has “written” the code.
In the afternoon it was time for our first talk of the week.
Synchronous putting-on-labcoat (photo by Dimitris Doutsiopoulos)Synchronous putting-pen-in-pocket (photo by Dimitris Doutsiopoulos)
Giving this talk is a lot of fun. It was very nice to have people come up to us afterwards to tell us how much they liked it. (Special thanks to JavaCro organiser Branko Mihaljević for all your kind words!)
Fortunately, I also had some time to catch up with more people, like Sandra Parsick, Sandra Ahlgrimm, and several others.
JCON speaker dinner
In the evening, it was time for the speaker dinner.
When you see Dimitris (photo by Dimitris Doutsiopoulos)
Earlier during the day, I had run into my friend Rien Korstanje, who I hadn’t seen in a while. We know each other from when I used to contribute to cucumber-jvm, as he is one of the core maintainers. Turns out is now also a maintainer for JUnit, so we had some time to catch up during dinner with Marc Philipp and Christian Stein (thanks for laughing at all my silly jokes!).
Unfortunately there was not enough time to properly catch up with everyone.
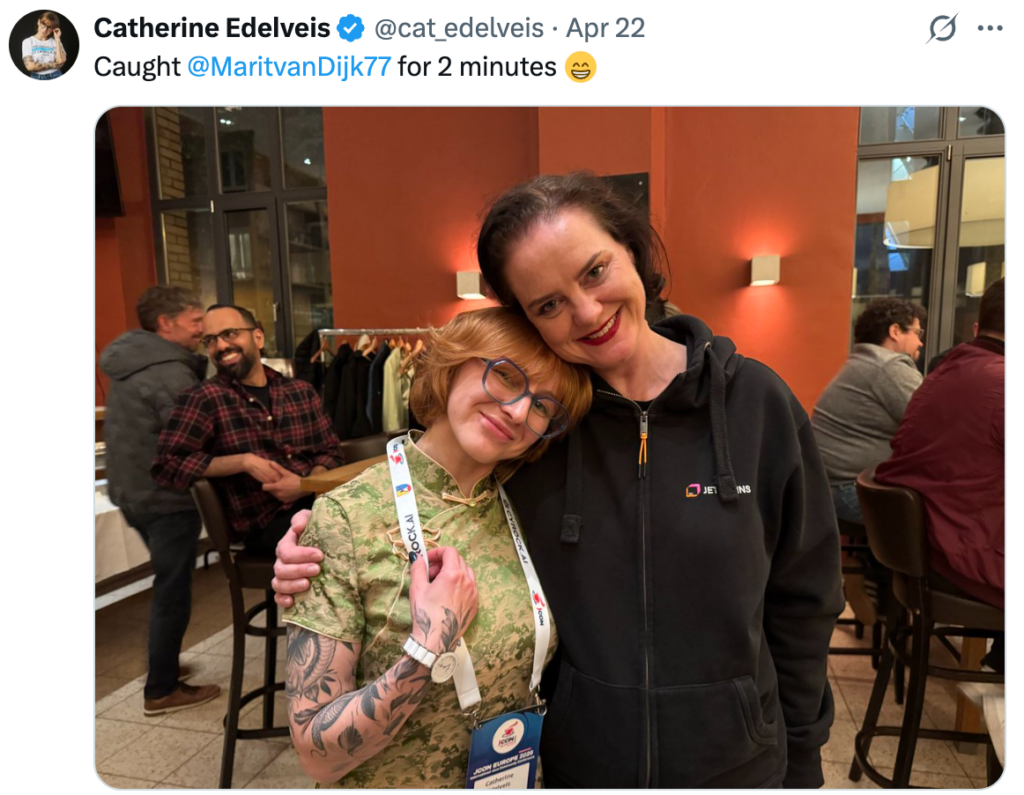
Seeing Catherine (too) briefly at the JCON speaker dinner
Devoxx France
On Wednesday, it was time to travel to Paris. We took the train and through sheer luck ended up with seats next to each other, even though we had booked through our respective employers. This gave us time to reflect on how the talk went at JCON and prepare for our session at Devoxx France in the afternoon.
After surviving the Paris metro, the first person we saw at Devoxx France was Estelle Landry, which was a very happy reunion as I hadn’t seen her since Devoxx Morocco.
Estelle helped us get some lunch, pointed us to the speaker room and got us settled in so we were ready for our session. We also ran into Daniel Garnier-Moiroux in the speaker room.
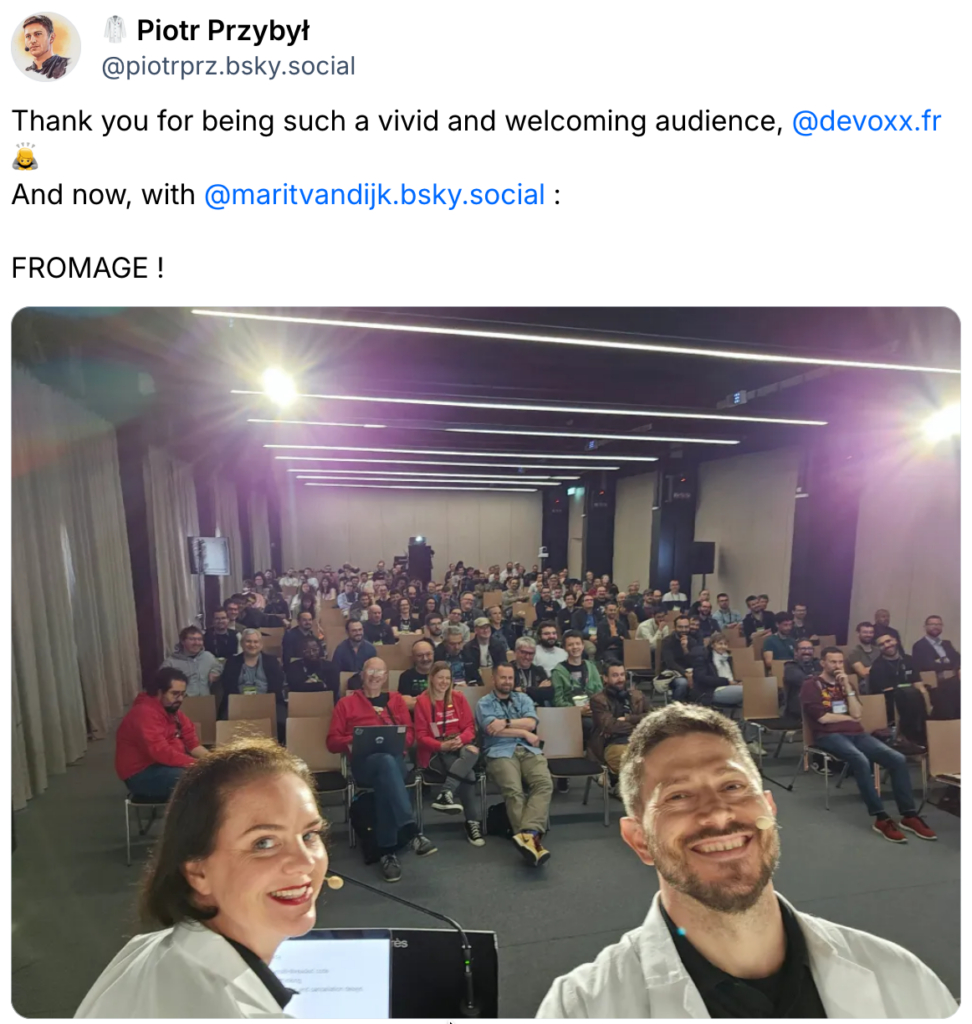
Our talk was again in the afternoon, and the audience was amazing! This was quite possibly the most engaged audience we have had for this talk, and also the best version of the talk we have done so far.
Taking a selfie at Devoxx France: Fromage!
It seems we were not the only ones who thought so, because we also received the highest rating for our talk so far: 4.92/5. In addion, we received some very nice feedback like “You make an awesome team” and “Very funny”.
In the evening, it was again time for the speaker dinner, where I had the opportunity to catch up with people like José Paumard, Zineb Bendhiba, and several others… We didn’t stay too late, as we had an early start to travel to Athens the next day.
Devoxx Greece
We met up early in the morning to take the train to the airport and fly to Athens. Upon arrival, we took a taxi to the venue to figure out the logistics for our talk the next day.
The next morning we met up at the venue for our talk. It was once again time to put on a labcoat 😉
Putting on the labcoat at Devoxx Greece (photo by Dimitris Doutsiopoulos)
We were a little rushed, as the talk slots were slightly shorter. But it seems that our talk was again well received; we received nice ratings (4,78/5) and lovely feedback. Special thanks to the person who came up to talk to me in Dutch and the folks who came up to us when we were taking pictures to tell us that ours was their favorite session!
We did a short interview for Devoxx Greece and recorded a short video ourselves with the help of Alina Yurenko (thanks!).
Alina Yurenko as our personal media teamAt Devoxx Greece (photo by Dimitris Doutsiopoulos)
In the afternoon, I had some time to catch up with people, had to take a meeting (is it even remote work if you don’t work from various weird places like conferences, trains, airports and hotel lobbies?) and then it was time to head home.
A great week
Overall, I had a great week. It was wonderful to see so many friends and meet new people. Many thanks to the conference organisers, volunteers and attendees at JCON, Devoxx France and Devoxx Greece and of course my amazing cospeaker Piotr Przybył.
Just over two weeks ago, I was at Voxxed Days Amsterdam. This was the second edition of the conference, and this year it was two days instead of one!
Day 1: Wednesday, April 1
Opening the day
As a member of the Program Committee, I got to open day 1 together with Michel Schudel. During the opening we introduced the speakers, the program committee, and the community reviewers. This year we had around 650 proposals, and some of us (including myself) reviewed each and every one of them! We also remind people to use the app to rate the talks, as that helps both speakers and organisers to know how talks are received. We use this information to improve our talks and the program!
Like last year, we had rotating keynotes; which meant that the keynote speakers would do their keynote twice (once in each room) rather than have an overflow room where people watch the keynotes on a screen. One of the keynotes on day 1 was Baruch Sadogursky‘s Never Trust a Monkey! Can We Trust AI-Generated Code? Baruch’s takes are always interesting, so I’d recommend checking it out.
Speaking with Piotr Przybył about modern Java
Right after the opening, it was time for Piotr Przybył and I to take the stage. We present our talk Learning modern Java the playful way, which we updated for Java 26. During this talk we show you how to update Java code from Java 8-11 to modern Java, using some of our favorite new Java language features, including Records, Stream Gatherers, Structured Concurrency, and for the Java 26 version we also added Lazy Constants. We do so using a demo application, and of course some silly jokes!
We aim for the session to be educational and entertaining. Fortunately, someone who attended our session stopped by to tell us that was exactly what they thought of our session, just as we were taking pictures for a social media post.
Foojay podcast
Frank Delporte was back again this year to interview speakers for the Friends of OpenJDK (Foojay.io) podcast. We discussed some topics dear to my heart: Java and reading code.
You can catch all of the interviews below:
Other talks
During the day I also managed to catch a few other sessions:
Adele is an amazing speaker, and this talk was no exception. I’d been wanting to see this talk ever since I first heard about it! In this talk, Adele goes over some of the decisions that were made during the design of the language, and how those resulted in some of the features that Java has (or doesn’t have). The talk was well-researched and the delivery was amazing. The title of the talk refers to the movie title “10 things I hate about you”. Adele ended the talk with a poem about Java, similar to the one Julia Stiles recites during the movie, and it was brilliant!
It is always fun to see what Josh and James are up to with Spring and AI. Even if you’ve seen them before, they are always entertaining. And in this session they also briefly mentioned Mellum by JetBrains.
Another talk I’d been wanting to see for a while. Even though Rachel is my colleague, we don’t usually go to the same conferences, as we are in different ecosystems. Rachel showed how easy it is to manipulate users through software design, with some absolutely appalling examples of dark patterns. This talk is a good reminder of the responsibility we have as developers.
This talk combines philosophy, language and communication in a way I cannot reproduce; you’ll just have to watch it yourself! Due to technical difficulties, Eli’s slides were not always shown properly. They managed to work around that quite well by describing the image that should have been displayed. It was a master class in communication.
Despite being able to catch some talks, there were also many I missed. For example, my other colleague Anton Arhipov was speaking at the same time as Rachel. And, as much as I would like to, unfortunately I still haven’t managed to clone myself so I can attend multiple sessions at the same time… 😔
Also, there is more to do on a conference day than attending talks; I also had regular work to do in between, like writing the Featured Content for Java Annotated Monthly that was about to be published.
In addition to her keynote, Iulia gave a talk about her physical AI adventures, bringing real hardware on stage. This was a very inspiring session; I am always amazed with how creative some people are in ways that are different from myself.
Iulia is definitely someone to watch! You can follow her YouTube channel Back to Engineering if you want to learn more.
A last minute addition to the program (we are lucky to have so many great speakers in the Netherlands!), Brian talks about some much needed security awareness in the age of AI.
Hallway track
And of course, some of the best parts of a conference happen in the hallway. It was great to catch up with friends and meet new people across both days. Among other things, I had a great conversation with Ronald Dehuysser about what working as a Developer Advocate looks like (spoiler: it’s more than speaking at conferences!). One of the things I like about this job is speaking to our users, getting their feedback and seeing how we can help them better. Ronald happened to have some relevant feedback that we discussed.
Thanks!
Many thanks to everyone who helped make this such a great event: the speakers for their great sessions, volunteers for helping out, sponsors for making this possible and of course all the attendees!
Almost three weeks ago, I had the pleasure of speaking at Voxxed Days Zürich. This was my third time at this conference, and also my third Swiss Voxxed Days this year (which will be relevant later!).
Speaker dinner
The speaker dinner the evening before the conference is always a good time to catch up with friends and meet other speakers. Good food and drinks are a bonus.
Because the restaurant was a little loud (maybe because it was filled with speakers…), some of us ended up outside.
Photographer Dimitris Doutsiopoulos took advantage of this to take some beautiful pictures, like this one of Paco van Beckhoven and me, which my colleague Jason Torres pointed out looks like a still from a movie. (It does, doesn’t it?)
Patrick created a beautiful animation for this year’s edition. And I have to say I am rather partial to these colors. They even got the steps of the cinema to match!
During the session they called out the Voxxed Days Switzerland Champions. Apparently I was one of six speakers who spoke at all three Swiss Voxxed Days conferences: Voxxed Days Ticino, Voxxed Days CERN and Voxxed Days Zürich. As I am a sucker for vanity metrics, I really appreciated this callout. 😂
Speaking with Andres Almiray about Maven
At Voxxed Days Zürich this year, I had the pleasure to do a new(ish) talk with Andres Almiray: “Getting more out of Maven”. This was only the second time we did this talk (the first time was at JavaLand). Unfortunately we had some trouble connecting my macbook to the screen, which threw us off a little…
During the talk we discussed several tips for using Maven in IntelliJ IDEA. We showed using the Maven wrapper to increase reproducibility of the build, and the enforcer plugin to see where your build breaks. We explained Maven lifecycle and goals, as well as how inheritance works, and more. And of course, we showed some useful IntelliJ IDEA features for working with Maven and dependency management, the dependency analyzer to find conflicts in dependencies, inspections to show you when dependencies have known vulnerabilities and finally the Vulnerable API inspection which can show you whether you are actually using the vulnerable API of a known vulnerability.
And of course, our session also included some custom memes that we created for this talk. If you want to see all the memes, you can find them in this repo.
Despite the initial technical trouble, overall our session went well. We got some positive feedback, and I had a nice conversation later with some of the attendees about the topic of our talk.
Other talks
During the day I managed to catch the following talks:
Agentic AI Patterns by Kevin Dubois and Mario Fusco
This was a great talk to stay up to date with everything AI. Kevin and Marco did also have some technical trouble, when there was some interference with audio from another room, which was quickly fixes by the conference.
Are We Ready For The Next Cyber Security Crisis Like Log4Shell? by Soroosh Khodami
Soroosh showed us how easy it can be to get compromised and different ways to prevent this.
Supercharge your JVM performance with Project Leyden and Spring Boot by Moritz Halbritter
Moritz showed us how Project Leyden can help you speed up your Spring Boot applications. Mandatory watching for anyone using Java and Spring Boot!
Hallway track
And I also managed to take advantage of the hallway track, again to catch up with people.
IntelliJ IDEA supports new Java versions from day one. Several features were added to make working with Java 25 language features in IntelliJ IDEA easier.
New project
Create a new project in IntelliJ IDEA.
You can use the New Project Wizard to create a new project in IntelliJ IDEA. If you select the option to Add sample code, IntelliJ IDEA will add sample code to your project, containing a class with a main method.
If you select IntelliJ as your Build system, set JDK to 25, the sample code will be a compact source file and instance main method, introduced in Java 25.
Compact source file
Create a compact source file in IntelliJ IDEA.
Compact source files were introduced in Java 25. To create a compact source file, right-click the Project tool window (or press ⌘N (macOS) / Alt+Ins (Windows/Linux)) and select New | Java Class. In the New Java Class popup, select the option Compact source file.
This compact source file is created in the root directory of your project, even if you create it from another package. IntelliJ IDEA automatically adds an instance main method void main() to the file.
Java Compact File
Create a compact source file in IntelliJ IDEA.
To create a Java Compact File, introduced in Java 25, right-click the src/main/java directory in the Project tool window and select New | Java Compact File. IntelliJ IDEA will provide a default name for the file, so your thought process is not disrupted when you want to quickly try something out. IntelliJ IDEA automatically adds an instance main method void main() to the file.
Convert compact source file to class
Convert a compact source file to a class in IntelliJ IDEA.
Java 25 introduced the concept of implicit classes or compact source files. We can convert an implicit class to a regular class as needed. Invoke Context Actions by pressing ⌥⏎ (macOS) / Alt+Enter (Windows/Linux) and select Convert an implicitly declared class of a compact source file into a regular class.
The reverse is also possible, should you prefer to use an implicit class at any point. To do so, use the quick-fix Convert into compact source file.
New live templates for main methods
Create an instance main method using a live template.
IntelliJ IDEA has some new live templates to add a main method to an implicit class, either with or without arguments: main, maina, psvm, psvma. Using the live templates psvm or main inside a compact source file will add the new main method, while they will continue to add the classic main method inside a class, as you can see in the preview.
Add arguments
Add args to your main method.
The new void main() method, introduced in Java 25, does not need String[] args. However, should you decide to use the args in your code, IntelliJ IDEA will help you by also adding them to the main method. Type args and press ⏎ (macOS) / Enter (Windows/Linux) to select args from code completion.
Live templates for simple IO
Add simple IO methods using live templates.
Java 25 introduces simple IO methods, such as IO.println() and readln() to make interacting with the console more convenient. IntelliJ IDEA introduces two new live templates to use these methods: iop for println() and ior for readln().
In addition, there are quick-fixes available to convert IO.println() to System.out.println(), and vice versa. Invoke Context Actions ⌥⏎ (macOS) / Alt+Enter (Windows/Linux) on the method and select the option Replace with System.out.println() or Replace with IO.println().
Add static import for simple IO
Add a static import for simple IO methods.
Java 25 introduces simple IO methods, such as IO.println() and readln() to make interacting with the console more convenient. To use these methods in a compact source file, you don’t need to add an import. However, you can add a static import the java.lang.IO class if you prefer. Invoke Context Actions ⌥⏎ (macOS) / Alt+Enter (Windows/Linux) on the method and select the option Add on-demand static import for java.lang.io.
Module Import
Using module import in IntelliJ IDEA.
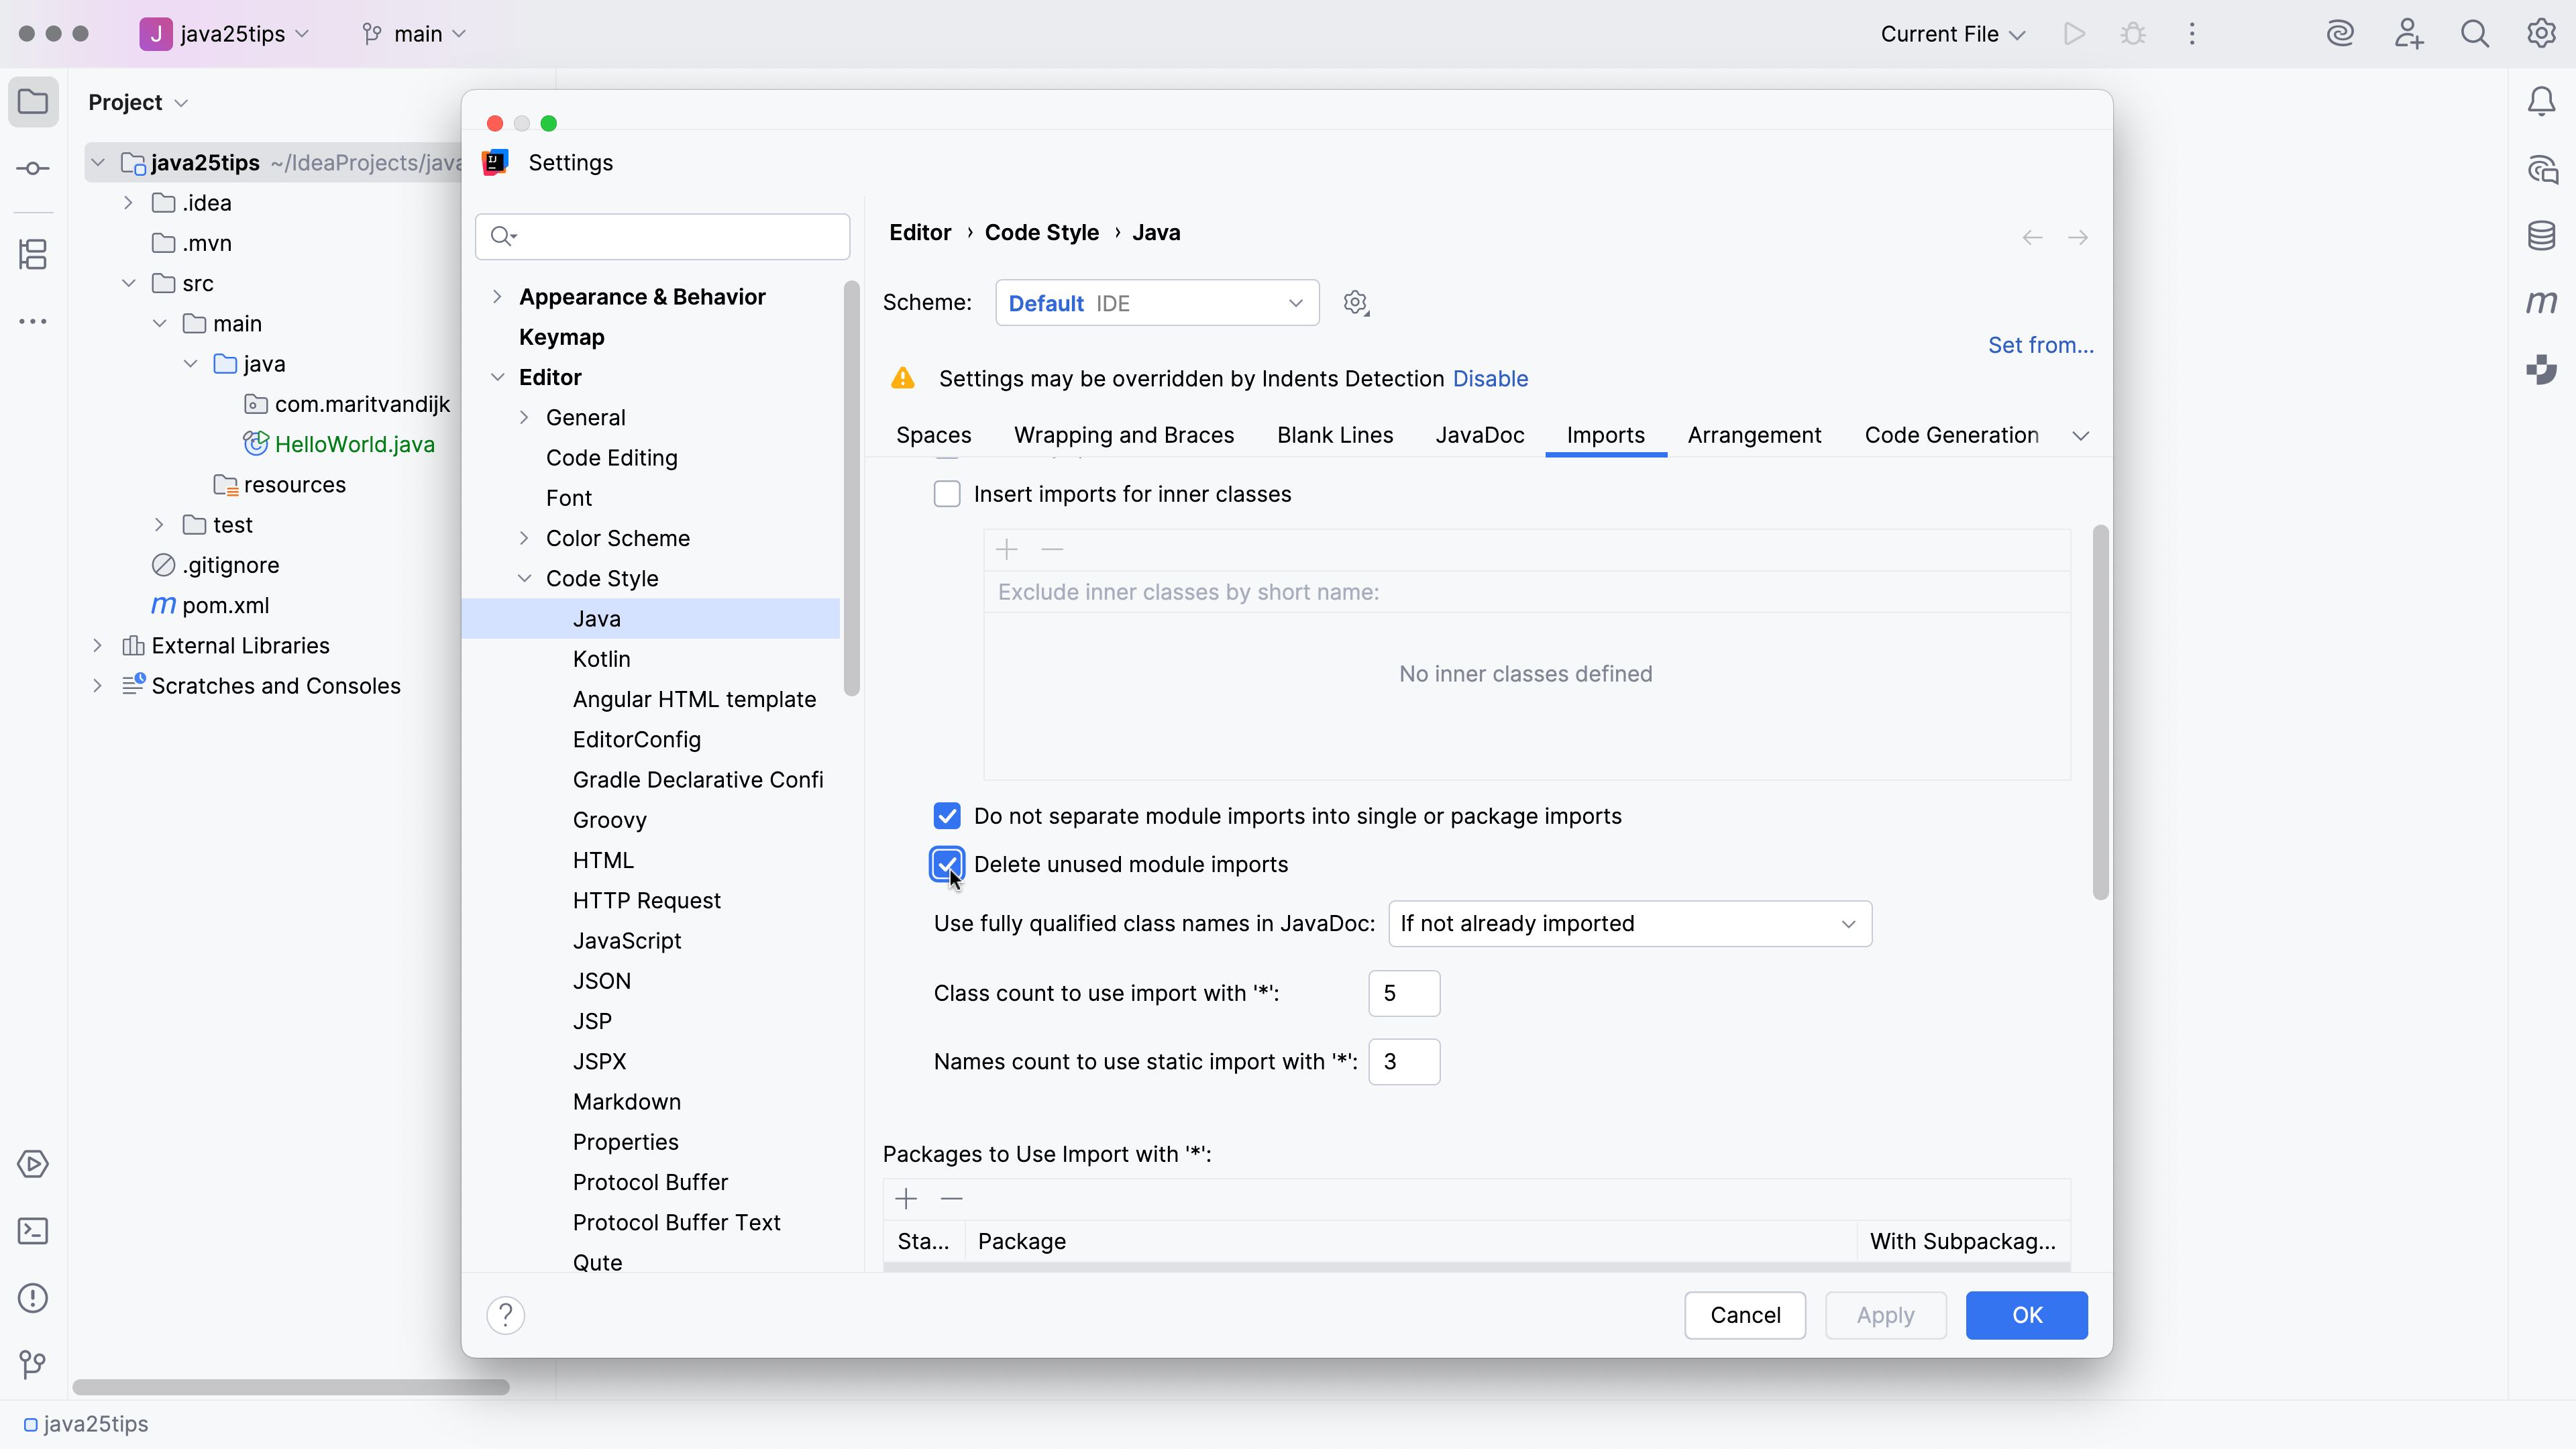
Java 25 introduces module imports. When adding a module import, use Jump Down to see the contents of the module. When using Optimized Imports, IntelliJ IDEA will automatically remove any imports that are added by the module import. If you prefer to use single class imports, invoke Context Actions ⌥⏎ (macOS) / Alt+Enter (Windows/Linux) and select Replace with single class imports.
If desired, it is possible to delete unused module imports when using Optimized Imports. To configure this option, open Settings | Editor | Code Style | Java and go to the Imports tab. Select the option Delete unused module imports. When this option is selected, Optimized Imports will remove unused module imports.
Conclusion
Support for Java language features in IntelliJ IDEA makes it easy to adopt and work with new Java language versions.
How many shortcuts can you remember? Three? Five? More? I try to learn as many as I can and still forget some of them…
What if you could unlock IntelliJ IDEA features, without having to remember shortcuts? You can still use shortcuts if you want. But you don’t haveto.
Command completion (..) is a new feature in IntelliJ IDEA that lets you discover and execute IDE actions right from your editor.
Command completion extends regular completion
Command completion is an extension of regular code completion – something every developer already uses. For example, when you have a variable, you can type a dot to show you completion options. It will show you API completion (all of the methods you can call on this variable), and postfix completion (templates you can apply to this variable). The list now also includes commands; all relevant commands for your current context. Code completion (a single dot) is now a universal entry point for all relevant actions.
To filter the list to show commands only, type two dots ... As the list can be quite long, the list is searchable, so you can type part of the command you want to use.
Command completion extends regular completion
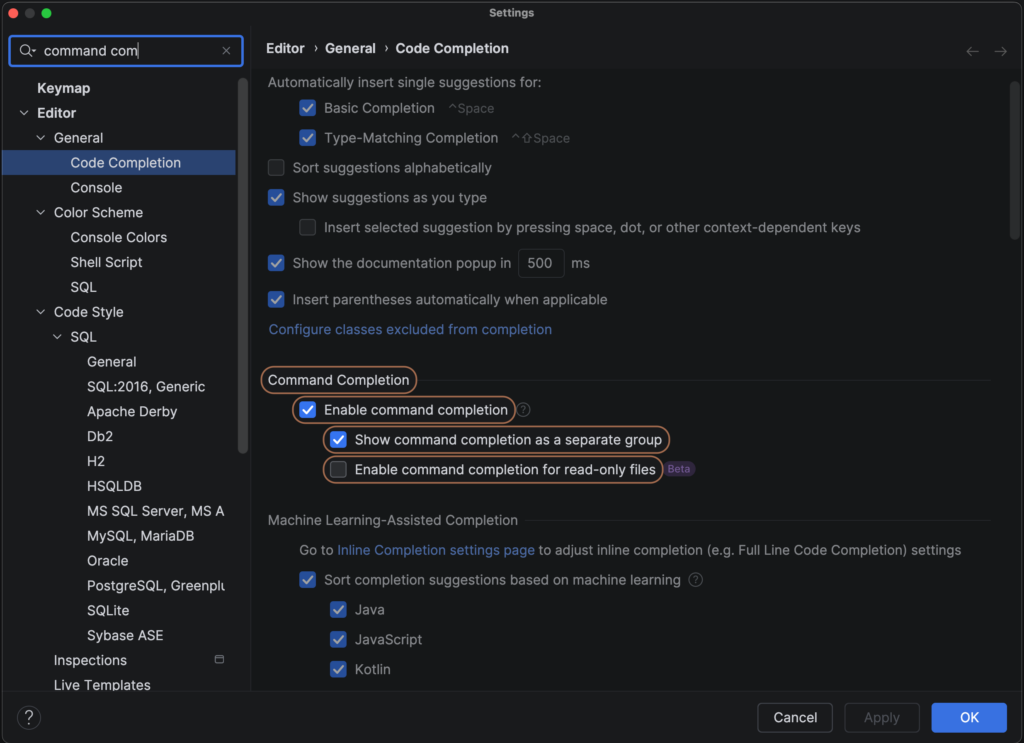
By default, the commands are shown in a separate section of the list. If you prefer Commands to be part of the regular completion list, you can adjust this in the Settings. Use Search Everywhere (Shift Shift) and look for “command completion” to go straight to the relevant settings and uncheck the option Show command completion as a separate group.
Command Completion Settings: Show command completion as a separate group
Fix errors and warnings with command completion
You can use this new feature to fix errors and warnings in your code. If you write code that doesn’t compile, IntelliJ IDEA will tell you. You can navigate to the error using F2 and press Alt+Enter to show context actions. However, Alt+Enter gives you only a few options; it is designed to give you the most relevant fixes to your problem. That means it might not always include the action you want to perform. On the other hand, command completion (..) offers you all actions that are relevant in your current context. IntelliJ IDEA will give you a preview of what each command will do.
Fix errors and warnings
Perform file- or class-level actions
It is now possible to unlock this type of completion in places where it wasn’t available before, like on a blank line. Typing a dot on a blank line now shows you file-level actions, like Reformat Code or Optimize Imports. For example, use Optimize Imports to remove an import statement that is no longer needed.
Perform file or class level actions
Refactoring and code transformation
Command completion can also help you when refactoring or transforming your code. When writing code, you can use it to keep moving forward. For example, to create classes, methods and fields.
Keep moving forward and create classes, methods and fields
You can use it to generate code for you, such as a toString() method.
You can transform your code as you go, for example to make use of modern Java language features. For example, you can refactor a class into a record, using only command completion.
Transform code
Use command completion for navigation
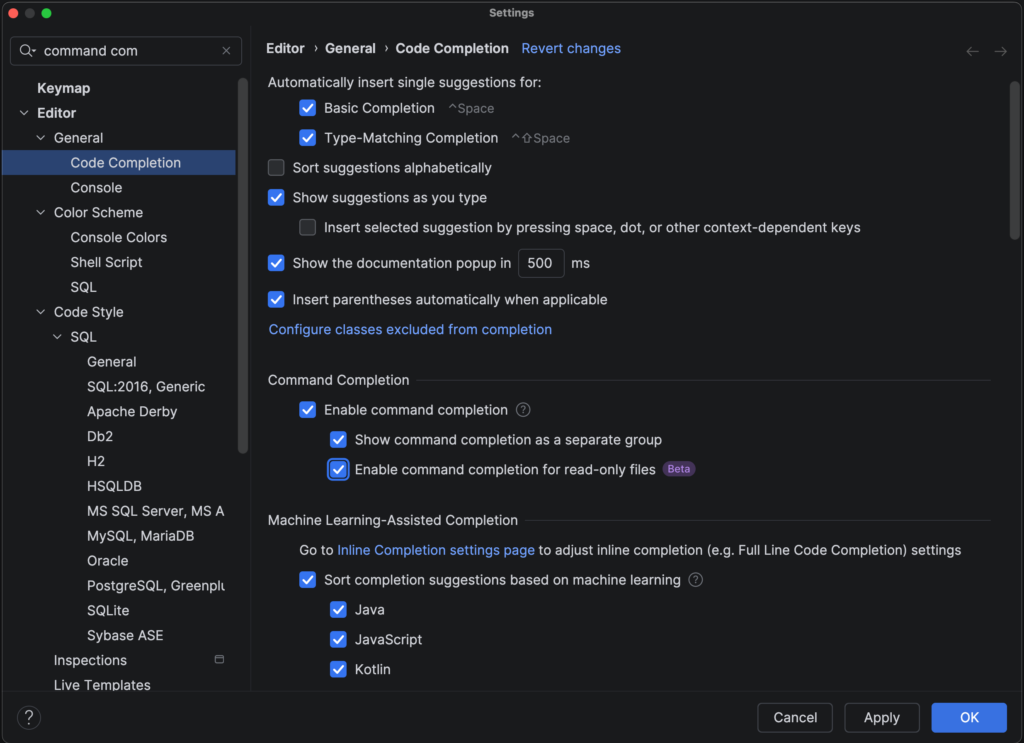
You can use it for navigation. For example, we can navigate to the String class declaration. You’ll notice that this file is read only! How will we use completion here? Don’t worry, you can change your settings to be able to use command completion in read-only files!
Open the Settings for Command Completion, by using Search Everywhere (Shift Shift) and searching for “command completion”. Select the option Enable command completion for read only files. Now, you can use command completion in read-only files, for example to navigate back to where you were.
Command Completion Settings: Enable command completion for read only files.
If you want to rename your class, you can use a shortcut to do so, but you need to know this shortcut (⇧F6 on macOS / Shift+F6 on Windows/Linux). Now, you can use command completion instead. Go to the end of the class or method name you want to rename and type ..rename.
Aliases for several commands
In some cases, you don’t even need to know the exact name of the command you’re looking for, as some commands have aliases. For example, you can also use ..change name instead of ..rename.
Aliases
This makes features even more discoverable; you don’t need to remember the exact name of the feature.
Imagine we declare a new instance of a class Person. To assign this new Person() to a variable, you can use the shortcut to Extract Variable (⌥⌘V on macOS / Ctrl+Alt+V on Windows/Linux). But this requires you to know this feature exists and the relevant shortcut.
Alternatively you could use postfix completion .var to create a variable. But that would again require you to know (or quickly be able to find) this specific postfix completion.
Instead, you can now use command completion to introduce a local variable. After the declaration of the new instance, use ..Introduce local variable.
Command completion complements existing features
If you want, you can still use postfix completion. For example, you type person.sout to print variable person to System.out: System.out.println(person);.
You can transform this code to modern Java and use features introduced in Java 25, like simple IO. After the line System.out.println(person); type .. and select ..Replace with IO.println().
You can use refactoring, like Extract Method (⌥⌘M on macOS / Ctrl+Alt+M on Windows/Linux), even if you don’t remember the shortcut. To do so, type .. and select ..Extract method after the method you want to extract.
Refactor: Extract method
What if you want to add JavaDoc to your code? You could use Alt+Enter to Add JavaDoc. But now you can also use command completion to generate JavaDoc, and convert it to Markdown.
Command completion is as easy as adding a dot, or two..
As you can see, using command completion is as easy as adding a dot, or two..
Conclusion
Command completion extends regular completion – which you already use. It lets you discover and use IntelliJ IDEA features without having to remember shortcuts. This keeps you in the flow of coding; you can think about what you want to do, instead of how to do it.
Type a . to find commands as part of regular completion, or .. to see all available commands relevant to your current context. You might discover powerful features you never knew were there!
Recently my friend Piotr posted a question on social media about how to format records in IntelliJ IDEA…
How to format records
Sidenote: I don’t know why he wouldn’t just ask me directly, but I guess this was more fun 😉
Configuring code style
IntelliJ IDEA can format your code for you. Code will be formatted as you type it, and if needed you can Reformat the code (⌘⌥L on macOS) / Ctrl+Alt+L on Windows/Linux). If the (pre)defined code style isn’t to your liking, you can change it.
By default, IntelliJ IDEA will format records with the curly braces {} on two lines. When you apply Reformat to a record, IntelliJ IDEA will let you know “No lines changed: content is already properly formatted”.
Content is already properly formatted
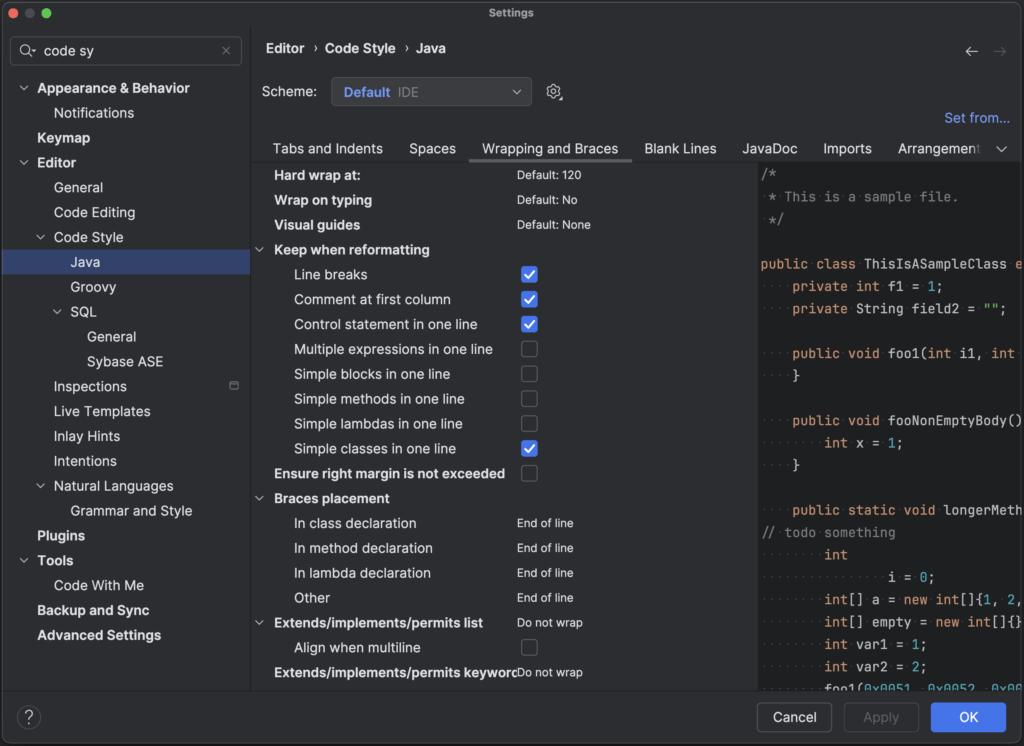
To change the formatting for records so that the curly braces {} will be on the same line, open Settings (⌘, on macOS / Ctrl+Alt+S on Windows/Linux) and go to Editor | Code style | Java. Open the tab Wrapping and Braces and in the section Keep when reformatting select the option Simple classes in one line. Don’t forget to Save Changes.
Settings – Code style
Now if we have any code with a record (or any other simple class), we can use the Reformat the code (⌘⌥L on macOS) / Ctrl+Alt+L on Windows/Linux) to reformat the simple class accordingly. Note that you’ll need to use the shortcut twice to remove custom line breaks.
The same formatting will be applied in other situations. For example, when we add another record to the file, and use Complete Current Statement (⌃⇧⏎ on macOS / Ctrl+Shift+Enter on Windows/Linux), our new record will be completed with the curly braces {} on one line.
What about generating a new Record?
From the Project tool window, we can generate a new record. Use GenerateNew (⌘N on macOS / Alt+Ins on Windows/Linux) and select Java class. In the New Java Class dialog, type the name of your new record, and select Record. Note this record is still generated with the curly braces {} on 2 lines.
To make sure a newly created record is also formatted with the curly braces {} on one line, we can change the File template for Record.
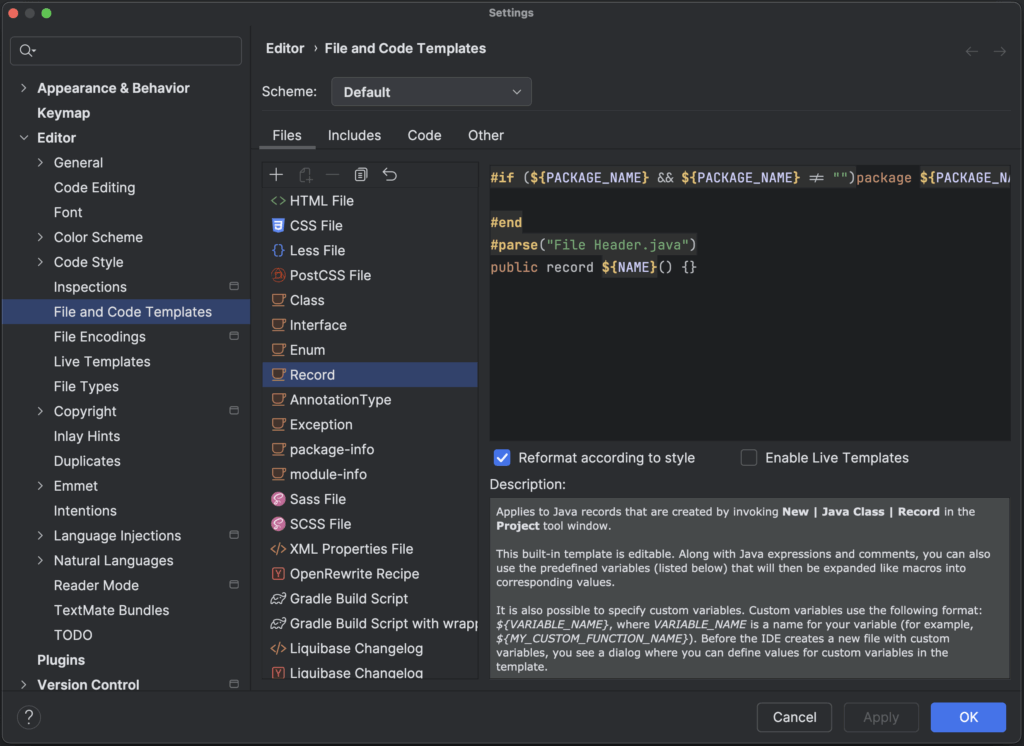
Open Settings (⌘, on macOS / Ctrl+Alt+S on Windows/Linux) and go to Editor | Code style | File and Code Templates. Open the template for Record and change the template to have the curly braces {} on one line. Again, don’t forget to Save Changes.
File and Code Templates – Record
Now when we generate a new record it will be formatted with the curly braces {} on one line.
Note that changing only the File Template for Record is not enough to format records with the curly braces {} on one line. For one, it will be immediately reformatted upon creation according to the code style, as long as the Reformat according to style box is checked for this file template. Even if we uncheck this option, reformatting a file with a record would reformat it to the code style (which by default is {} on 2 lines).
In this blog post, we will look at how to debug Java code using the IntelliJ IDEA debugger. We will look at how to fix a failing test, how to find out where an `Exception` is thrown, and how to find problems with our data. And we will learn some neat tricks about the debugger in the process!
To illustrate using the debugger, we will use a small example application that reads test scores from a CSV file, calculates the average score per student, and prints the results to the console. If you’d like to follow along, you can find the code here.
Debug a failing test
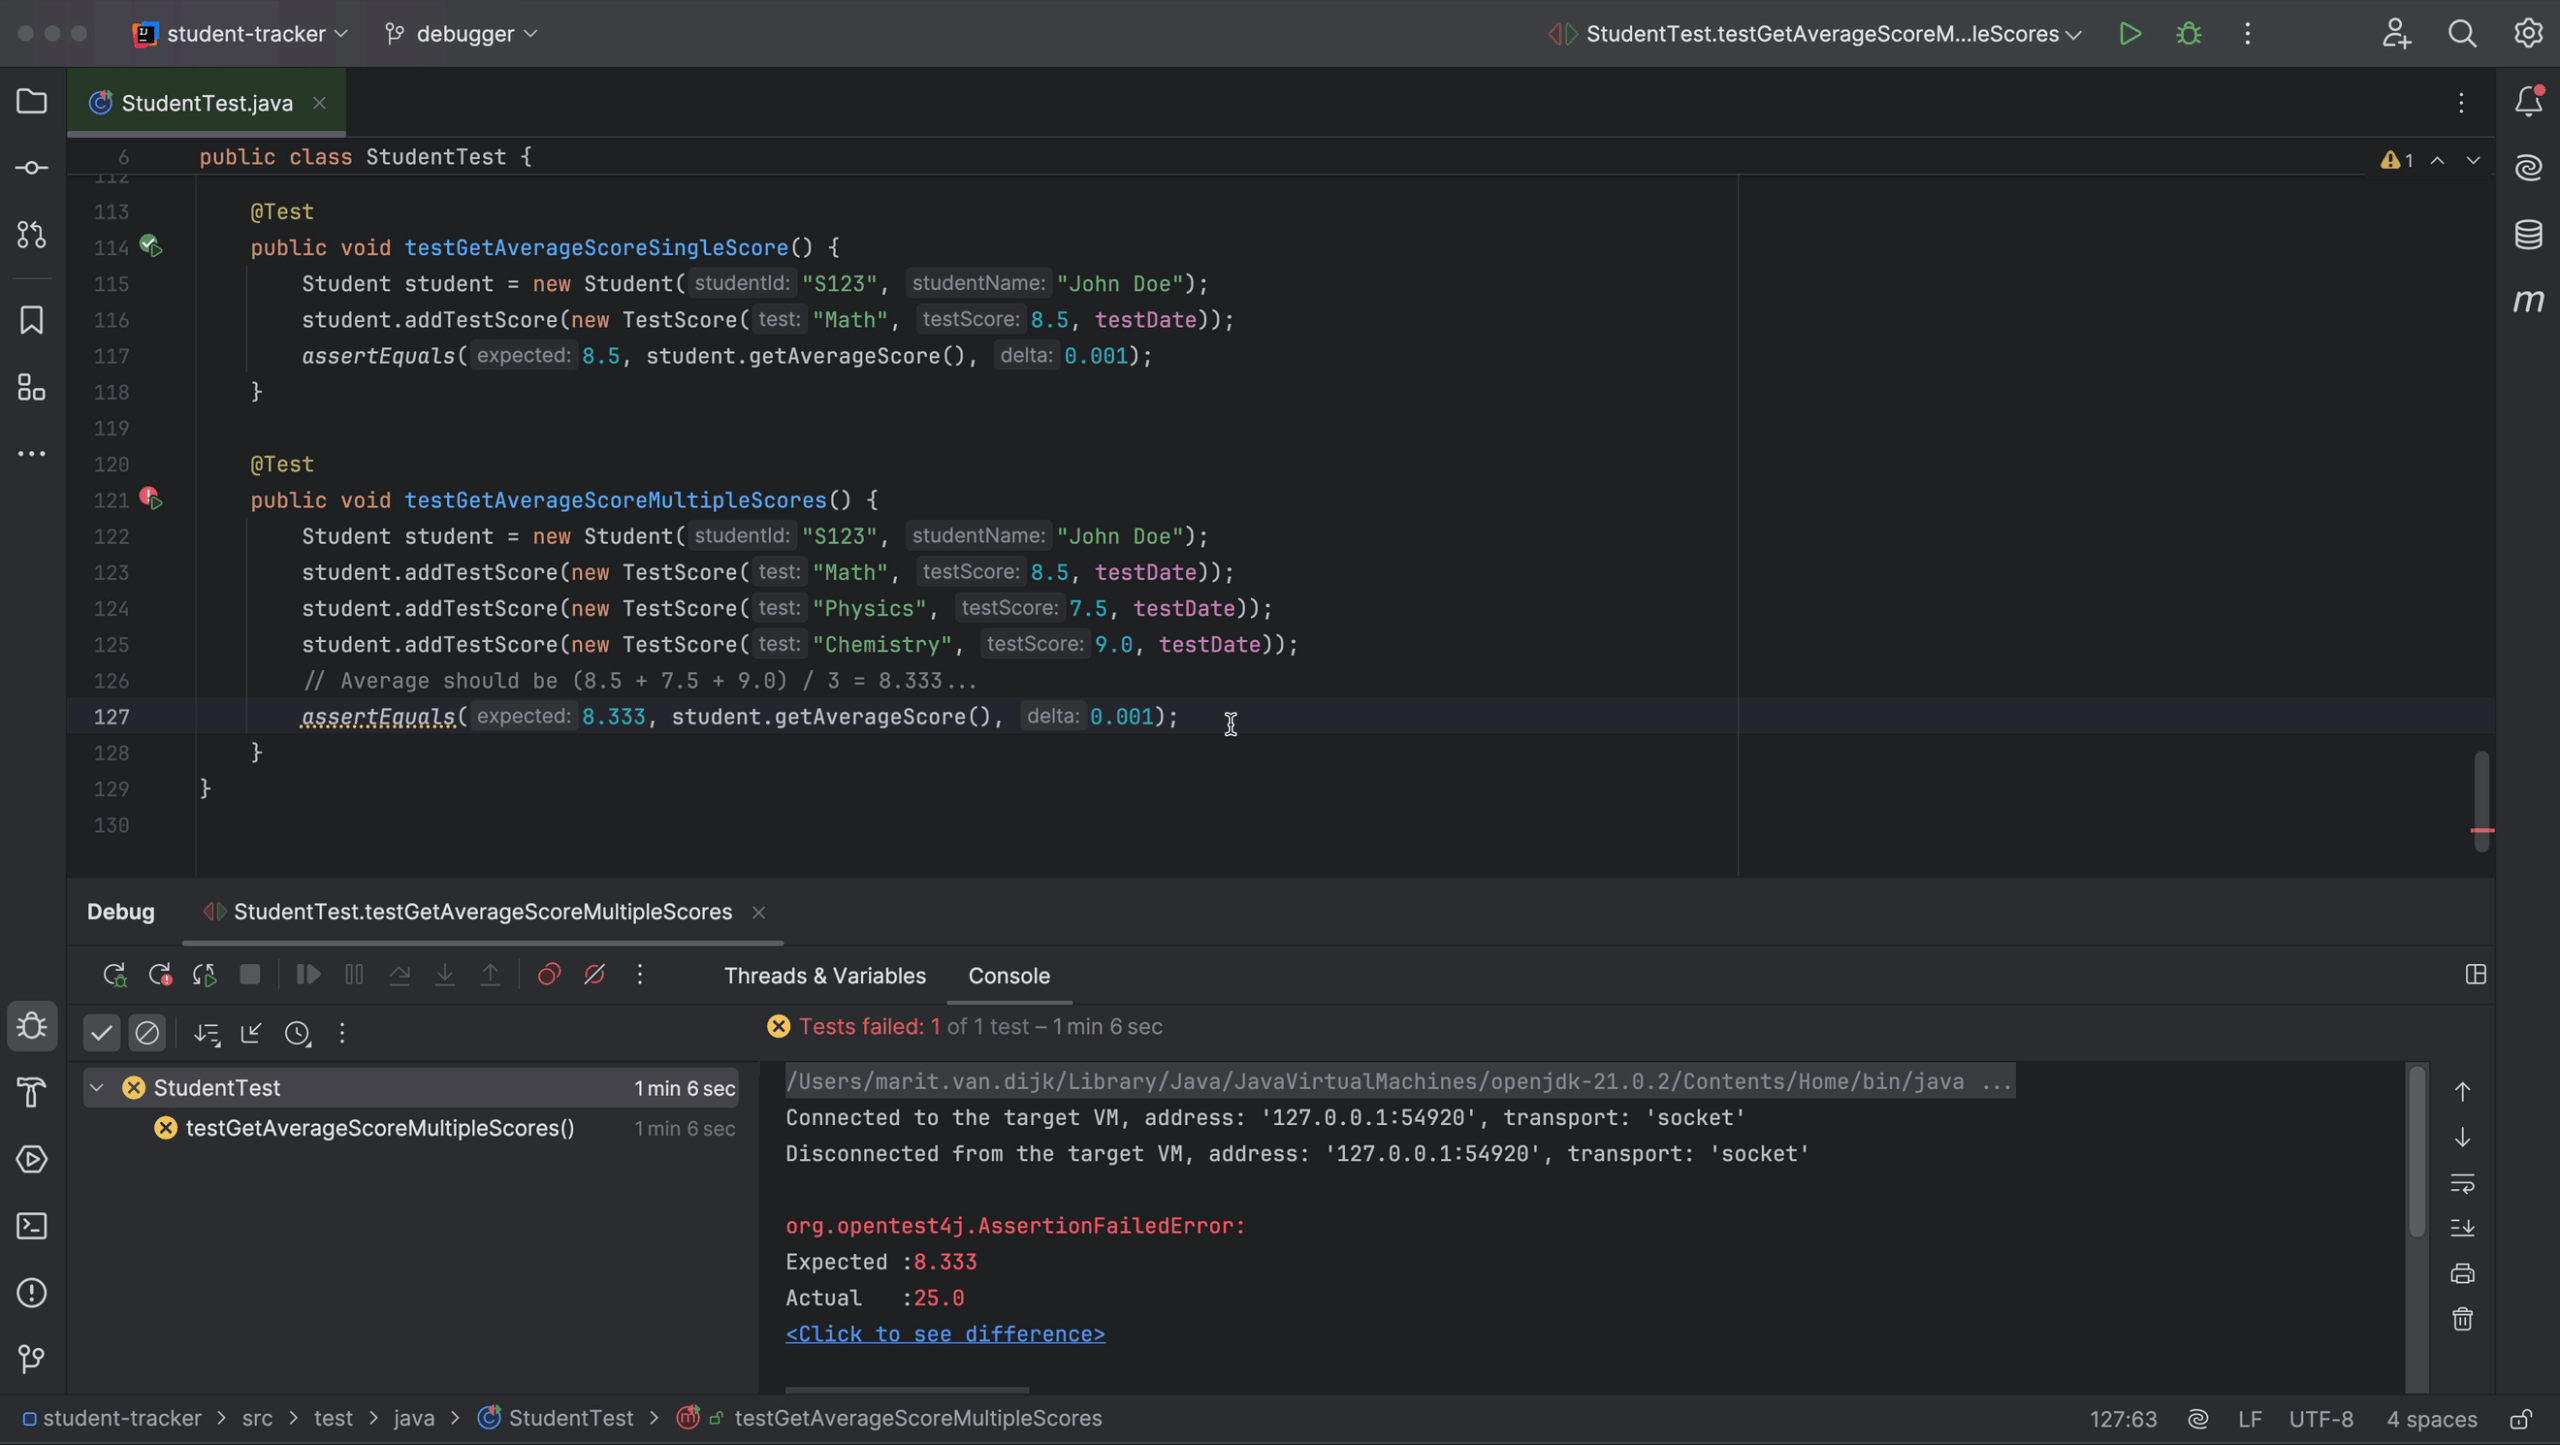
One reason you might need the debugger is when one of your tests fails. In our example application, when we run the tests in `StudentTest`, we see that there is a failing test.
Failing test
Currently, this test fails because the expected average does not match the result of the method `getAverageScore()`, as we can see on line 127. We can use the debugger to find out what the problem is and how to fix it. Let’s navigate to this method so we can set a breakpoint there to see what happens.
Set a breakpoint
We can navigate to the method `getAverageScore()` using Jump to Source (⌘↓ on macOS / F4 on Windows/Linux) when our cursor is on the method. We can place a breakpoint, either by clicking in the gutter or using the shortcut (⌘F8 on macOS / Ctrl+F8 on Windows/Linux). Place the breakpoint on the first line of the method (line 50).
Breakpoint in method
Run in Debug mode
When we run the test in Debug mode (⌃D on macOS / Shift+F9 on Windows/Linux), execution will stop when it hits the breakpoint, so that we can look at the state of our application. We see inline debugging information in the editor.
Run in Debug mode
Here we see that the list of `testScores` has `size = 3`. We can even click in the editor to expand this list to see details of the values in the list. We also see that `testScores.isEmpty()` evaluates to `false`, and therefore the `return` statement inside that `if` statement is unreachable and greyed out.
In the Debug tool window (⌘5 on macOS / Alt+5 on Windows/Linux), we see the call stack (the methods that were called) on the left. We can also see information about objects and variables, like the student and their test scores, in this example.
Debug tool window
Stepping through the application
Now, we can step through the code to see what happens, using different step actions.
Use Step Over (F8) to step over a line and go to the next line, or use Step Into (F7) to step into a method that is called on a line. In this example, we can step into `getTestScore()` – which isn’t very interesting. When we step into a method, we can continue stepping to return to the call site once we exit the method, or use Step Out (Shift F8) to return right away. Notice that the variables and values that are shown inline and in the Debug tool window are updated as we step through the program.
Step through the program
Once all the scores have been added, we see that the` totalScore` is 25. And here, we see the problem with our logic: we forgot to divide by the number of test scores!
Evaluate expression
To fix our problem, we need to divide the total score by the number of test scores. To make sure our intended fix is correct, we can use Evaluate Expression. Right-click on `totalScore` in the editor to open the context menu and select Evaluate Expression. Alternatively, use the shortcut ⌥F8 on macOS / Alt+F8 on Windows/Linux.
Evaluate Expression
If we evaluate `totalScore`, we get 25.0, as we can already see in the debugger. However, we can use Evaluate Expression to evaluate other expressions, even ones not currently part of our code. Here we can try out potential solutions. For example, if we evaluate `totalScore / testScores.size()`, we get “8.333333333333334”, which is the expected average.
Evaluate Expression
Apply fix and rerun tests
Let’s apply our fix to the code to return `totalScore / testScores.size()` instead of `totalScore` from the method `getAverageScore()`. When we rerun the test, we see that it now passes. Note that you might want to run all tests to make sure that your fix has not had any unintended side effects.
Test passed
Since we no longer need the breakpoint, we can remove it, either by clicking the breakpoint in the gutter or by using the shortcut ⌘F8 on macOS / Ctrl+F8 on Windows/Linux.
Run the application
Now that we’ve fixed our failing test and all the tests pass, let’s see if our application works correctly. Go to the `Main` class and run it, for example, by clicking the Run button in the gutter.
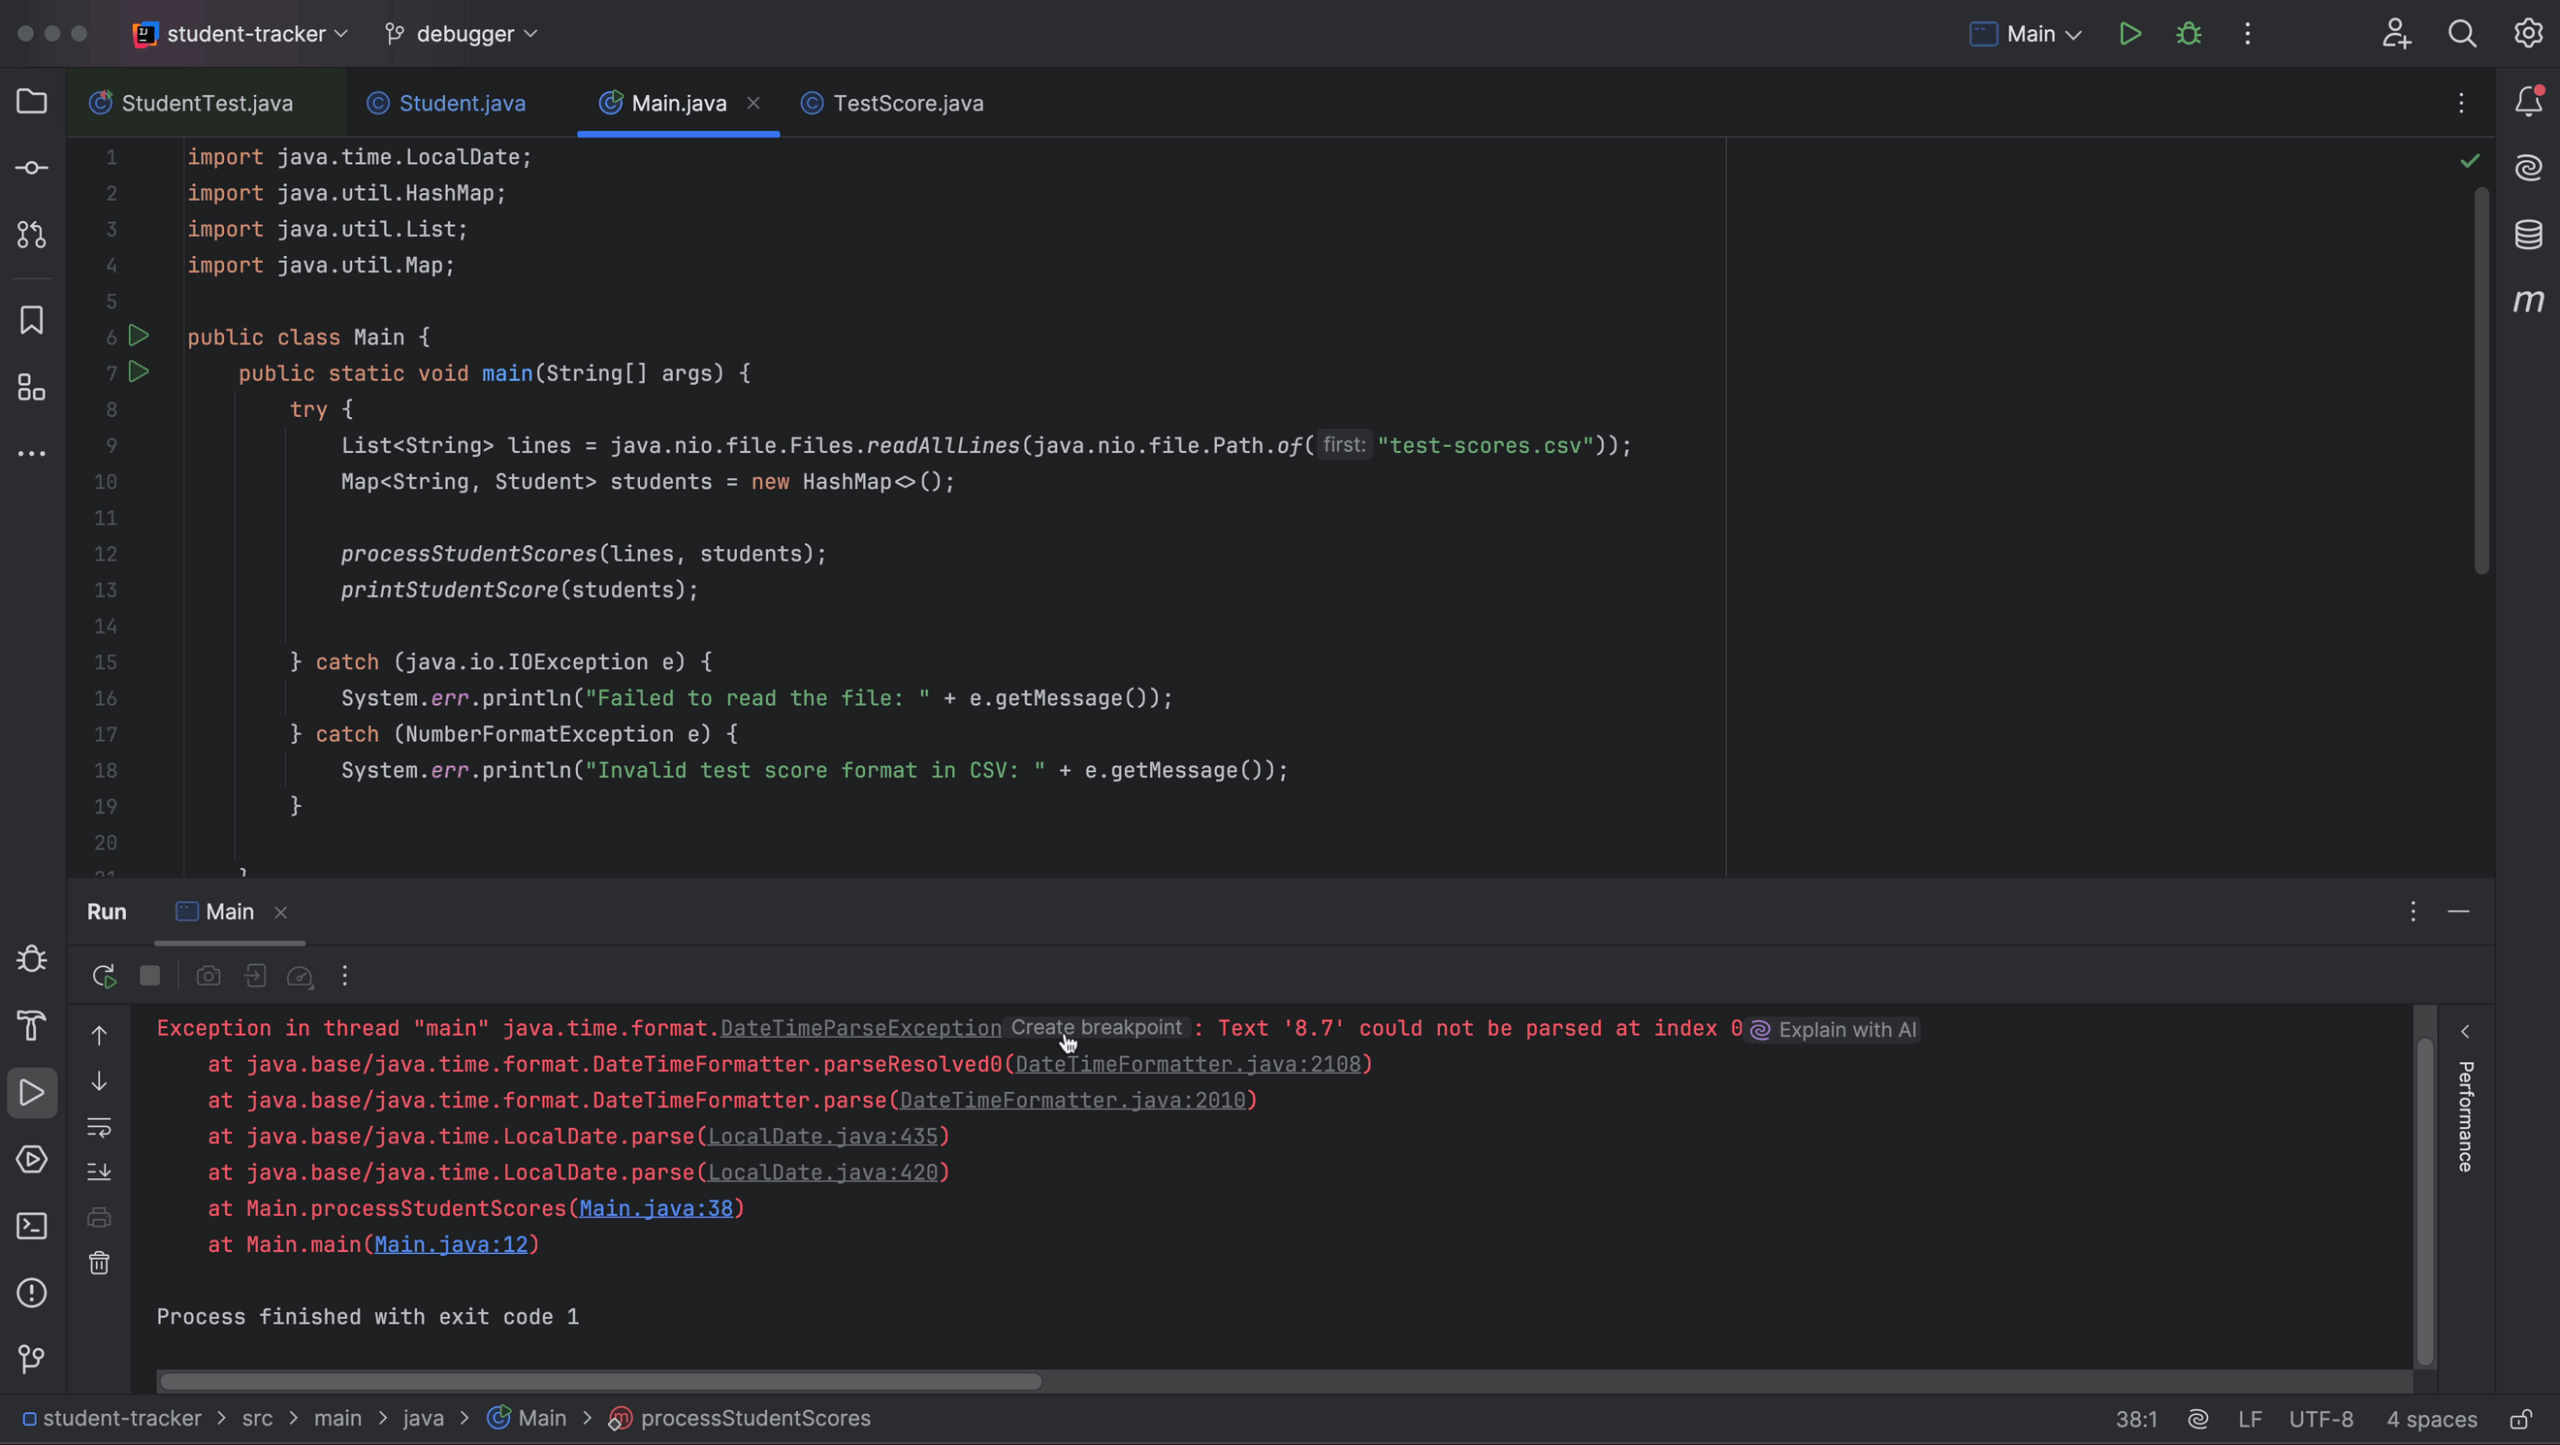
Debug an Exception
When we run the application, we see that there seems to be another problem! Our application throws a `DateTimeParseException`, with the message `Text ‘8.7’ could not be parsed at index 0`. Let’s use the debugger to find out what’s wrong.
DateTimeParseException
Note that we can create a breakpoint right from the console, by clicking the link Create breakpoint. This opens the Breakpoints dialog, where an Exception Breakpoint has been added for the `DateTimeParseException`.
Create Exception Breakpoint
Now, when we run our application in Debug mode, execution will stop when and where this exception is thrown, so we can figure out what caused it. Execution stops in the `DateTimeFormatter` class. When we expand the `Exception` in the Debug tool window, we see that the `detailMessage` is “Text “8.7” cannot be parsed as a `DateTime`”. That makes sense, as the number 8.7 does not represent a valid date.
Reset frame
To find out where the incorrect value comes from, we can go back in the call stack. The call stack is shown in the left pane of the Debug tool window. We see a round arrow in front of the last method that was called. When we hover over this arrow, we see the option to Reset Frame.
Reset Frame
We can use Reset Frame to go back to the previous frame. Let’s do so until we get to the point in our code where we try to parse this value into a date. We will need to drop several frames until we get back to our own code. We see that we try to parse a `LocalDate` on line 38 of our `Main` class.
Note that there are limitations to using Reset Frame; it only resets local variables, not static and instance variables. It also won’t undo any side effects of your application, like console output. While this is not relevant in the current example, you should be aware when you use Reset Frame in the future.
We are trying to parse a part of a line from our CSV file. Each line has been split into parts. To see all parts of the current line, click the View link next to the `parts` variable in the Debug tool window. Here we see that “8.7’ is actually a test score, as you might have guessed. We can also see that the line does contain a date, but it is in the next part of the line.
Reset Frame
As we can see in our code, we are parsing the same part of the line (`parts[3]`) twice! This looks like a copy-paste error! We should be parsing the part of the line that contains the date, which is `parts[4]`. Let’s fix that by changing line 38 to `var testDate = LocalDate.parse(parts[4]);`
Note that we could have also gone directly to this line in the code from the console, by clicking the link “Main.java:38” in the console. However, it is useful to know how to set a breakpoint for an exception in case you ever need it.
Go to line in code from console
Print to the console
In fact, while we’re here, let’s make sure that we are parsing all the parts of the lines correctly.
As we can see in the code just above (on line 25), our CSV file contains a header. Let’s print this header to the console to make sure we parse each part of the line to the correct field. We could add a `System.out.println()` to our code to print the header, but we don’t want to risk print statements ending up in production! Fortunately, there is a better way to do so.
Non-suspending logging breakpoint
Let’s create a non-suspending breakpoint, which means that execution will not stop on this breakpoint, and set it to log the line to the console when the breakpoint is hit.
To do so, create a breakpoint on line 27. Right-click the breakpoint and click More to open the Breakpoints dialog. Unselect Suspend to make this a non-suspending breakpoint. Next, select Log and Evaluate & log. Set the Evaluate & log field to `”Header: ” + line` and click Done. Notice that the breakpoint is yellow, to signify that this is a non-suspending breakpoint.
Non-suspending breakpoint
Now, when we run the application in Debug mode, we see that the header is printed to the console. But so are all the other lines from the file. To print only the header, the breakpoint should be on the next line. We could set a new breakpoint there, but then we’d have to redo the configuration…
Drag and drop breakpoint
Instead of creating a new breakpoint, we can drag and drop the existing breakpoint to the next line, preserving its configuration.
Drag and drop breakpoint
Now, when we run the application in Debug mode, only the header is printed to the console. Along with the output of our program, of course. It looks like our fields correspond correctly to the headers of the file.
Checking the functionality of the application
Let’s run our application again to see if everything is now as it should be. We see that the application runs without errors, but it looks like one of the students has a negative average test score.
Negative average score
That can’t be right! Let’s see what’s going on. We’ll set a breakpoint in the code where we add test scores to the student (line 45 in `Main.java`). When we run our application in Debug mode, execution will stop every time this breakpoint is hit. We can click the Resume Program button (⌥⌘R on macOS / F9 on Windows/Linux), either in the Debug tool window, or inline in the editor, to get to the next test score.
Resume program
Every time we click the Resume Program button, we can see the values change both in the inline debugging information in the editor and in the Debug tool window. Execution will stop every time it hits this breakpoint, so for every test score. Since there are a lot of test scores in the file, this is going to take a while…
Resume program
Conditional breakpoint
As we are only interested in the test scores for a particular student, we don’t need execution to stop for each test score. Instead of clicking the Resume Program button many times in a row to get to the scores we’re interested in, we can use a conditional breakpoint – which will only halt execution under certain conditions.
Right-click the breakpoint to open the Line Breakpoint dialog and edit the configuration for the breakpoint. Since we don’t need execution to suspend until we process this particular student’s test scores, we can set the field Condition to `studentName.equals(“Olivia Garcia”)` and click Done.
Conditional breakpoint
Notice that the breakpoint has a small question mark in it, to signify that it is a conditional breakpoint. Now, when we resume our program, execution will stop only once we get to the test scores for the student whose name we have set in the condition. Here we can see that the test score is negative.
Negative test score
Add watch
To see whether all test scores for this student are negative, let’s add a watch to the field `testScore`. Adding a watch makes it easier to explicitly watch the value of a field. Right-click on the variable `testScore` in the Threads & Variables tab in the Debug tool window and select Add to watches from the context menu. The watch will be shown in the right pane of the Debug tool window.
Add to Watches
If needed, select the Layout Settings icon at the top right of the Debug tool window and select Watches in the list, to show watches in the right pane.
Add Watches to Debug tool window
When we click Resume Program and loop over this student’s scores, we see that all her scores are negative. That would explain her negative average…
This looks like a problem with the input data. Let’s open the CSV file to correct the scores and make sure Olivia’s scores are no longer negative. We can use multiple carets to fix all scores at the same time.
In this example, we can fix our input data ourselves. If you are dealing with user input that you can’t change, consider adding validation to the code, for example, that test scores cannot be negative.
Final check
Let’s run our application one more time to see that everything is in order. We see that average scores are printed to the console for all students, and none of the scores are negative. This is how our application is expected to work.
Final check
Conclusion
In this blog post, we’ve seen how to use the debugger to find and fix several types of bugs, from problems with the logic in the code, to reasons that exceptions are thrown, and finding problems with input data.
Is there anything else you’d like to learn about the debugger? Please tell us in the comments!
This article was first published in NLJUG‘s Java Magazine. You can view an online copy here.
As developers, we read code more than we write it. Research has shown that “developers on average spend as much as 58% of their time comprehending existing source code” (The Programmer’s Brain – Felienne Hermans). And yet, we don’t practice reading code nearly as much as we do writing code. Let’s look at how to practice reading code and how IntelliJ IDEA can help.
Code Reading Club
In 2022, a friend invited me to join a Code Reading Club, based on the work of Felienne Hermans. We have monthly sessions where we take a sample of code and apply structured exercises to this code to try and make sense of it. I have really enjoyed our sessions, not only for the opportunity to practice reading code, but also because I find it very interesting to learn how other people read code. To start your own club, use the Code Reading Club resources. Or try the code reading exercises from Felienne’s book, The Programmer’s Brain.
While it’s possible to use these exercises in our daily work, developers mostly read code in the IDE.
Exploring an existing code base
When joining a new team or company, you need to quickly get up to speed with existing code bases. Obviously you can look at the project, but unfortunately not everything can be captured in the code.
It helps to have a teammate give an introduction to the application; a description of what the application does, its place in the landscape, relevant history and design choices, current plans (are you actively developing new features or mostly doing maintenance?), which parts of the application are changed more than others, as well as links to existing documentation and other relevant information. Also think about which stories a new team member can pick up to help them become familiar with the project.
As a new team member, check out all relevant repositories. Make sure you can build the project, run the tests and run the application locally. How to do this will hopefully be described in the README. If not, consider adding it. Running the project locally can help you to both see how the application works by trying it out, and make sure that you can test your changes when you are done.
Opening a project in the IDE allows you to search and navigate your codebase more easily, as well as use additional useful IDE features. Let’s dive into several powerful IntelliJ IDEA features you can use to quickly be productive.
Note: Keyboard shortcuts are provided for macOS and Windows/Linux respectively.
Project overview
Explore modules and packages in the Project tool window (⌘1 | Alt+1) to get an idea of the project. If you prefer a visual representation, IntelliJ IDEA can generate several types of diagrams for you, including UML class diagrams. Also consider drawing your own diagrams; this will help you retain the information better and lets you focus only on the information you need for the task at hand.
To understand dependencies between modules, packages and classes, the Dependency Structure Matrix (DSM) can help. Open the DSM from the main menu using Code | Analyze Code | Dependency Matrix….
Dependency Structure Matrix
In this example the matrix displays modules in a project. As you can see in the legend at the top right, dependencies are marked in blue and the direction of the dependencies is marked in green and yellow; the module marked in green depends on the module marked in yellow. Visualising the dependencies can help us to get an overview of the application. If you prefer, you can also generate a Project Modules diagram. Note that this diagram only gives you one side of the equation (which modules the selected module depends on).
Search & navigate
Use Search Everywhere (⇧⇧ | Shift+Shift) to find anything in your project, including IDE settings & features. Other useful navigation features include Recent Files (⌘E | Ctrl+E) or Recent Locations (⌘⇧E | Ctrl+Shift+E). Knowing how to search and navigate code in your IDE is helpful when working with existing code, so you can focus on the task at hand.
Looking at a slice of the application
Instead of looking at the whole code base, look at a specific slice of the application. For example, find the main method and see what the application does from there, find a specific endpoint and trace the code down to the database, or find the location where an error is thrown and trace the code back up to how you got there.
Understanding a piece of code
At some point you’ll find a piece of code that you will need to understand, for example, to fix a bug or make necessary changes. If you’ve ever been overwhelmed by a piece of code without any idea how to start, this is where code reading exercises can help! Of course, your IDE can also provide you with handy features. For starters, IntelliJ IDEA provides you with hints about the code, like syntax highlighting, inlay hints and gutter icons.
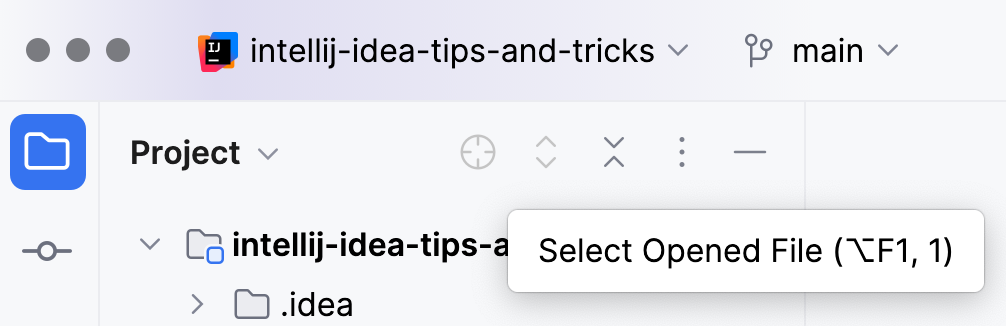
One of the reasons code can be confusing is because of a lack of information. For example, you might not know the exact implementation of a class or method. While you can Jump to Source (⌘↓ | F4) to navigate to the relevant code, and use shortcuts to Navigate Back (⌘[ | Ctrl+Alt+Left Arrow) and Navigate Forward (⌘] | Ctrl+Alt+Right Arrow), it’s easy to get lost in a large code base. To see where a particular file is located in the project, use the crosshair icon at the top of the Project tool window.
Select Opened File
It is also possible to pull up additional information using Quick Documentation (F1 | Ctrl+Q) to show the Javadoc, Quick Definition (⌥␣ | Ctrl+Shift+I) to see the code or Type Information (⌃⇧P | Ctrl+Shift+P) to determine which type is returned by an expression.
Did you know IntelliJ IDEA can help you work with regular expressions? You can mark a String as RegExp from Show Context Actions (⌥⏎ | Alt+Enter), using Inject Language or Reference and selecting RegExp (or a specific flavor of regular expressions). From the Show Context Action menu, select Check RegExp to open a popup where you can check whether a certain String matches the regular expression. Place your String in the Sample field in the popup; a yellow warning sign will be shown if the String is incomplete, a red exclamation mark shows the String does not match, or a green check mark will indicate that the String matches the RegExp.
Check RegExp
The structure of the code
Code is not read from top to bottom. Code doesn’t run linearly either! Developers “scan” code looking for the parts you’re interested in. Using white space and formatting can help improve readability.
When you write code in IntelliJ IDEA, the code will be formatted automatically. If you encounter code that isn’t properly formatted, you can reformat it (⌘⌥L | Ctrl+Alt+L).
You can collapse the code (⌘⇧- | Ctrl+Shift+Minus) to get an overview of a class without being overwhelmed with too many details. You can expand it again (⌘⇧+ | Ctrl+Shift+Plus) as needed. Other ways to get a quick overview of the code are to use the File Structure popup (⌘F12 | Ctrl+F12), or the Structure tool window (⌘7 | Alt+7).
When reading code, it might help to play with it a little bit as you try to understand it. Remember to revert any changes you make!
Restructure
Restructure the code by moving code blocks around to match your mental model, preferred style or coding conventions. Use shortcuts to move a statement up (⌘⇧↑ | Ctrl+Shift+Up Arrow) or down (⌘⇧↓ | Ctrl+Shift+Down Arrow).
Refactoring
You can use refactoring to change the code to aid your understanding. Rename variables or methods (⇧F6 | Shift+F6), extract variables (⌥⌘V | Ctrl+Alt+V) or extract methods (⌥⌘M | Ctrl+Alt+M) and give them meaningful names, inline variables (⌥⌘N | Ctrl+Alt+N) you don’t need. The most frequently used refactorings are available in the Refactor This menu (^T | Ctrl+Alt+Shift+T) . Additional refactorings or quick fixes might be available under Show Context Actions (⌥⏎ | Alt+Enter).
Testing
Look at the tests for a piece of code to see what this code is supposed to do, using Navigate to Tests (⌘⇧T | Ctrl+Shift+T). Hopefully names of the tests will express the intended behavior of the application. This is useful for two reasons: 1. The tests will serve as executable documentation of the system. 2. Should the tests fail in the future, good names can help to quickly tell you what’s wrong, so you don’t spend more time than necessary analyzing failures.
Debugging
Run code through the debugger to see if the actual behavior of the code matches your understanding. Place a breakpoint (⌘F8 | Ctrl+F8) in the code at the point where you want to observe its state. Run the test in debug mode (⌃D | Shift+F9); execution will halt when it hits the breakpoint. You can observe the state of objects & variables in the editor and in the debug window, and look at the call stack in the Debug tool window. Continue execution by either stepping into a method (F7) or stepping over a line (F8).
The IntelliJ IDEA debugger is very powerful and has many useful features. I highly recommend familiarizing yourself with its features; this will come in handy next time you need to urgently debug your code for a production incident!
Version control
Sometimes you might want to know how the code came to be the way it is, and do a bit of what I like to call “Git archeology”. Use Annotate with Git Blame to see when the code was last changed. Click the commit in the gutter to navigate to that commit in the Git tool window and look at the diff. If you’re using JetBrains AI Assistant [13], you can also ask it to explain the commit to you. Right-click the commit and select Explain Commit with AI Assistant from the context menu.
Explain Commit with AI Assistant
AI Assistant features to understand code
Finally, AI coding assistants, like JetBrains AI Assistant, may offer other useful features for understanding existing code. For example, chat with an AI Assistant and ask questions about software development, your project’s code and version control. Ask it to explain specific code to you, maybe even explain regular expressions, SQL queries, cron expressions, etc.
Because it is deeply integrated within IntelliJ IDEA, JetBrains AI Assistant can explain runtime errors right from the console. With another assistant you may need to copy-paste the error into a chat window. Alternatively, use an AI assistant to write documentation for a class or method. The generated Javadoc is often more concise than the explanation in the chat.
Conclusion
I hope you found this overview useful to see how to approach understanding existing code with the help of IntelliJ IDEA. This article is based on my talk “Reading Code”, which includes live demos of the features discussed in this article.
Used to determine whether a user is included in an A / B or Multivariate test.
18 months
_ga
ID used to identify users
2 years
_gali
Used by Google Analytics to determine which links on a page are being clicked
30 seconds
_ga_
ID used to identify users
2 years
_gid
ID used to identify users for 24 hours after last activity
24 hours
_gat
Used to monitor number of Google Analytics server requests when using Google Tag Manager
1 minute
_gac_
Contains information related to marketing campaigns of the user. These are shared with Google AdWords / Google Ads when the Google Ads and Google Analytics accounts are linked together.
90 days
__utma
ID used to identify users and sessions
2 years after last activity
__utmt
Used to monitor number of Google Analytics server requests
10 minutes
__utmb
Used to distinguish new sessions and visits. This cookie is set when the GA.js javascript library is loaded and there is no existing __utmb cookie. The cookie is updated every time data is sent to the Google Analytics server.
30 minutes after last activity
__utmc
Used only with old Urchin versions of Google Analytics and not with GA.js. Was used to distinguish between new sessions and visits at the end of a session.
End of session (browser)
__utmz
Contains information about the traffic source or campaign that directed user to the website. The cookie is set when the GA.js javascript is loaded and updated when data is sent to the Google Anaytics server
6 months after last activity
__utmv
Contains custom information set by the web developer via the _setCustomVar method in Google Analytics. This cookie is updated every time new data is sent to the Google Analytics server.