In this tutorial, we are going to take a look at contributing to Open Source Software, specifically how to do a pull request (PR). We will look at forking and cloning the project, making the changes, committing and pushing these changes, creating the pull request, the review and hopefully merge of your PR. The same process may apply when making contributions to a project at work that you don’t own. In this example, the project is on GitHub. Other Git code repositories may use a similar process.
There are many reasons to contribute to open source projects, and different ways to find an issue to work on, from fixing a bug that is bothering you, to simply wanting to help out, or even just to gain more experience and learn something new. If you’re fixing something that is currently bothering you, you will have a specific issue and project to work on. If not, you could consider contributing to a project you like to use, or finding an issue that is suitable for someone new to contributing to open source and/or the project. There are also many different things you can contribute. Code is one, but projects also need testing and other things. For more information on what you can contribute and how to find something to contribute, please have a look at this video.
For this blog post, let’s assume we’ve found a project we want to work on, and an issue we want to fix.
Getting the project
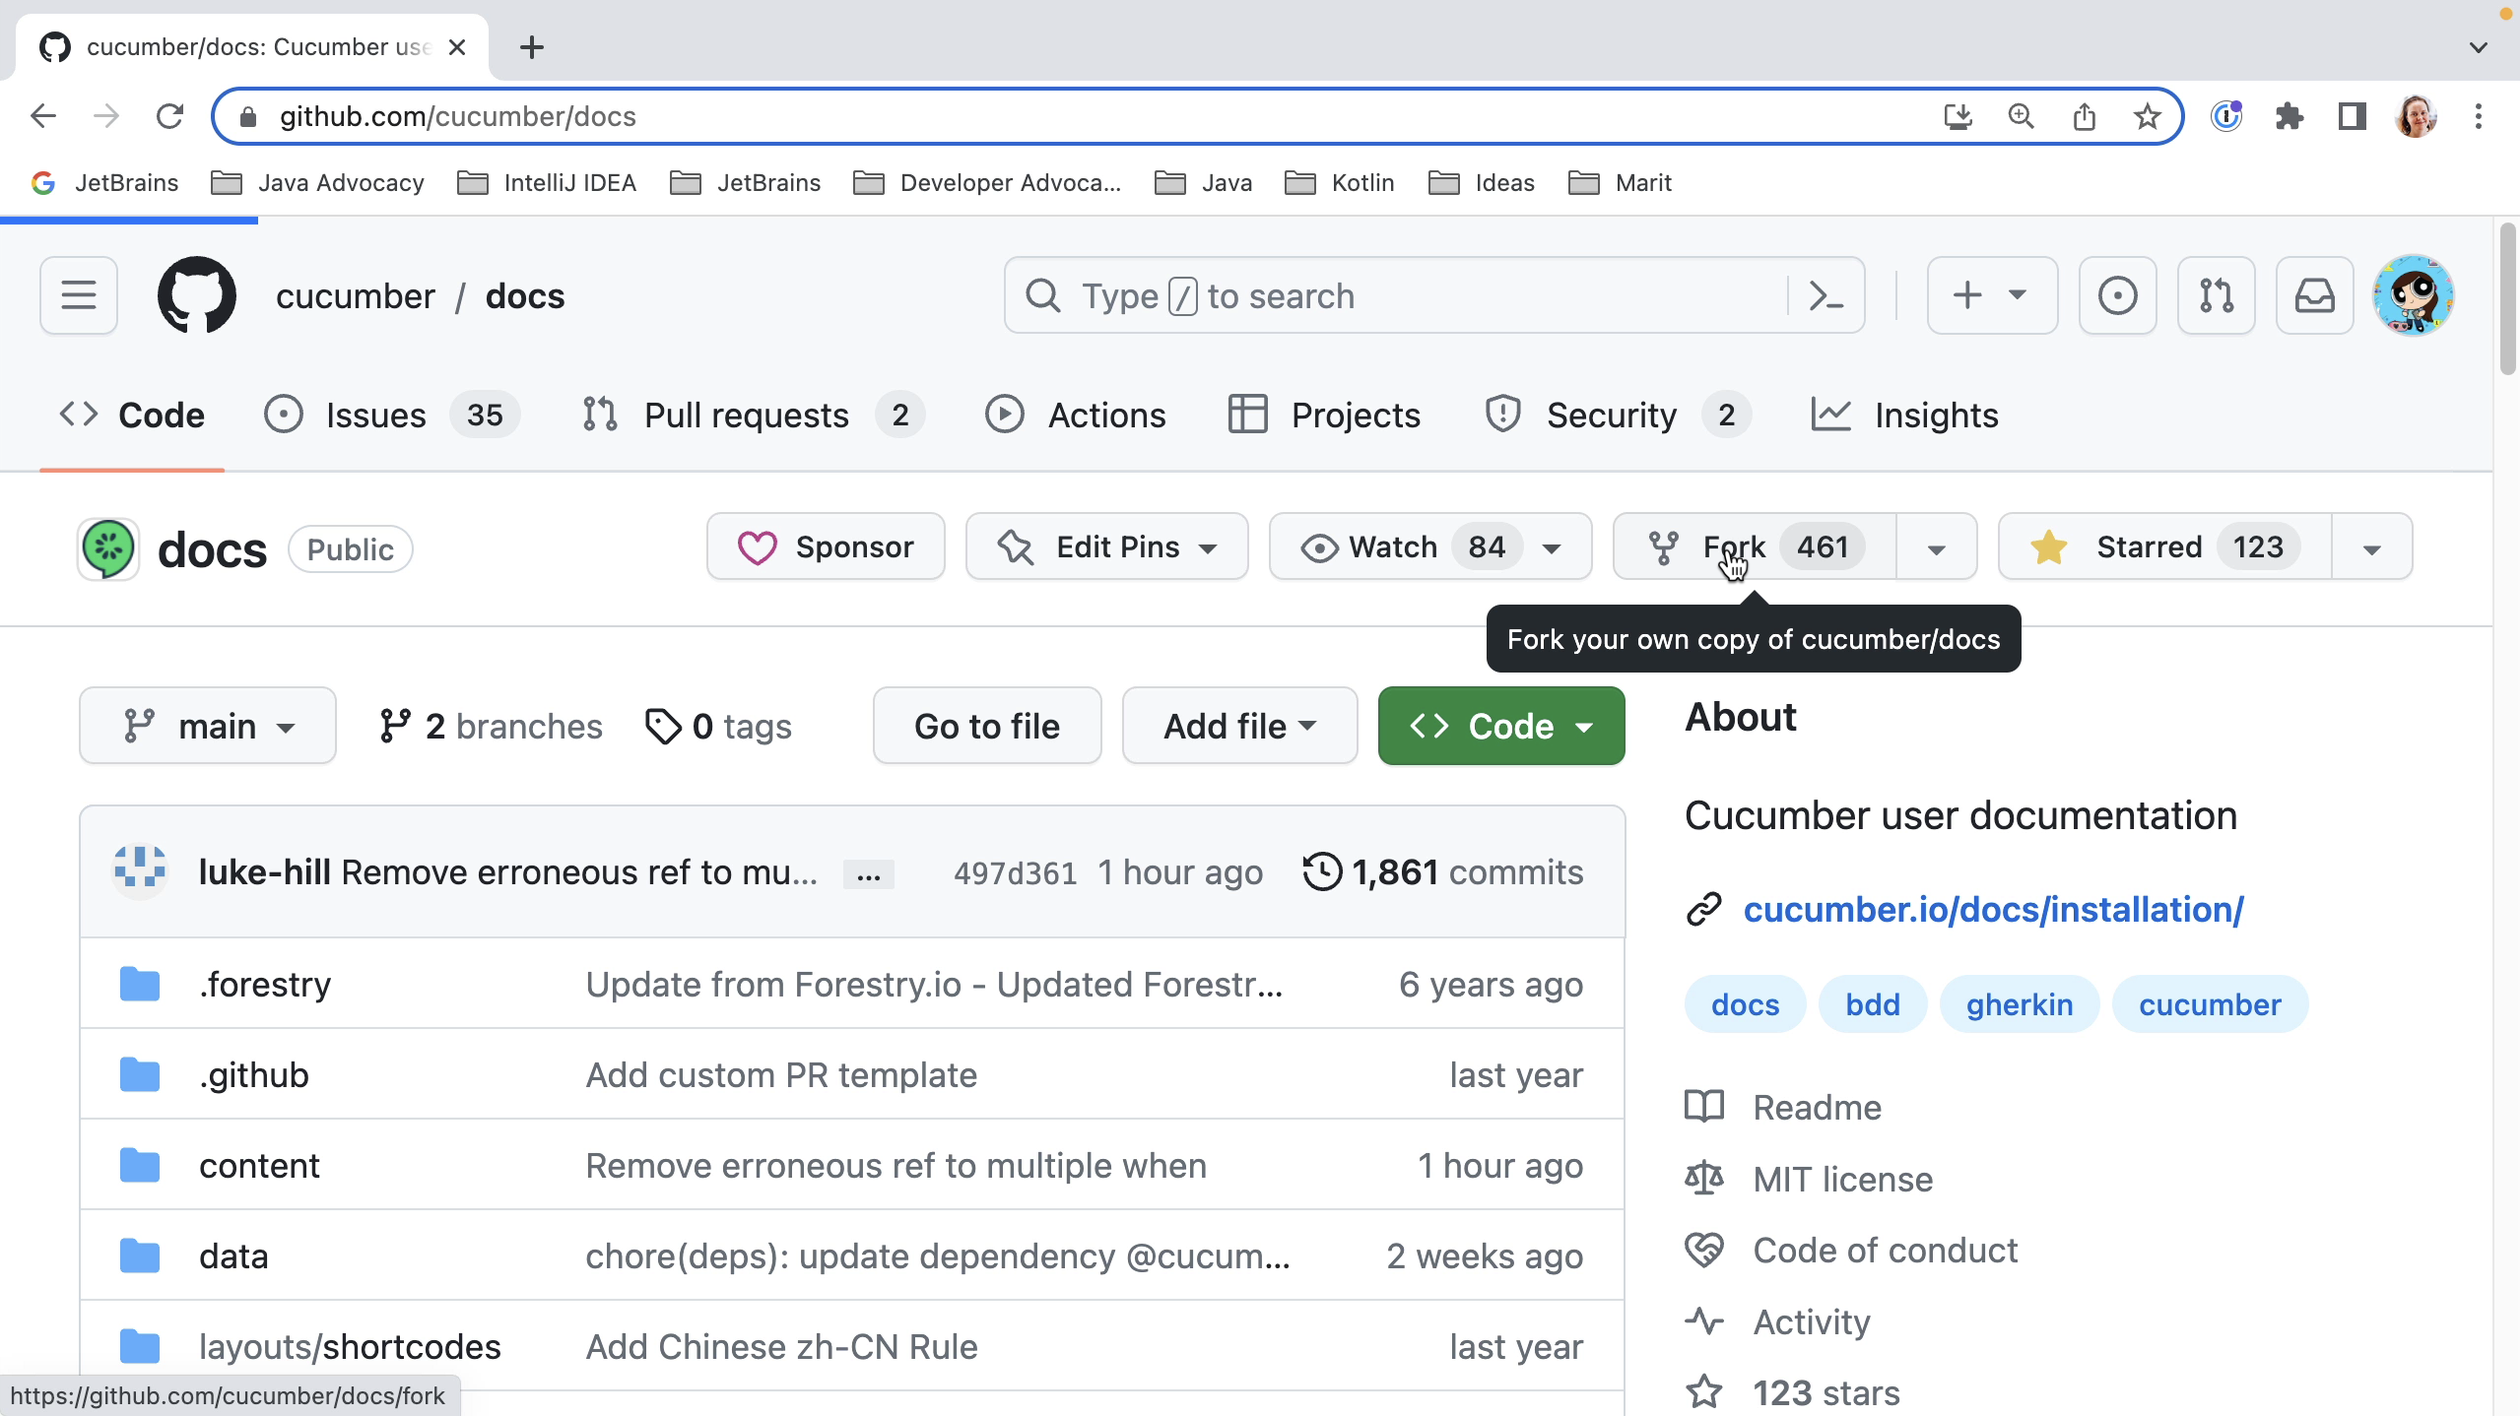
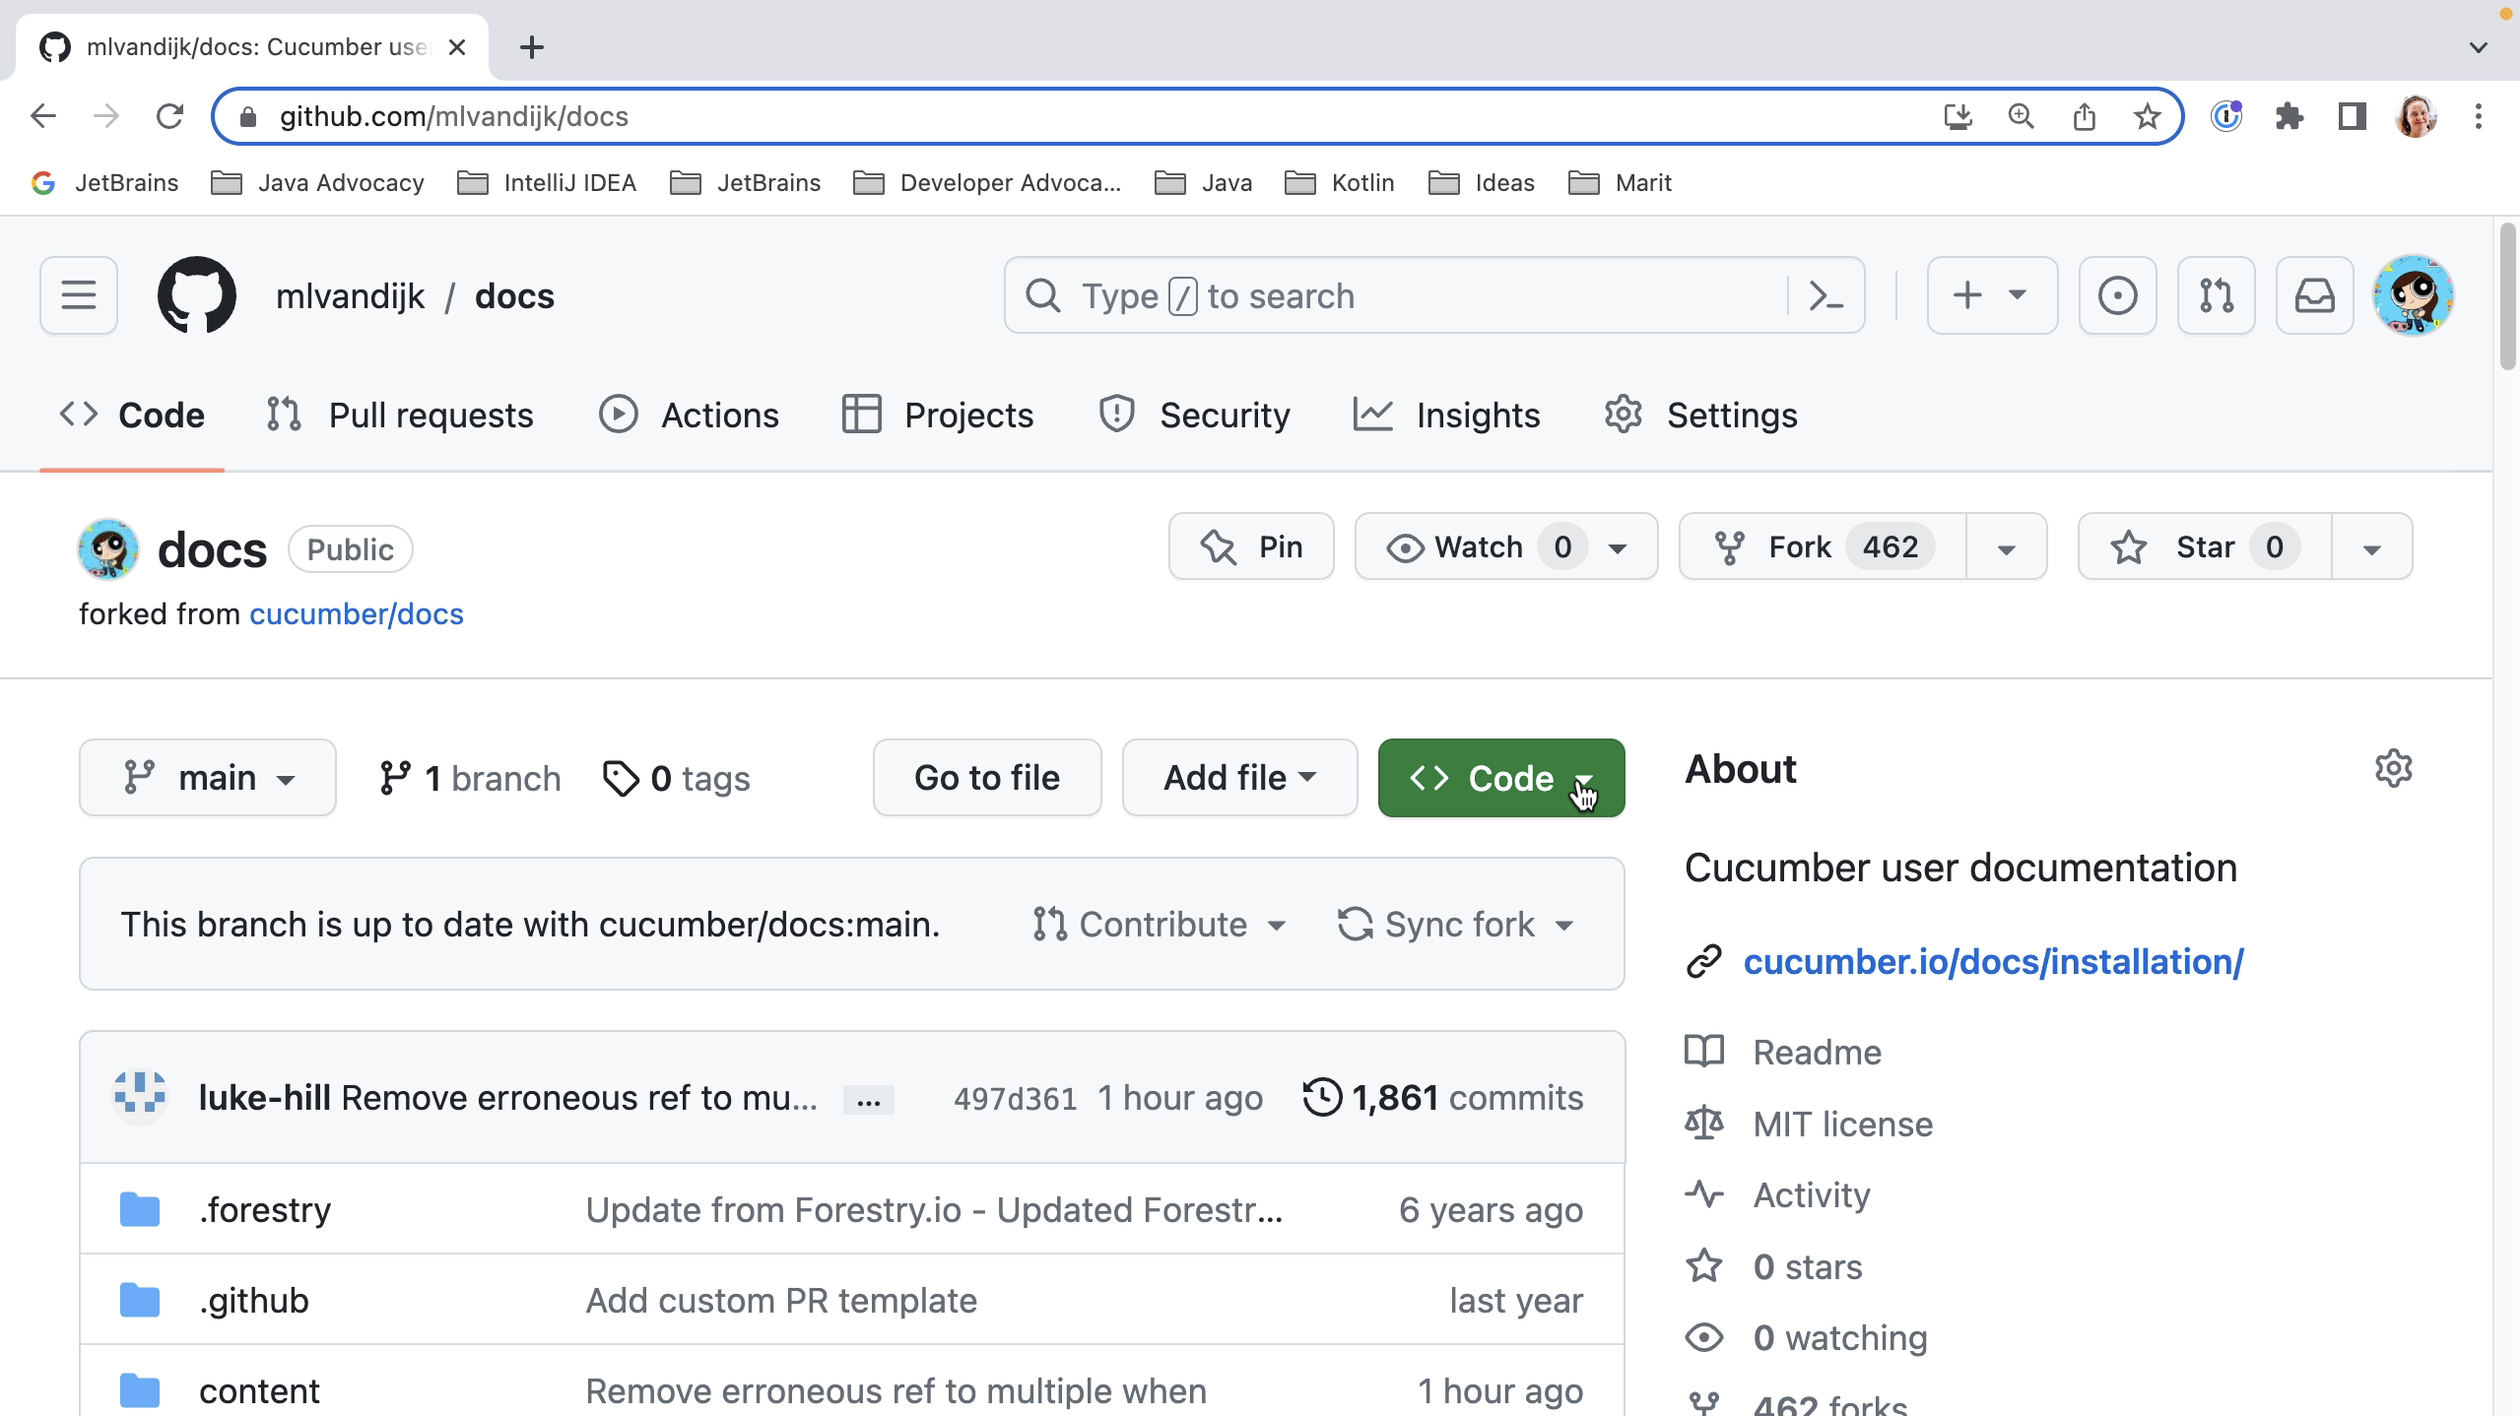
When making your first contribution, you won’t have access to push to the open source project directly. So, the first thing we will need to do is fork this project to our own profile. This means we create a copy of the original project on our profile.
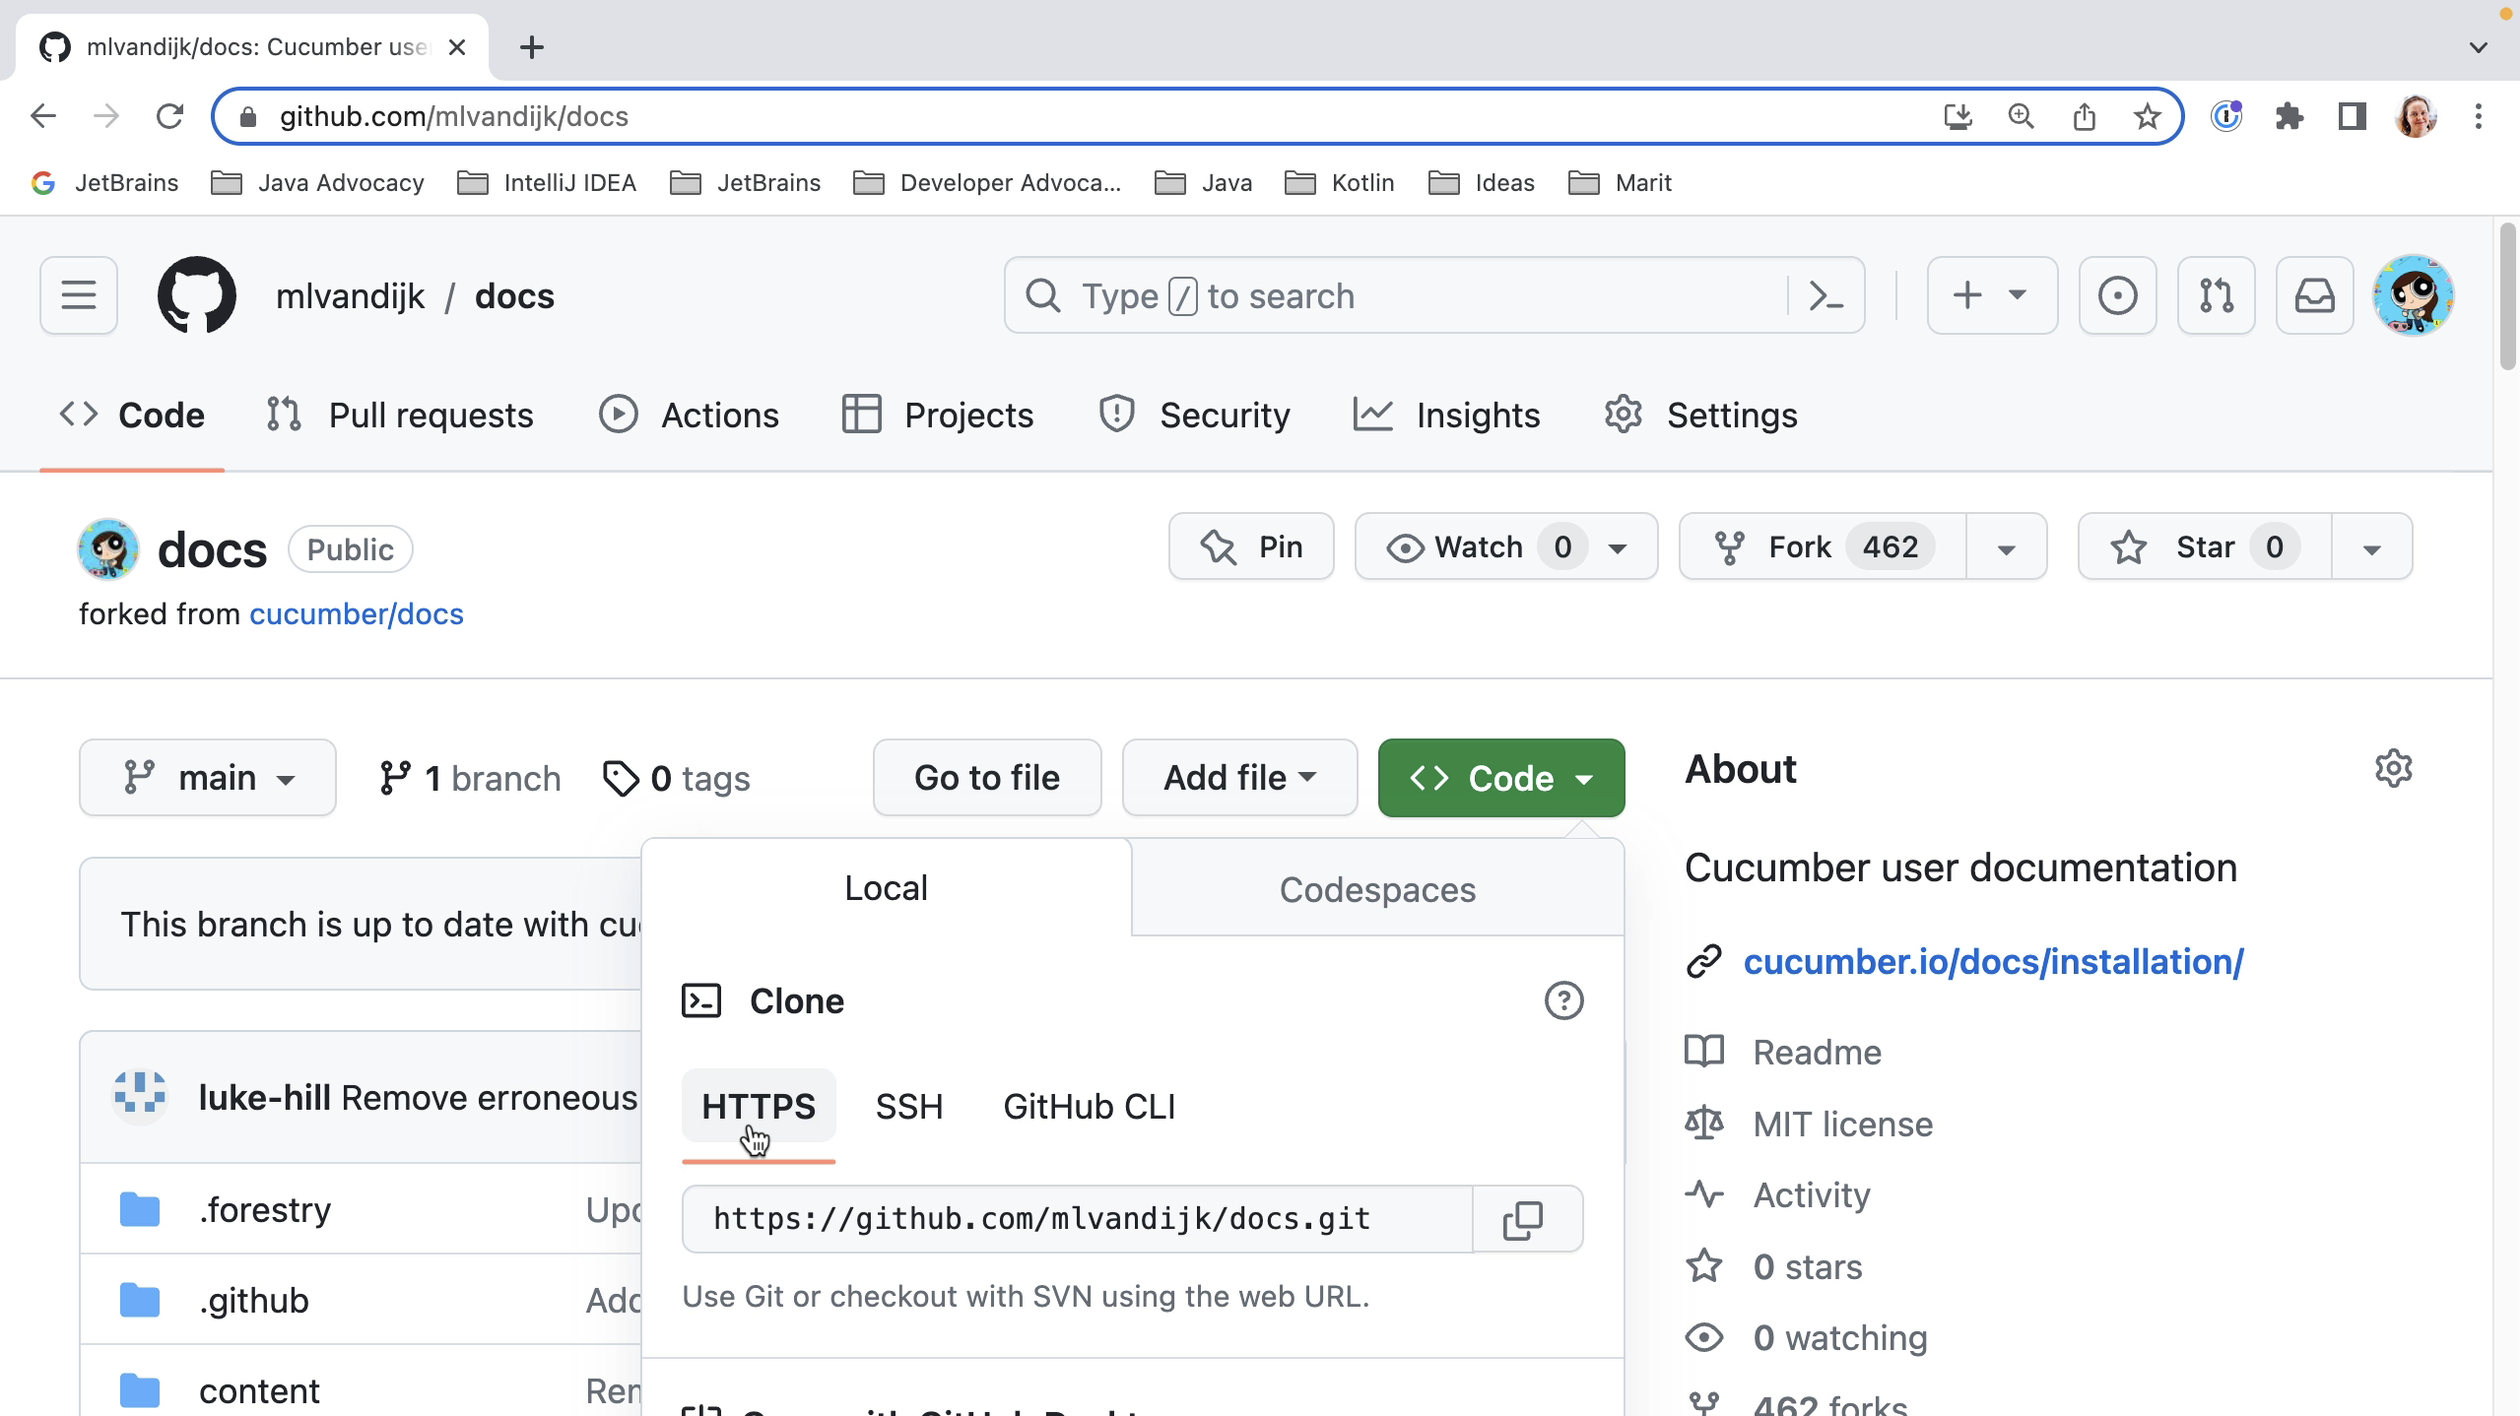
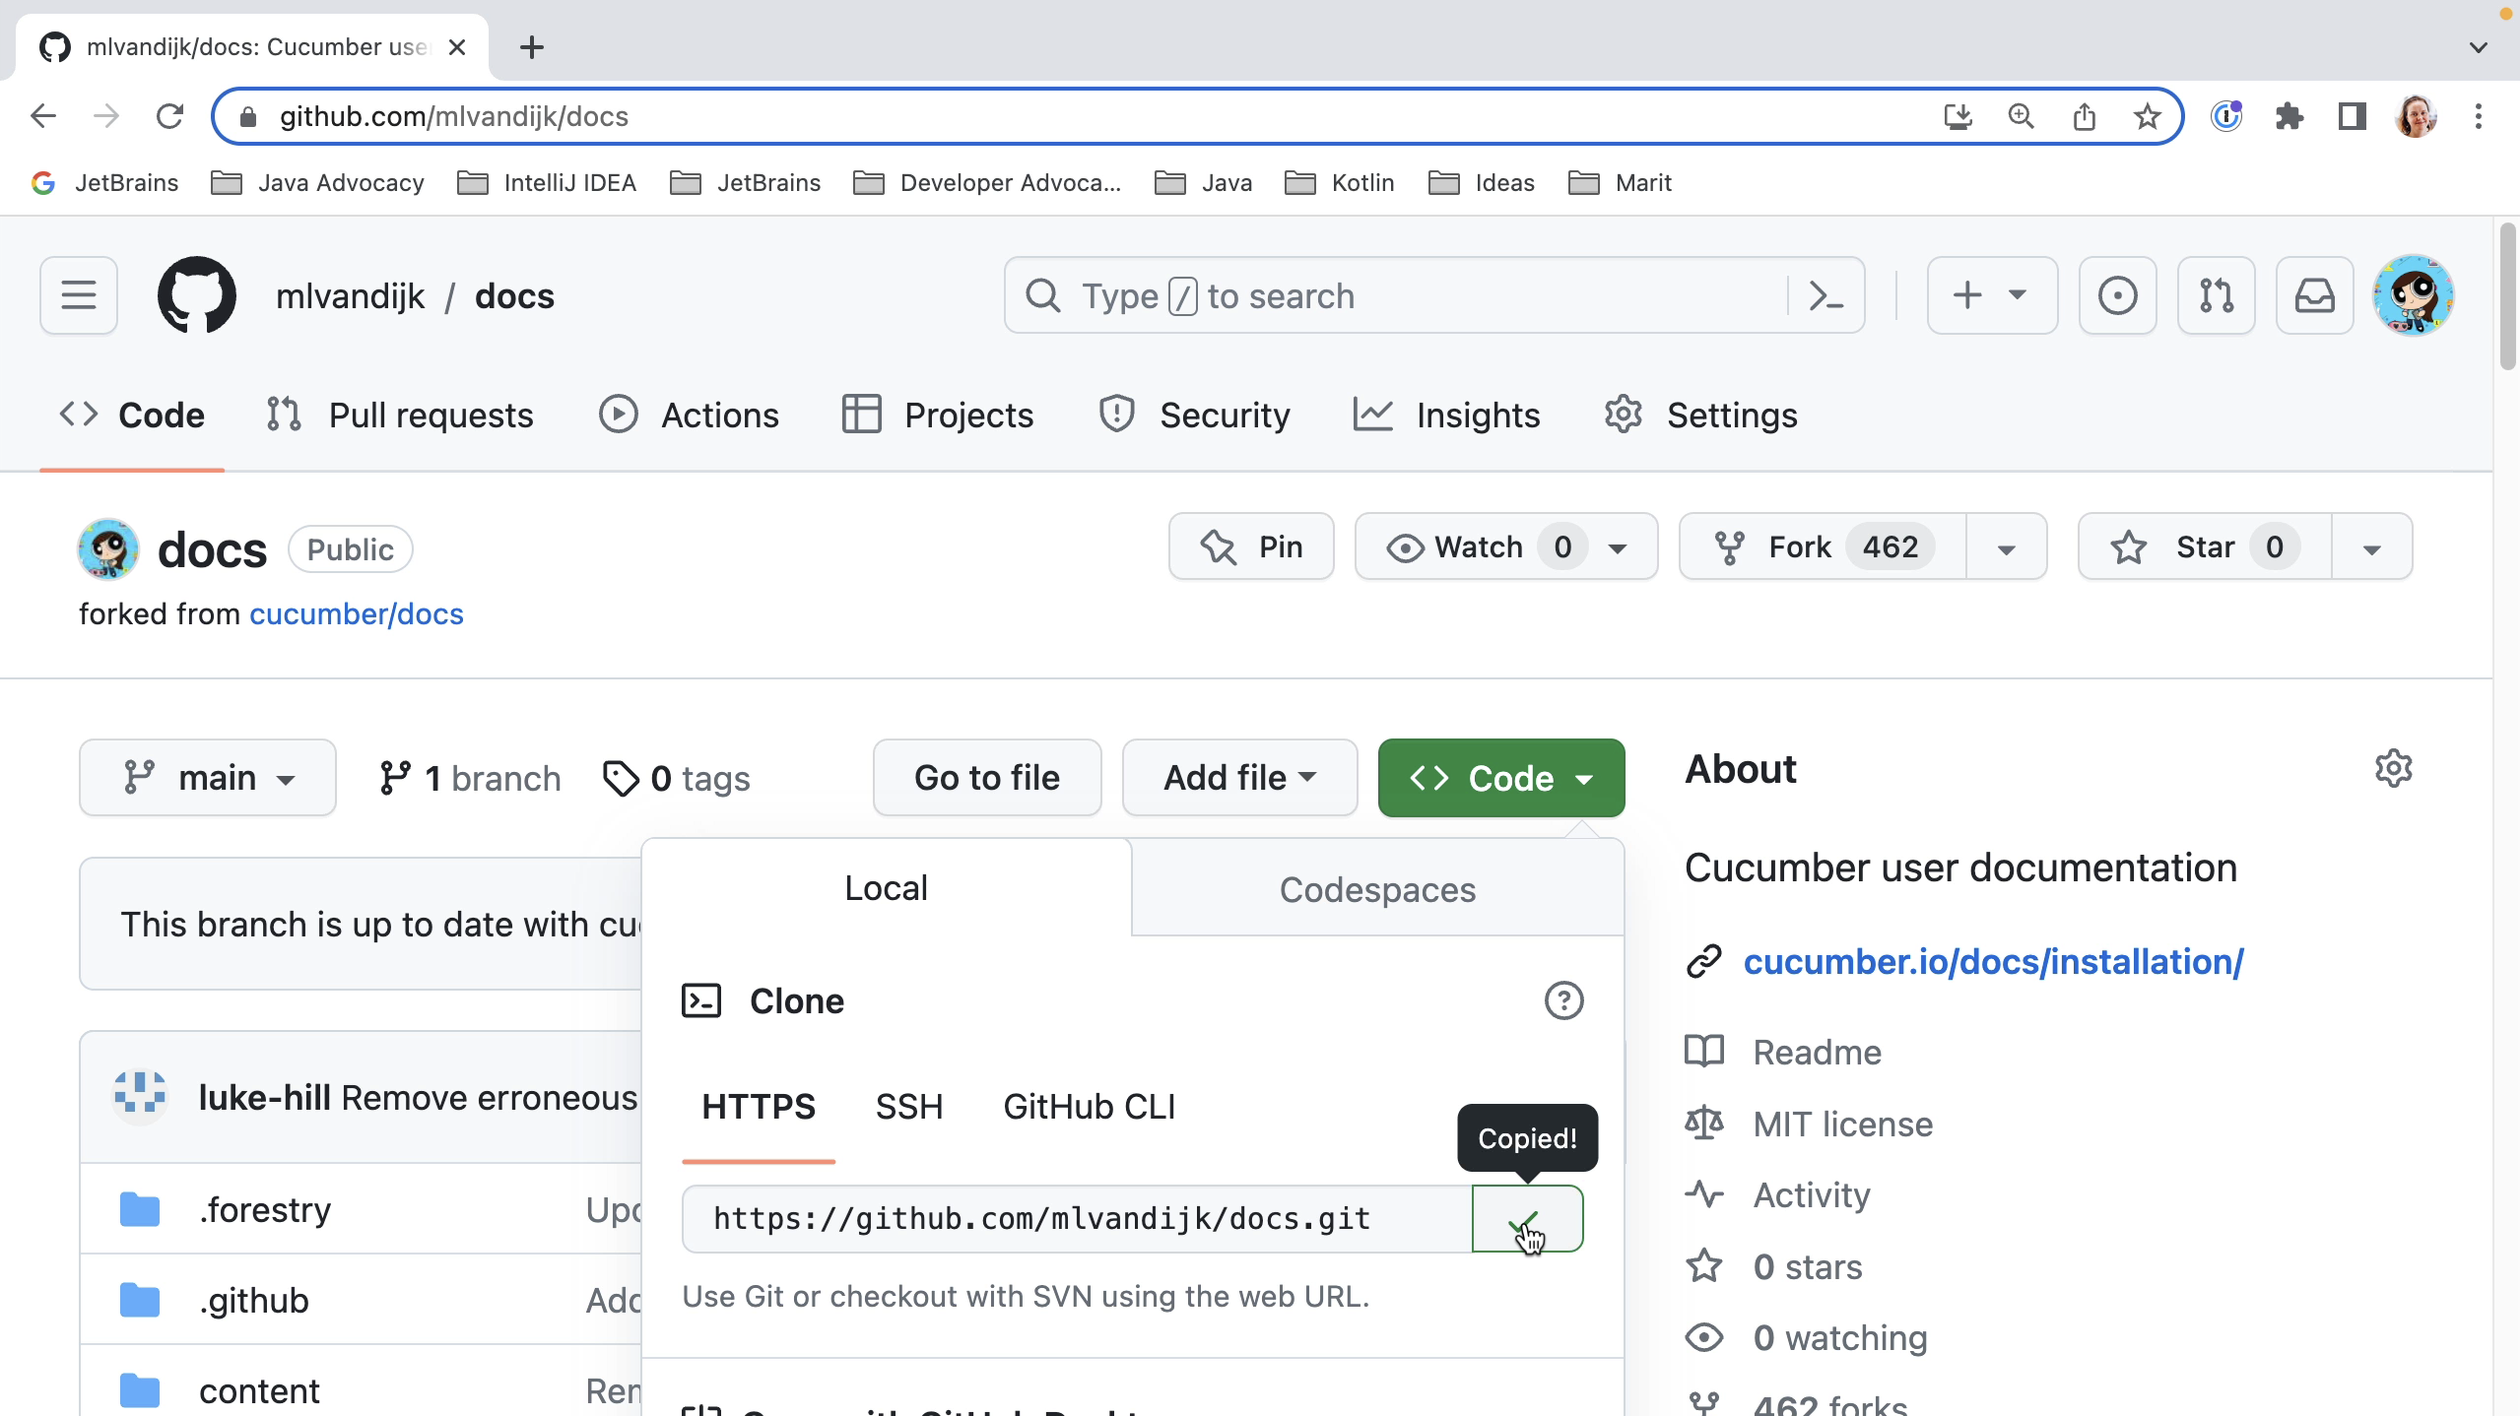
We then need to clone this project to our local machine. We see that we have several options to get the code. Let’s use HTTPS as that can be the simplest option. When we click the clipboard icon, the URL will be copied to our clipboard.
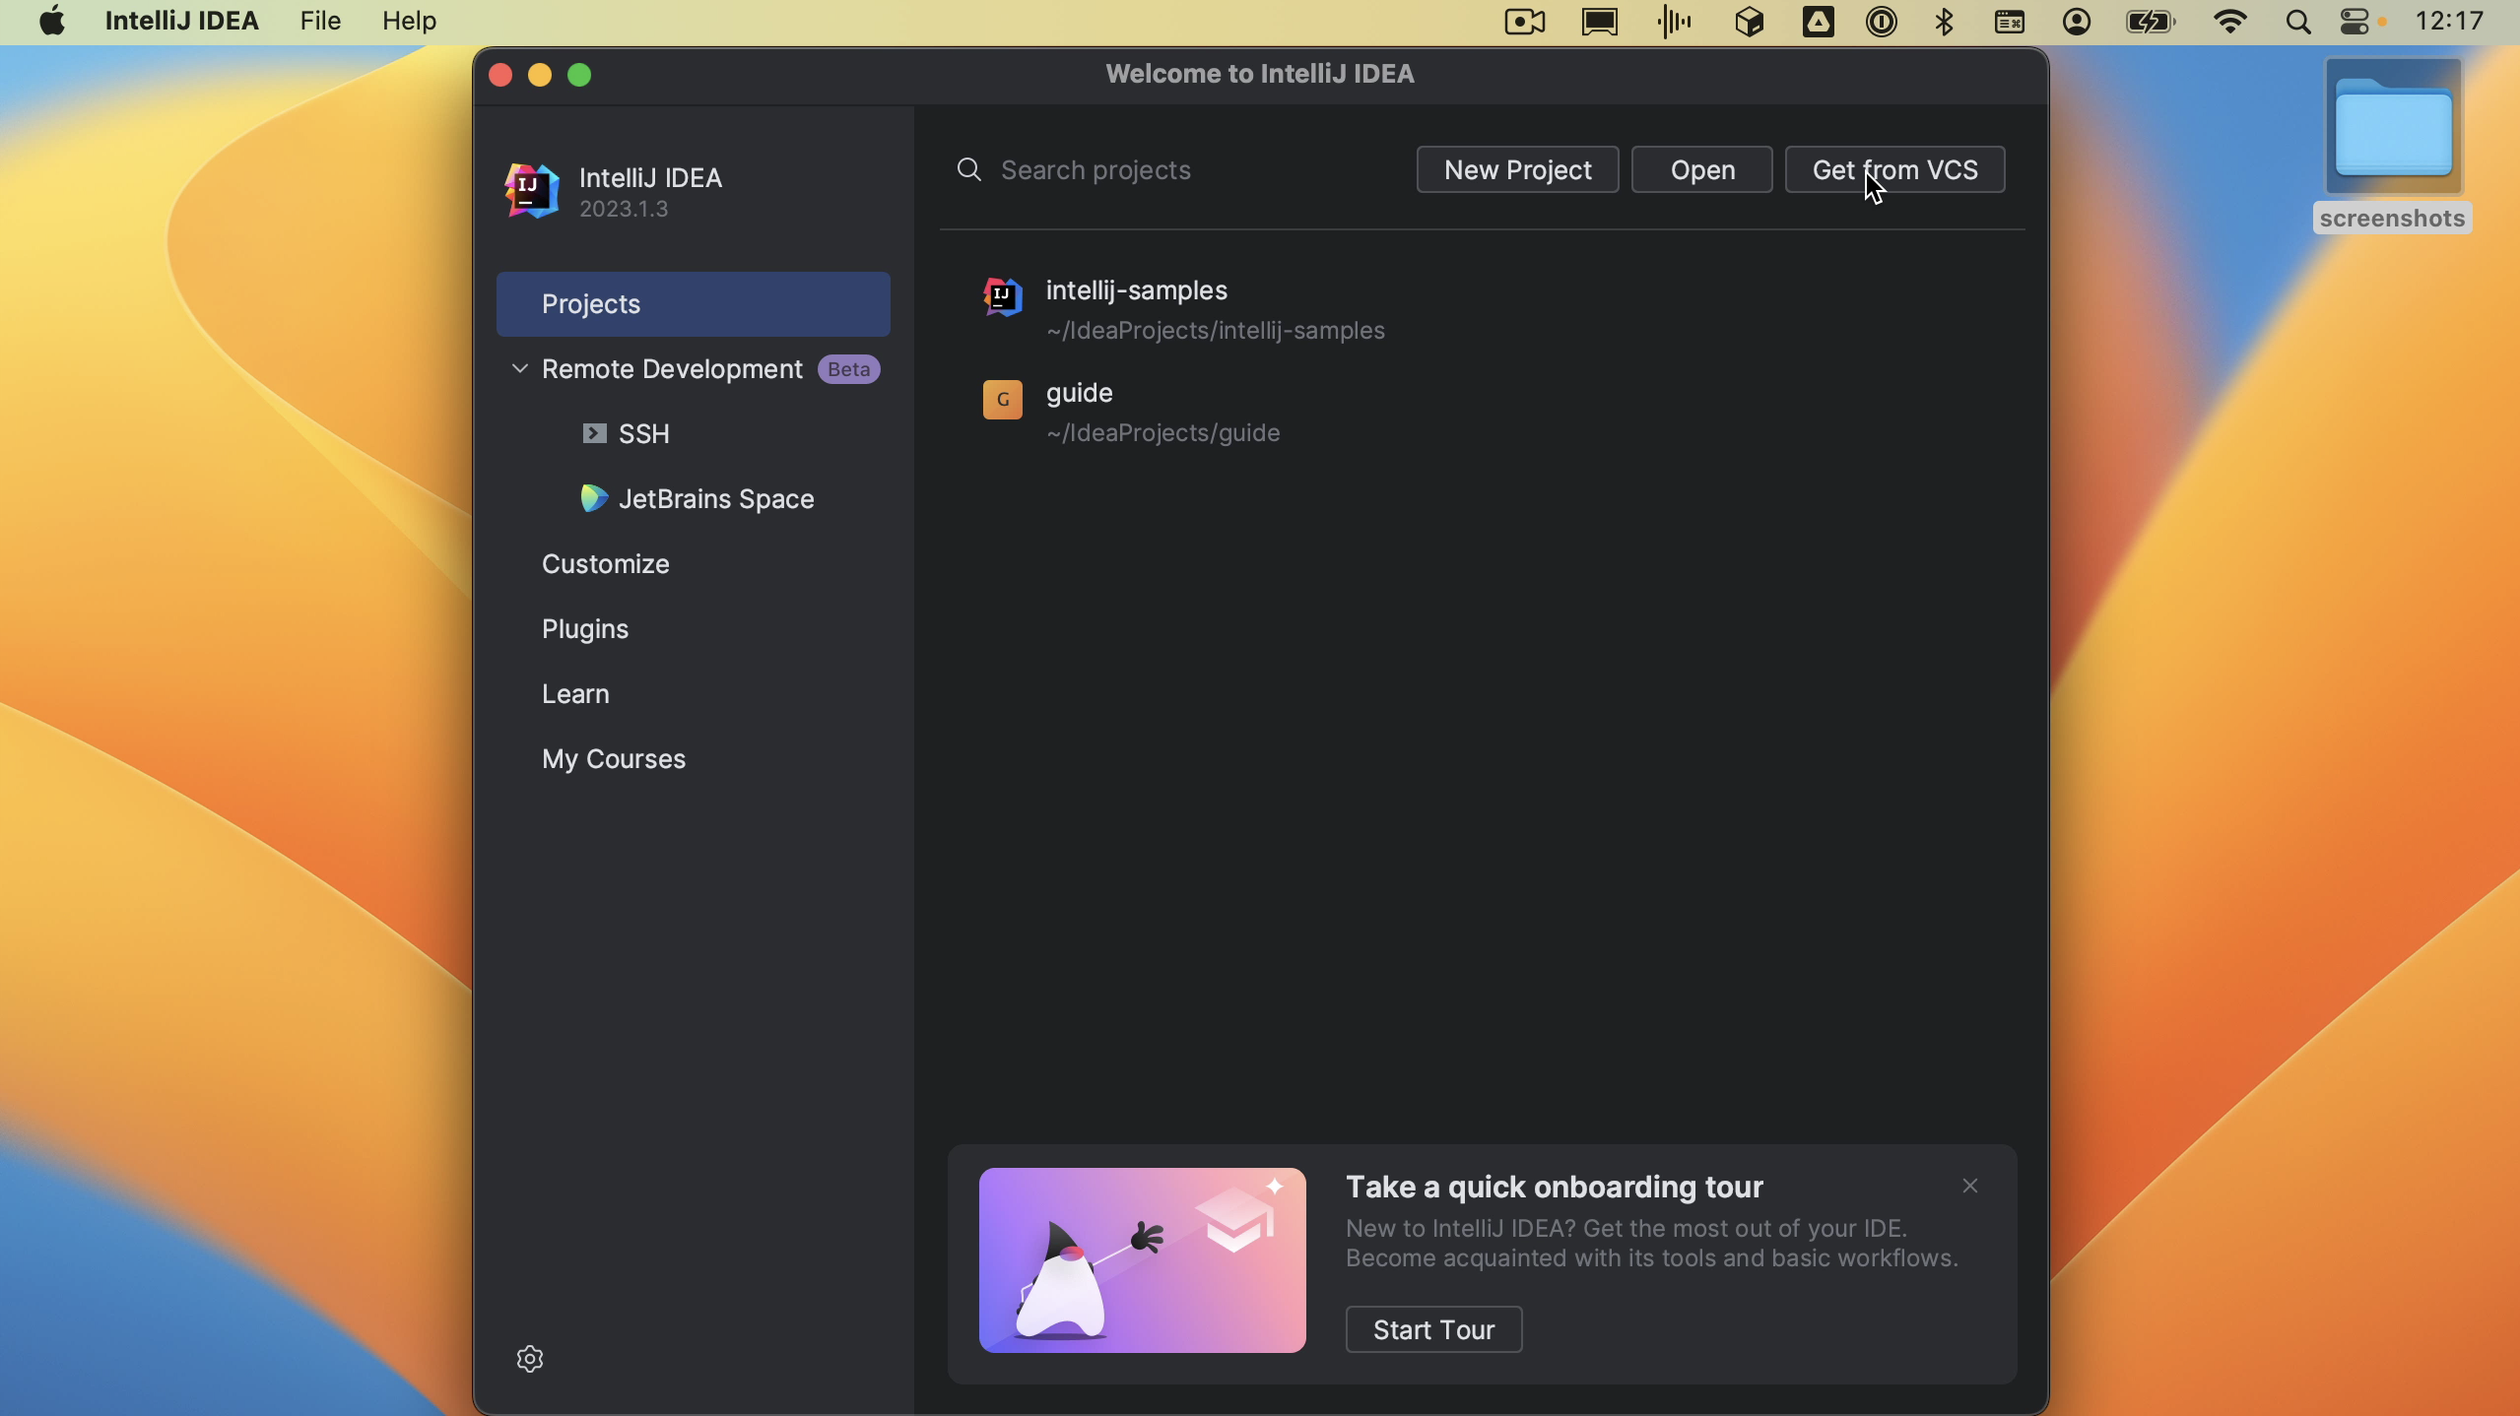
When we open IntelliJ IDEA and don’t already have a project open, we’ll see the Welcome screen. Here we have the option to Get from VCS (version control system).
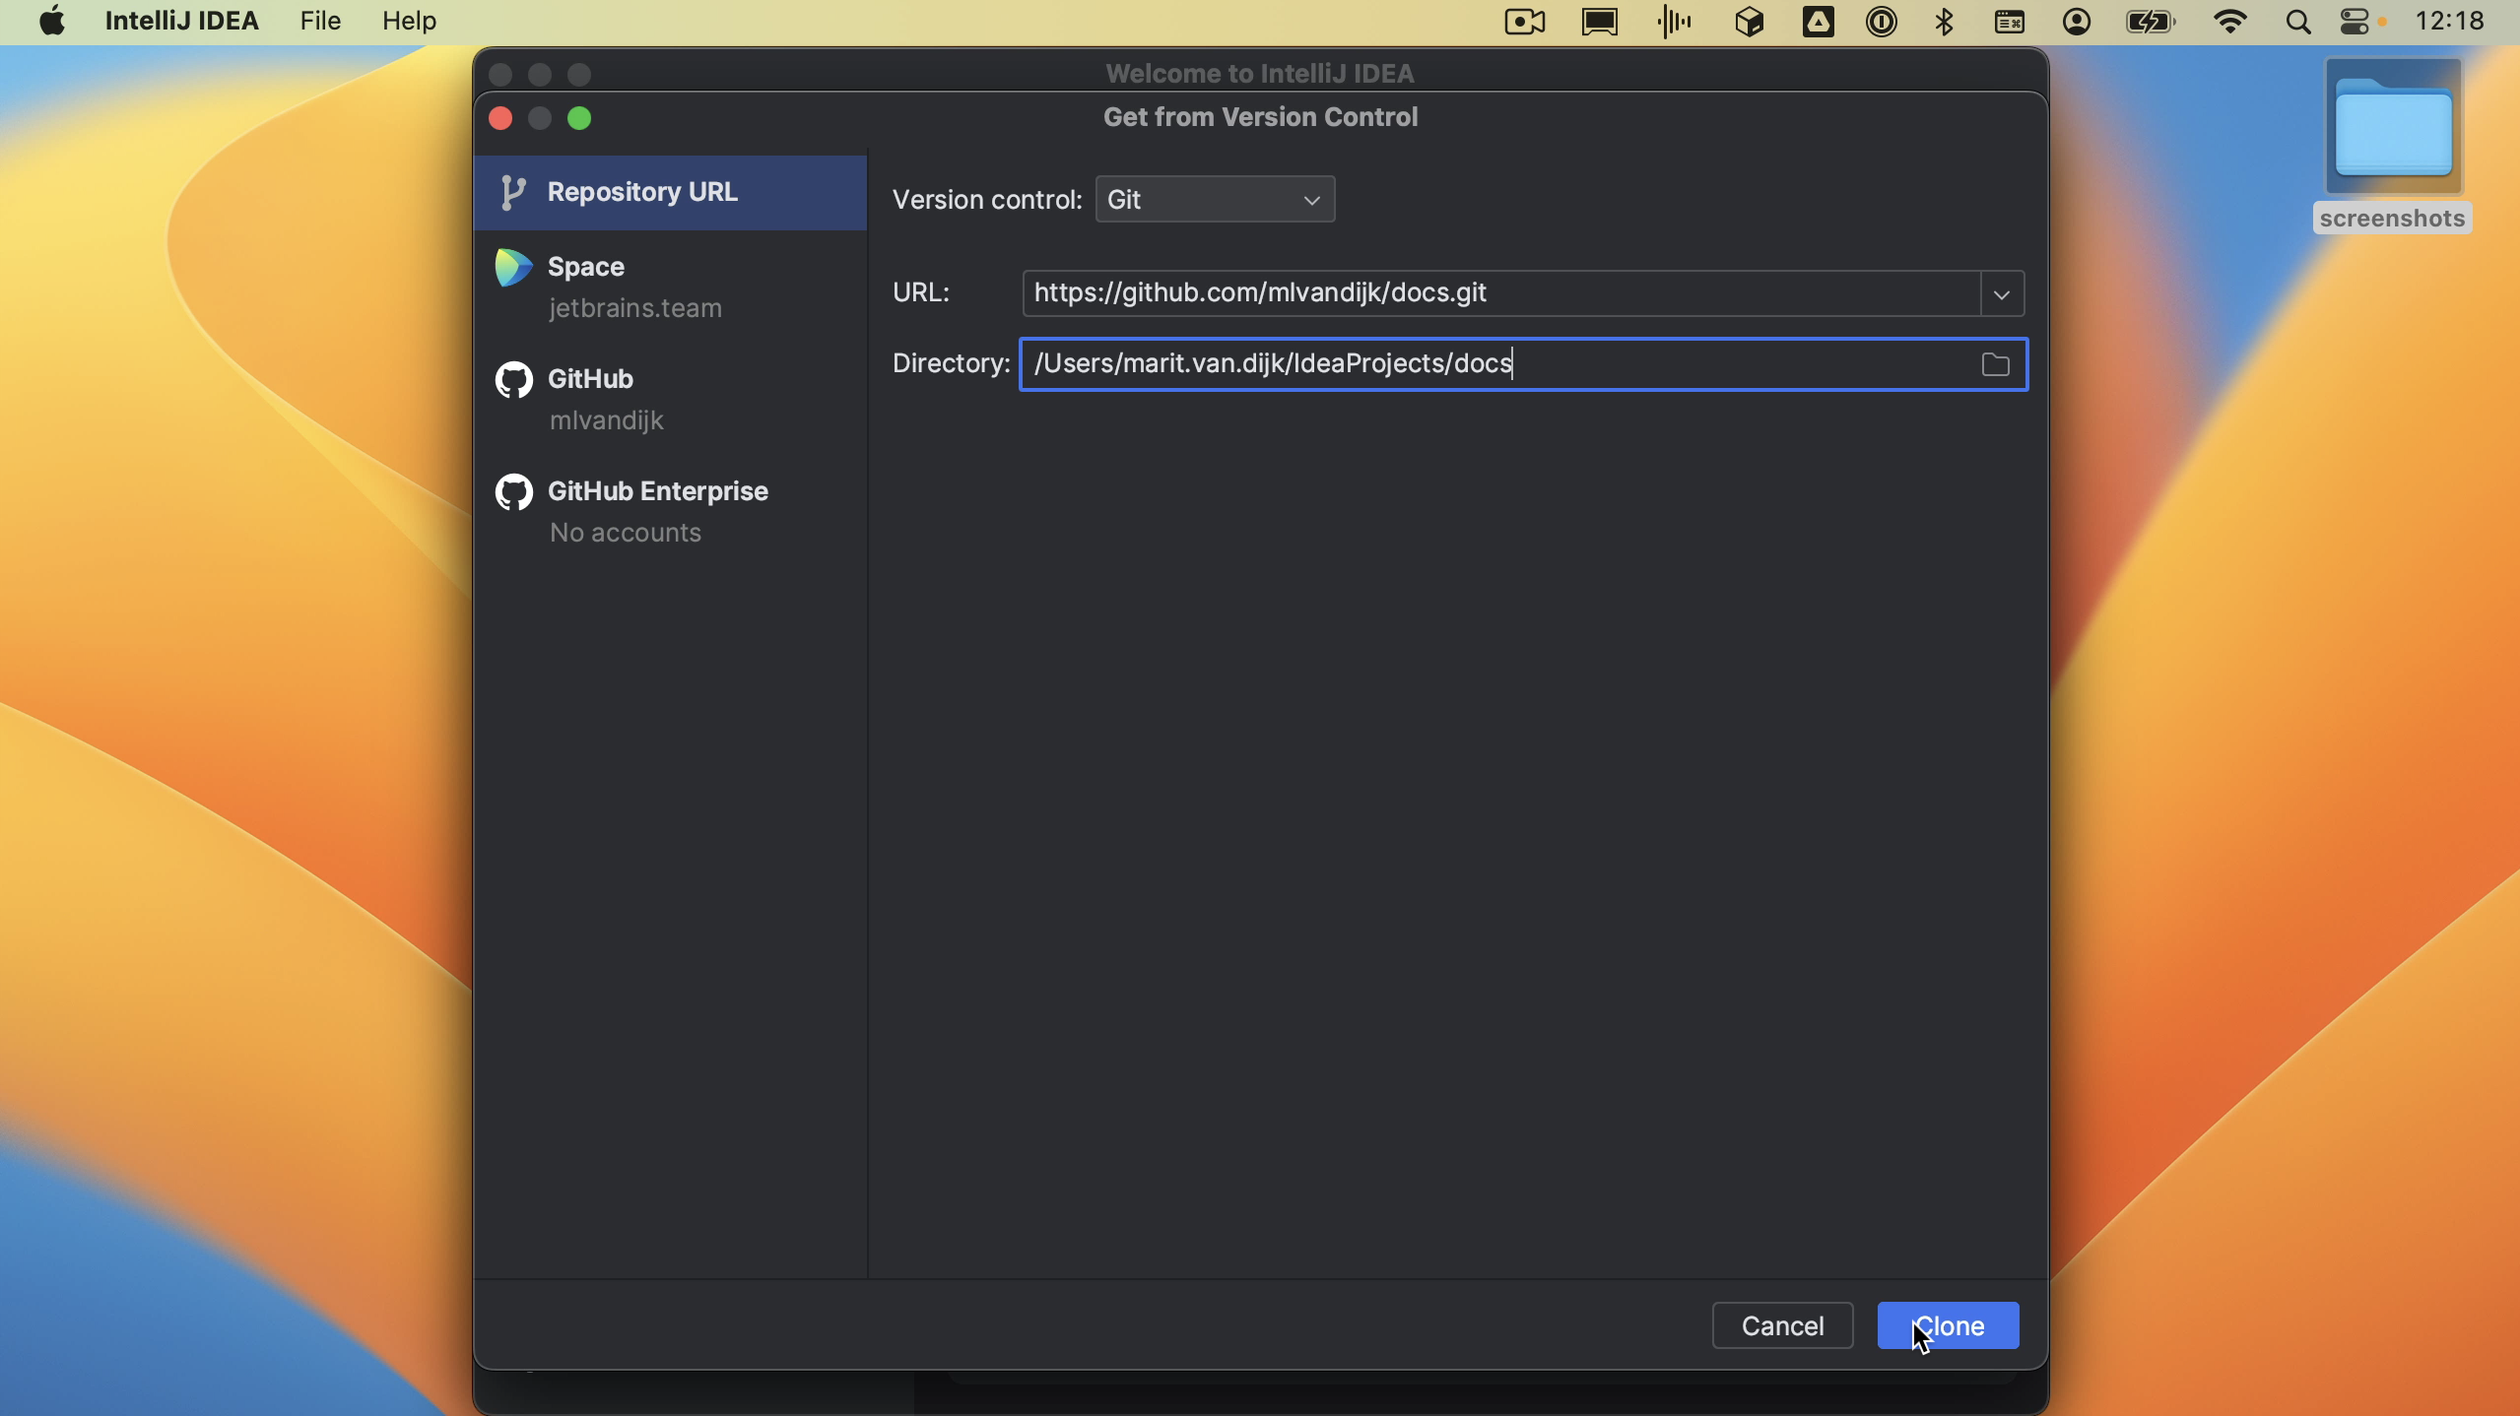
When we click the button, the Get from Version Control dialog opens. We can paste the URL we just copied. We can select where we want to store this project on our computer; let’s stick with the default. When we select Clone, IntelliJ IDEA will clone the GitHub repository to the selected directory.
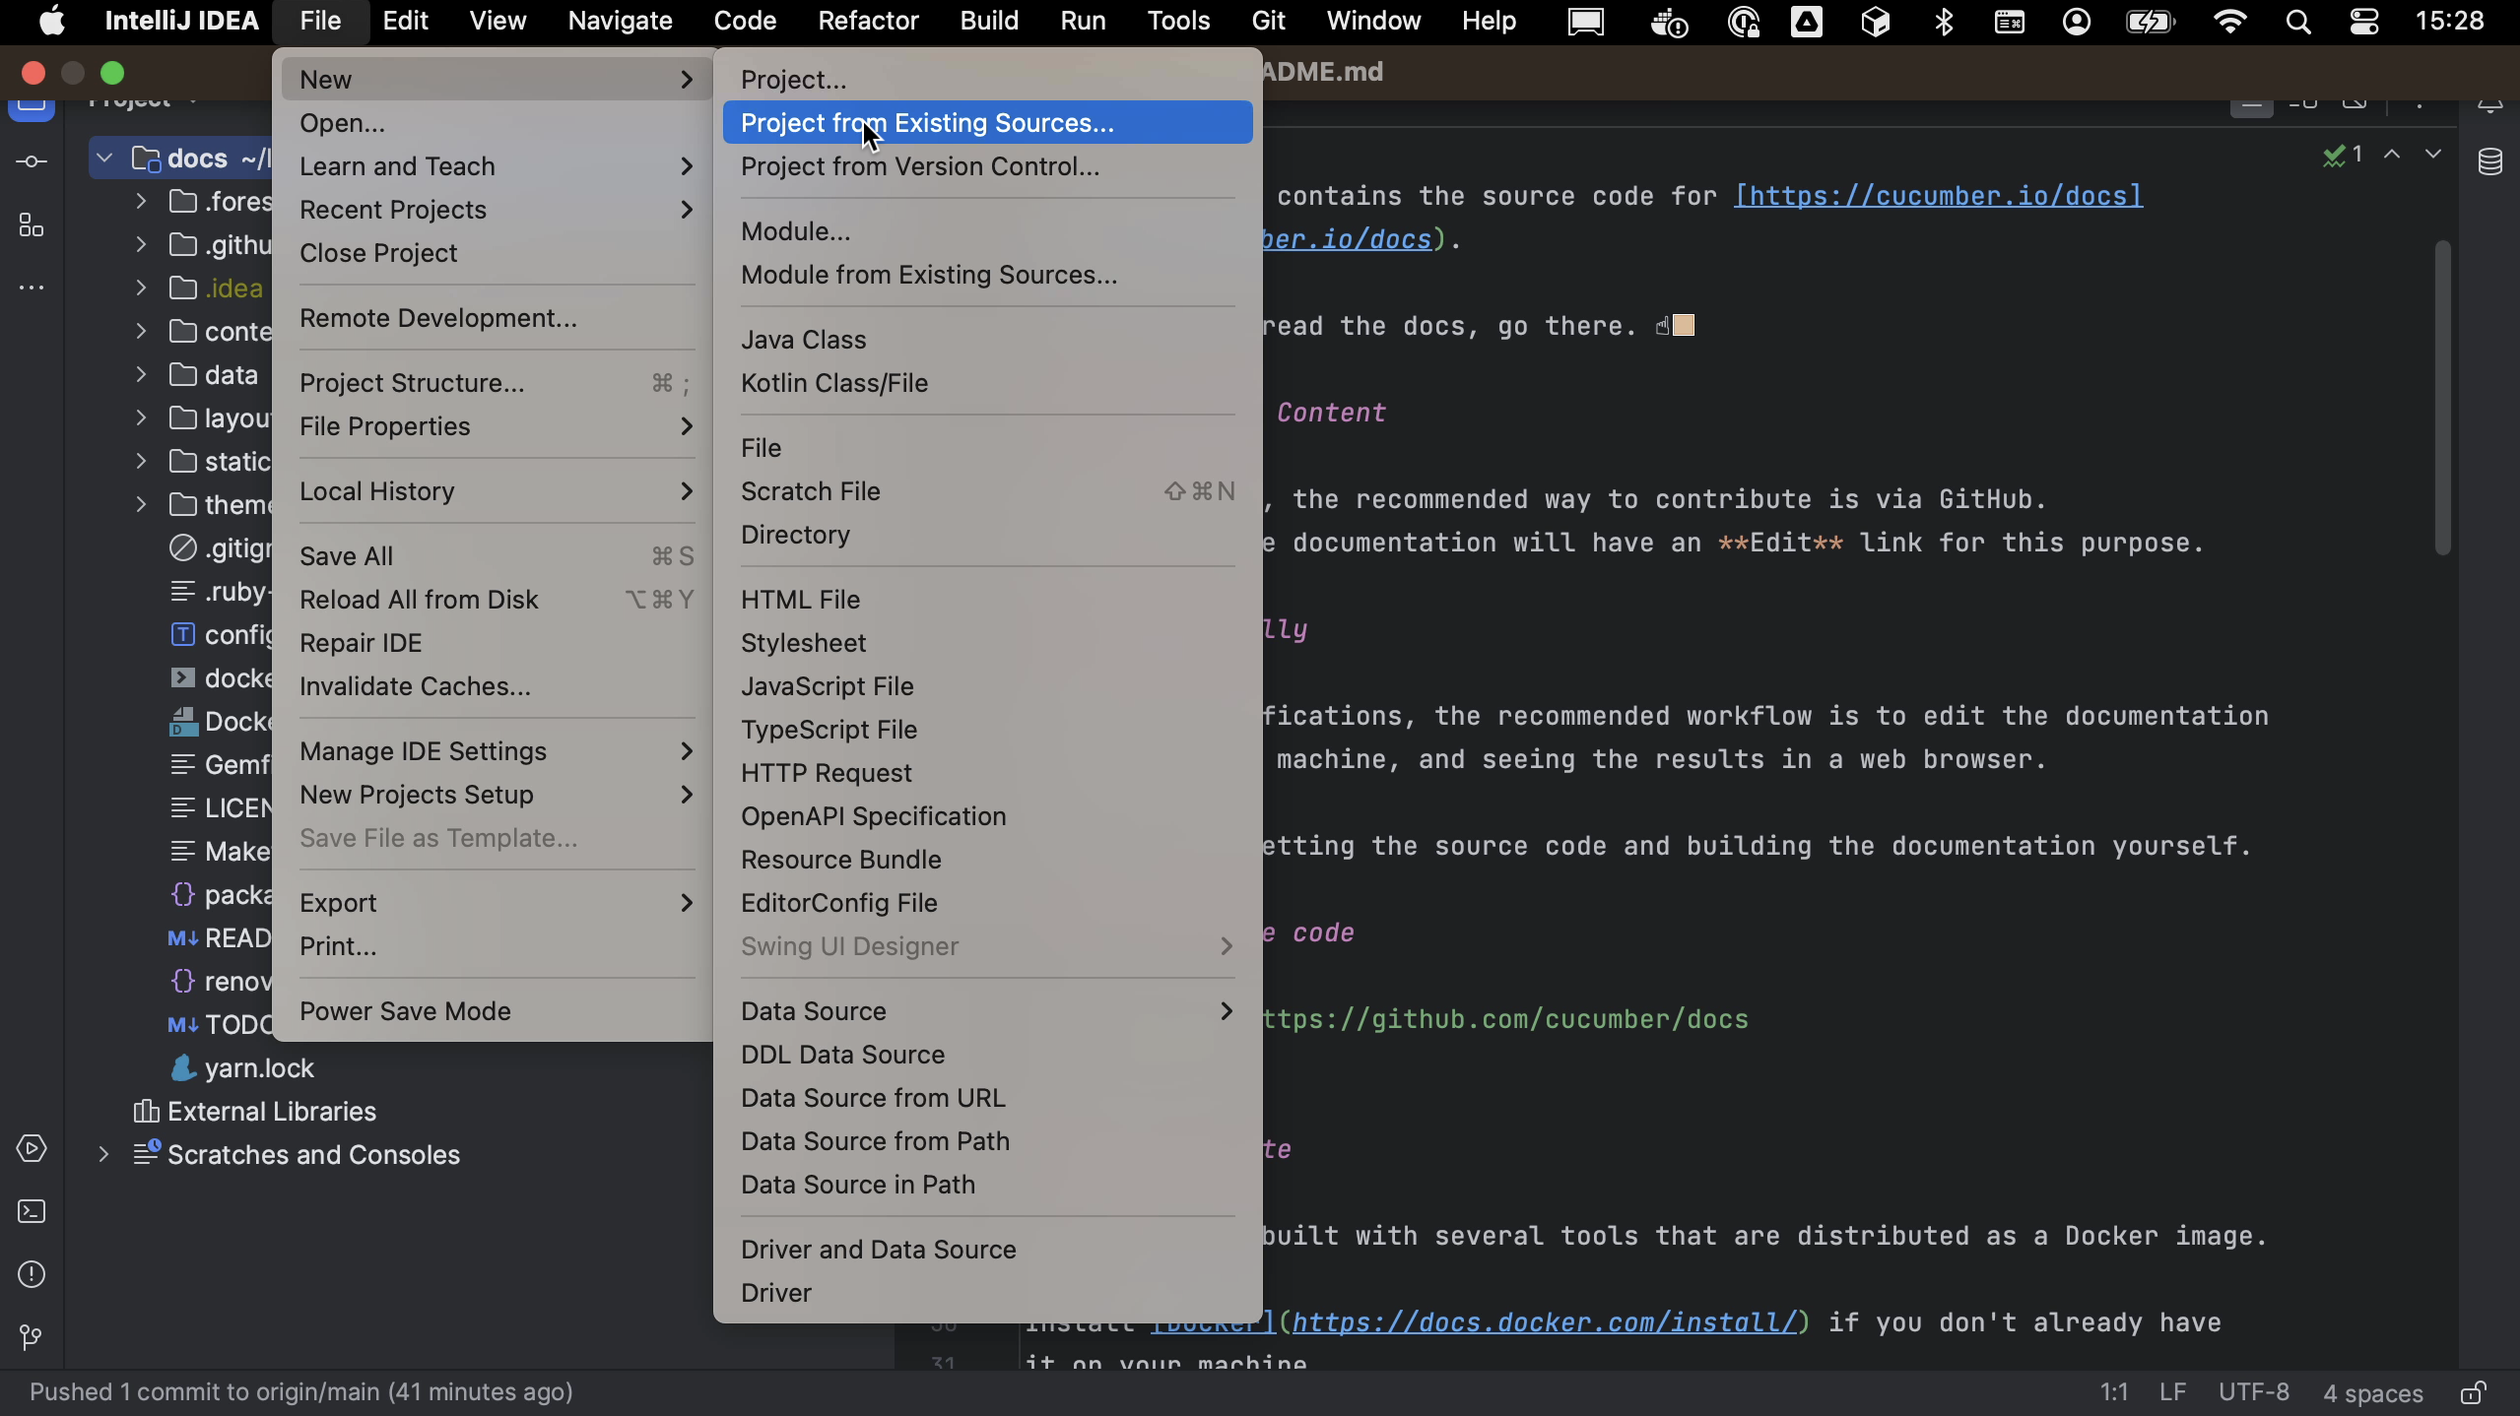
If we already have a project open, we can open the Get from Version Control dialog by going to File > New > Project from version control.
IntelliJ IDEA will open the project on our machine.
Making and committing our changes
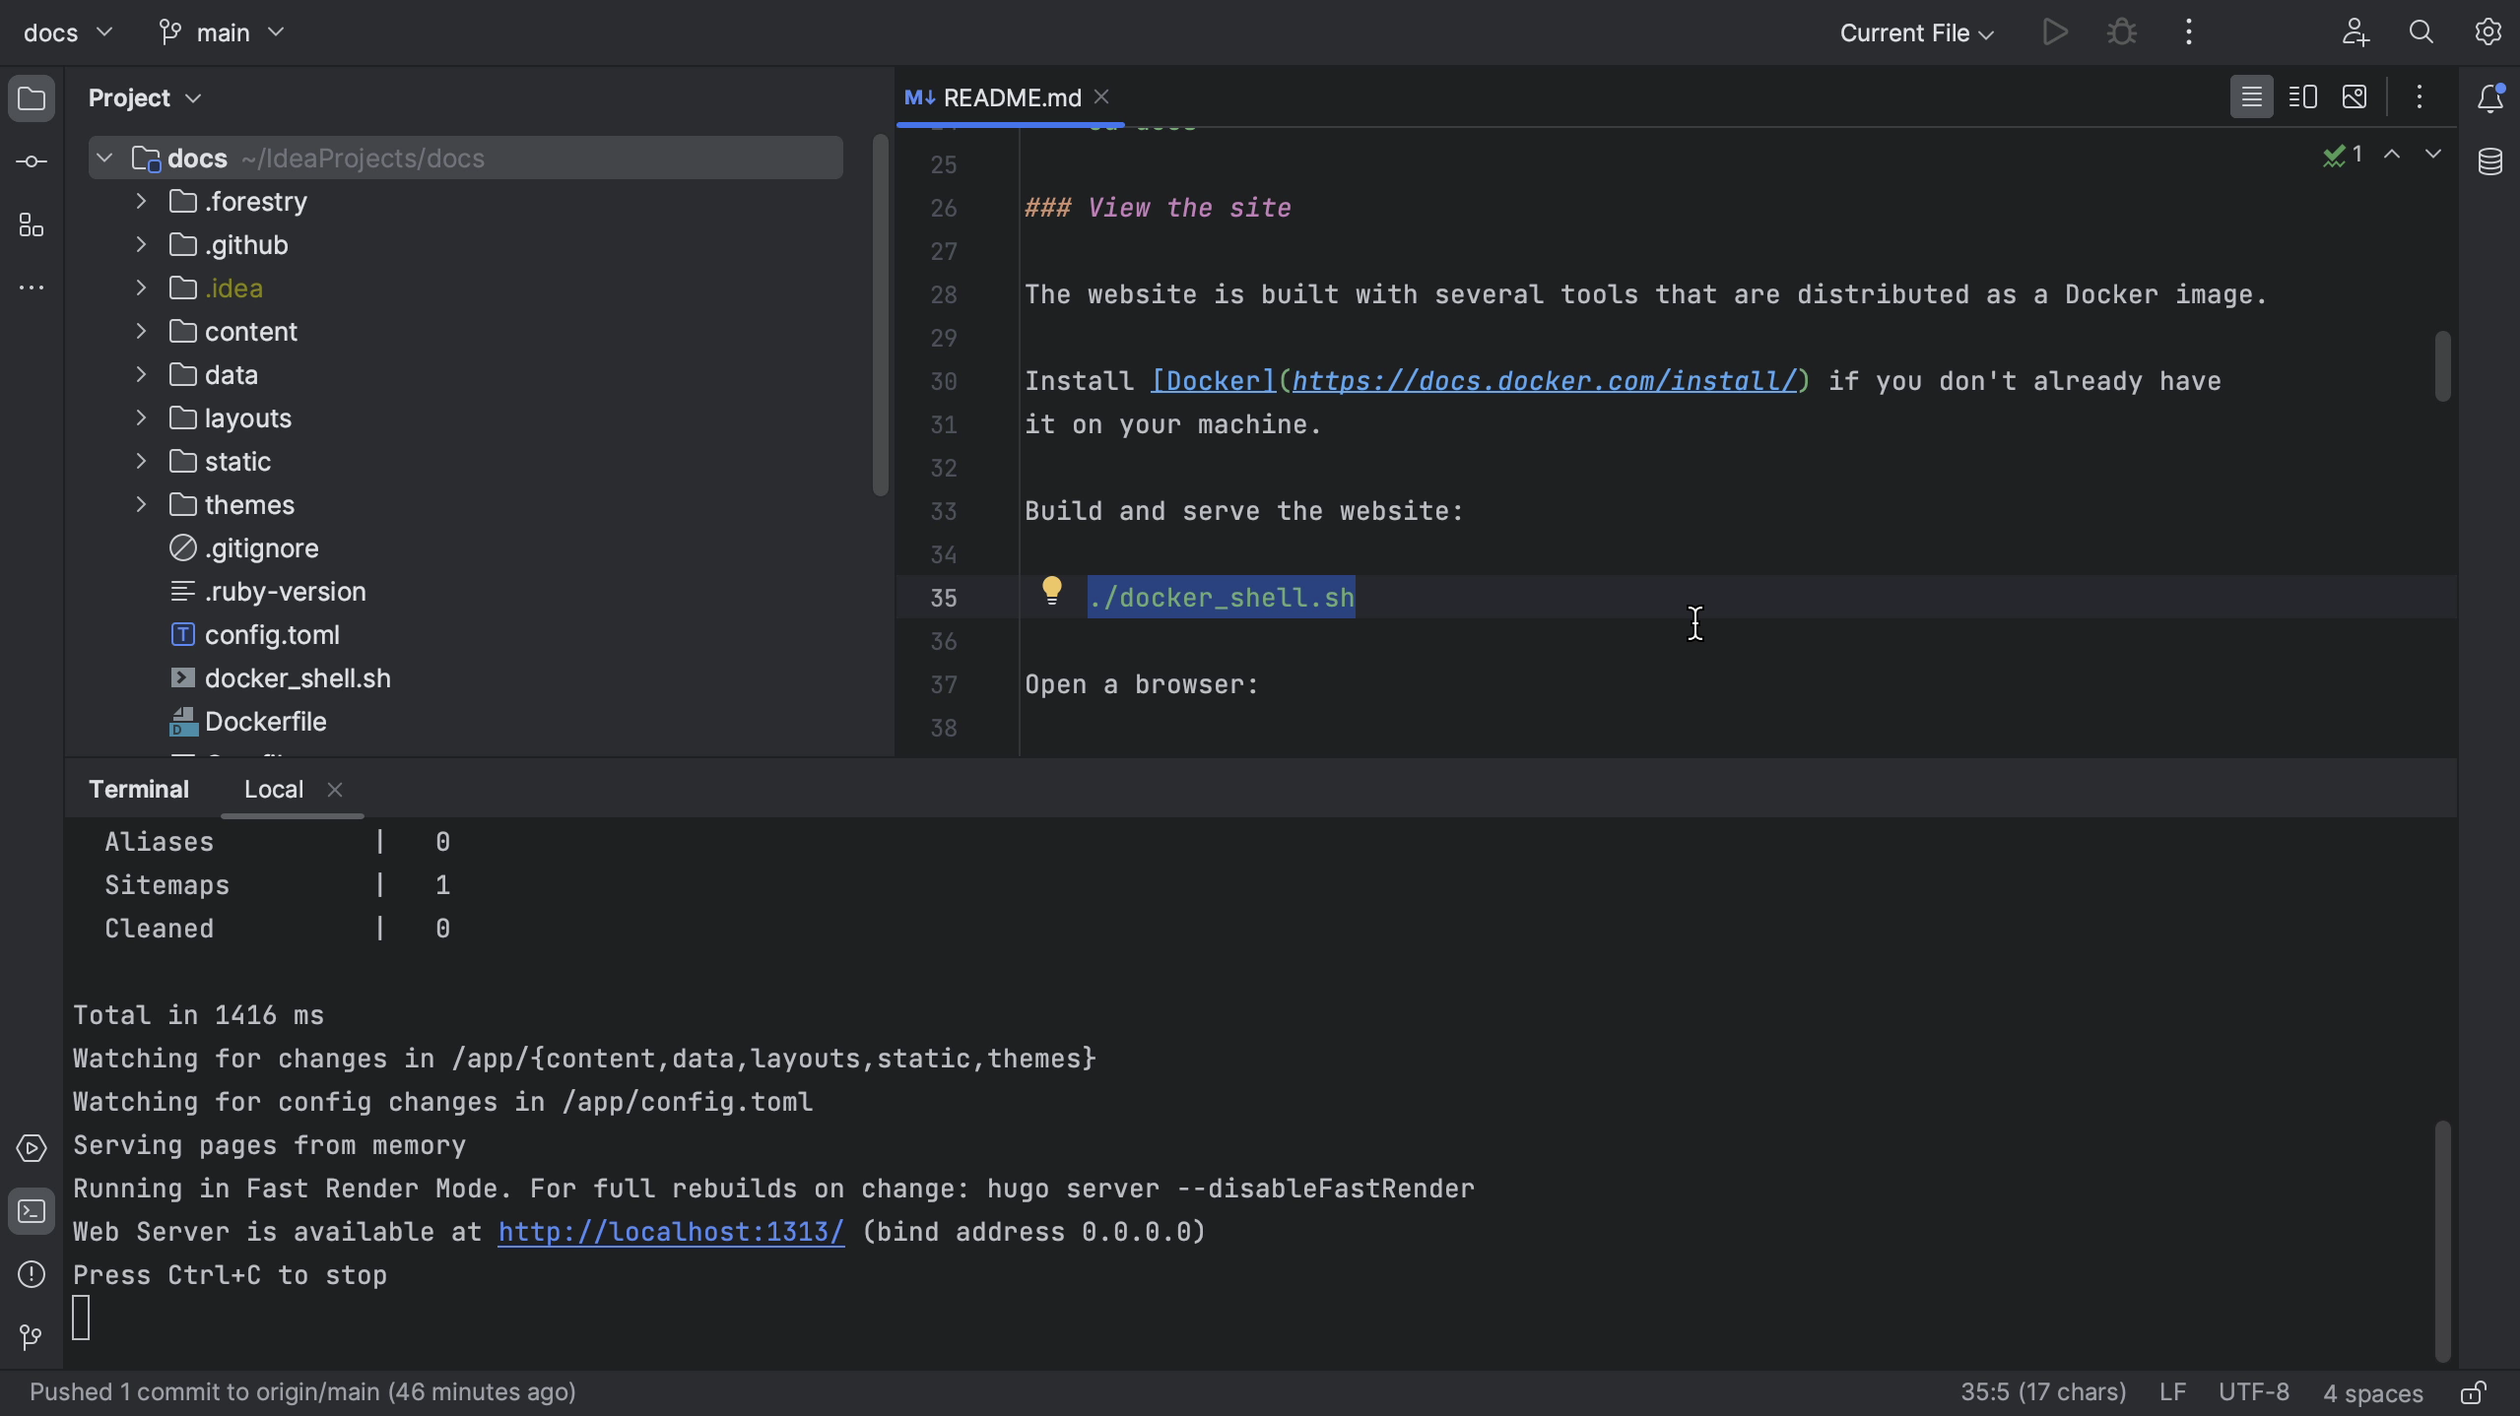
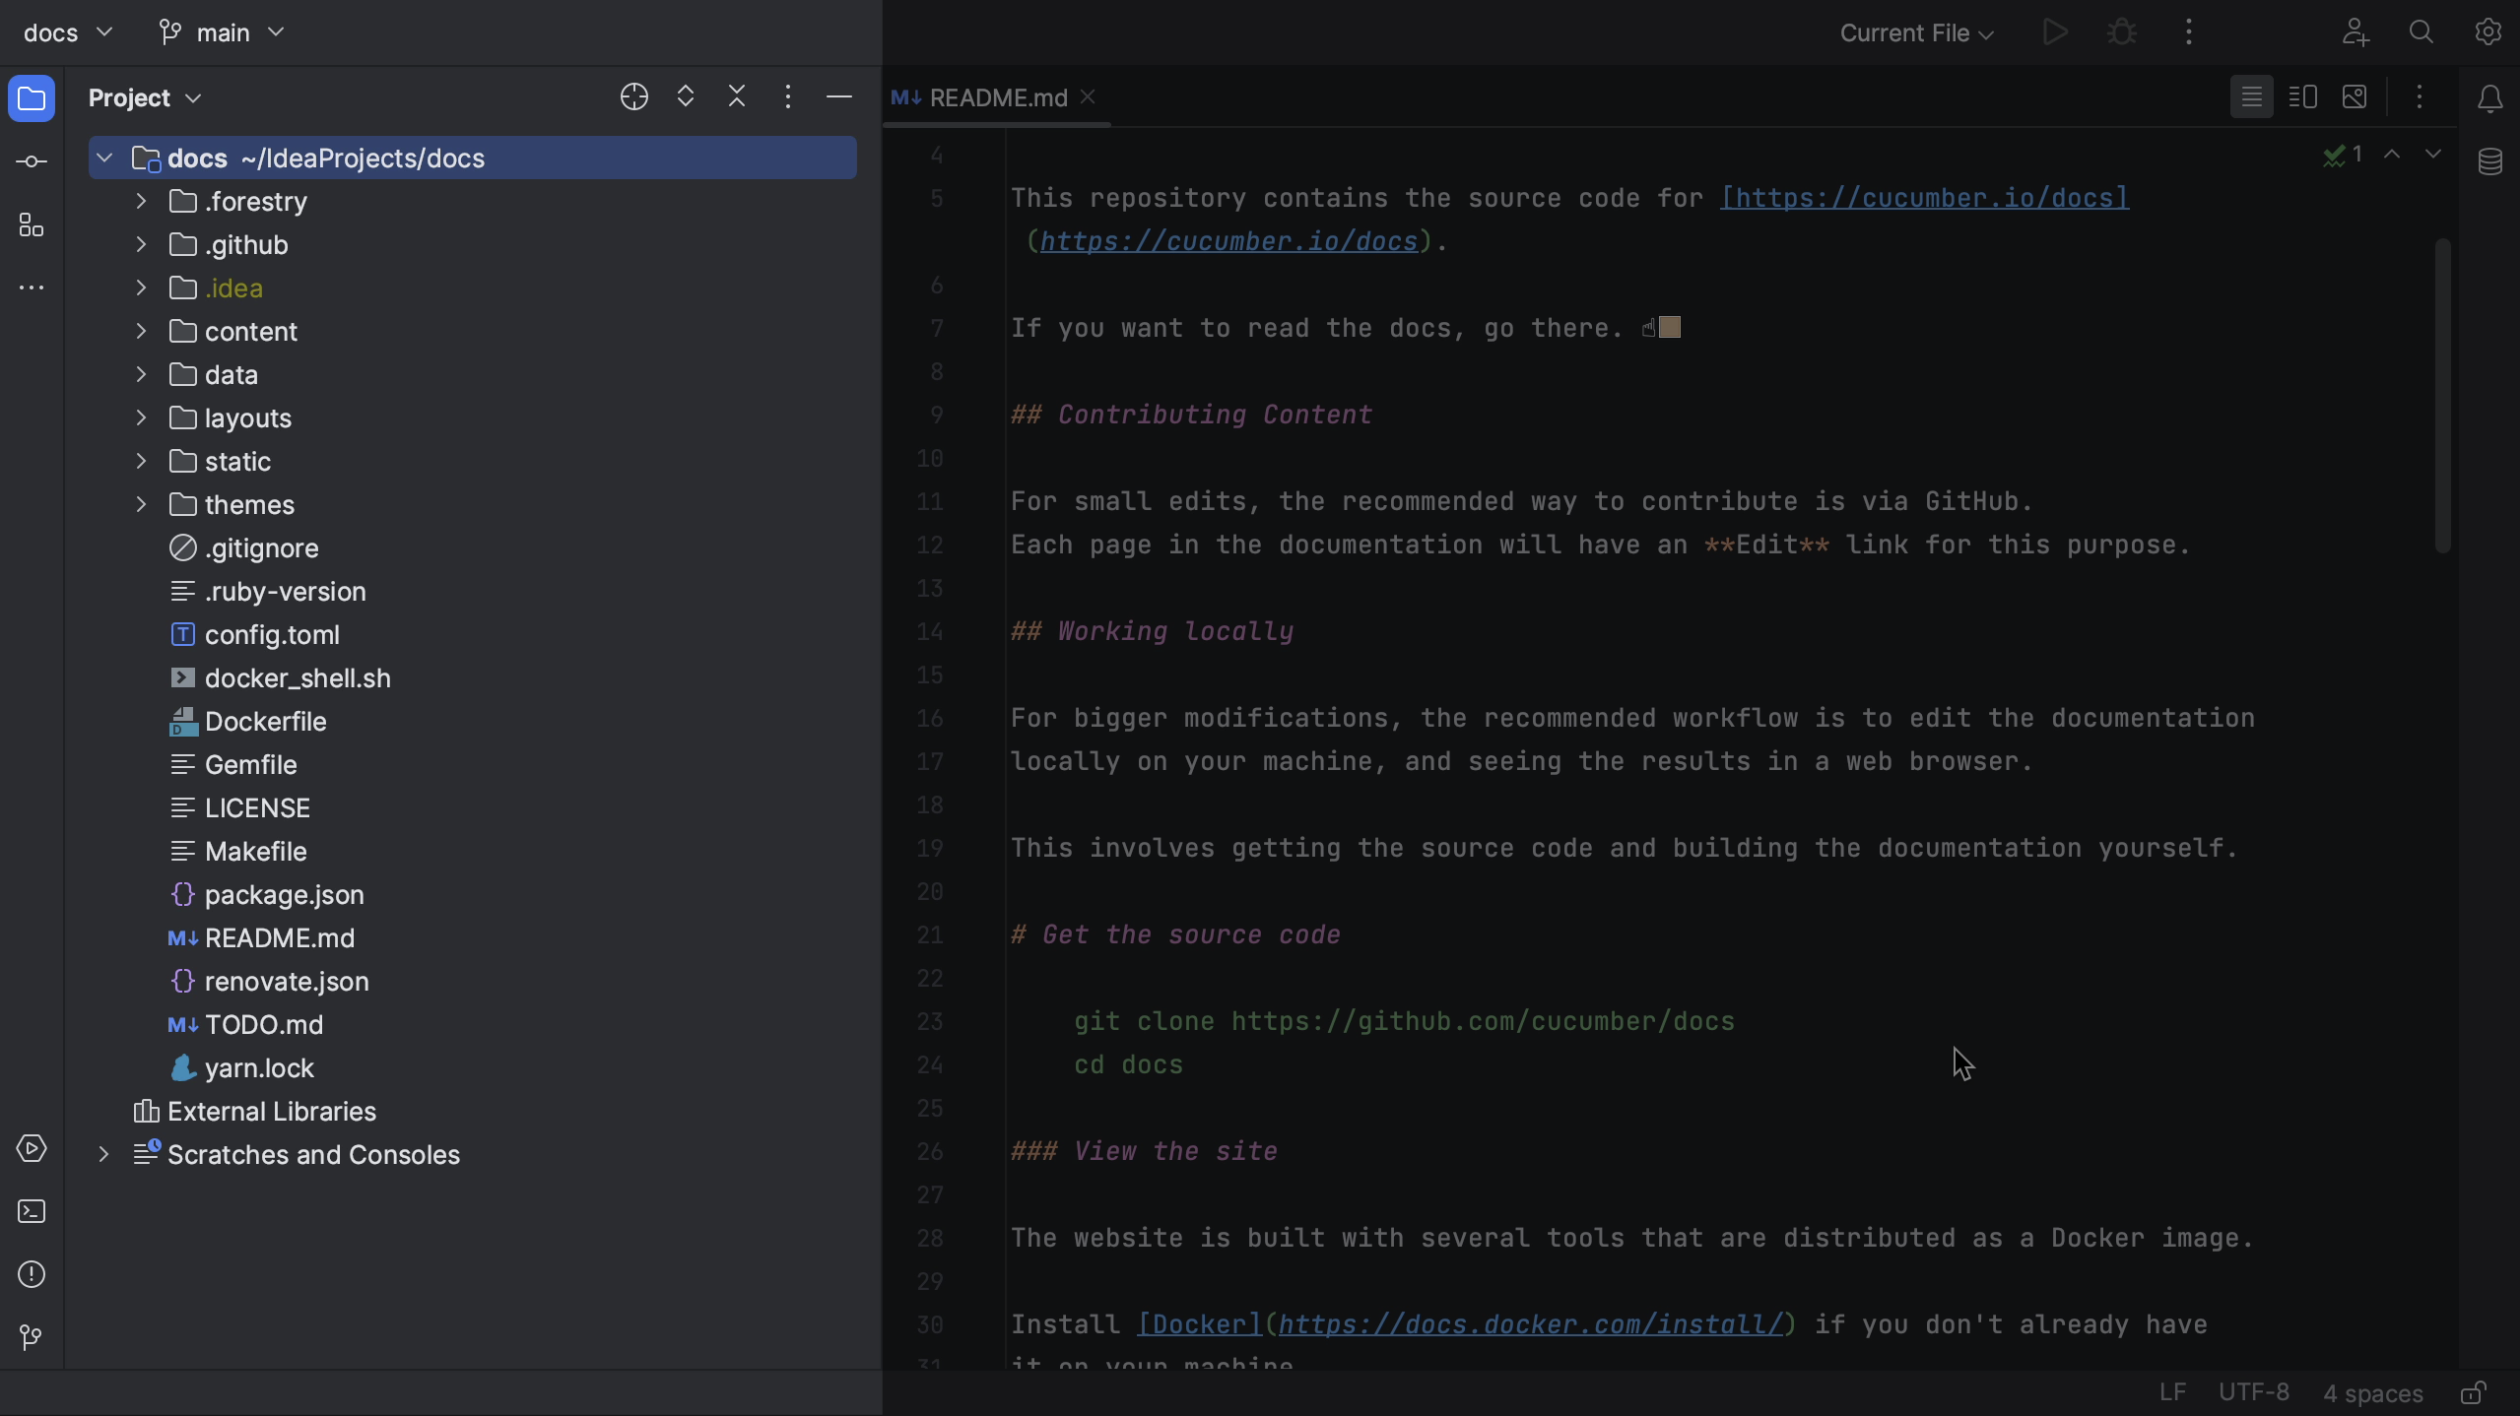
Before making any changes, we’ll want to make sure that we can build the project. Hopefully, how to build the project will be described in the README, as it is for this example. Let’s open the terminal and build the project as described. In this example, we need Docker, which is already installed and running.
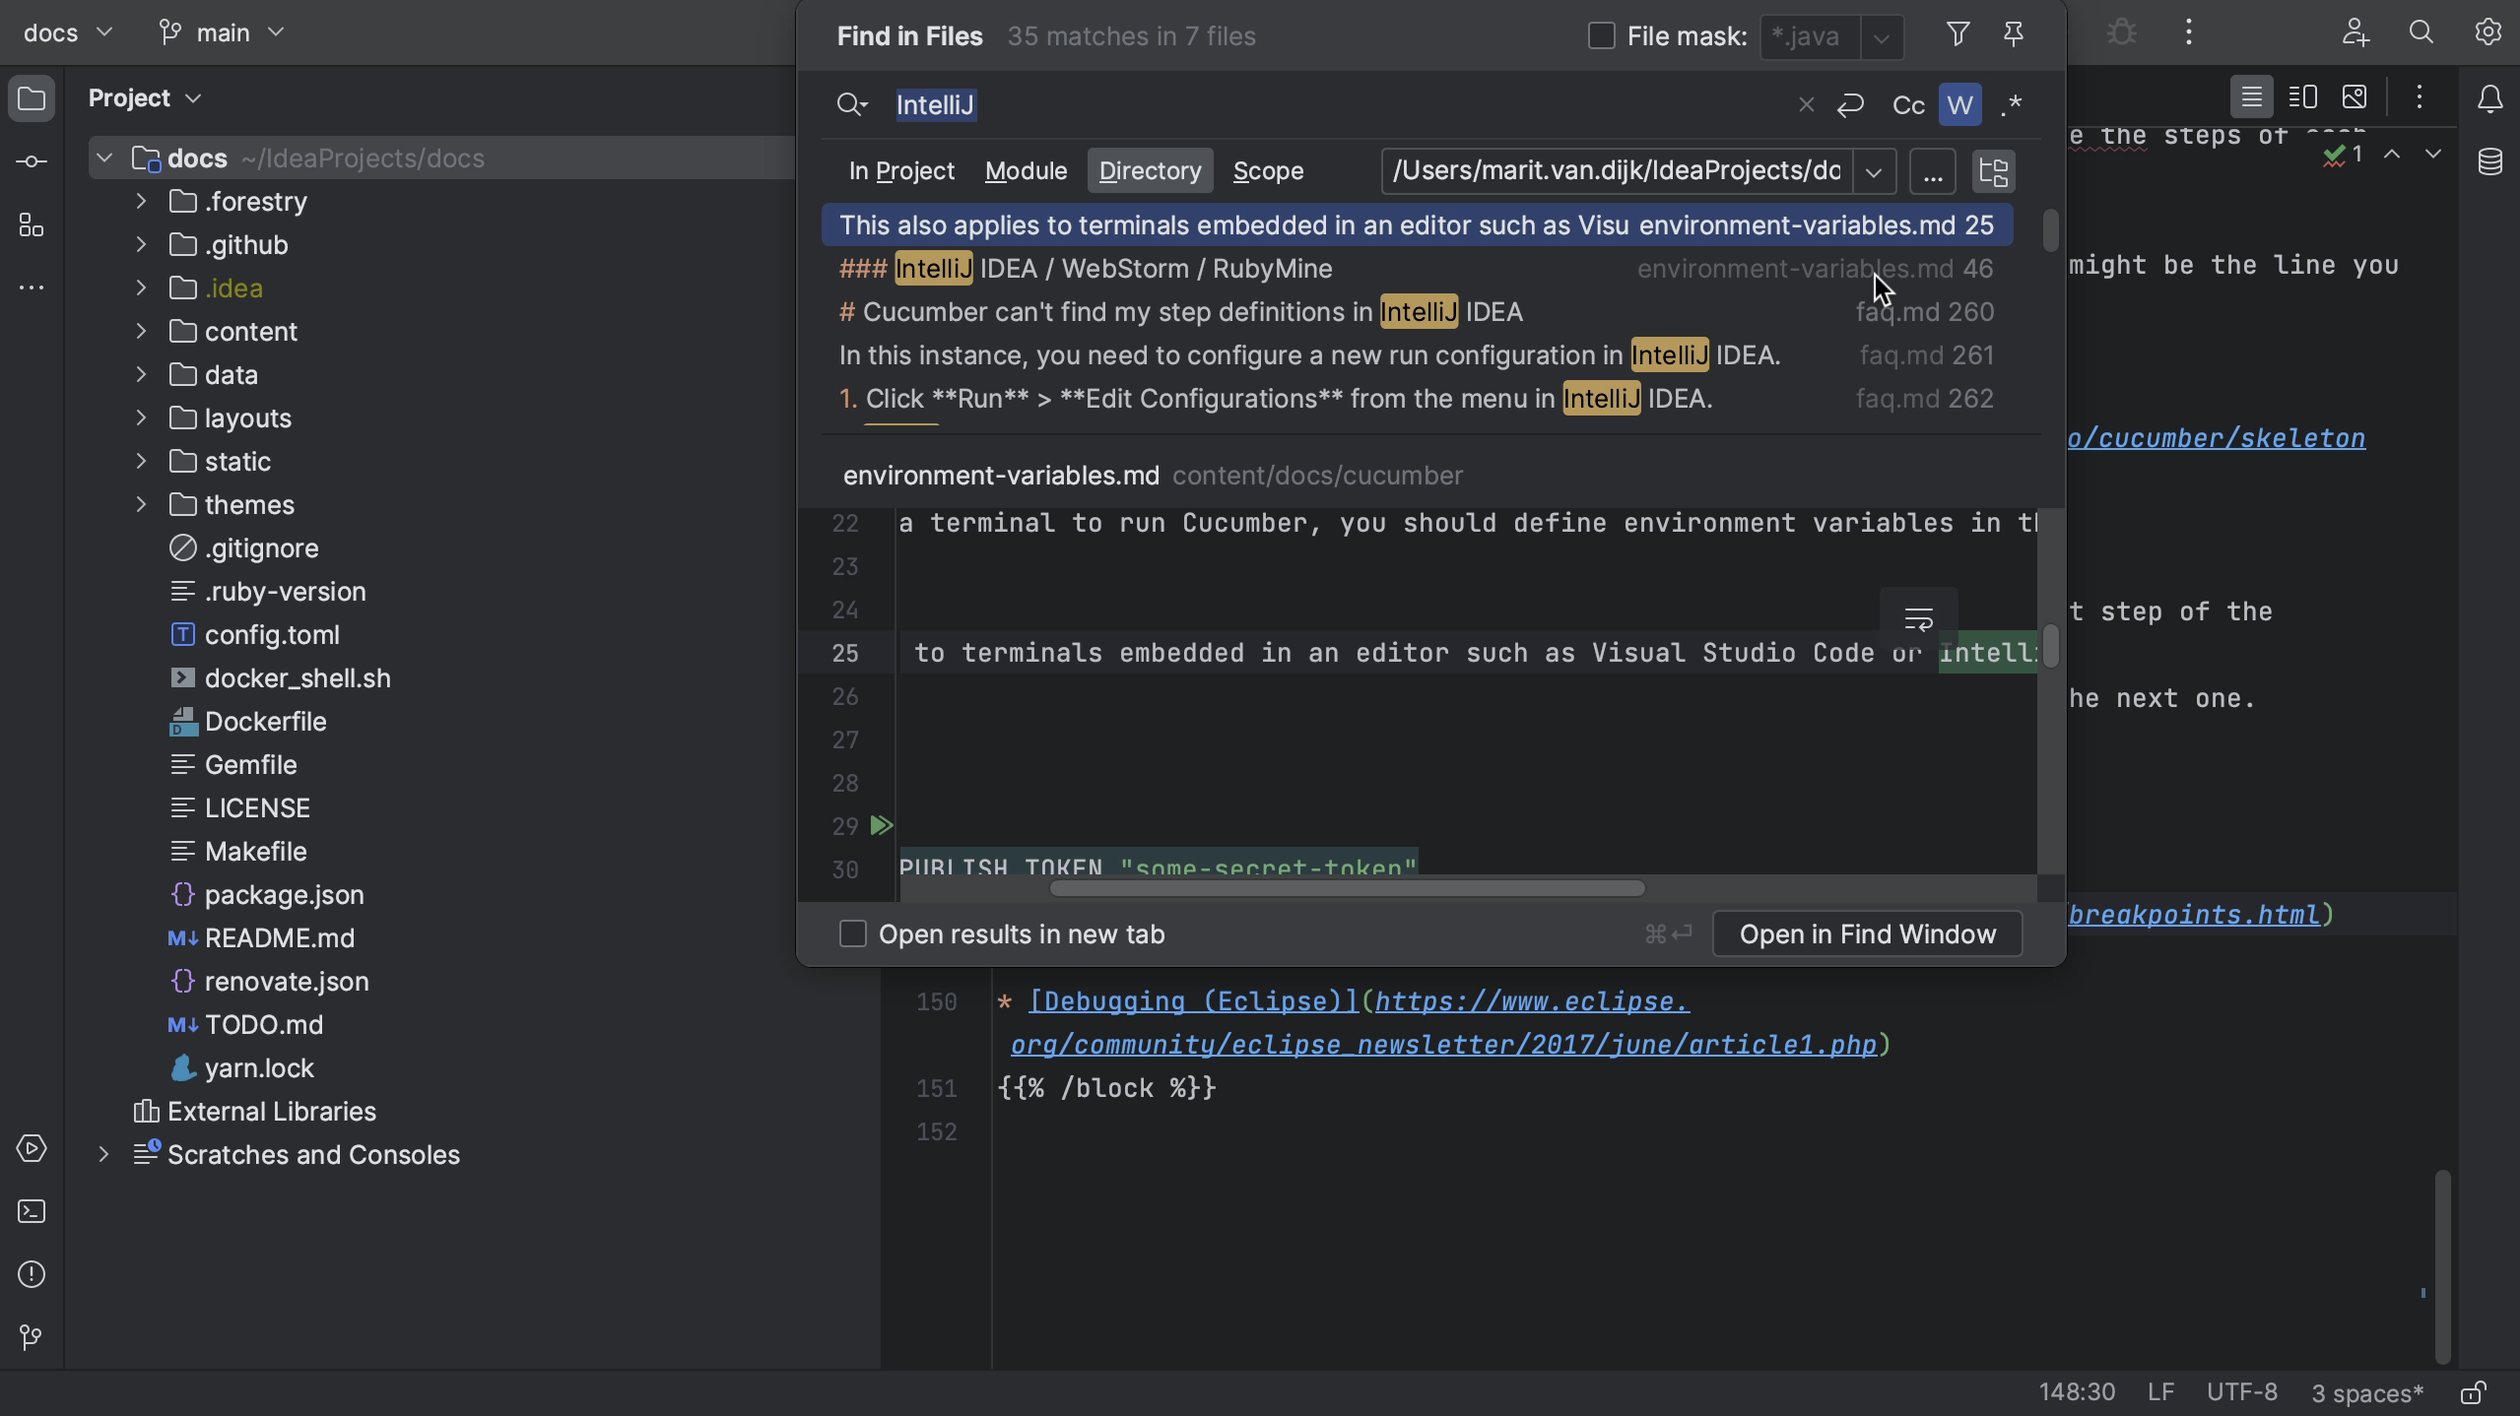
Now that we know we can build the project, we can start making changes. First, we need to look for the right place to make the change. We might navigate the project in the Project tool window (⌘1 on macOS, or Alt+1 on Windows/Linux), or look for a specific file or code snippet using Find in Files (⌘⇧F on macOS, or Ctrl+Shift+F on Windows/Linux).
We might want to create a specific branch for our changes.
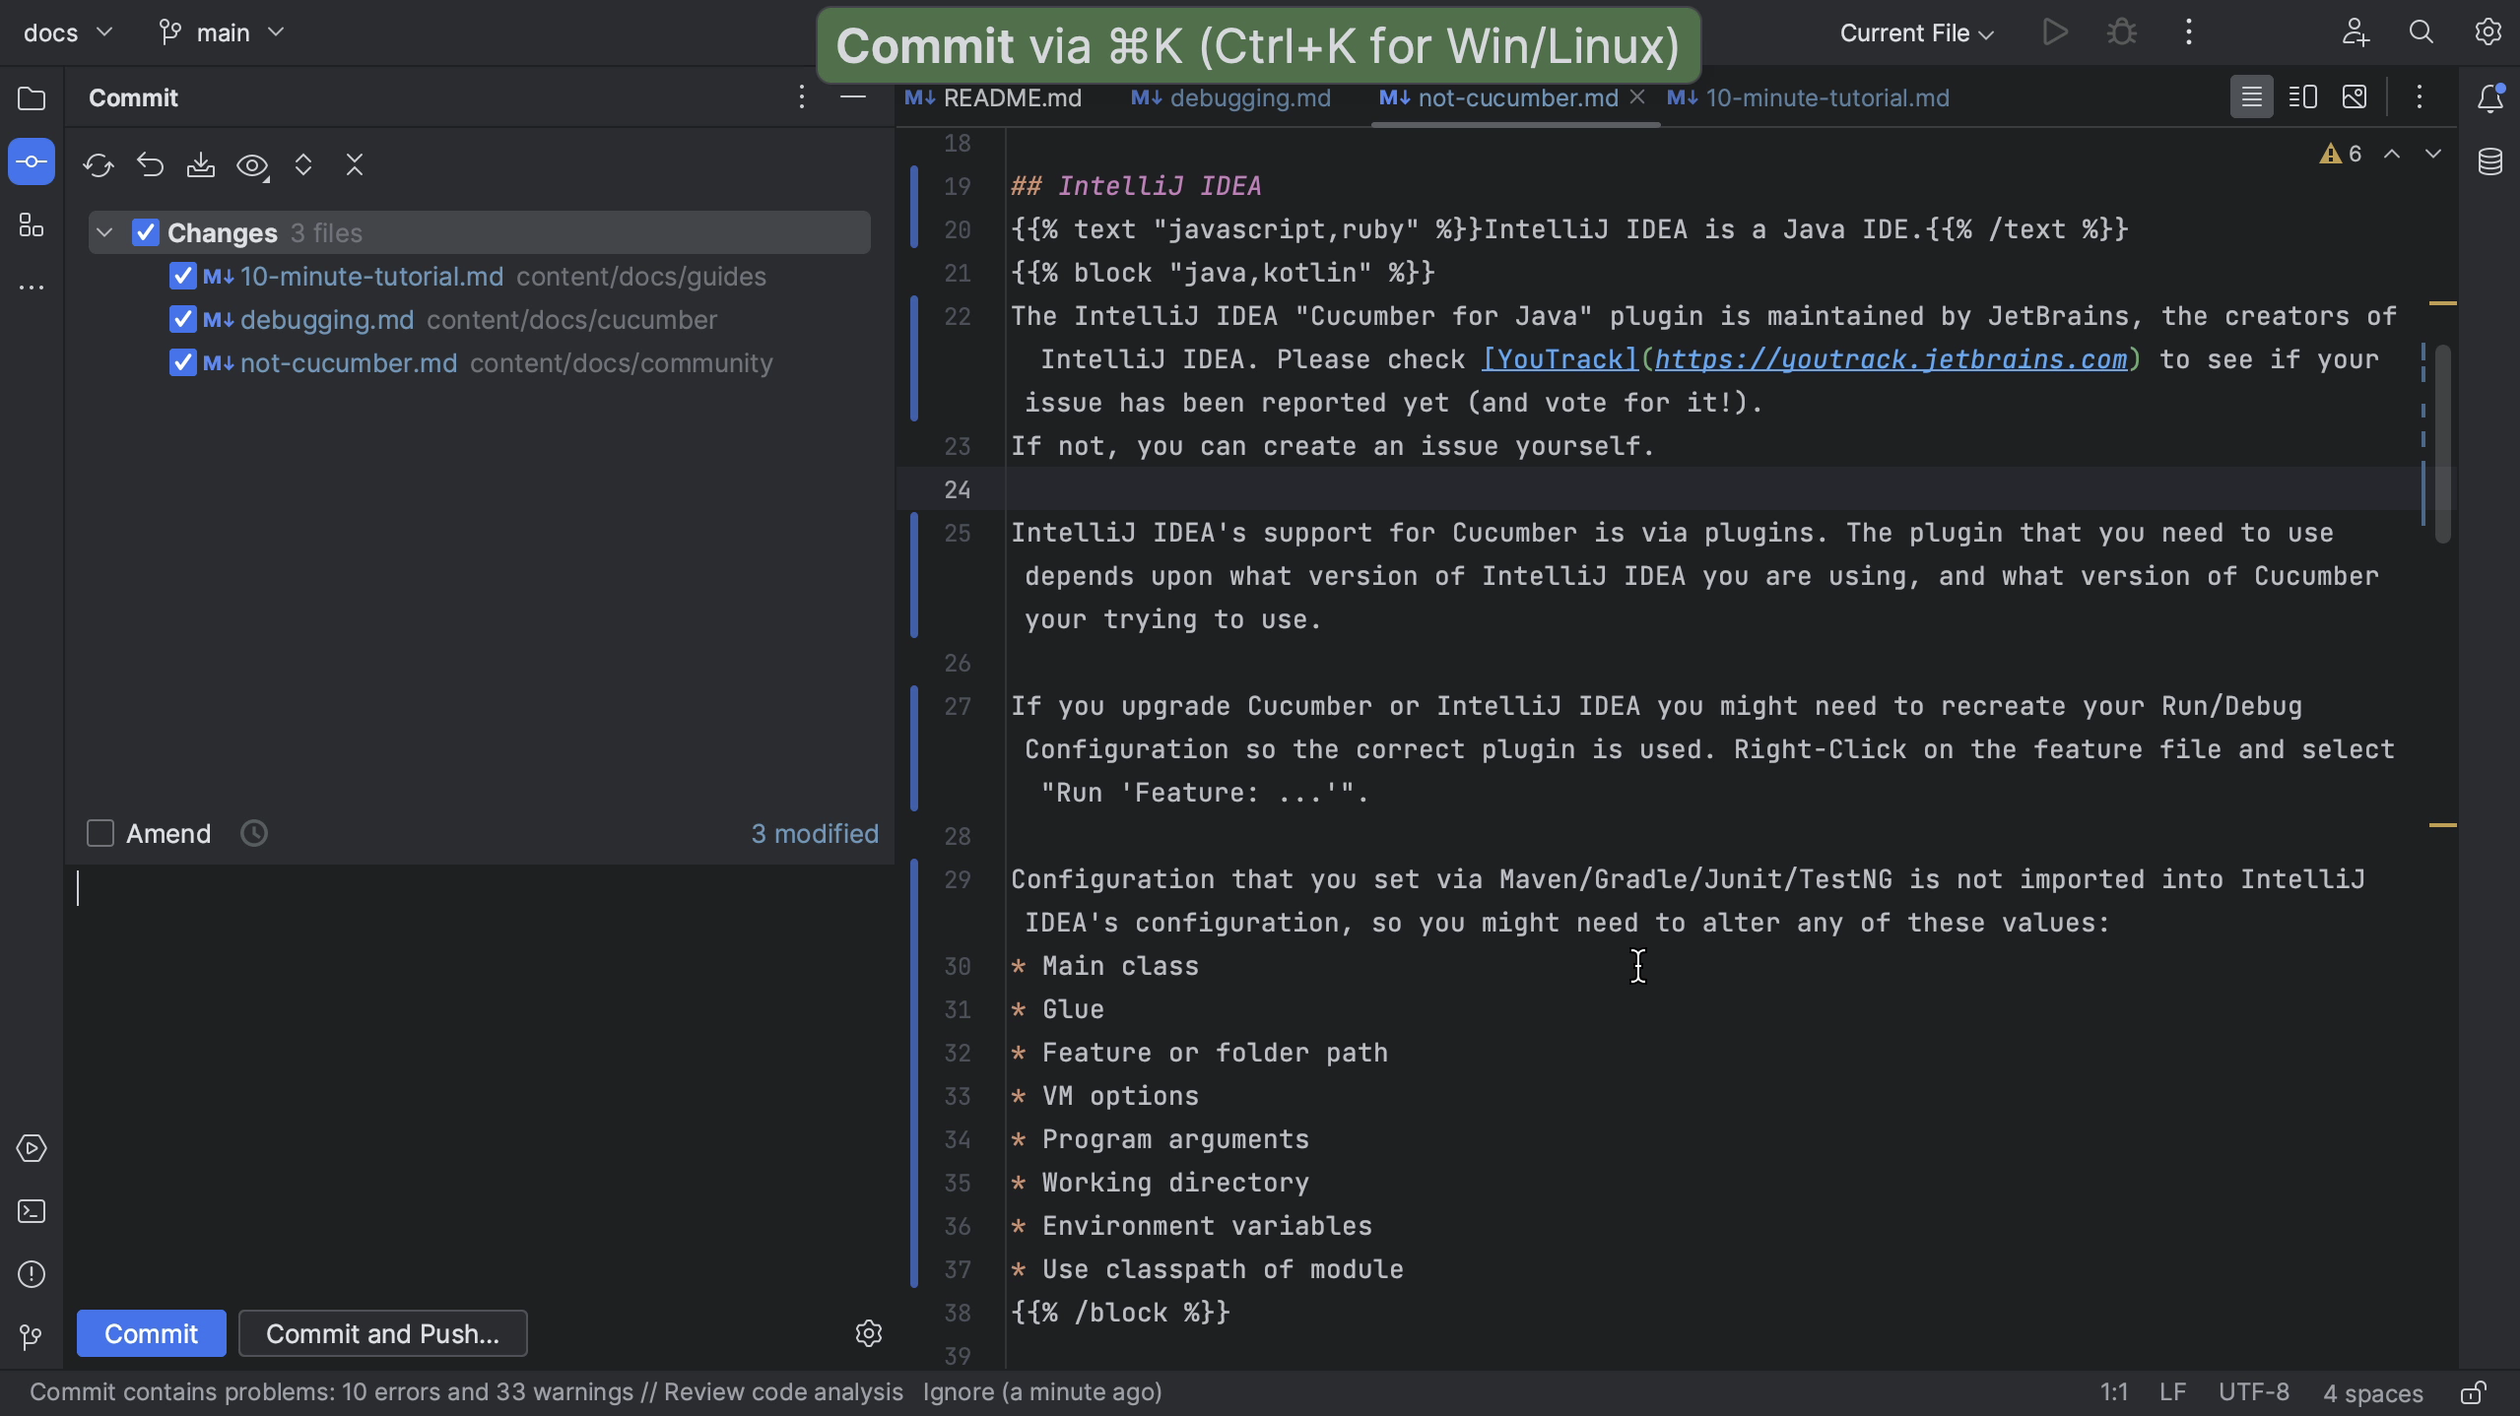
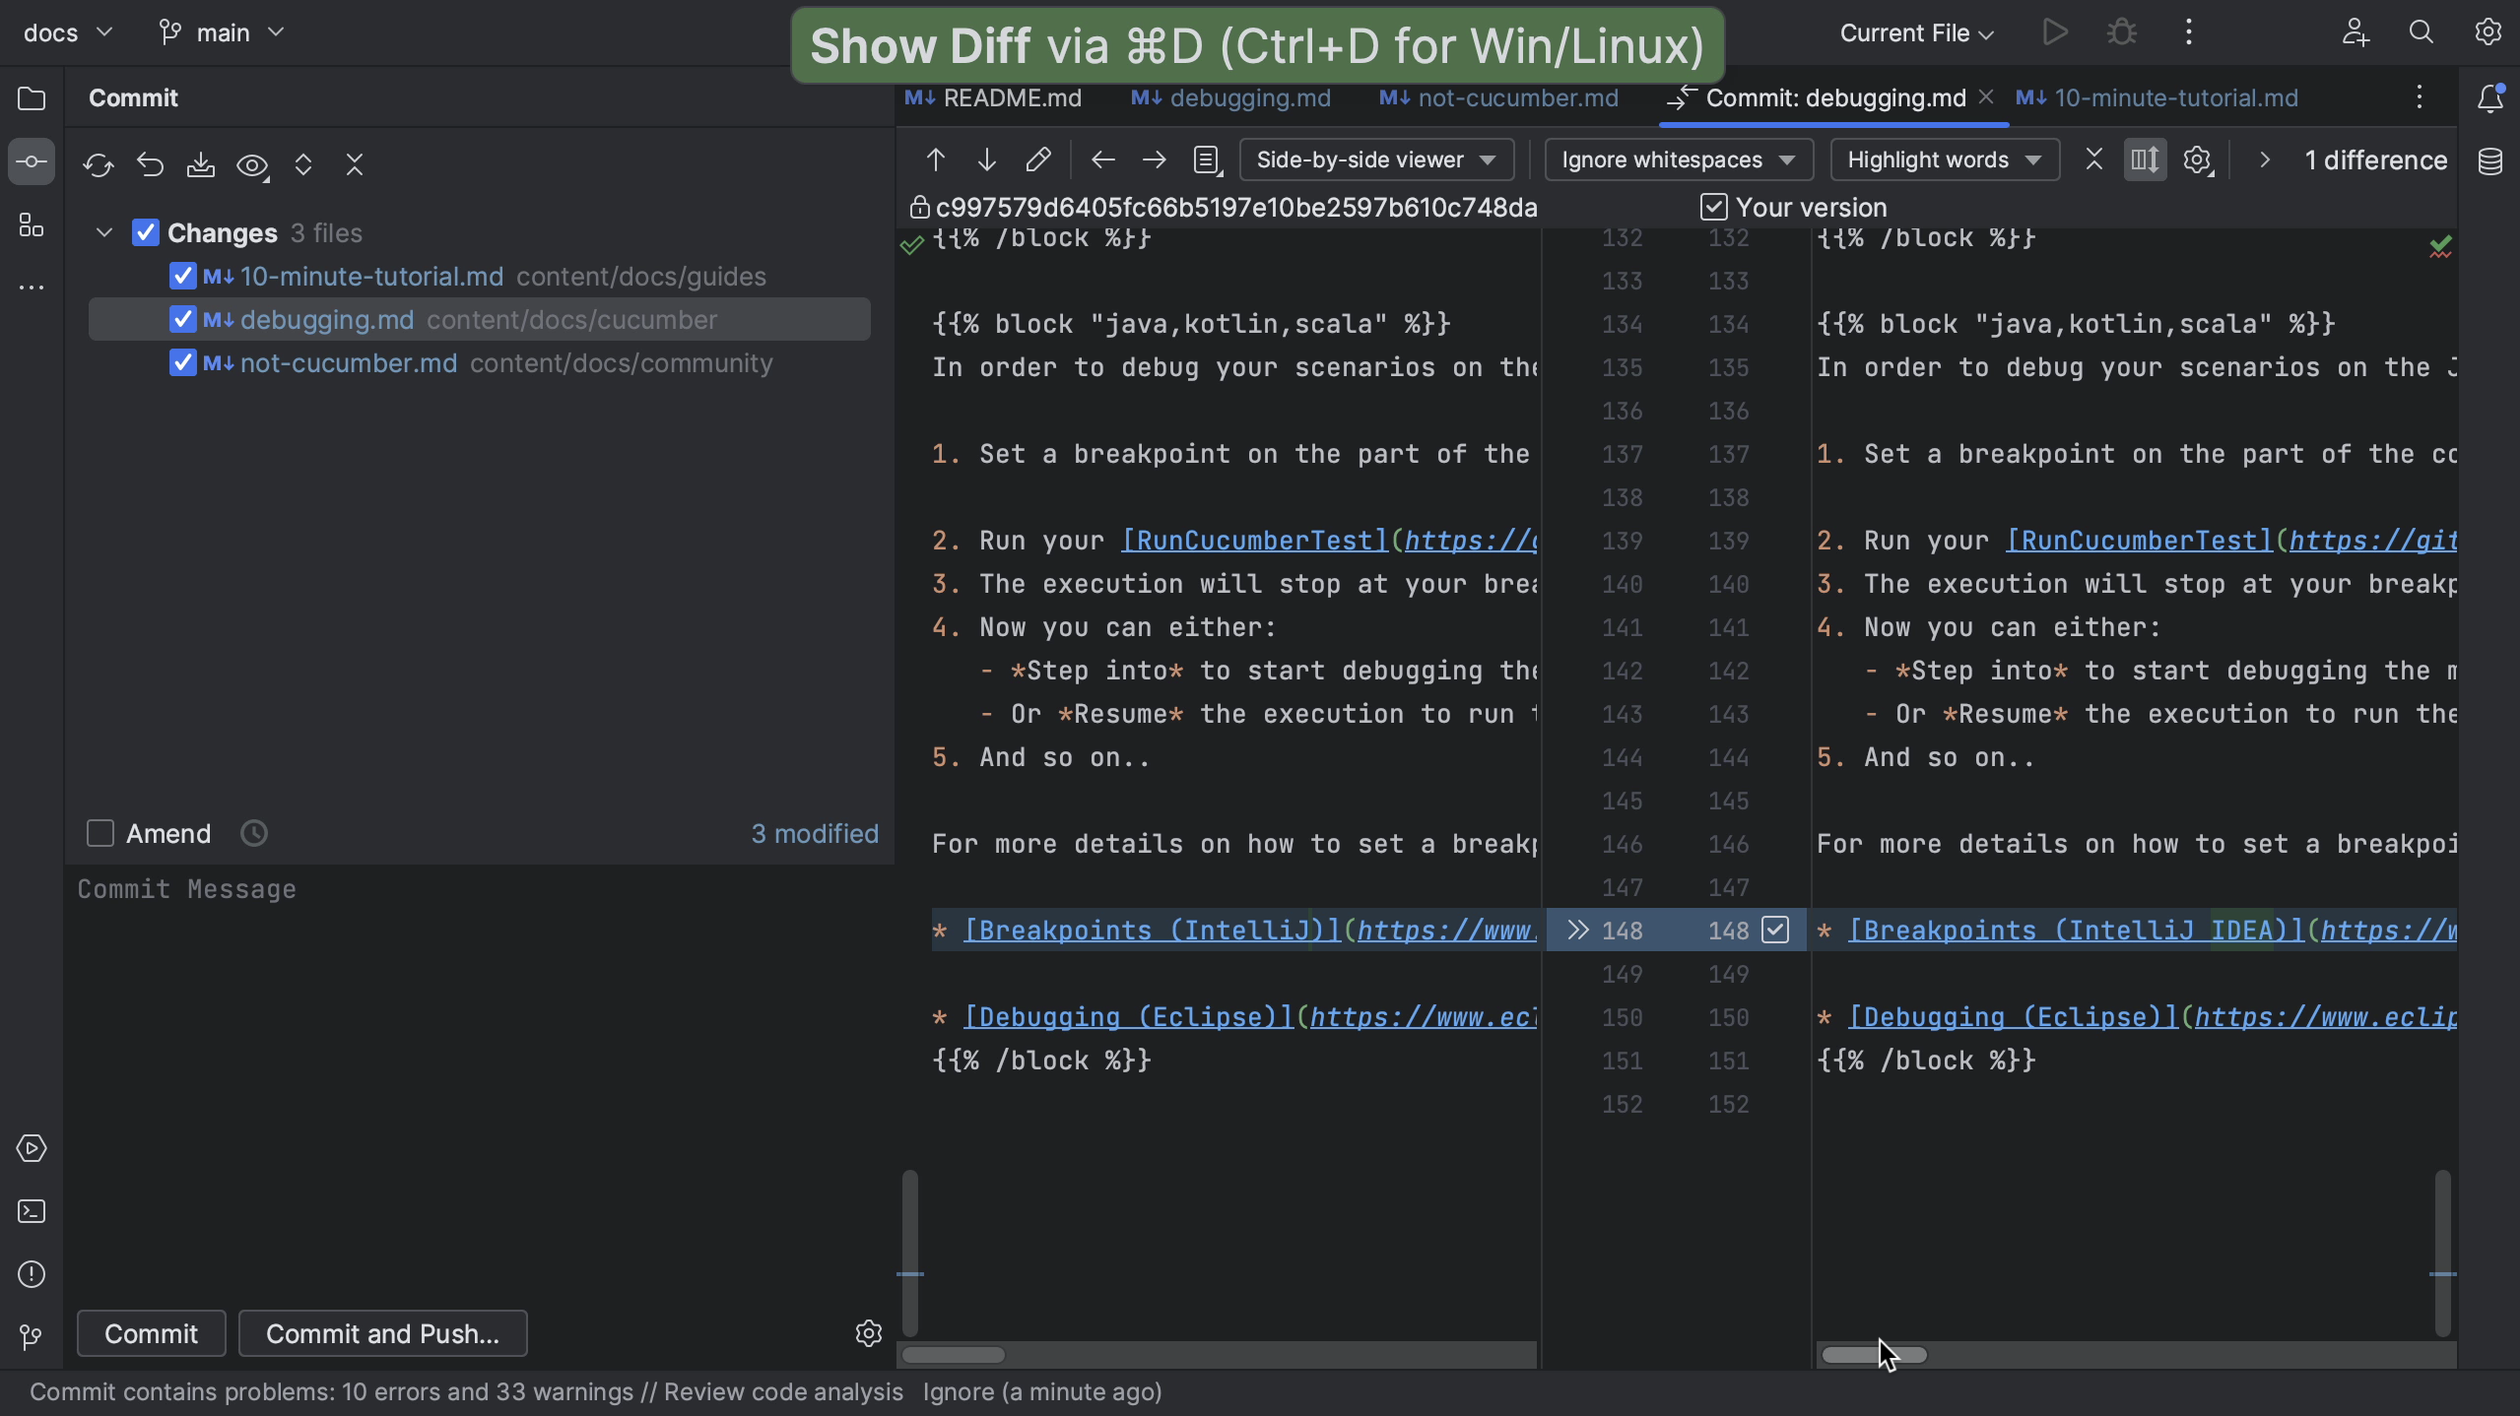
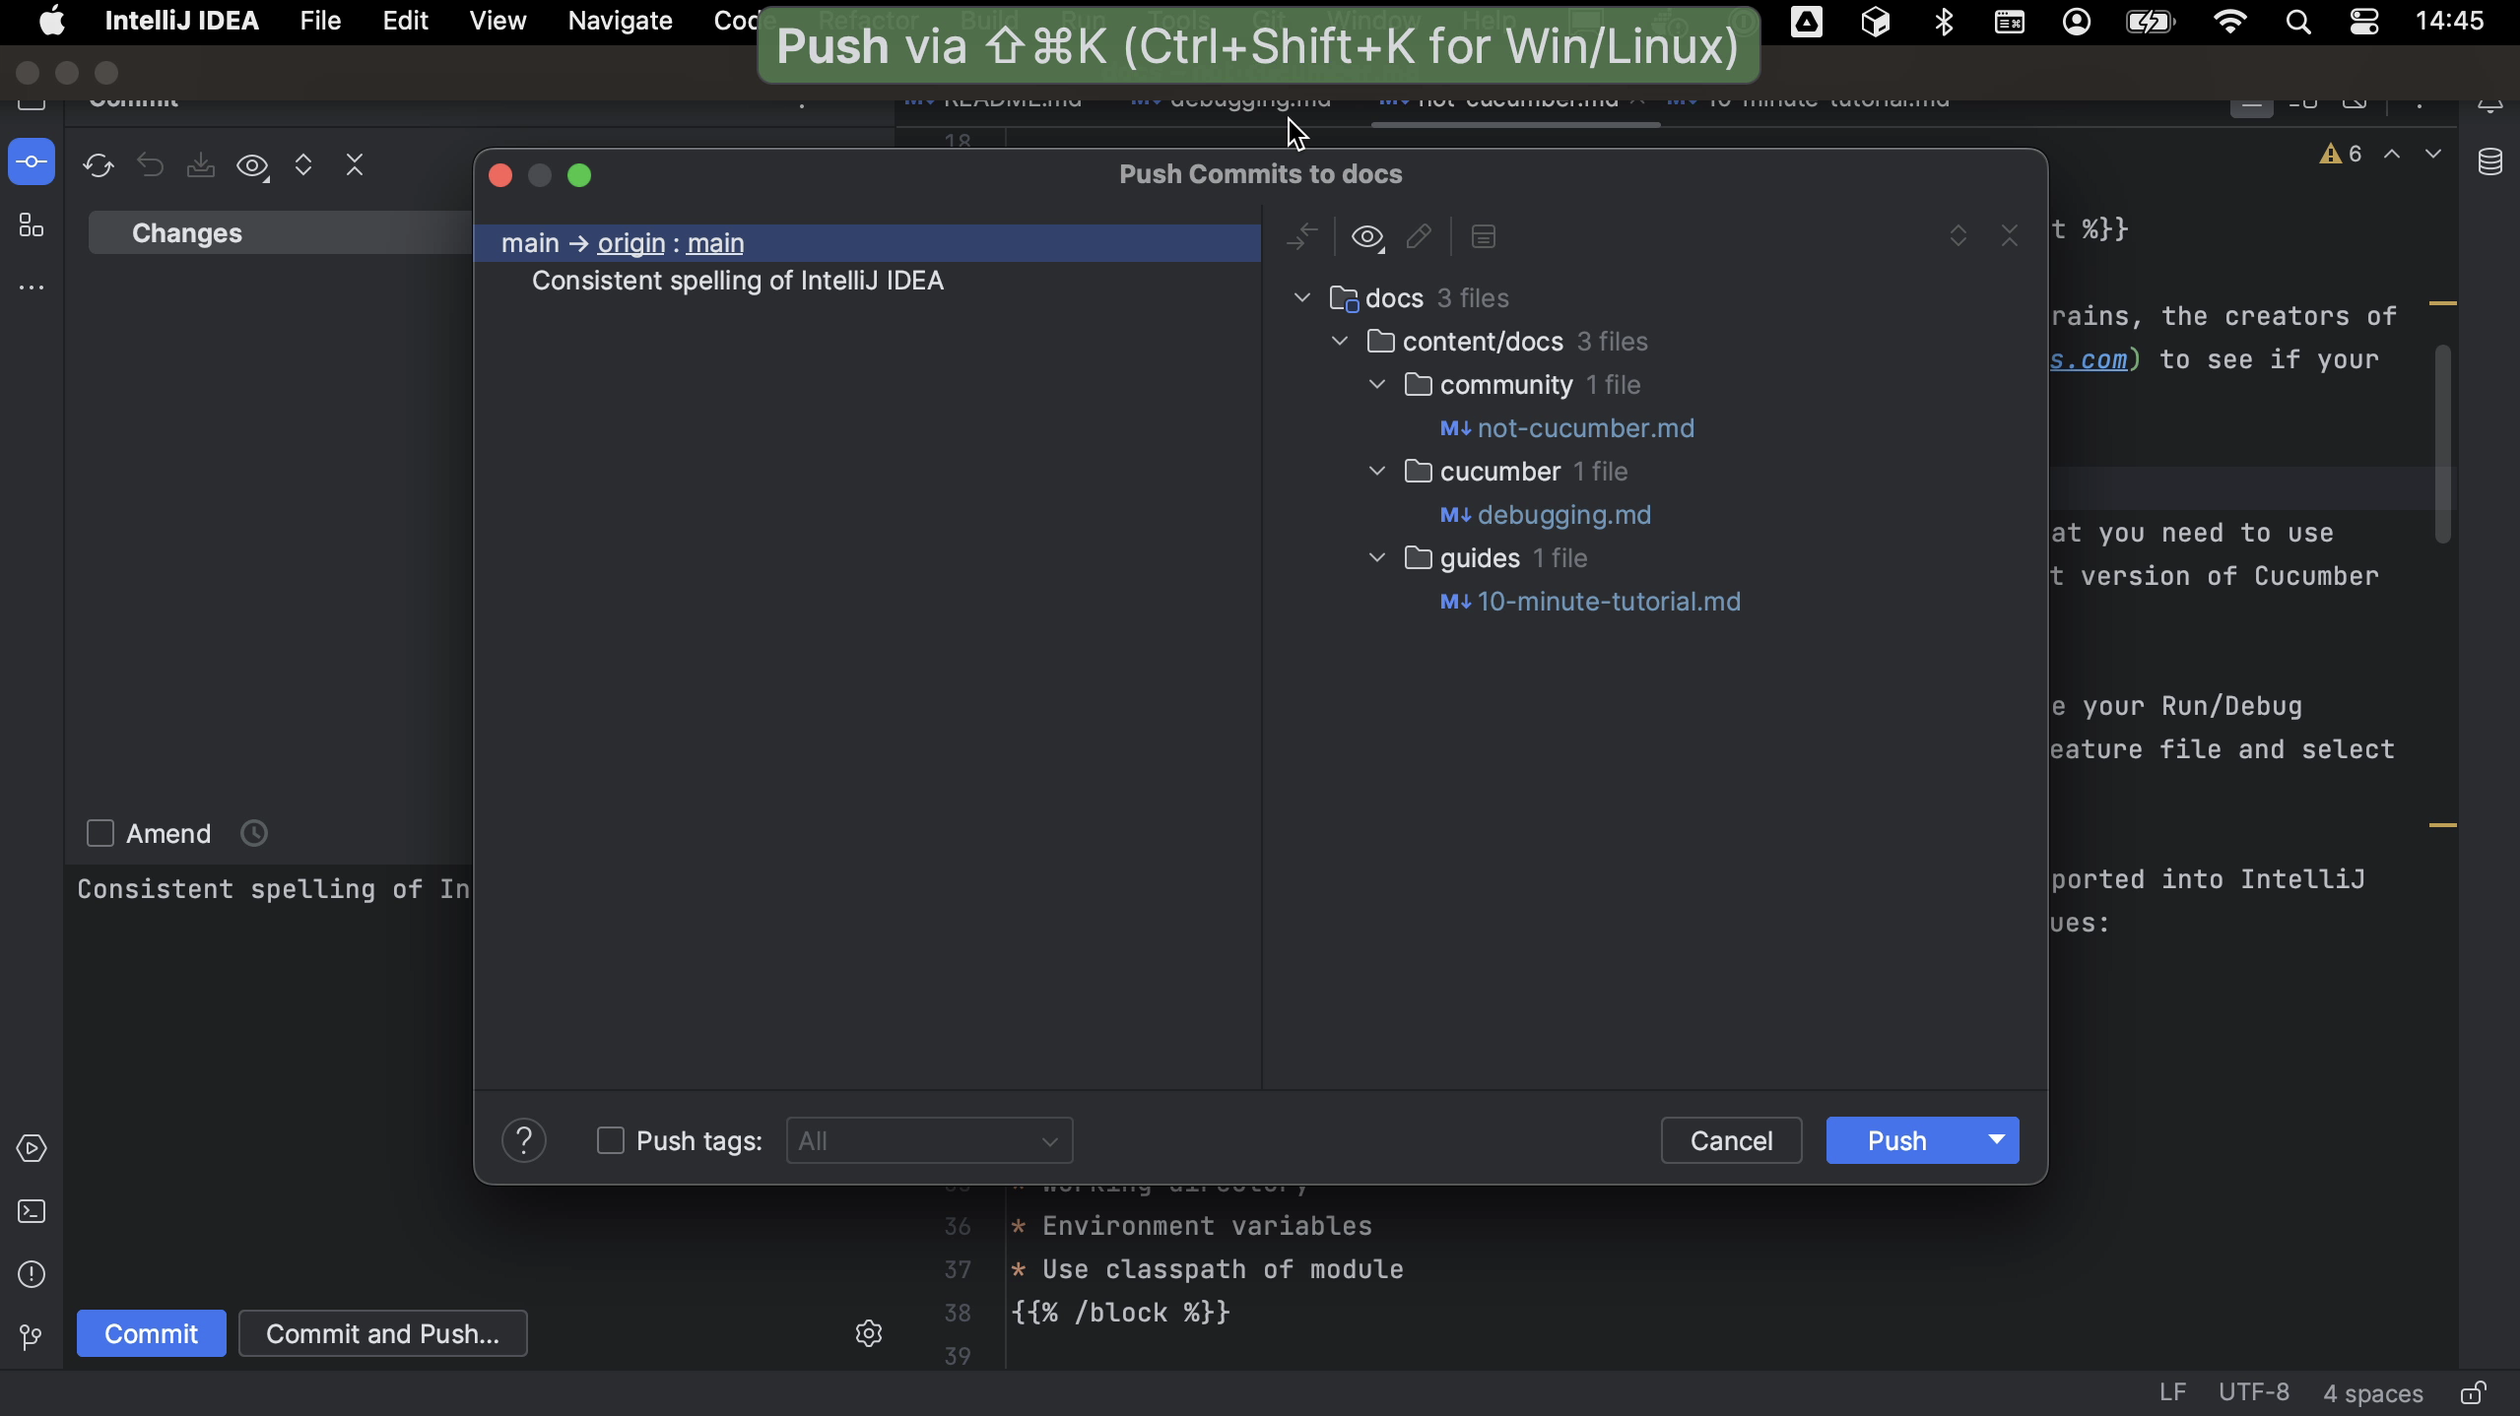
Once we are done making our changes and the project still builds, we can commit our changes (⌘K on macOS, or Ctrl+K on Windows/Linux). We can check our changes in the Commit tool window (⌘1 on macOS, or Alt+1 on Windows/Linux) to see if these are the right files and use Show Diff (⌘D on macOS, or Ctrl+D on Windows/Linux) to see if the changes are correct.
If we don’t have access to the original project, we need to push our code to our fork.
Creating the pull request
Once we are happy with our changes, we can create a pull request.
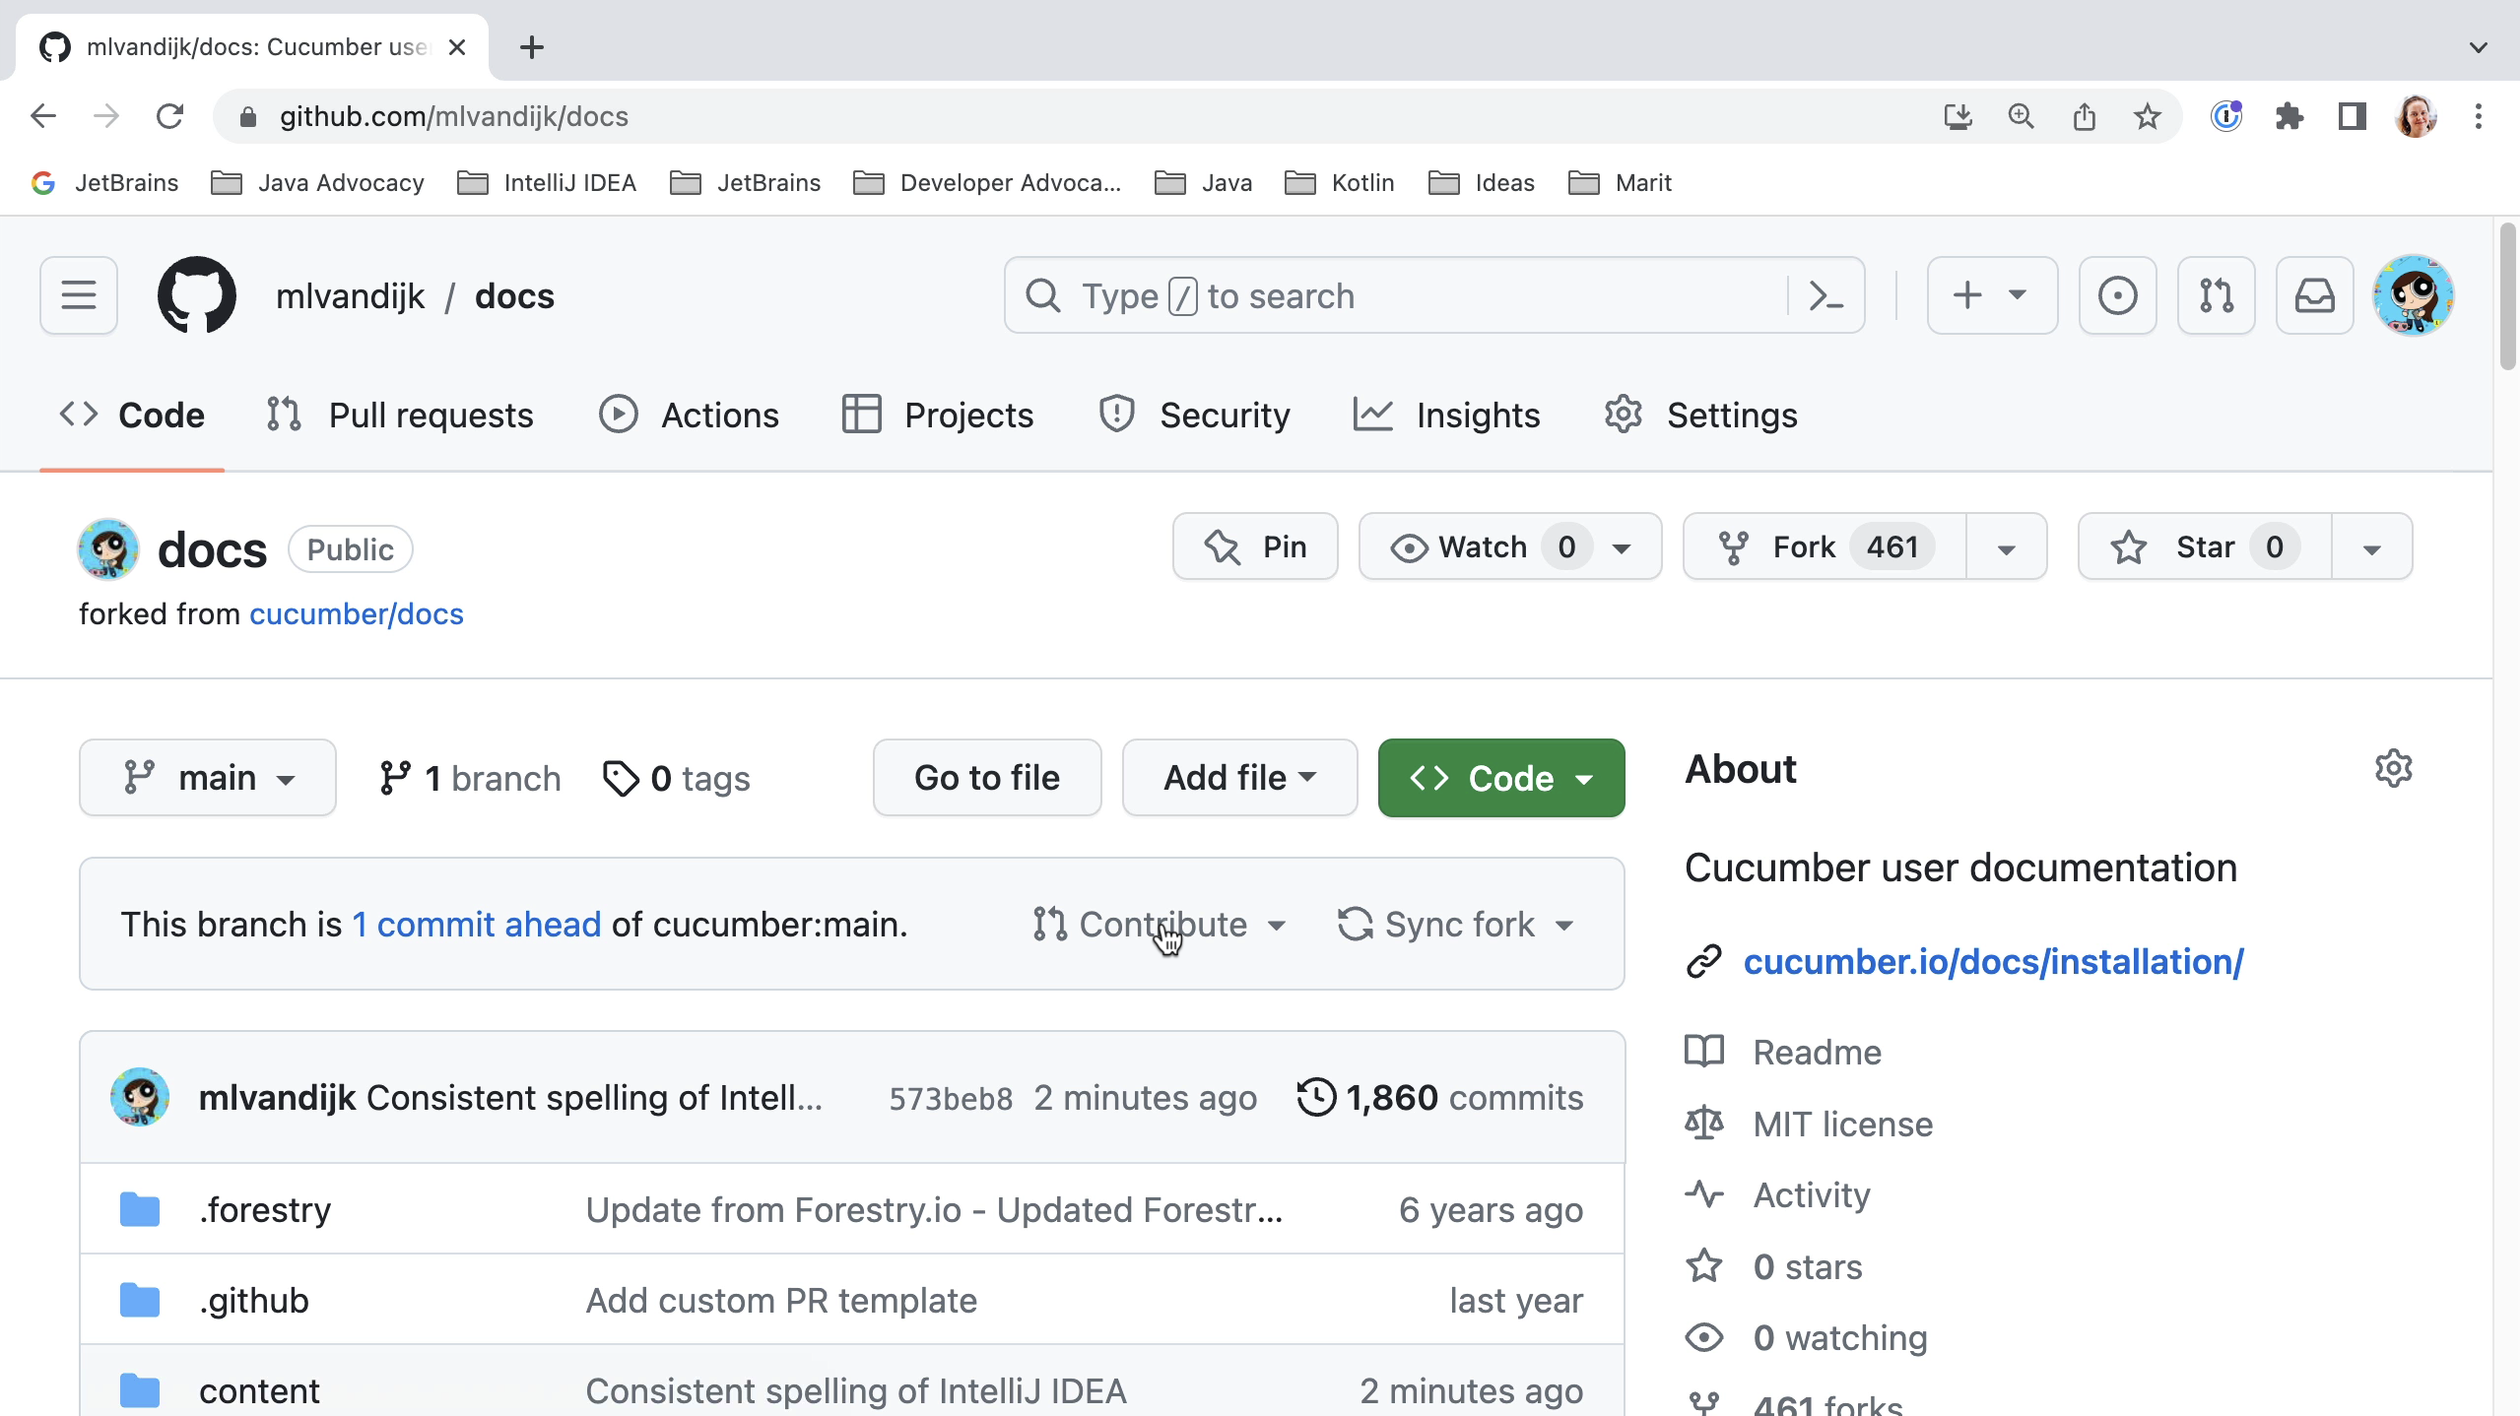
We go back to our GitHub profile and create a pull request from there. After we have pushed our changes, we can see that our fork is 1 commit ahead. We can start creating our pull request by clicking Contribute.
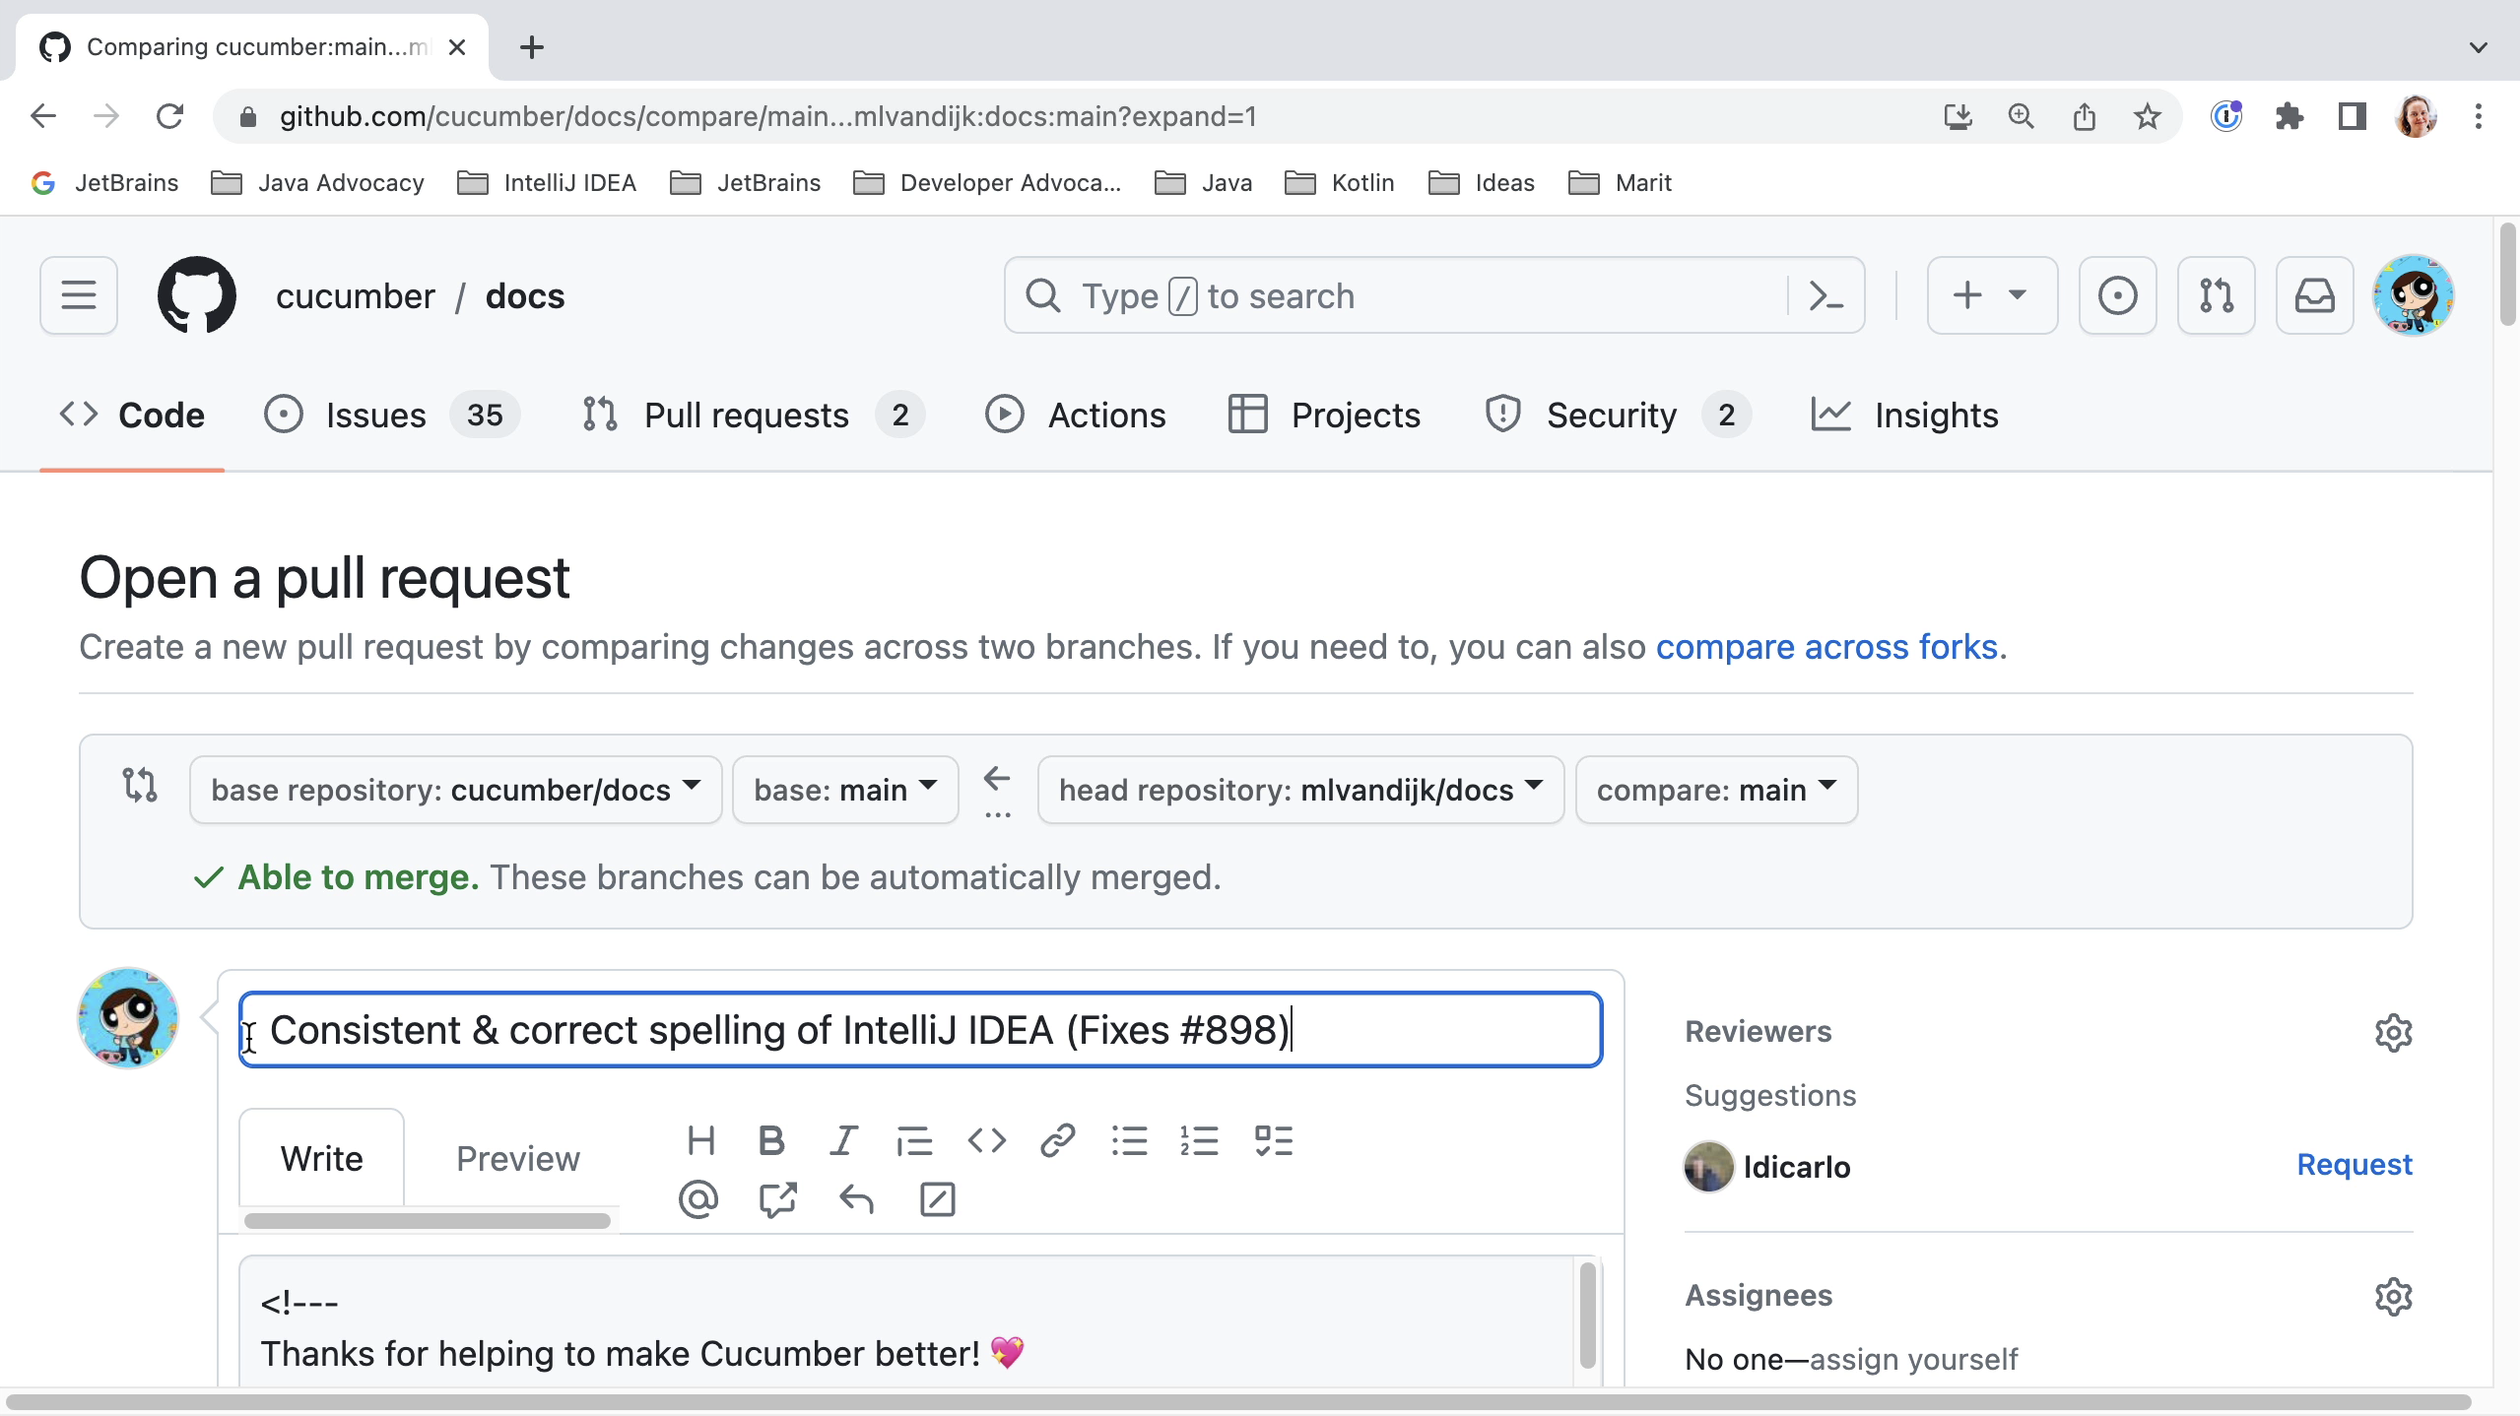
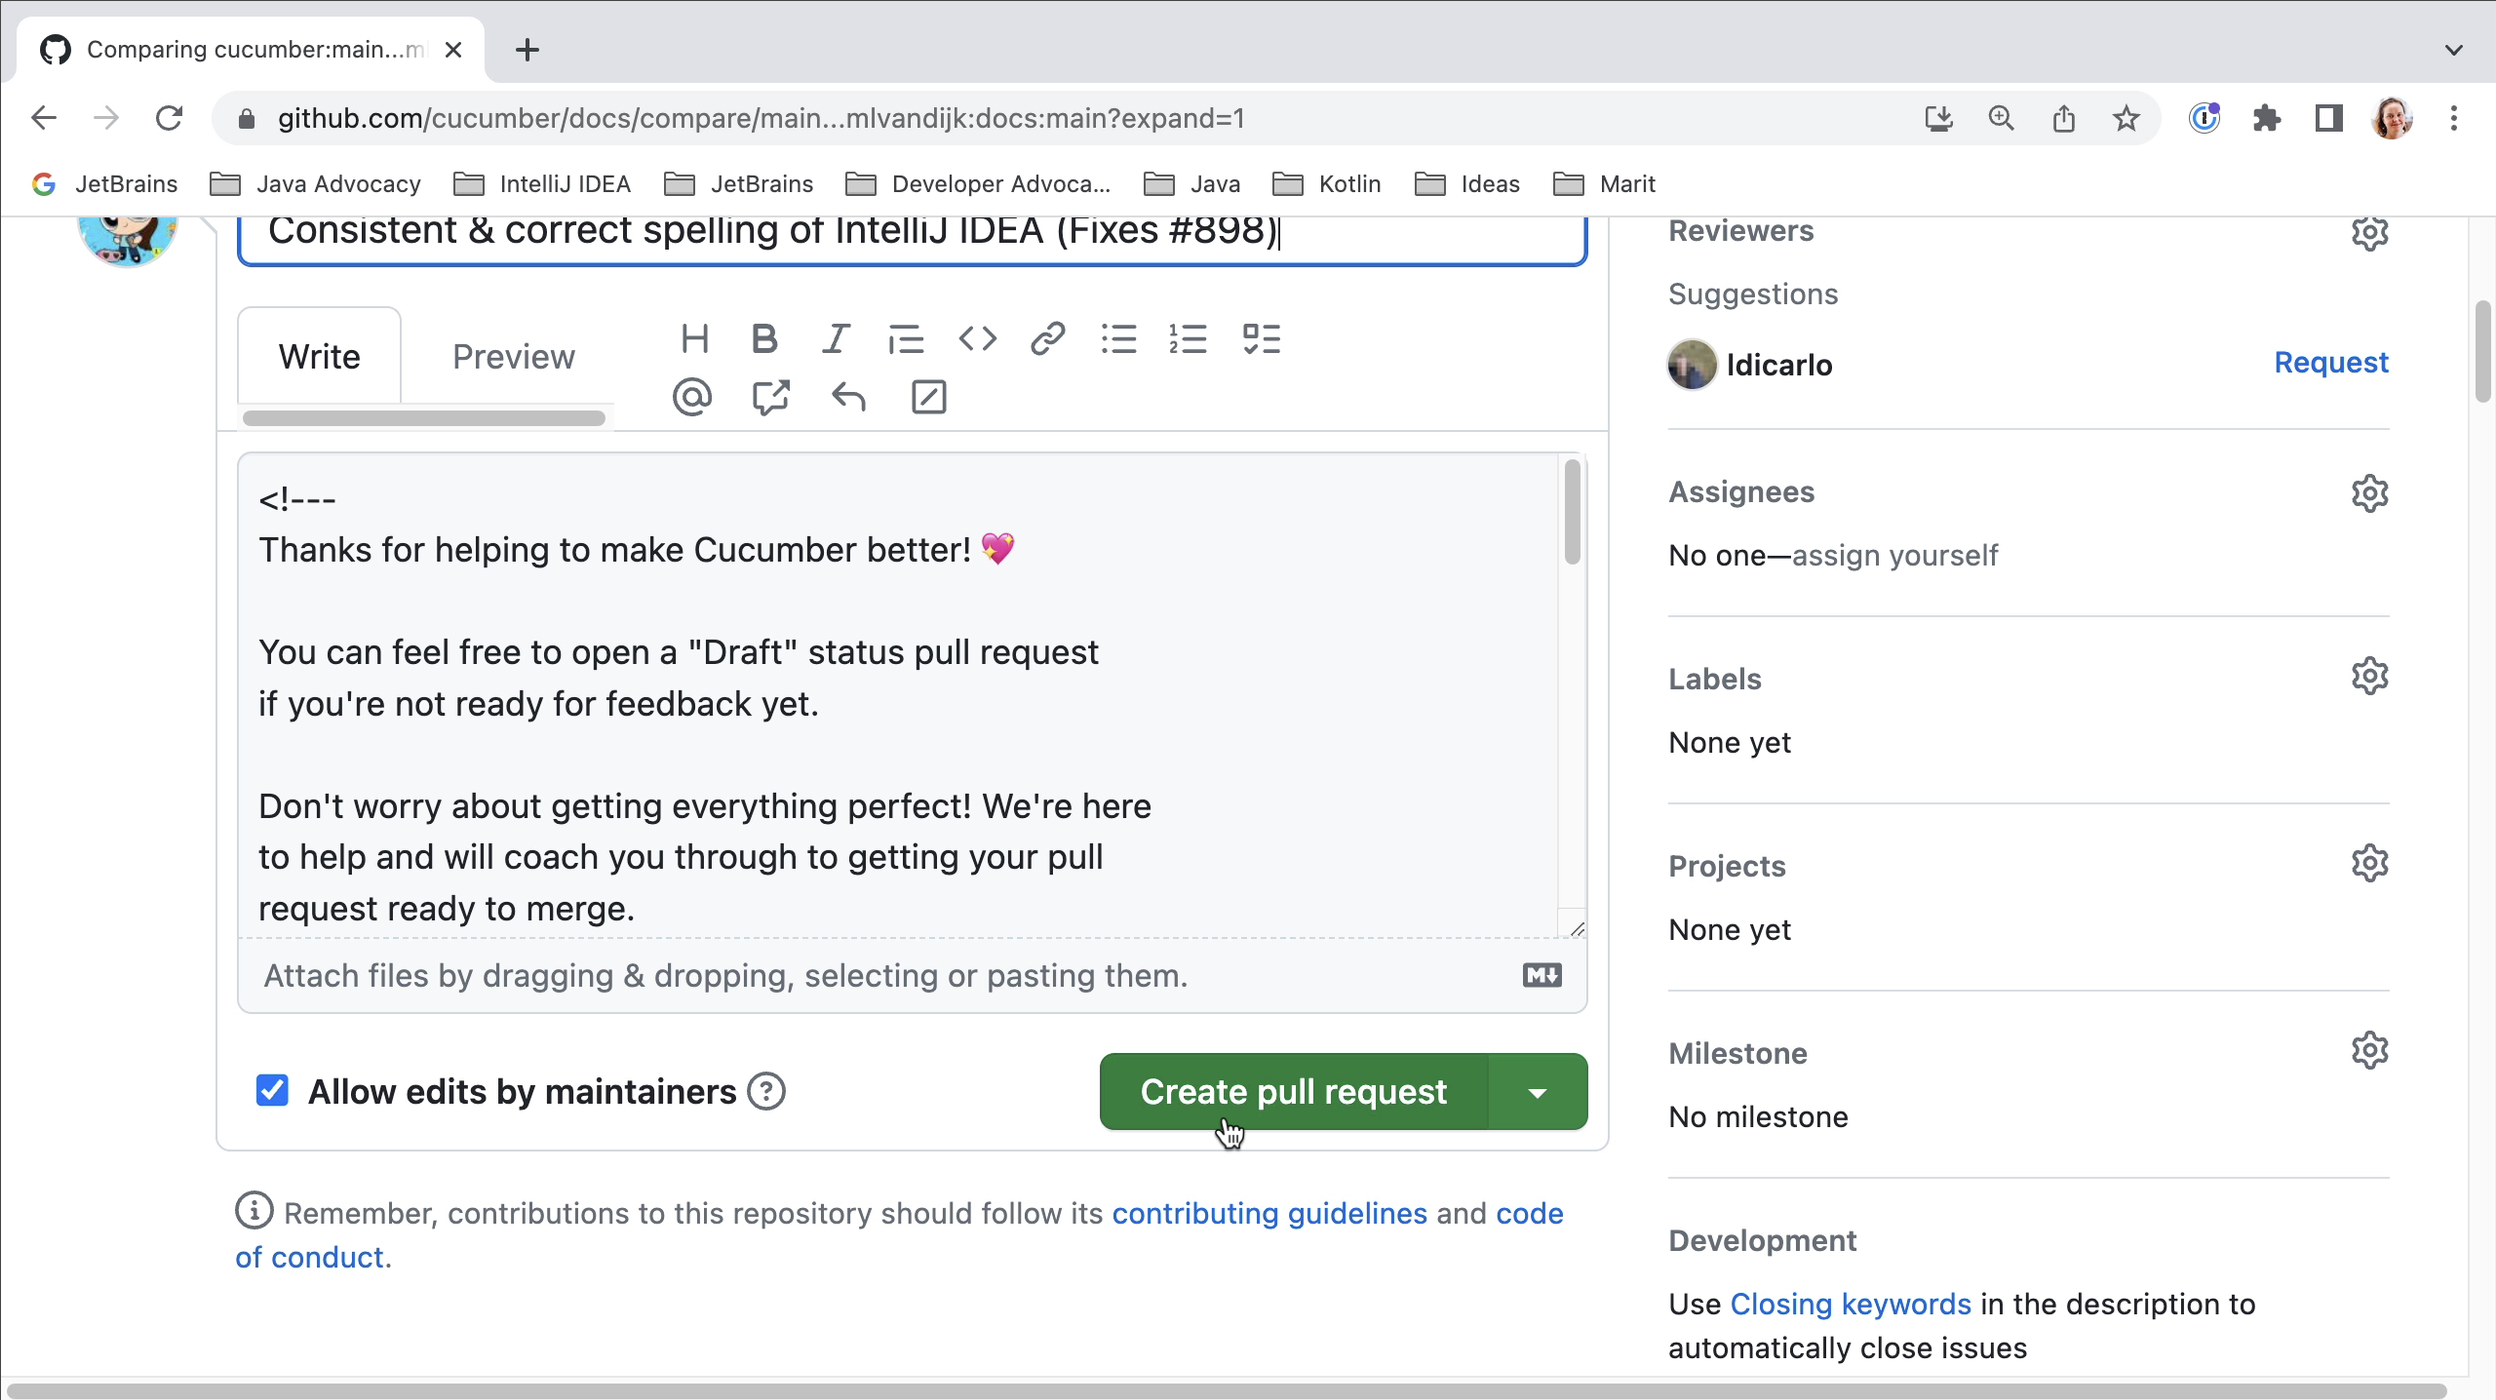
We need to provide a title and description for our pull request. Make sure the title is a good description of the changes you want to contribute. If your PR fixes an issue, you can add “fixed #x” (where x is the issue number) to the title; this will automatically close the linked issue when the PR is merged. Once you are happy with the title and description, click the button Create pull request to open your pull request.
Negotiating the review process
Now the waiting starts. On an active project, hopefully your PR will be reviewed soon. Your PR might get comments from reviewers that you need to fix. For complex changes, this might take several iterations. For smaller changes, hopefully it won’t. Before doing a lot of work on an issue you might want to check that your contribution is wanted and your solution is what they are looking for. Don’t be discouraged by review comments. Keep in mind that the maintainers will have to maintain your solution in the future and they want to make sure that it fits their project.
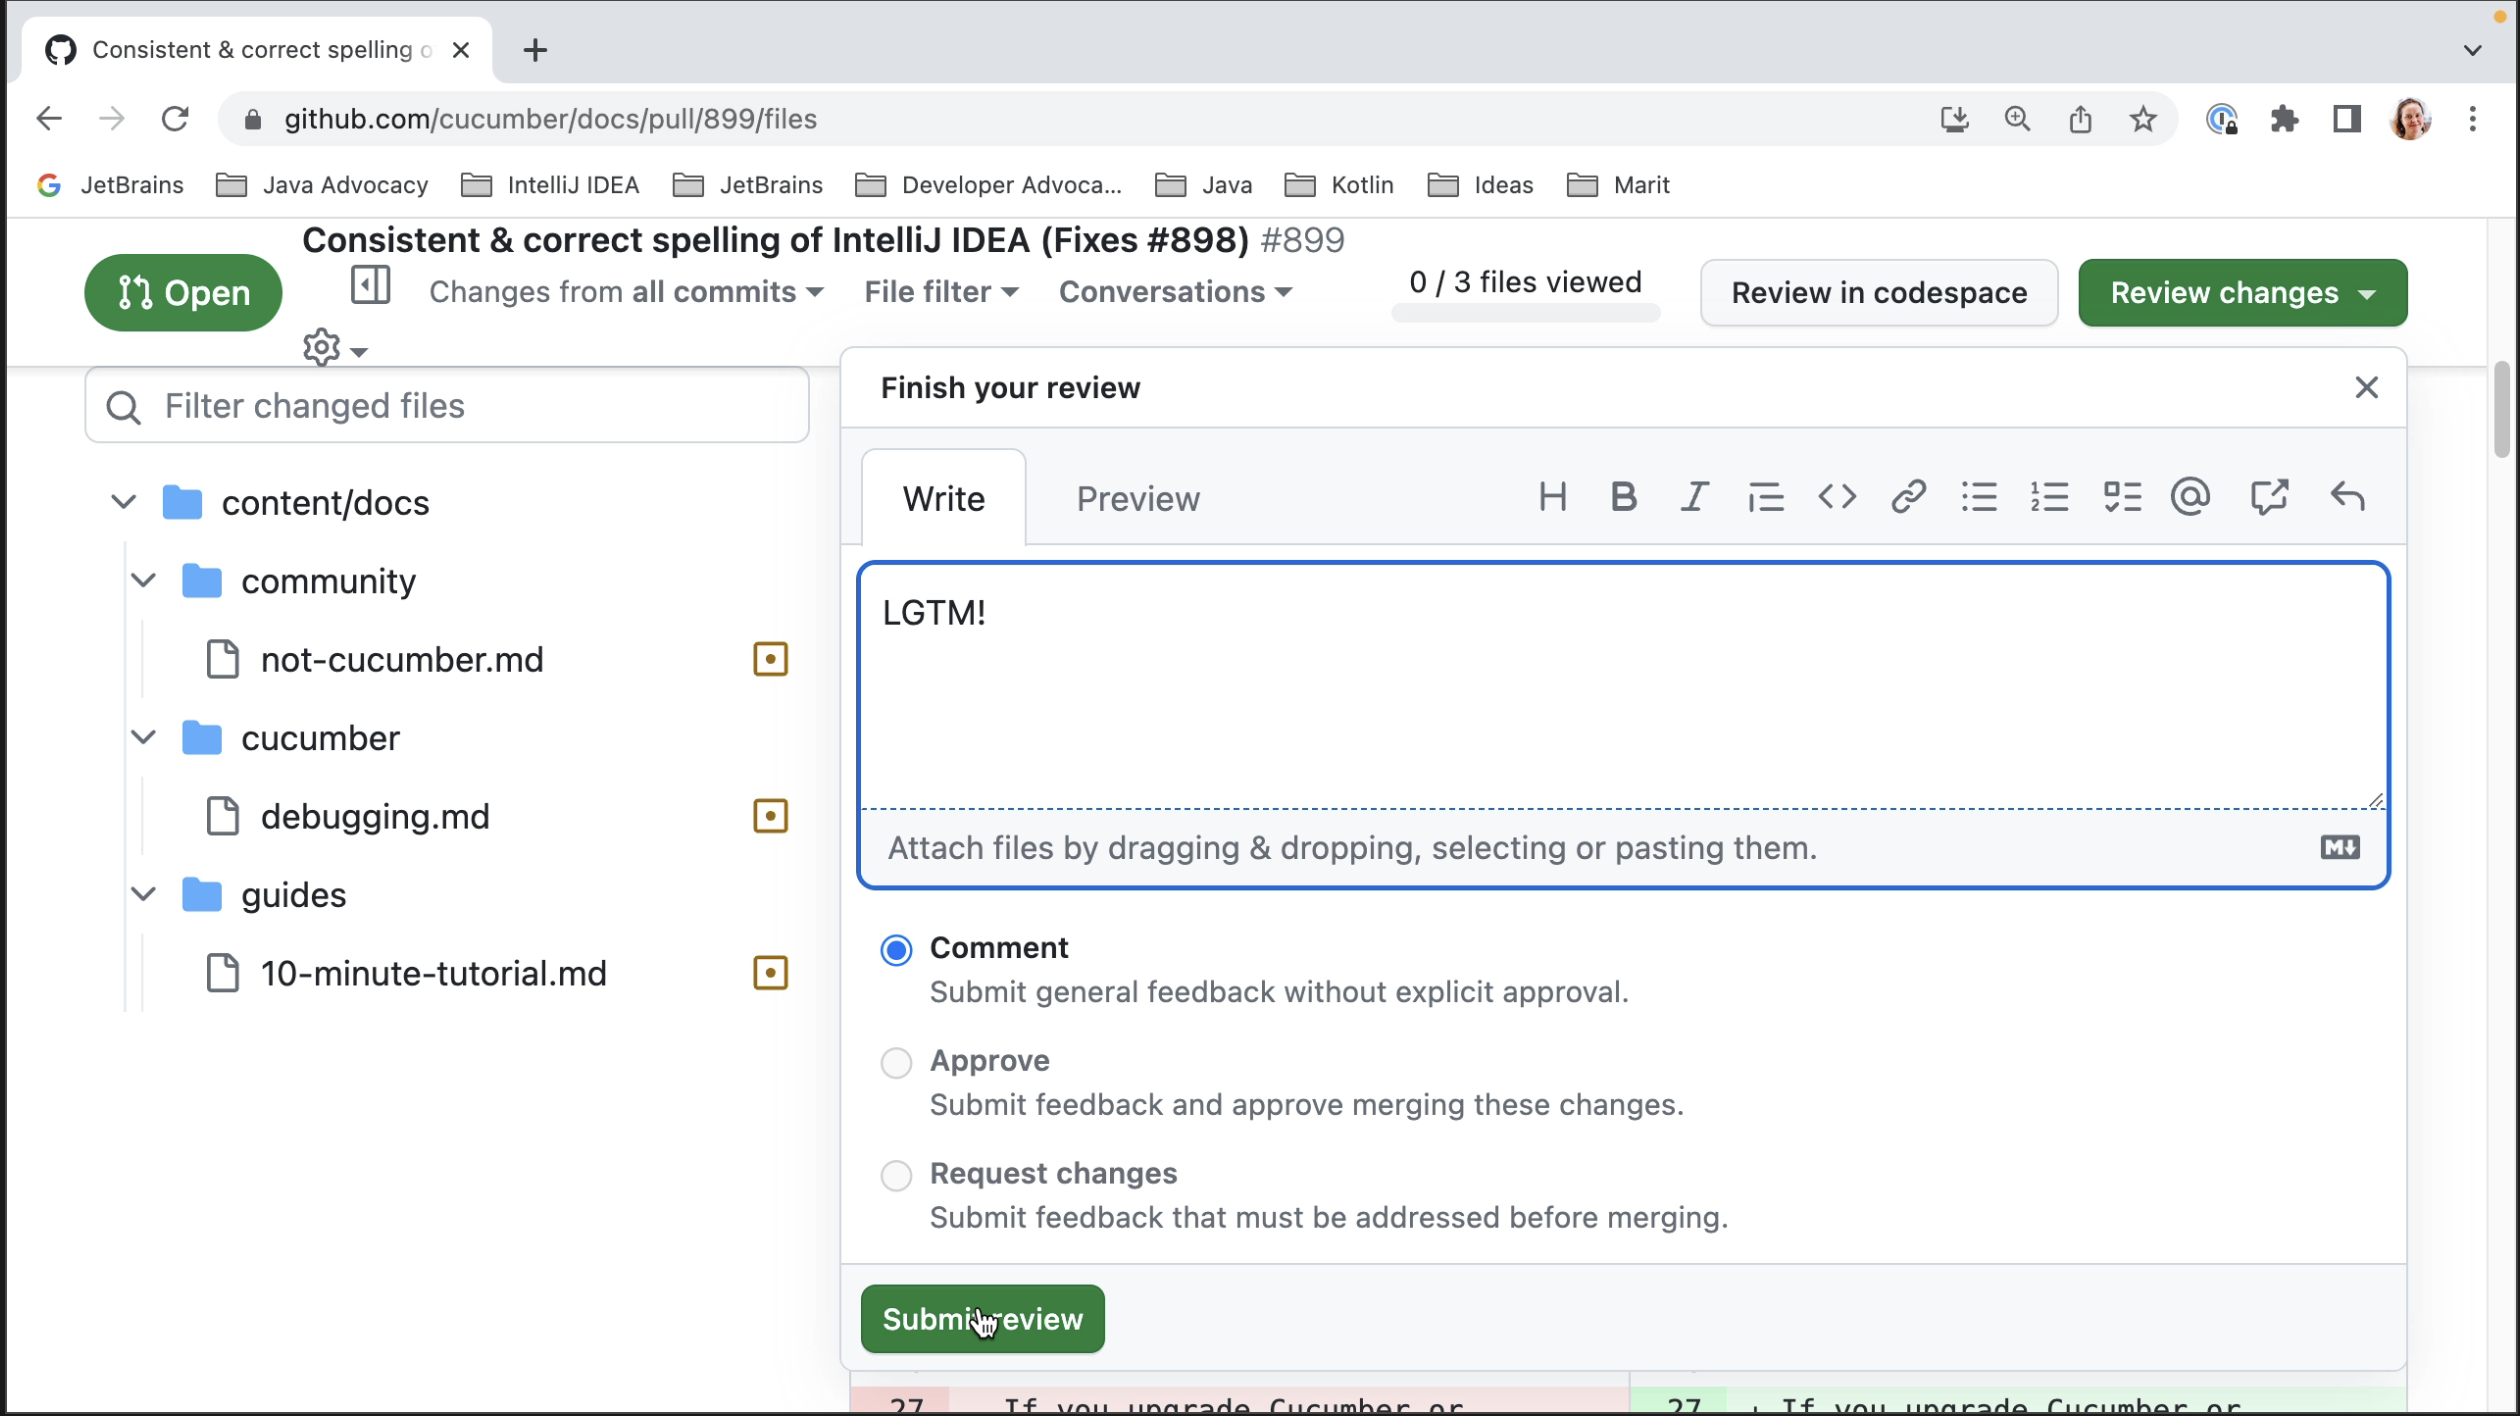
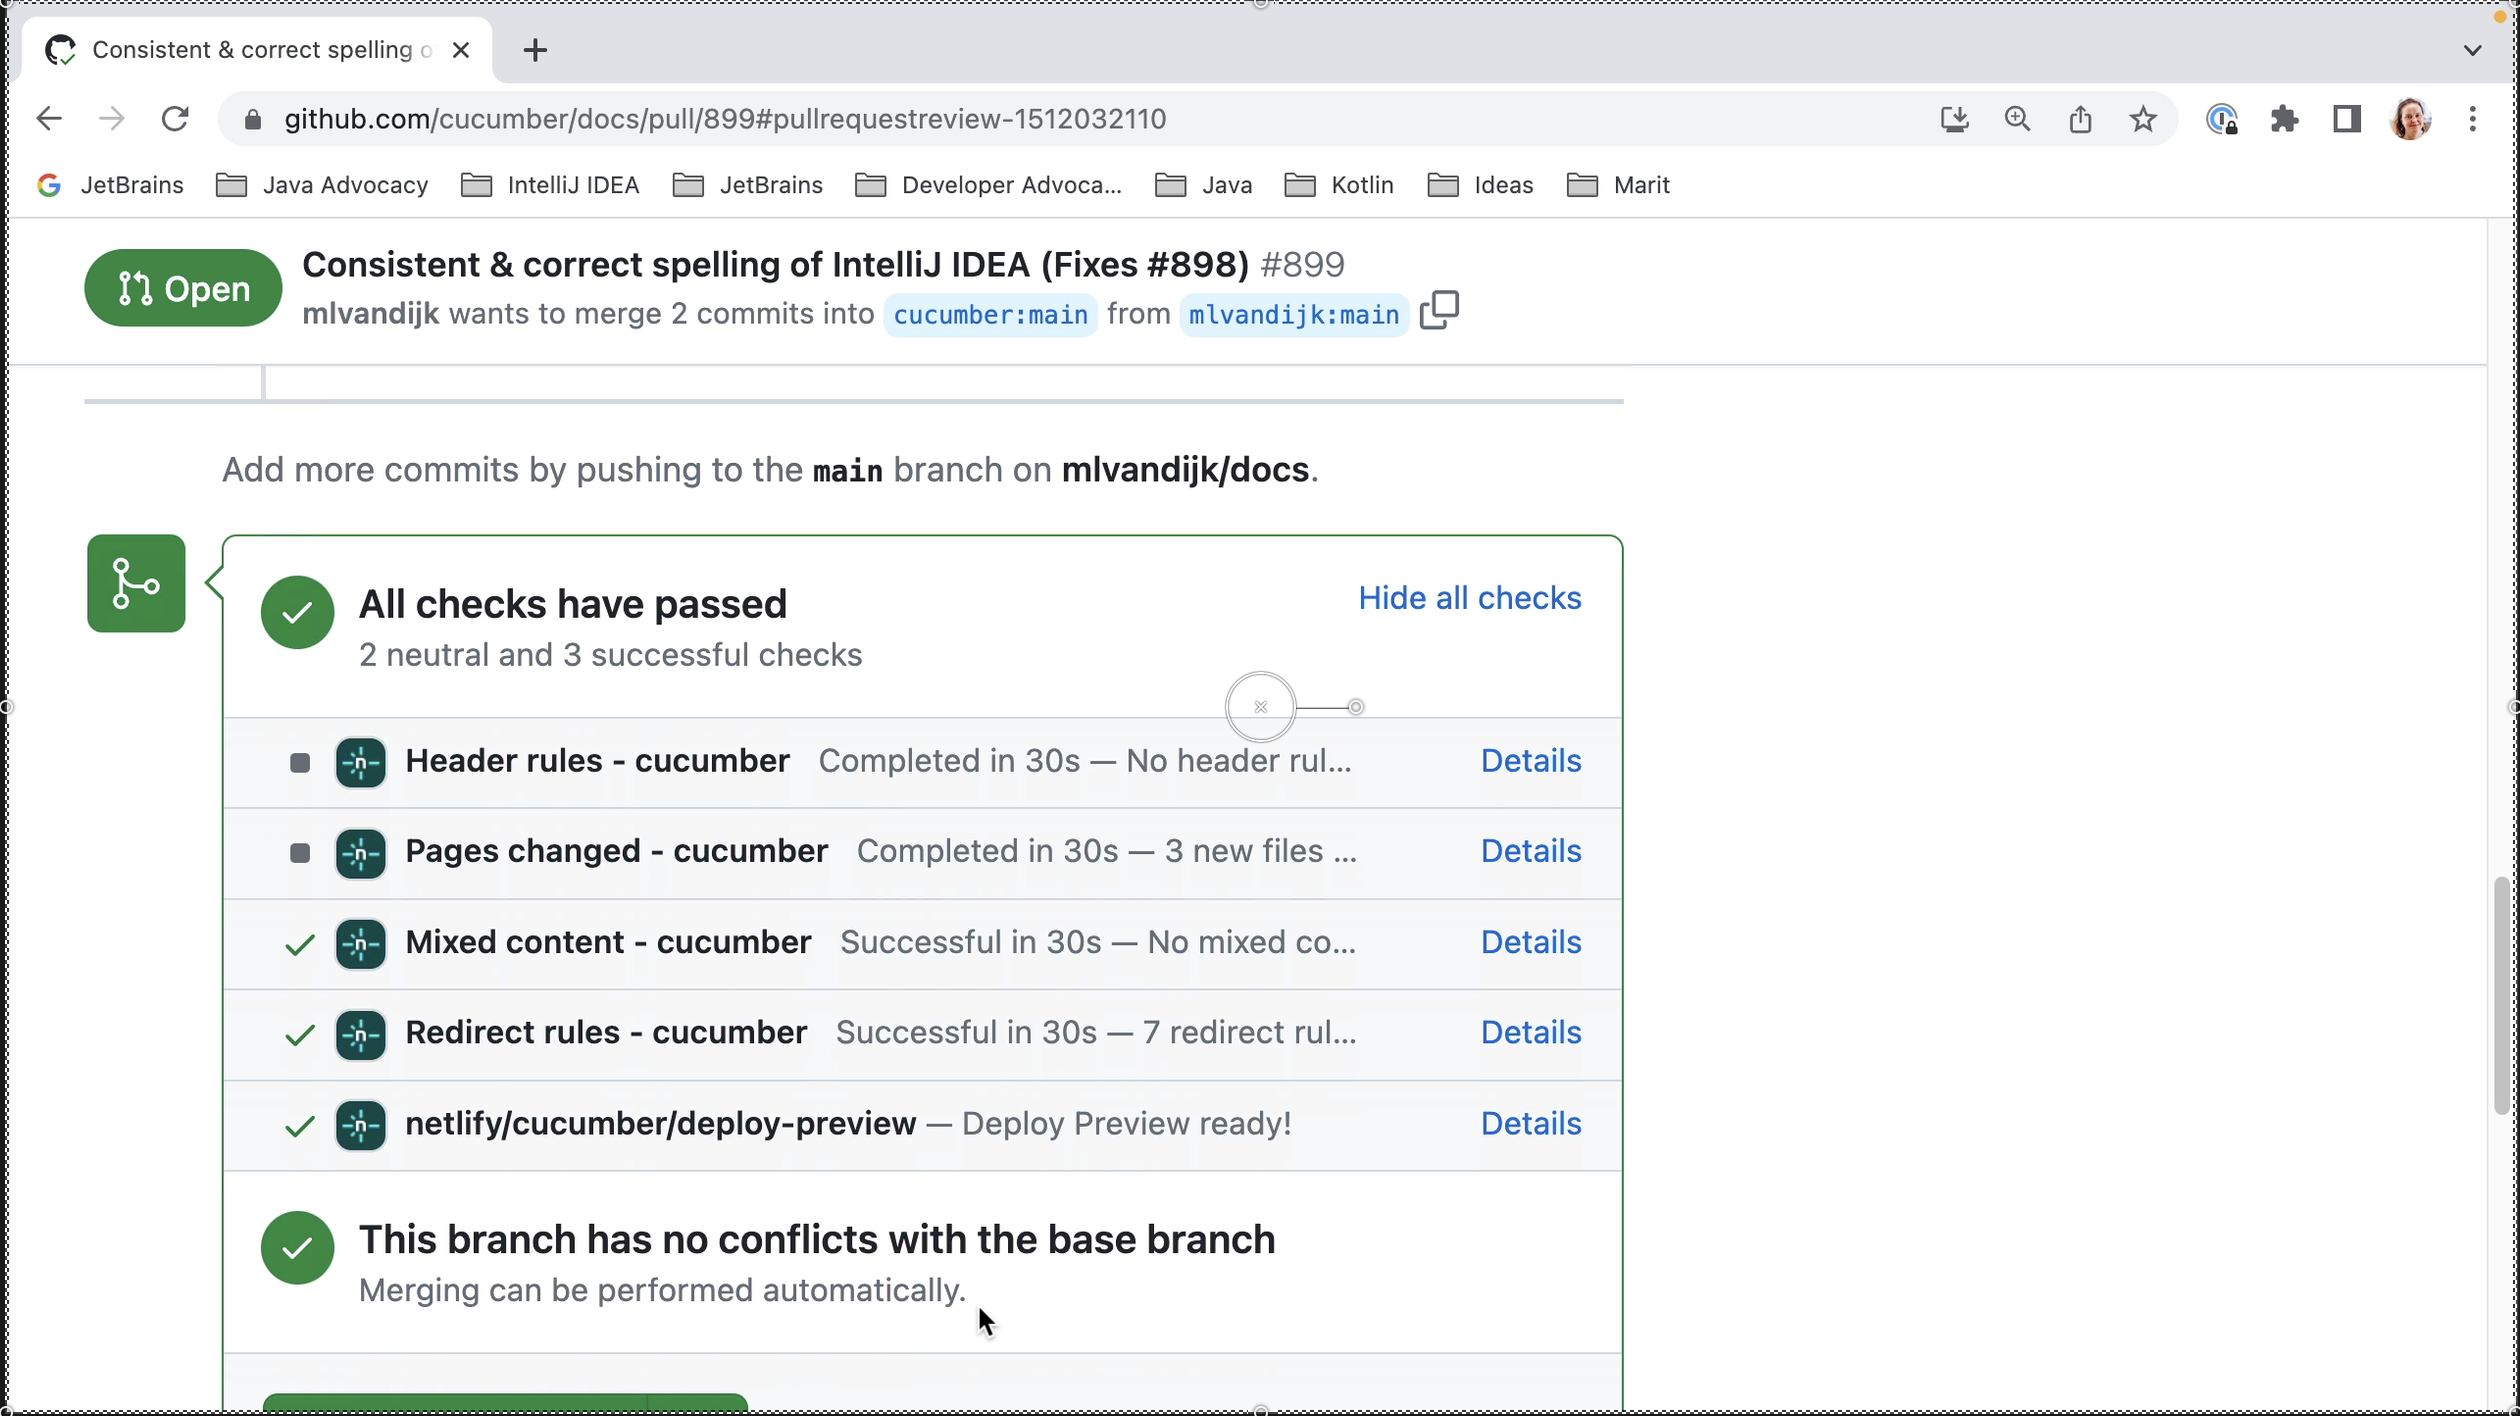
As you can see, reviewers can comment on your PR, approve the PR or request changes which must be addressed before merging. A project might have other checks set up that need to pass before merging. You might want to check that these checks pass and that there are no conflicts with the main branch.
Summary and shortcuts
In this blog post, we’ve seen how to do an open source pull request. For more information on what you can contribute and how to find something to contribute, please have a look at this video.
IntelliJ IDEA Shortcuts Used
Here are the IntelliJ IDEA shortcuts that we used.
Open source software is everywhere. Most likely you are using some open source projects either at work and/or in your side projects.
Pros and cons of using dependencies
One of the upsides of using Java as a programming language, is that there are libraries and frameworks available to do many of the things we want to do in our projects, but don’t necessarily want to write ourselves. Using existing libraries and frameworks helps us deliver business value faster.
Unfortunately, there are also downsides to using external dependencies. The most dangerous being when security vulnerabilities are found in libraries many of us use, like the Log4Shell vulnerability in the log4j logging library that was disclosed in December 2021 and the Spring4Shell vulnerability in Spring in March 2022. These vulnerabilities were so severe that we had to patch all our services ASAP. Even if the version of a dependency you use does not have any known vulnerabilities, you might need to update them for other reasons.
In addition, adding dependencies to your project also has an impact on the size of your binary. For example, Brian Vermeer has created a demo to show the number of lines of code written versus number of lines pulled in by Spring. Granted, he admits that “this was the most useless Rest endpoint you could ever write”, but this demo clearly shows how the code pulled in by dependencies can overshadow to amount of code you write yourself.
A balancing act
This means we have to think carefully about which dependencies we want to use. Some developers try to add little or no external dependencies to their projects. This is one way to avoid the downsides mentioned above. Another argument may be that it gives you more control over the code in your project. Of course, the downside here is that you have to write everything yourself, which might not always be the best idea. For example, I’d rather use JUnit and Mockito than write my own testing and mocking frameworks. On the other hand, we shouldn’t just add any library or framework, as we’ll have to not only implement them now, but also maintain them over time. Or even remove them in the future, which is not always easy. Some projects, like Lombok or Reactor, will be present throughout your code base and hard to remove should you ever want to (for example, when moving to Kotlin & coroutines).
Most of us will be somewhere in the middle; we don’t want to write everything ourselves, and we will use certain frameworks and libraries that offer us some useful functionality, but we also want to make sure we can continue to maintain our project without having to (urgently) update dependencies or rewrite our code because something is vulnerable or otherwise outdated.
What to consider when selecting dependencies for your project
The best time to check your dependencies is before you add them. The second-best time is now. So take a critical look at any dependencies you’re adding or already using and consider the following:
Do we really need this dependency?
To make it worth it to use a dependency, it has to solve our problem and do so without adding new problems. We need to consider if the project fits our needs. We can do so by reading the documentation, and by seeing what experience other users already have with a particular tool. Keep in mind that, just because other users are enthusiastic about a particular library, that doesn’t necessarily mean it’s right for you. Their context or use case might be different from your own. There might be other libraries out there offering similar functionality that are a better fit for your project.
Also consider how much of the library you’ll actually use. If it is only a small part, consider other solutions. For example, do we really need to import StringUtils to use it for one or several String functions, or can we write them ourselves? (And, if we moved to Kotlin since then, we might be able to replace them with standard Kotlin functionality.) Or are we already using another library for this particular problem? For example, we won’t need gson if we are already using jackson (or vice versa)?
Is the project well maintained?
If a project is no longer maintained, we run the risk of having to urgently replace it if security vulnerabilities are found. To see if a project is actively maintained, you can check when the last release was, and how frequently new versions come out; you can find this information for example on Maven repository. You can also check when the last commit was, and whether the project is maintained by one person, or a group of active maintainers. A project that depends on one particular person runs the risk of becoming unmaintained if that person no longer has the time and energy to maintain that project. Maintaining a successful open source project can be a thankless task and maintainer burnout is real. With multiple maintainers the load and risk can be shared. You might want to look into how many open Issues and Pull Requests (PR) there are, and the interaction on those Issues & PR’s. You can find this information on GitHub or wherever the code for the project is kept.
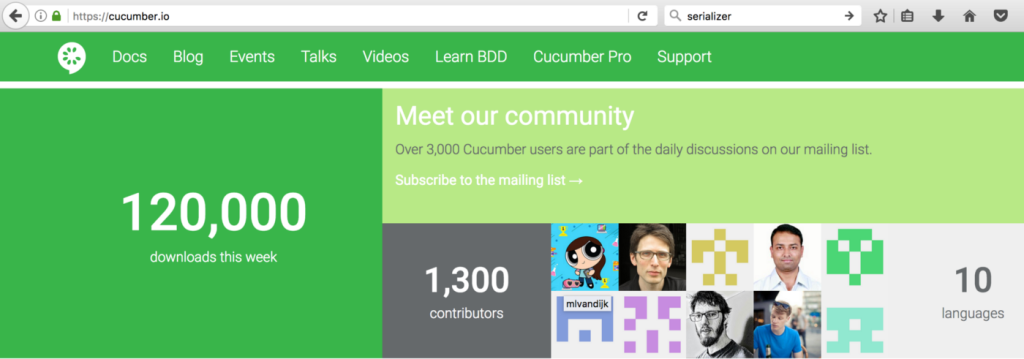
How popular is the project?
A popular project might have more stars, watches and forks on GitHub. Although these metrics don’t necessarily mean that people are using it; they might have starred it to try it out later. These metrics might be useful when comparing similar tools, but not necessarily when comparing different tools.
A widely used project will likely have more people talking and writing about it. Having a large number of users means more people who are able to help out others. It also means there are more potential contributors, but unfortunately a high number of users doesn’t always translate to a high(er) number of contributors. And just because a project is popular doesn’t mean it’s right for you.
What is the community like?
Consider whether the community is friendly and welcoming. How do they interact with their users and (potential) committers? How do they respond when issues are reported? Do they review PR’s quickly and offer constructive feedback? Friendly maintainers often make for a more friendly community. They might be active in official support channels like Slack, Gitter or mailing lists, or help answer questions on StackOverflow, write talks and blog posts or find other ways to share their knowledge.
Is it easy to use?
Finally, consider whether the project easy to implement & use, and whether you like using it. Developers have personal preferences with regard to almost everything in software development, including which tools they like to use. If a popular framework doesn’t work for you, and you have options, choose something else! Part of whether a project is easy to use might include how well documented a project is. Good documentation can help make it easier to use. Consider looking at the official documentation, as well as blogs and content created by users. The official documentation will (hopefully!) explain how a project is meant to be used.
What is the latest stable version? Are there any open vulnerabilities?
Once you’ve decided to import a dependency, make sure to add the latest stable version. We don’t want to add an older or unstable versions that we then have to update. And we definitely don’t want to import a dependency that has known vulnerabilities that have not (yet) been fixed! We want to keep our software secure and maintainable.
Where to find this information
As mentioned, there are several places where we can look for information about a dependency we are considering. One is Maven repository where we can find open source packages, their versions, whether there are any known vulnerabilities and more.
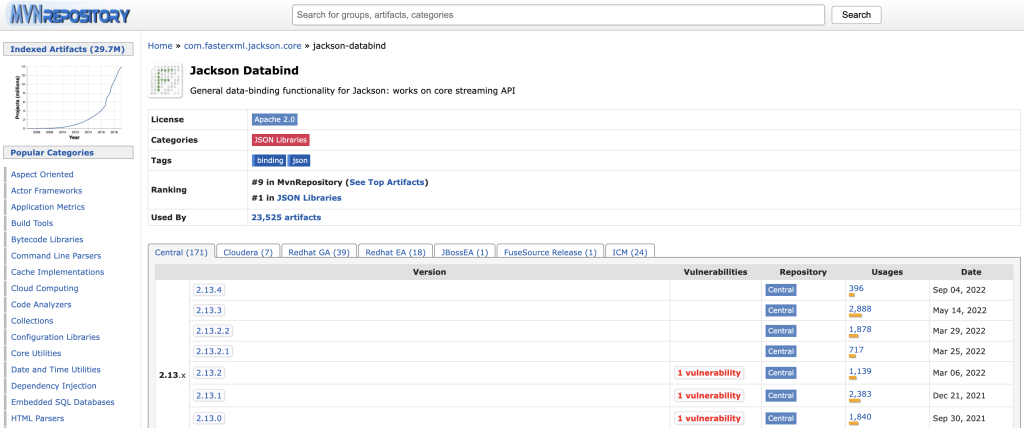
For example, when we look at Jackson Databind on Maven repository we see a list of versions and their release dates, we see the number of usages by other artifacts for each version, and we see a warning in red for versions with known vulnerabilities.
Jackson Databind on MvnRepository
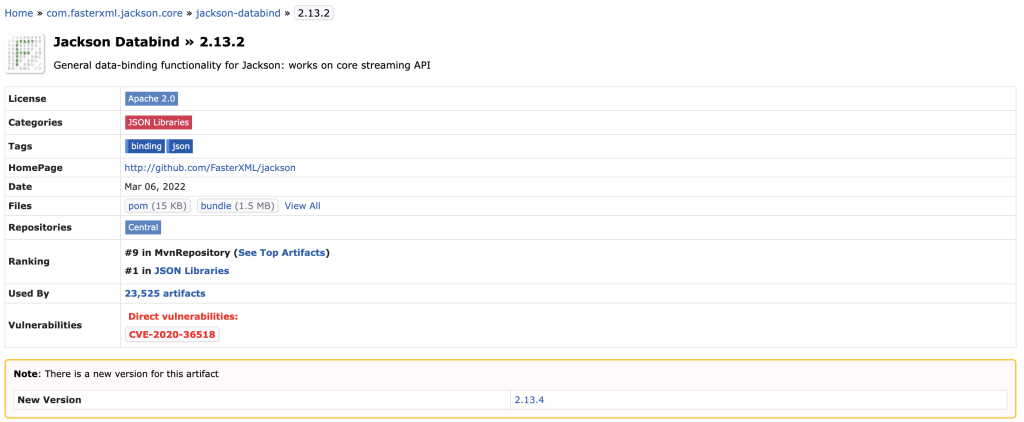
When we look at the details of a version with known vulnerabilities (Jackson Databind v2.13.2 in this example), we see the CVE number for this vulnerability which links to the details for this CVE). There is also a warning in yellow that there is a new version for this artifact with the link to that version.
Details for a vulnerable version of Jackson Databind
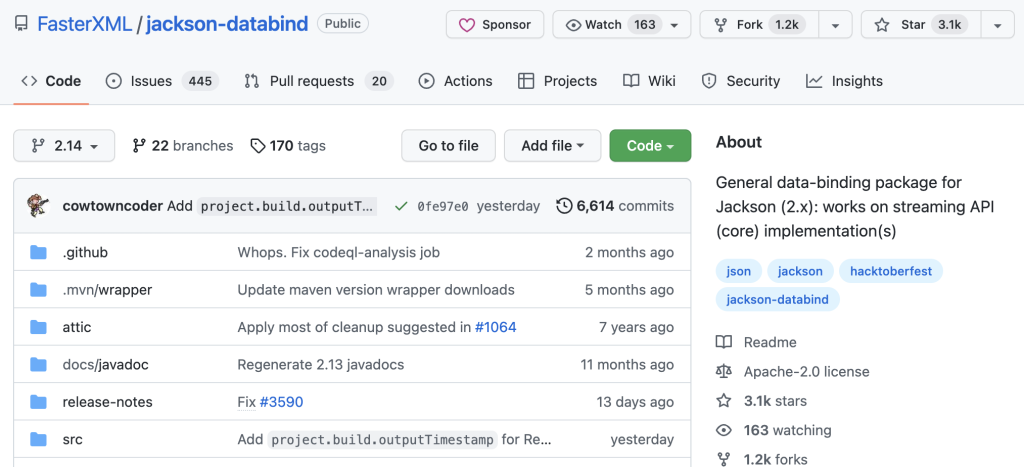
Another is to find the project’s code on GitHub, to look at the code itself, see when the latest commit was, look at open Issues and PR’s, and check Insights for more details on contributors, frequency of commits and other activity.
Jackson Databind repository on GitHub
We can look for official documentation and read (or at least scan) it to see whether the project is a good fit for us, and whether it is well documented. Other information might take a bit more effort to find: Go into the support channels and ask questions. Search for blog posts (or YouTube videos, if you prefer) and other places where you can find information. We might even check StackOverflow to see whether there is a tag for this dependency, how many (open) questions there are, etc.
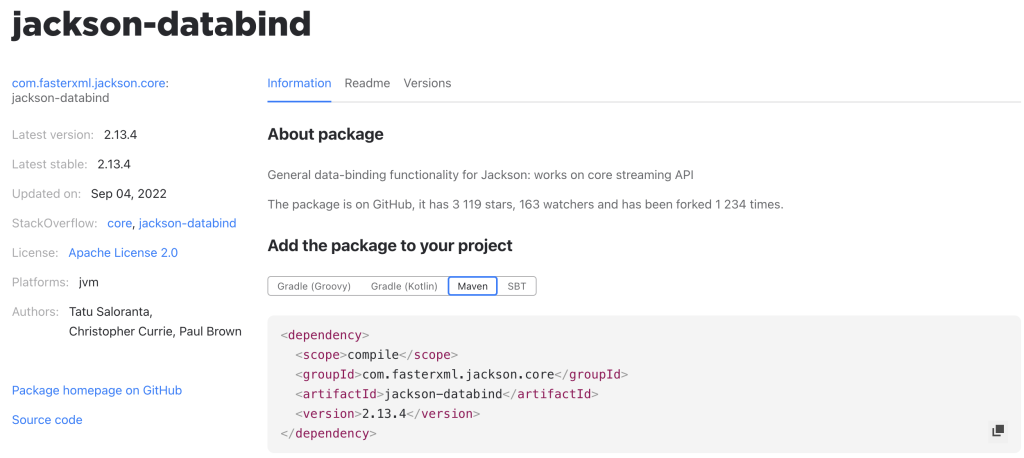
JetBrains has created a Package Search website that can be used to search for Java and Kotlin libraries and get a lot of this relevant information, including the latest (stable) version, links to relevant tags on StackOverflow, links to the official docs and the code, and if the project is on GitHub the number of stars, watchers and forks on the Information tab. A list of versions (similar to the one on Maven repository) can be found on the Versions tab.
Carefully consider which dependencies to use, taking into account at least some of the things we have discussed here. The best time to do so is before you start using them. But don’t forget to periodically check the dependencies in your existing codebase to see if you still use them, and still want to use them based on the considerations above. Don’t be afraid to remove them if they no longer bring you value.
In April of 2018, I attended Cukenfest; a BDD and Agile conference organised by the people at Cucumber. As a Cucumber user and open source contributor, this was a great way to meet some people I’d previously only chatted with on Slack, as well as hear some great talks by amazing people.
Preconference Dinner
The evening before the conference, we got together at a local pub with both conference speakers and Cucumber contributors. Here I finally got to meet people I’d been collaborating with in person! It was great getting to know them better, and discussing our experiences with Cucumber and BDD.
We also bonded over other topics, like a shared love of Kotlin , or dealing with a similar challenge of moving more towards a Software Engineering role from a tester role.
The highlight of the evening, other than meeting so many great people, might have been the discussion we had about Cucumber expressions, which were already available in the Ruby and JavaScript implementations, and have since been added to Cucumber-JVM.
Lots of smart people, with lots of interesting ideas and experiences to share.
Day one
The first day of the conference had a great lineup of talks by amazing speakers, including Dan North, Liz Keogh, Gáspár Nagy, Nat Price and Aslak Hellesøy (the creator of Cucumber). Speakers were introduced by Seb Rose, who could very well have a career as a standup comedian (you know, if this IT thing doesn’t work out).
After the first round of talks, there was an opportunity for a speed meet; inspired by the European Testing Conference. The format of the speed meet was to have people draw a mind map about themselves as input to 3 minute conversations they would have with other attendants. Rows of chairs are set up facing each other and after every three minutes, people shift places so they end up talking to someone else. This is a great way to get conference attendees to talk to each other. Some people might find it a bit intimidating, but it does seem to foster more communication. The only downside for me is that it can get very loud!
Hallway track
At some point, I ran into Victoria Wiggins in the hallway. She had just done an amazing talk on neurodiversity and this provided the chance to tell her how how inspiring it was. It really showed a great self acceptance! While this led me to miss some of the scheduled talks, we had the opportunity to discuss (neuro)diversity in the workplace.
Personally, I really appreciate the hallway track at conferences, as it gives you the opportunity to meet people, and get different perspectives on things. This really reinforces the learning, as well as foster a community.
Day two
The second day of the conference was an open space, or `unconference`. This day was particularly geared towards interaction between participants.
Matt Wynne introduced us to the rules of the game:
The law of 2 feet; if you’re not learning from or contributing to a session, you can walk off in search of a different session.
2. The other rules are:
Whoever comes is the right people
Whatever happens is the only thing that could’ve
When it starts is the right time
When it’s over, it’s over
This helps make sure everyone in a sessions remains interested and engaged.
Documentation
Some of us had our own sessions planned; we’d been working on improving the Cucumber documentation and wanted to see what was needed to get them live. It ended up being Matt Wynne, Sam Wright (a.k.a. Plaindocs) and myself working on the last bits and pieces and getting them live!
Later that day we had a demo session, and gathered some great feedback from participants. We’ll be slowly improving them, based on actual user feedback. But for now, we’re very happy to have them live after working on them for many months!
After conference
At the end of the day, we got to enjoy the lovely weather at the rooftop bar. We continued discussions about Cucumber, BDD, Software Engineering, working in tech, being women in tech, and so much more.
Later, a few of us went out to dinner and conversations continued, sharing ideas and experiences and getting to know wonderful people. It’s all about the conversations…
Open Source Day
The next day, we had an Open Source Day, where we got together to discuss upcoming changes to various implementations of Cucumber, as well as how to continue improving the documentation. I got to meet some more Cucumber contributors, which was loads of fun. We even managed to get a few things done!
Using open source projects has become increasingly popular. The number of companies using open source is growing. Unfortunately, the number of people building and maintaining it is not growing quite as fast.
Open source doesn’t come for free; someone is doing the work. And they could use your help!
Why you should contribute to open source
There are many reasons why you might want to contribute to open source. Personally, I started because I was looking for a way to learn more about programming, and wanted to do so in a way where I might contribute something useful.
Then, I continued doing it because I enjoyed the collaboration and feeling useful and appreciated. Also, I did learn new things I was able to use at work. Your reasons might be entirely different!
I’ve heard people also contribute to open source to give back to the project or community, to build their CV, to “scratch an itch” (fix a problem they are having), or a variety of other reasons.
Ways to contribute
The most obvious thing you can do is to fix bugs, or add new features. If this is something you can do, please do! Unfortunately, this can take considerable time and coding skill, which not everyone might have. So how can you contribute, if you are not a programmer with lots of spare time?
There are many things that you can do that don’t involve coding and don’t (have to) take a lot of time. I have listed some below, along with some examples of my own contributions.
Writing documentation
One of the ways to contribute is by adding to the documentation. This is often mentioned as an easy way to get started. You don’t need to know how to code to do it; you don’t even necessarily need to know a lot about the whole project (depending on the change). If you are adding content, you do need to be able to write well, and articulate ideas clearly. Other skills that might help are attention to detail (like spelling and grammar), coming up with good examples, etc. Even if writing is not your strength, there are still many ways in which you can help: * Read documentation to see if it is clear and complete. If not, offer suggestions on how to improve it. Or at least inform maintainers what is unclear to you and why. * Fix small things, like typos or dead links, if you can. For example, some small contributions I’ve made were fixing a dead link in the Docker documentation and fixing a typo in a Pitest error message. * Let maintainers know if you find typos, dead links, mistakes, outdated or missing information. It’s really hard to keep a fresh eye on documentation you might have rewritten and edited multiple times! * Add information that is missing, especially if it is something you had to find out for yourself (either with or without the help of the community). Someone else might have the same problem. * Add (links to) relevant blog posts. If the blog post is your own, consider adding relevant information from your blog post to the official documentation also. You can still offer a different perspective in your own blog. * Review any open PR’s (pull requests) on the documentation. Look for the things mentioned above: it is clear, complete, correct? Do you see any typos or other mistakes? (Have I mentioned it’s hard to spot typos in something you’ve been working on for a while?) I, for one, love getting reviews on my documentation PR’s; the suggestions make them so much better! And I love how this makes each PR the product of collaboration, rather than one person.
And for all of these: if it is something you can do yourself, please do so!
Answering questions
As a user, you can probably help other users with problems you have faced before. Remember, someone probably helped you in the past in one way or another. Share what you have learned! And if you notice a lot of similar questions, consider adding to the documentation. We have recently added a FAQ page to the Cucumber documentation, and would love additional contributions to the page. Other projects probably will too!
Creating an issue
The least you can do if you encounter a problem, is create an issue. Maintainers might not all use the project in the same way, and might not be aware there is an issue unless you tell them.
Before creating an issue, please check that there isn’t an open issue for the same problem (prevent duplication). If there is, you might be able to add additional useful information to that issue.
If you are not sure you have found a bug, please contact the community to ask them. Most projects will have one or more ways for you to ask questions (Gitter, Slack, mailing groups, etc). It will often be quicker to get help that way, as more people in the community can help you (not just the maintainers who monitor GitHub issues). This might also start up a dialog on what the exact issue is, how to reproduce it etc. which will make it easier to fix.
When you do create an issue, please be as specific as you can and provide sufficient information to help maintainers understand and reproduce your issue. Many projects use templates requesting the type of information they need; make use of them! Or, if they don’t use a template yet, maybe you can add one to the project?
And again, if it is something you can fix yourself, please do!
Reproducing issues
When someone opens an issue, a maintainer needs to look at it to understand the problem. This is where you can help! Is the issue clearly described, and does it contain sufficient information to reproduce the issue? If you can reproduce it, you might be able to provide additional helpful information. And if you can’t, you could ask the original author for more information. Or maybe the issue can be closed!
Add unit tests
If you know how, you could try to add a unit test that reproduces the issue, which both shows there is an issue and will help getting it fixed. And if you can, fix it yourself. My first contributions to Cucumber-JVM were unit tests; the first one to show that a particular (old) issue had already been resolved, and another to reproduce an issue. Fortunately, I was also able to fix it too!
Labelling issues
Many projects on GitHub use labels, to signify the type of issues. Which labels are used will vary per project, but using labels can help people either find an issue similar to theirs (preventing duplicate issues from being created), or help people find issues they could contribute to. Adding the right labels to issues can help both maintainers and users of the project, and is something other maintainers might not have time for. Note: as far as I know, you do have to have access to the project to be able to add labels, so this is not something you can do when you first get started.
Review PR’s
Reviewing incoming PR’s can be a lot of work. If you are not too familiar with the code base, you might not be able to say anything about the overall usefulness or direction of the PR, but you might still be able to help. For starters, you could check the readability of the code, see whether the test coverage is good, look for typos, etc. Alternatively, you might be able to build the branch locally and test it yourself to see if it solves whatever issue it was designed to solve. Even if you can’t read code, you can probably still review documentation PR’s (see above). Reviewing PR’s can also be a great way to gain experience with reading code, and to get to know the project better.
Testing new features or versions
Maintainers and contributors don’t always have time to extensively test new features or versions. This is where you can help! Create a new project to test the new feature, or upgrade your existing project to the new version (even if it is still in development). Provide feedback to the people who are working on it.
Note: there might not be open issues registered for test work. That doesn’t mean it’s not needed! You might hear about test work that is needed, when you become a more active member of the community. If this is something you’d like to do, but you are not aware of anything that needs testing, ask the community! Even if they don’t have anything right now, they might ask you in the future. For example, when Cucumber expressions were being implemented in Cucumber-JVM, I tried them out with a small sample project and reported my findings to core maintainers, as well as made some notes on things that should be added to the documentation.
Cleaning up code
Projects might also benefit from refactoring or cleaning up code. There will be plenty of ways the code could be improved, especially if they have been developed over several years by different developers. One of the PR’s I did on Cucumber-JVM recently, was to make use of a parent pom.xml. This removed a lot of duplicate dependencies from the project. While doing this, I also learned more about Maven, which I have since been able to use at work.
Upgrading dependencies
If you notice a project is using outdated dependencies, see if you can upgrade them. Especially, if the older versions contain security vulnerabilities. Note that some projects might introduce breaking changes, so always make sure that the project still works with the upgraded dependency. For example, I have updated Jackson dependencies on GraphQL, due to some security issues found in older versions of Jackson.
Other
There might be other ways for you to contribute. Even if you’re not a programmer, you might have other skills that are valuable to a project. If you do have ways to contribute that are not mentioned here, please let me know in the comments!
How to find a project to contribute to
There are several ways to find a project to contribute to.
Websites
If you have no idea where to start, there are several websites that list projects looking for help: * GitHub itself offers some suggestions on choosing projects. * Have a look on CodeTriage for projects with open issues * Look for issues by project, label (like “good first issue”) and/or tag (for example, your preferred programming language) on Up-for-grabs * You can also find these links and more on First Timers Only
Projects you use yourself
A great tip on where to get started, is to help out with a project you use yourself. You’ll be more familiar with this project, and you might even be able to solve your own problems. If you are already be part of their community, you’ll have a better idea of what is needed.
Focus on welcoming communities!
Focus on projects that welcome new contributors. Some of the following might help: * See if there are any issues marked “first timers only”, “good first issue” or something similar; this would signify they are open / looking for new contributors and give you an idea of where to start. * See how they respond to issues created or PR’s opened (do they ask for more information in a polite or a hostile way, how constructive is feedback on PR’s or issues) * Check to see if there is a code of conduct, contributing guidelines or things like that (and whether they are enforced) * Join the communication channel(s) to see how the community interacts
Know that there are plenty of projects and communities out there who would love, love, LOVE your help! And I hope you find one, if you are looking.
Personally, I was very lucky to find the Cucumber community, who were very welcoming and helpful. When I first started, I accidentally merged something that shouldn’t have been merged yet. Unfortunately, I didn’t know a lot about Git yet, but several core maintainers helped to fix the problem (and were still nice to me). I spent the weekend doing Git tutorials, so this would never happen again! Learning more about Git has been very helpful at work; I’m even able to help out coworkers at times.
Reasons not to contribute to open source
While there are many reasons to contribute to open source, there might also be reasons not to do so.
Employer or contract doesn’t allow it
This might be a valid reason for you not to contribute, especially to the code. You might still be able to help the community by answering questions from other users, sharing your experience, creating issues or adding relevant information to them. If your employer uses open source projects, they will also have an interest in keeping the project maintained. Instead of letting their employees contribute code, perhaps they could become a sponsor? Cucumber, and several other projects, accept donations through OpenCollective; others use Patreon, or other options. Recently, one of my coworkers donated his education budget for the year to an open source project he uses at work. I think that is a great idea!
Being a noob…
Please don’t underestimate the value of a fresh pair of eyes! Documentation, especially beginner tutorials, should be easy to follow along even for people who are new to the project. The project itself should be easy to use. If they are not, this is your chance to provide valuable feedback! If you are having any problems when using the project, contact the community and let them know. And if they take the time to help you out, why not document what you have learned for the next person who comes along? Even if you are not having any problems right now, you can still read the documentation and provide feedback (see above).
Not sure this is a bug, or how to fix it
If you have a question, please find out how to contact the community. Many projects have an active user community willing to help you. If you’re not sure you’ve found a bug, just ask them. They’ll let you know whether you should log an issue. They will also ask you for the information they need to fix it. If you want to add a feature but don’t know how, there might be people to help you get started. They could point you in the right direction of where to make the change, or provide insights on where the project is going. Proposing your change before doing a lot of work on it, will also prevent you from building a feature that might not be in line with the direction the project is taking.
Don’t have time
Again, fair enough. You might have other priorities in your life. Not all contributions have to be big or take a lot of time. There might be small things you can do. You might be able to do them at work, if they are related to your work (and your employer allows you to!). Even engaging with the community, by asking and answering questions, or logging issues, can be very helpful!
Come collaborate with us!
Open source software isn’t free — someone else paid for it.
However you are using open source, and however little you feel you have to contribute, there are plenty of small ways you can make open source better. I hope I’ve given you some ideas to try. Please go and find a way you can contribute to your favourite open source project!
This tutorial will tell you how to get started with Cucumber-jvm in Java. It is intended as a brief, easy guide. For more examples on how to use Cucumber with Java or Kotlin, check the links at the bottom of this tutorial.
Prerequisites
To get started with Cucumber in Java, you will need the following:
Java SE — Java 8 (Java 9 is not yet supported by Cucumber)
First, we need to set up the project so we can use Cucumber.
Create a Maven project
In this tutorial, we’re using Maven to import external dependencies. We start by creating a new Maven project, which will automatically create some of the directories and files we will need.
To create a new Maven project in IntelliJ IDEA:
Click the menu option File > New > Project
In the New project dialog box, select Maven on the left (if it isn’t already selected)
Make sure that the Project SDK is selected (for instance, Java 1.8) and click Next
Specify a GroupId and ArtifactId for your project and click Next
Specify a Project name and Project location for your project (if needed) and click Finish
You should now have a project with the following structure:
├── pom.xml
└── src
    ├── main
    │   └── java        (marked as sources root)
    │   └── resources   (marked as resources root)
    └── test
        └── java        (marked as test sources root)
Add Cucumber to your project
Add Cucumber to your project by adding a dependency to your pom.xml:
If you have IntelliJ IDEA configured to auto-import dependencies, it will automatically import them for you. Otherwise, you can manually import them by opening the Maven Projects menu on the right and clicking the Reimport all Maven Projects icon on the top left of that menu. To check if your dependencies have been downloaded, you can open the External Libraries in the left Project menu in IntelliJ IDEA.
To make sure everything works together correctly, open a terminal and navigate to your project directory (the one containing the pom.xml file) and enter mvn clean test.
You should see something like the following:
[INFO] Scanning for projects...
[INFO]
[INFO] -------------------------------------------------------------
[INFO] Building cucumber-tutorial 1.0-SNAPSHOT
[INFO] -------------------------------------------------------------    <progress messages....>[INFO] -------------------------------------------------------------
[INFO] BUILD SUCCESS
[INFO] -------------------------------------------------------------
[INFO] Total time: <time> s
[INFO] Finished at: <date> <time>
[INFO] Final Memory: <X>M/<Y>M
[INFO] -------------------------------------------------------------
Your project builds correctly, but nothing is tested yet as you have not specified any behaviour to test against.
Specifying Expected Behaviour
We specify the expected behaviour by defining features and scenarios.
The feature describes (part of) a feature of your application, and the scenarios describe different ways users can use this feature.
Creating the Feature Directory
Features are defined in .feature files, which are stored in the src/test/resources/ directory (or a sub-directory).
We need to create this directory, as it was not created for us. In IntelliJ IDEA:
In the Test folder, create a new directory called resources.
Right click the folder and select Mark directory as > Test Resources Root.
You can add sub-directories as needed. Create a sub-directory with the name of your project in src/test/resources/
Our project structure is now as follows:
├── pom.xml             (containing Cucumber and JUnit dependencies)
└── src
    ├── main
    │   └── java        (marked as sources root)
    │   └── resources   (marked as resources root)
    └── test
        ├── java        (marked as test sources root)
        └── resources   (marked as test resources root)
                └── <project>
Creating a Feature
To create a feature file:
Open the project in your IDE (if needed) and right-click on the src/test/resources/<project> folder.
Select New > File
Enter a name for your feature file, and use the .feature extension. For instance, belly.feature.
Our project structure is now as follows:
├── pom.xml             (containing Cucumber and JUnit dependencies)
└── src
    ├── main
    │   └── java        (marked as sources root)
    │   └── resources   (marked as resources root)
    └── test
        ├── java        (marked as test sources root)
        └── resources   (marked as test resources root)
                └── <project>
                       └── belly.feature
Files in this folder with an extension of .feature are automatically recognized as feature files. Each feature file describes a single feature, or part of a feature.
Open the file and add the feature description, starting with the Feature keyword and an optional description:
Feature: Belly
  Optional description of the feature
Creating a Scenario
Scenarios are added to the feature file, to define examples of the expected behaviour. These scenarios can be used to test the feature. Start a scenario with the Scenario keyword and add a brief description of the scenario. To define the scenario, you have to define all of its steps.
Defining Steps
These all have a keyword (Given, When, and Then) followed by a step. The step is then matched to a step definition, which map the plain text step to programming code.
The plain text steps are defined in the Gherkin language. Gherkin allows developers and business stakeholders to describe and share the expected behaviour of the application. It should not describe the implementation.
The feature file contains the Gherkin source.
The Given keyword precedes text defining the context; the known state of the system (or precondition).
The When keyword precedes text defining an action.
The Then keyword precedes text defining the result of the action on the context (or expected result).
The scenario will look this:
Scenario: a few cukes
    Given I have 42 cukes in my belly
    When I wait 1 hour
    Then my belly should growl
Running the test
To run the tests from JUnit we need to add a runner to our project.
Create a new Java class in your src/test/java/<project> directory, called RunCucumberTest.java:
package <project>;

import cucumber.api.CucumberOptions;
import cucumber.api.junit.Cucumber;
import org.junit.runner.RunWith;

@RunWith(Cucumber.class)
@CucumberOptions(plugin = {"pretty"})
public class RunCucumberTest{
}
Our project structure is now as follows:
├── pom.xml             (containing Cucumber and JUnit dependencies)
└── src
    ├── main
    │   └── java        (marked as sources root)
    │   └── resources   (marked as resources root)
    └── test
        ├── java        (marked as test sources root)
        │     └── <project>
        │            └── RunCucumberTest.java
        └── resources   (marked as test resources root)
              └── <project>
                     └── belly.feature
The JUnit runner will by default use classpath:package.of.my.runner to look for features. You can also specify the location of the feature file(s) and glue file(s) you want Cucumber to use in the @CucumberOptions.
You can now run your test by running this class. You can do so by right-clicking the class file and selecting RunCucumberTest from the context menu.
You should get something like the following result:
1 Scenarios (1 undefined)
3 Steps (3 undefined)
0m0.015s
You can implement missing steps with the snippets below:@Given("^I have (\\d+) cukes in my belly$")
public void i_have_cukes_in_my_belly(int arg1) throws Exception {
    // Write code here that turns the phrase above into concrete actions
    throw new PendingException();
}@When("^I wait (\\d+) hour$")
public void i_wait_hour(int arg1) throws Exception {
    // Write code here that turns the phrase above into concrete actions
    throw new PendingException();
}@Then("^my belly should growl$")
public void my_belly_should_growl() throws Exception {
    // Write code here that turns the phrase above into concrete actions
    throw new PendingException();
}
Process finished with exit code 0
As we can see, our tests have run, but have not actually done anything — because they are not yet defined.
Define Snippets for Missing Steps
We now have one undefined scenario and three undefined steps. Luckily, Cucumber has given us examples, or snippets, that we can use to define the steps.
To add them to a Java class in IntelliJ IDEA:
Create a new Java class in your src/test/java/<project> folder (for instance, StepDefinitions.java)
Paste the generated snippets into this class
IntelliJ IDEA will not automatically recognize those symbols (like @Given, @When, @Then), so we’ll need to add import statements. In IntelliJ IDEA:
Add import statements for @Given, @When, @Then (underlined in red)
In IntelliJ IDEA you can do so by putting your cursor on the @Given symbol and press ALT + ENTER, then select Import class.
Our project structure is now as follows:
├── pom.xml             (containing Cucumber and JUnit dependencies)
└── src
    ├── main
    │   └── java        (marked as sources root)
    │   └── resources   (marked as resources root)
    └── test
        ├── java        (marked as test sources root)
        │     └── <project>
        │            └── RunCucumberTest.java
        │            └── StepDefinitions.java
        └── resources   (marked as test resources root)
              └── <project>
                     └── belly.feature
Now, when you run the test, these step definitions should be found and used.
Note: Run configurations
If this does not work, select Run > Edit Configurations, select Cucumber java from the Defaults drop-down, and add the project name to the Glue field on the Configuration tab.
Your result will include something like the following:
cucumber.api.PendingException: TODO: implement me
	at skeleton.Stepdefs.i_have_cukes_in_my_belly(Stepdefs.java:10)
	at ✽.I have 42 cukes in my belly(/Users/maritvandijk/IdeaProjects/cucumber-java-skeleton/src/test/resources/skeleton/belly.feature:4)
The reason for this is that we haven’t actually implemented this step; it throws a PendingException telling you to implement the step.
Implement the steps
We will need to implement all steps to actually do something.
Update your StepDefinitions.java class to implement the step definition.
The step can be implemented like this:
@Given("^I have (\\d+) cukes in my belly$")
    public void I_have_cukes_in_my_belly(int cukes) throws Throwable {
        Belly belly = new Belly();
        belly.eat(cukes);
    }
To make this step compile we also need to implement a class Belly with a method eat().
Implement the class Belly.java inside your src/main/java/<project> folder; create your <project> directory here (if needed)
Our project structure is now as follows:
├── pom.xml             (containing Cucumber and JUnit dependencies)
└── src
    ├── main
    │   └── java        (marked as sources root)
    │   │     └── <project>
    │                └── Belly.java
    │   └── resources   (marked as resources root)
    └── test
        ├── java        (marked as test sources root)
        │     └── <project>
        │            └── RunCucumberTest.java
        │            └── StepDefinitions.java
        └── resources   (marked as test resources root)
              └── <project>
                     └── belly.feature
Now you run the test and implement the code to make the step pass. Once it does, move on to the next step and repeat!
PendingException
Once you have implemented this step, you can remove the statement throw new PendingException(); from the method body. The step should no longer thrown a PendingException, as it is no longer pending.
Result
Once you have implemented all your step definitions (and the expected behaviour in your application!) and the test passes, the summary of your results should look something like this:
If you’d like to try Cucumber with Kotlin, have a look at my blog post.
Note: This tutorial was originally written as part of the new Cucumber documentation. You can find the cucumber documentation project on GitHub. It was adapted a little here to make a stand-alone tutorial.
Cookie Consent
We use cookies to improve your experience on our site. By using our site, you consent to cookies.
Cookie Preferences
Manage your cookie preferences below:
Essential cookies enable basic functions and are necessary for the proper function of the website.
Name
Description
Duration
Cookie Preferences
This cookie is used to store the user's cookie consent preferences.
30 days
Statistics cookies collect information anonymously. This information helps us understand how visitors use our website.
Google Analytics is a powerful tool that tracks and analyzes website traffic for informed marketing decisions.
Used to determine whether a user is included in an A / B or Multivariate test.
18 months
_ga
ID used to identify users
2 years
_gali
Used by Google Analytics to determine which links on a page are being clicked
30 seconds
_ga_
ID used to identify users
2 years
_gid
ID used to identify users for 24 hours after last activity
24 hours
_gat
Used to monitor number of Google Analytics server requests when using Google Tag Manager
1 minute
_gac_
Contains information related to marketing campaigns of the user. These are shared with Google AdWords / Google Ads when the Google Ads and Google Analytics accounts are linked together.
90 days
__utma
ID used to identify users and sessions
2 years after last activity
__utmt
Used to monitor number of Google Analytics server requests
10 minutes
__utmb
Used to distinguish new sessions and visits. This cookie is set when the GA.js javascript library is loaded and there is no existing __utmb cookie. The cookie is updated every time data is sent to the Google Analytics server.
30 minutes after last activity
__utmc
Used only with old Urchin versions of Google Analytics and not with GA.js. Was used to distinguish between new sessions and visits at the end of a session.
End of session (browser)
__utmz
Contains information about the traffic source or campaign that directed user to the website. The cookie is set when the GA.js javascript is loaded and updated when data is sent to the Google Anaytics server
6 months after last activity
__utmv
Contains custom information set by the web developer via the _setCustomVar method in Google Analytics. This cookie is updated every time new data is sent to the Google Analytics server.