Overview of IntelliJ IDEA 2023

IntelliJ IDEA is designed to help developers like us stay in the flow while we’re working. Like all IDEs, it has a lot of functionality available, but it’s designed to get out of your way to let you focus on the code.

Take a look at this overview of IntelliJ IDEA.

Introduction

  • Find Action: ⌘ ⇧ A (on macOS) / Ctrl+Shift+A (on Windows/Linux)
  • Feature Trainer
  • Hide all windows: ⌘ ⇧ F12 (on macOS) / Shift+Command+F12 (on Windows/Linux)
  • Project tool window: ⌘1 (on macOS) / Alt+1 (on Windows/Linux)
  • Quick Switch Scheme: ^`(on macOS) / Ctrl+` (on Windows/Linux)
  • IDE viewing modes
  • Preferences: ⌘, (on macOS) / Ctrl+Alt+S (on Windows/Linux)

Coding assistance

  • Code completion
  • Complete Current Statement: ⌘ ⇧ ⏎ (on macOS) / Shift+Ctrl+Enter (on Windows/Linux)
  • Show Context Actions: ⌥ ⏎ (on macOS) / Alt+Enter (on Windows/Linux)
  • Intention actions
  • Navigate to next highlighted error: F2
  • Navigate to previous highlighted error: Shift F2
  • Generate code: ⌘ N (on macOS) / Alt + Insert (on Windows/Linux)
  • Live templates

Refactoring

  • Rename: Shift F6
  • Extend selection: ⌥ Up (on macOS) / Ctrl+W (on Windows/Linux)
  • Extract variable: ⌘ ⌥ V on macOS) / Ctrl+Alt+V (on Windows/Linux)
  • Postfix completion
  • Reformat code: ⌘ ⌥ L (on macOS) / Ctrl+Alt+L (on Windows/Linux)
  • Move statement up: ⇧⌘ Up (on macOS) / Ctrl+Shift+Up (on Windows/Linux)
  • Surround with: ⌘ ⌥ T (on macOS) / Ctrl+Alt+T (on Windows/Linux)
  • SmartType Completion: ^ ⇧ Space  (on macOS) / Shift+Ctrl+Space (on Windows/Linux)
  • Inline: ⌘ ⌥ N (on macOS) / Ctrl+Alt+N (on Windows/Linux)
  • Extract method: ⌘ ⌥ M on macOS) / Ctrl+Alt+M (on Windows/Linux)

Testing & Debugging

Navigation

  • Navigate backwards: ⌘ [ (on macOS) / Ctrl+Alt+Left (on Windows/Linux)
  • Navigate forwards: ⌘ ] (on macOS) / Ctrl+Alt+Right (on Windows/Linux)
  • Find usages / declaration: ⌘ B (on macOS) / Ctrl+B (on Windows/Linux)
  • Recent Files: ⌘E (on macOS) / Ctrl+E (on Windows/Linux)
  • Recent locations: ⇧⌘E (on macOS) / Ctrl+Shift+E (on Windows/Linux)
  • Search everywhere: ⇧⇧ (on macOS) / Shift Shift (on Windows/Linux)
  • Find in files: ⇧⌘F (on macOS) / Ctrl+Shift+F (on Windows/Linux)

Reading Code

  • Folding -> Expand: ⌘ + (on macOS) / Ctrl+ + (on Windows/Linux)
  • Folding -> Collapse: ⌘ – (on macOS) / Ctrl+ – (on Windows/Linux)
  • Folding -> Expand All : ⇧ ⌘ + (on macOS) / Ctrl+Shift+ + (on Windows/Linux)
  • Folding -> Collapse All: ⇧ ⌘ + (on macOS) / Ctrl+Shift+ – (on Windows/Linux)
  • File Structure: ⌘ F12 (macOS) / Ctrl+F12 (Windows/Linux) – Twice to expand list
  • Quick documentation: F1 (macOS) / Ctrl+Q (Windows/Linux)
  • Toggle Rendered View:  ^ ⌥ Q (macOS) / Ctrl+Alt+Q (Windows/Linux)

Version Control support (Git)

  • Commit: ⌘ 0 (macOS) / Alt+0 (Windows/Linux)
  • Jump to last tool window: F12
  • Show diff: ⌘ D (macOS) / Ctrl+D (Windows/Linux)
  • Commit Anyway and Push: ⌥ ⌘ K (on macOS) / Ctrl+Alt+K (on Windows/Linux)
  • Git tool window: ⌘9 (on macOS) / Alt+9 (on Windows/Linux)
  • Terminal: ⌥ F12 (on macOS) / Alt+F12 (on Windows/Linux)
  • Git integration

Language and technology support

Integrated tools support

Using Git Interactive Rebase

This article was published on Foojay.io on August 25, 2022.

This tutorial will cover how to clean up your Git commit history with Git interactive rebase, both via the IntelliJ IDEA UI and from the command line.

Git interactive rebase allows you to change individual commits, squash commits together, drop commits or change the order of the commits.

This allows you to clean up your Git commit history to make it linear and meaningful, which can make it easier to understand the history of the project in the future.

Open the Git window in IntelliJ IDEA using ⌘+9 on Mac (or Alt+9 on Windows & Linux). In the Git log window we can see the commits that were made to the project.

We will use a Git demo project available on GitHub. This example uses TDD (Test Driven Development) to add a new feature.

In TDD, we start by adding a failing test, writing the minimum of code we need to get that test to pass and finally do some refactoring.

Even though we made the necessary changes in multiple commits, we don’t need to keep all these individual commits for future reference.

Using Git interactive rebase in the UI

We can use Git Interactive Rebase in IntelliJ IDEA as follows:

In the Git history, identify the commit from where you want to clean up your history. That will be the oldest commit in the series of commits you want to clean up; in this example, the first failing test that we added.

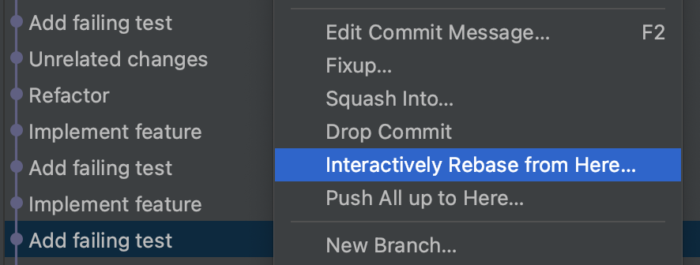
Right-click on the commit from where you want to clean up your history and select “Interactively Rebase from Here…“.

IntelliJ IDEA context menu with the option "Interactively Rebase from Here..." highlighted in blue

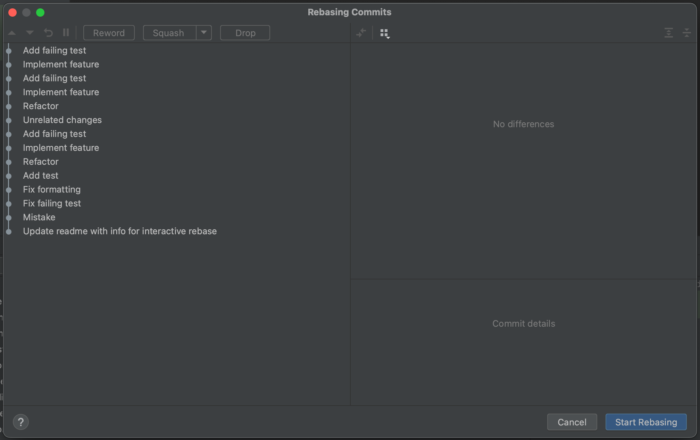
This will open the “Rebasing Commits” popup window with a list of the commits that were done on top of the selected commit.

IntelliJ IDEA "Rebase Commits" dialog

Notice there are several options at the top of this popup, that become active when we select one or more of the commits:

  • Reword allows us to change the commit message of a specific commit.
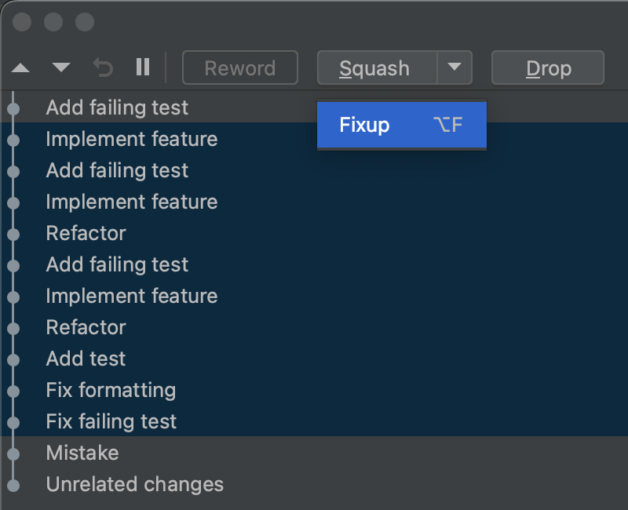
  • The Squash button is actually a dropdown that allows us to choose between Squash and Fixup. Both options will combine the changes made in the selected commits into one commit. If we select squash, by default the individual commit messages will be combined. If we select fixup, the commit message of the fixup commit will be discarded. You can select fixup while in the “Rebasing Commits” popup with ⌥+F on Mac (or Alt+F on Windows & Linux)
  • Drop allows us to drop one or more commits.

Changing the order of the commits

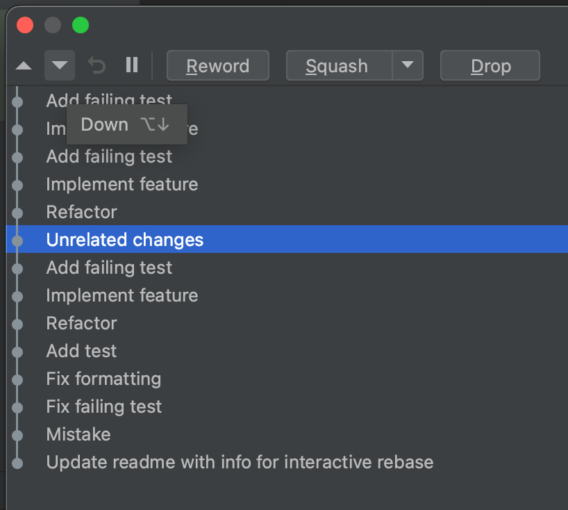
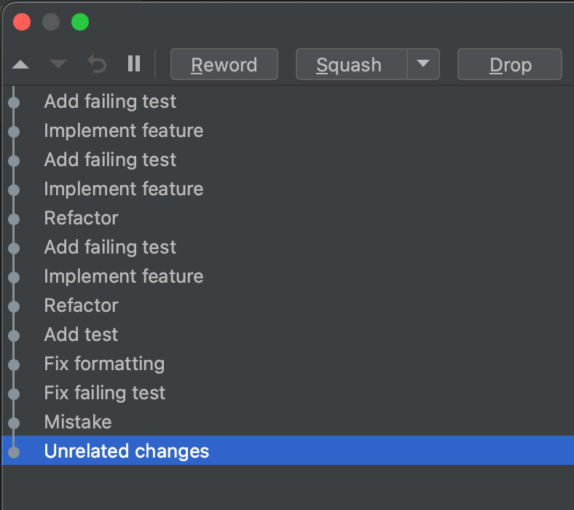
Let’s say we want to change the order of the commits; we want to keep the unrelated change, but separately from the changes for the new feature. We can select this commit and use the up and down buttons on the top left to change where in the order this commit will be.

List of commits in the "Rebase Commits" dialog window, with one commit selected.
List of commits in the "Rebase Commits" dialog window, with the  selected commit moved down.

Once we’re sure about the order, select “Start Rebasing“. We see in the Git log that the order of the commits has changed.

Combining multiple commits into one commit

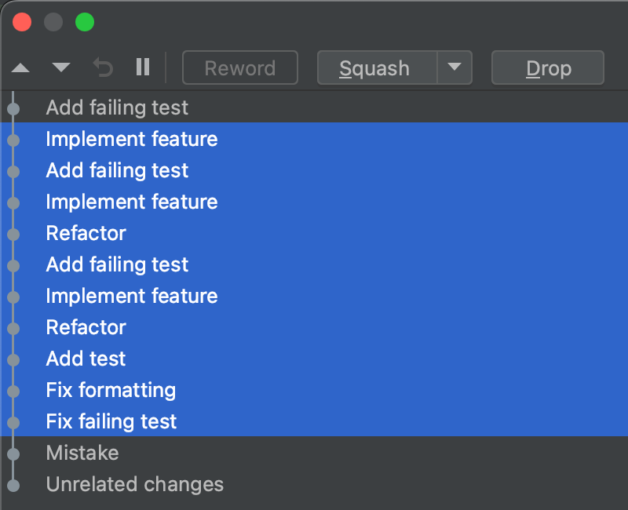
Next, we want to combine multiple commits where we added the tests and implemented the new feature. Let’s reopen the “Rebasing Commits” window and select those commits.

List of commits in the "Rebase Commits" dialog window, with several commits in a row selected.

Now, because we want to combine those commits into one commit with one commit message we select “Fixup“, and then select “Start Rebasing“.

The Squash dropdown selected, with the Fixup option selected in the "Rebase Commits" dialog window.
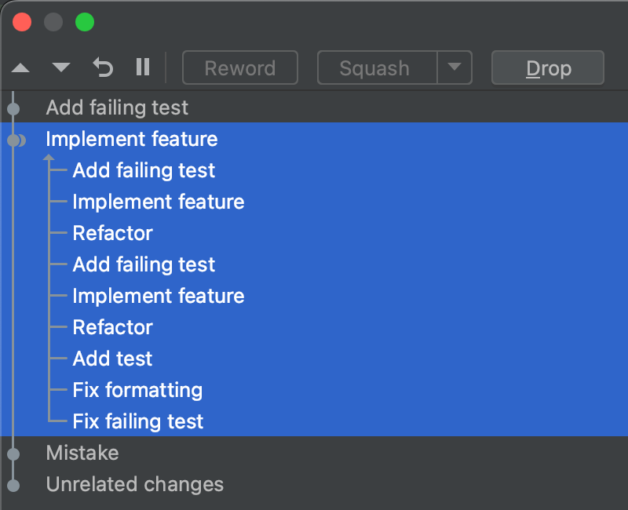
List of selected commits in the "Rebase Commits" dialog window, shown in a tree structure ready for Fixup.

In the Git log, we can see that multiple individual commits are now combined into one commit with one commit message.

Drop a commit

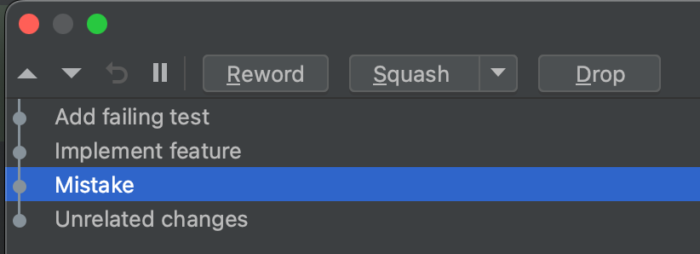
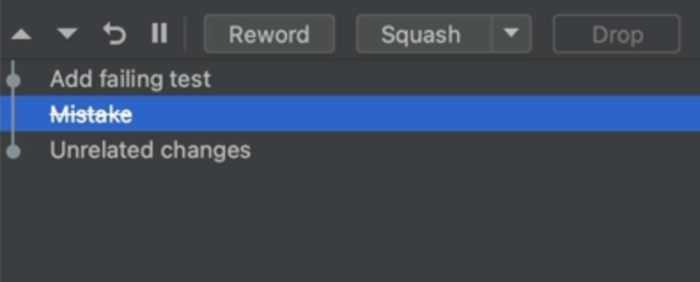
Finally, we want to drop the commit with a mistake that we made. Let’s reopen the “Rebasing Commits” window, select the mistaken commit, select “Drop” and select “Start Rebasing“.

List of commits in the "Rebase Commits" dialog window, with one commits selected.
List of commits in the "Rebase Commits" dialog window, where the selected commit it shown with strike through.

We see in the Git log that the commit is dropped.

Rename a commit

Now that we have cleaned up our commit history, we might want to rename the commit where we added the new feature. We have several options to do so.

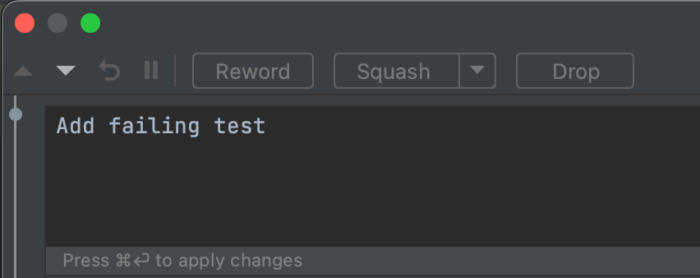
We can do so using Git interactive rebase, in the “Rebasing Commits” popup, by selecting the commit you want to rename and clicking the “Reword” button at the top of the popup. This will open a small editor pane where you can reword the commit message for this commit, apply the change to the message and select “Start Rebasing“.

Open dialog to Reword the commit message.

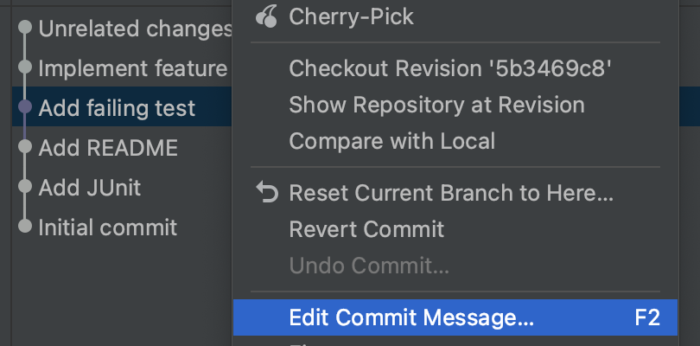
You can also edit the commit message directly in the Git log window. Right-click the commit you want to rename and select “Edit Commit Message” or press F2 on macOS, Windows or Linux.

IntelliJ IDEA context menu with option "Edit Commit Message" highlighted.

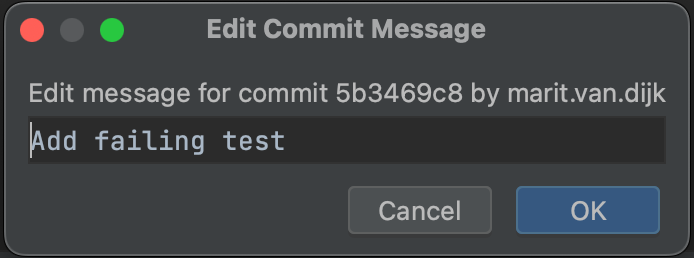
This will open a “Edit Commit Message” popup, where you can edit the commit message and click “Ok” (or “Cancel“) when you are done.

IntelliJ IDEA "Edit Commit Message" dialog.

See which Git commands were executed

To see which Git commands IntelliJ IDEA performed, open the “Console” tab in the Git window.

Using Git interactive rebase from the command line

Let’s take a look at how to use Git interactive rebase from the command line.

In the Git history, identify the commit just before the commit from where you want to clean up your history. In this example, that will be the last commit before we started adding the new feature.

Find the commit hash for this commit in the “Commit Details” to the right of the Git history in the Git window and copy this commit hash. (Spoiler: the commit hash in this example is 34bb0f99.)

IntelliJ IDEA Git history, showing the details of a selected commit, with the commit hash `34bb0f99` highlighted.

Open the Terminal window, using ⌥F12 on Mac (or Alt+F12 on Windows & Linux) and type git rebase -i 34bb0f99 (where 34bb0f99 is the commit hash we copied above).

Terminal with the command `git rebase -i 34bb0f99`

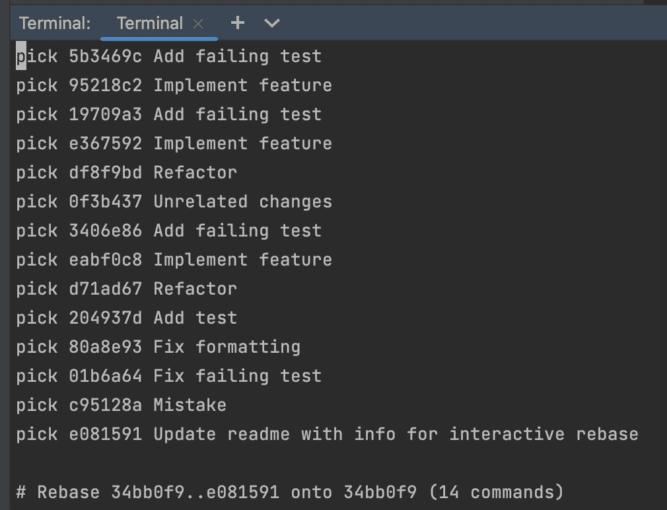
This will open an editor in the terminal with the list of commits that were done on top of the selected commit. Each line in this file is an individual commit.

Terminal with vi editor open, showing a list of commits.

By default, Git will use whatever you have set as your default text editor. If you haven’t set one, it will fall back to the vi editor, which is what we will use in this tutorial.

Changing the order of the commits

Let’s say we want to change the order of the commits; we want to keep the unrelated change, but separately from the changes for the new feature. We can do so by changing the order of the lines (individual commits) to reflect the order we want.

In the editor in the terminal, switch to edit mode by pressing I to be able to edit this file.

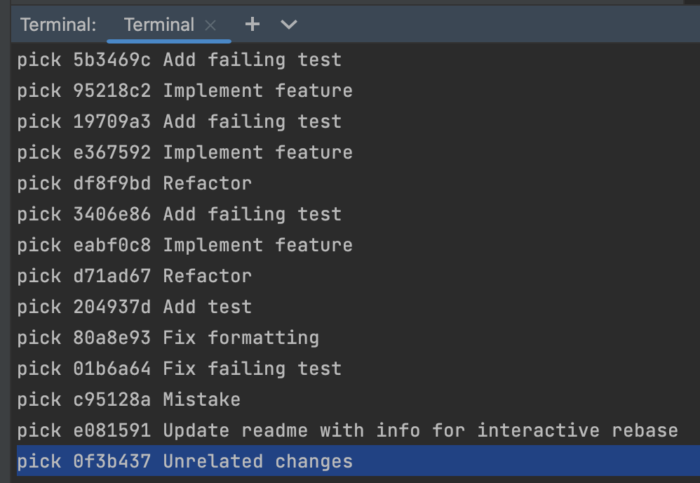
We can change the order of the lines by removing the commit we want to move from the list and inserting it in the place where we want it.

In vi, we can do so as follows:

  • Place the cursor anywhere on the line you want to move (in this example the commit “Unrelated changes”) and remove this line by typing dd.
  • Move the cursor to the line where you want to reinsert this commit (in this example, the end of the file) and type p.
  • Note: you do not need to switch to edit mode to do so.
Terminal with vi editor open, showing a list of commits. The bottom commit is highlighted.

Once we’re sure about the order, we need to save the file. Press esc to exit edit mode and type :wq to save the file.
Note: If you made changes to the file that you do not want to save, type :q! to force quit.

The interactive rebase will be applied. We see in the Git log that the order of the commits has changed.

Combining multiple commits into one commit

Next, we want to combine multiple commits where we added the tests and implemented the new feature. In the terminal, type git rebase -i 34bb0f99 to start rebasing. If you have already run this command, you can press the up arrow  in the terminal to show the last used command(s).

This will again open an editor in the terminal with the list of commits.

Switch to edit mode in the editor in the terminal. In vi, you can do so by pressing I.

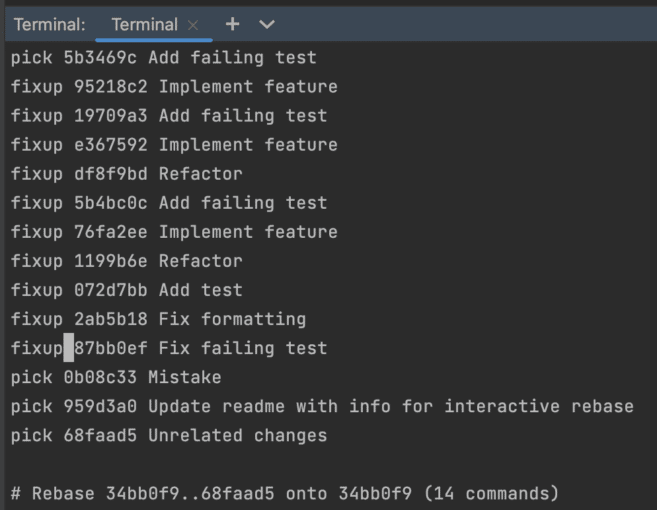
For each of the commits we want to combine, replace “pick” with “fixup”.

Note that we use “fixup” because we want to use one commit message for the combination of the commits. Alternatively, we could use “squash” to combine the individual commit messages into the new commit message.

Terminal with vi editor open, showing a list of commits. For several commits `pick` is replaced with `fixup`.

Once we have correctly edited all the commits we want to combine, save the file.
In vi, press esc to exit edit mode and type :wq to save the file.
The interactive rebase will be applied. In the Git log, we can see that multiple individual commits are now combined into one commit with one commit message.

Drop a commit

Finally, we want to drop the commit with a mistake that we made. In the terminal, type git rebase -i 34bb0f99 to start rebasing.

To drop a commit, remove that commit from the list of commits. In this example, we will remove the commit “Mistake”.

In vi, we can remove a line by placing the cursor anywhere on the line we want to remove and typing dd. Alternatively, we can switch to edit mode by pressing I and removing the line manually. Press escto exit edit mode.

Terminal with vi editor open, showing a list of commits.

Save the file by typing :wq and the interactive rebase will be applied. We see in the Git log that the commit is dropped.

Summary

Now we know how to use git interactive rebase either from the IntelliJ IDEA UI or from the command line. Give them a try and use whichever way you prefer.

IntelliJ IDEA Shortcuts Used

Here are the IntelliJ IDEA shortcuts that we used.

NamemacOS ShortcutWindows / Linux Shortcut
Open the Git Tool Window⌘9Alt+9
Open the Commit Window⌘0Alt+0
Open the Terminal⌥F12Alt+F12
Select Fixup (in the “Rebasing Commits” popup)⌥F12Alt+F
Edit commit message (in the Git Log)F2F2
IntelliJ IDEA shortcuts

Git commands Used

Here are the Git commands that we used.

Nameterminal command
Git interactively rebase from a specific commit with commit hash, for example 11aa23bcgit rebase -i 11aa23bc
Use this commitpick
Fixup this commit (add changes to previous commit under the same commit message)fixup
Squash this commit (add changes to previous commit and combine commit messages)squash
Git commands

vi Shortcuts Used

Here are the shortcuts that we used.

NameShortcut
Open interactive (edit) modeI
Exit interactive (edit) modeesc
Remove line (note: not in edit mode)dd
Reinsert line (note: not in edit mode)p
Write and quit:wq
Force quit:q!
vi shortcuts

Related Links

Use Testing to Develop Better Software Faster

This blog post was first published on the 97 Things blog on Medium and is published in the book “97 Things Every Java Programmer Should Know” (O’Reilly Media).

Book cover of “97 Things Every Java Programmer Should Know", which includes "Use Testing to Develop Better Software Faster".
Book cover of “97 Things Every Java Programmer Should Know”

Testing your code will help you verify your code does what you expect it to do. Tests will also help you to add, change, or remove functionality, without breaking anything. But testing can have additional benefits.

Merely thinking about what to test will help to identify different ways the software will be used, discover things that are not clear yet, and better understand what the code should (and shouldn’t) do. Thinking about how to test these things before even starting your implementation could also improve your application’s testability and architecture. All of this will help you build a better solution before tests and code are written.

Alongside the architecture of your system, think not only about what to test but also where to test. Business logic should be tested as close as possible to where it lives: unit tests to test small units (methods and classes); integration tests to test the integration between different components; contract tests to prevent breaking your API; etc.

Consider how to interact with your application in the context of a test and use tools designed for that particular layer, from unit test (e.g., JUnit, TestNG), to API (e.g., Postman, RestAssured, RestTemplate), to UI (e.g., Selenium, Cypress).

Keep the goal of a particular test type in mind and use the tools for that purpose, such as Gatling or JMeter for performance tests, Spring Cloud Contract Testing or Pact for contract testing, and PiTest for mutation testing.

But it is not enough to just use those tools: They should be used as intended. You could take a hammer to a screw, but both the wood and the screw will be worse off.

Test automation is a part of your system and will need to be maintained alongside production code. Make sure those tests add value and consider the cost of running and maintaining them.

Tests should be reliable and increase confidence. If a test is flaky, either fix it or delete it. Don’t ignore it — you’ll waste time later wondering why that test is being ignored. Delete tests (and code) that are no longer valuable.

A failing test should tell you exactly what is wrong quickly, without you having to spend a lot of time analyzing the failure. This means:

  • Each test should test one thing.
  • Use meaningful, descriptive names. Don’t just describe what the test does either (we can read the code), tell us why it does this. This can help decide whether a test should be updated in line with changed functionality or whether an actual failure that should be fixed has been found.
  • Matcher libraries, such as HamCrest, can help provide detailed information about the difference between expected and actual result.
  • Never trust a test you haven’t seen fail.

Not everything can (or should) be automated. No tool can tell you what it’s actually like to use your application. Don’t be afraid to fire up your application and explore; humans are way better at noticing things that are slightly “off” than machines. And besides, not everything will be worth the effort of automating.

Testing should give you the right feedback at the right time, to provide enough confidence to take the next step in your software development life cycle, from committing to merging to deploying and unlocking features. Doing this well will help you deliver better software faster.

Managing state in Cucumber-JVM using Spring

This article was first published on Medium.

A frequently asked question about Cucumber-JVM is how to share state between steps. This post describes how to use Spring with Cucumber to help you share objects between steps, without accidentally sharing state between scenarios (a common cause of flaky scenarios).

First of all, why not use static variables?

A solution often seen to share variables or objects between steps, is to declare static variables at the top of the step definitions file. However, there are several downsides this approach:

  1. As your project grows, you’ll probably want to divide your step definitions into different classes, divided into meaningful groups. At that point, you can no longer use the static variables declared in one step definition file.
  2. Using static variables might cause your tests to accidentally leak state into other scenarios, making them unreliable. Test automation is only any good if it is reliable.

Using Dependency Injection

The recommended solution to share state is to use Dependency Injection (DI). Cucumber supports several DI frameworks, including PicoContainer, Spring and Guice.

Using Dependency Injection with Cucumber will bring you several benefits:

  • You can safely share state between your steps
  • It will help improve the design of your test code; making it easier to share state between different step definition classes (so you can split them into meaningful groups).
  • It will create and manage instances of classes for you.

Choosing a Dependency Injection framework

If your project already uses Dependency Injection, you could use the framework you already have. If not, consider using PicoContainer; it’s very light-weight and easy to use (at least, this is my personal experience in side projects).

Since my team already uses Spring in our projects, we’ve opted to use Spring with Cucumber.

Adding the cucumber-spring dependency

In order to use Spring with Cucumber, we need to add a cucumber-spring dependency to our pom.xml:

<dependency>
<groupId>io.cucumber</groupId>
<artifactId>cucumber-spring</artifactId>
<version>2.4.0</version>
<scope>test</scope>
</dependency>

Other dependencies

If you are using Spring and Cucumber in your project, you will already have those dependencies. Otherwise, you should add those as well.

Annotation based configuration

If you are using annotation based configuration, you can register your classes as Beans to be managed by Spring:

  • Add the @Component annotation to each of the classes you’d like Spring to manage for you.
  • Add an annotation to specify the scope: the @Scope("cucumber-glue"), in order to have cucumber-spring remove them after each scenario!
  • Add the location of your classes to the @ComponentScan of your (test) configuration.
import org.springframework.context.annotation.ComponentScan;
import org.springframework.context.annotation.Configuration;

@Configuration
@ComponentScan("your.package")
public class Config {
}

This approach works for any classes that you have defined yourself. This may include:

  • domain objects (like a “Customer” or an “Account”)
  • any other step definition files (if you have split your files)
  • any “services” or “helper” classes you extract to represent parts of the system your tests interact with (like PageObjects, REST API’s, etc.). The steps can then call these services/helpers, instead of each other.

If you are using classes that you have not defined yourself, you cannot annotate them as Components for Spring to find with the component scan. You will have to explicitly register them as Beans in your (test) configuration.

Here is an example, using Selenium WebDriver:

import org.openqa.selenium.WebDriver;
import org.springframework.context.annotation.Bean;
import org.springframework.context.annotation.ComponentScan;
import org.springframework.context.annotation.Configuration;
import org.springframework.context.annotation.Scope;

@Configuration
@ComponentScan("your.package")
public class Config {
    @Bean
    @Scope("cucumber-glue")
    public WebDriver webDriver() {
        // return a driver with desired capabilities
    }
}

In our latest projects, we are using SpringBoot. We can annotate our StepDefinitions class with @SpringBootTest(classes = [Config.class]);.

XML configuration

Alternatively, you can specify your beans in a .cucumber.xml file, like this. Here is an example (again using Selenium WebDriver; this could also be one of your own classes):

<bean class="org.openqa.selenium.WebDriver" scope="cucumber-glue" />

You can annotate your StepDefinitions with @ContextConfiguration("classpath:cucumber.xml").

Using the Beans

You can now use the Beans, by autowiring them where you need them.

For example, you can Autowire your WebDriver to your PageObject:

import org.openqa.selenium.WebDriver;
import org.springframework.beans.factory.annotation.Autowired;

public class PageObject {
    @Autowired
    WebDriver driver;    // the rest of your page object
}

Conclusion

As you can see, it is relatively easy to add Cucumber-Spring to manage state. You are now able to safely share state between your steps, as well as split your step definition files into meaningful groups.

This will make your project easier to understand and maintain, and your tests more reliable.

Getting started with Cucumber in Java — A 10 minute tutorial

This article was first published on Medium.

This tutorial will tell you how to get started with Cucumber-jvm in Java. It is intended as a brief, easy guide. For more examples on how to use Cucumber with Java or Kotlin, check the links at the bottom of this tutorial.

Prerequisites

To get started with Cucumber in Java, you will need the following:

  • Java SE — Java 8 (Java 9 is not yet supported by Cucumber)
  • Maven — Version 3.3.1 or higher
  • An IDE editor, for example IntelliJ IDEA (which will be used in this introduction; the community edition is free!)
  • A Cucumber plugin for your IDE, for example IntelliJ IDEA Cucumber for Java plugin to go with IntelliJ IDEA

Setting up the project

First, we need to set up the project so we can use Cucumber.

Create a Maven project

In this tutorial, we’re using Maven to import external dependencies. We start by creating a new Maven project, which will automatically create some of the directories and files we will need.

To create a new Maven project in IntelliJ IDEA:

  1. Click the menu option File > New > Project
  2. In the New project dialog box, select Maven on the left (if it isn’t already selected)
  3. Make sure that the Project SDK is selected (for instance, Java 1.8) and click Next
  4. Specify a GroupId and ArtifactId for your project and click Next
  5. Specify a Project name and Project location for your project (if needed) and click Finish

You should now have a project with the following structure:

├── pom.xml
└── src
├── main
│ └── java (marked as sources root)
│ └── resources (marked as resources root)
└── test
└── java (marked as test sources root)

Add Cucumber to your project

Add Cucumber to your project by adding a dependency to your pom.xml:

<dependencies>
<dependency>
<groupId>io.cucumber</groupId>
<artifactId>cucumber-java</artifactId>
<version>2.3.1</version>
<scope>test</scope>
</dependency>
</dependencies>

In addition, we need the following dependencies to run Cucumber with JUnit:

<dependencies>
...
<dependency>
<groupId>io.cucumber</groupId>
<artifactId>cucumber-junit</artifactId>
<version>2.3.1</version>
<scope>test</scope>
</dependency> <dependency>
<groupId>junit</groupId>
<artifactId>junit</artifactId>
<version>4.12</version>
<scope>test</scope>
</dependency>
</dependencies>

If you have IntelliJ IDEA configured to auto-import dependencies, it will automatically import them for you. Otherwise, you can manually import them by opening the Maven Projects menu on the right and clicking the Reimport all Maven Projects icon on the top left of that menu. To check if your dependencies have been downloaded, you can open the External Libraries in the left Project menu in IntelliJ IDEA.

To make sure everything works together correctly, open a terminal and navigate to your project directory (the one containing the pom.xml file) and enter mvn clean test.

You should see something like the following:

[INFO] Scanning for projects...
[INFO]
[INFO] -------------------------------------------------------------
[INFO] Building cucumber-tutorial 1.0-SNAPSHOT
[INFO] ------------------------------------------------------------- <progress messages....>[INFO] -------------------------------------------------------------
[INFO] BUILD SUCCESS
[INFO] -------------------------------------------------------------
[INFO] Total time: <time> s
[INFO] Finished at: <date> <time>
[INFO] Final Memory: <X>M/<Y>M
[INFO] -------------------------------------------------------------

Your project builds correctly, but nothing is tested yet as you have not specified any behaviour to test against.

Specifying Expected Behaviour

We specify the expected behaviour by defining features and scenarios.

The feature describes (part of) a feature of your application, and the scenarios describe different ways users can use this feature.

Creating the Feature Directory

Features are defined in .feature files, which are stored in the src/test/resources/ directory (or a sub-directory).

We need to create this directory, as it was not created for us. In IntelliJ IDEA:

  1. In the Test folder, create a new directory called resources.
  2. Right click the folder and select Mark directory as > Test Resources Root.
  3. You can add sub-directories as needed. Create a sub-directory with the name of your project in src/test/resources/

Our project structure is now as follows:

├── pom.xml             (containing Cucumber and JUnit dependencies)
└── src
    ├── main
    │   └── java        (marked as sources root)
    │   └── resources   (marked as resources root)
    └── test
        ├── java        (marked as test sources root)
        └── resources   (marked as test resources root)
                └── <project>

Creating a Feature

To create a feature file:

  1. Open the project in your IDE (if needed) and right-click on the src/test/resources/<project> folder.
  2. Select New > File
  3. Enter a name for your feature file, and use the .feature extension. For instance, belly.feature.

Our project structure is now as follows:

├── pom.xml             (containing Cucumber and JUnit dependencies)
└── src
├── main
│ └── java (marked as sources root)
│ └── resources (marked as resources root)
└── test
├── java (marked as test sources root)
└── resources (marked as test resources root)
└── <project>
└── belly.feature

Files in this folder with an extension of .feature are automatically recognized as feature files. Each feature file describes a single feature, or part of a feature.

Open the file and add the feature description, starting with the Feature keyword and an optional description:

Feature: Belly
Optional description of the feature

Creating a Scenario

Scenarios are added to the feature file, to define examples of the expected behaviour. These scenarios can be used to test the feature. Start a scenario with the Scenario keyword and add a brief description of the scenario. To define the scenario, you have to define all of its steps.

Defining Steps

These all have a keyword (GivenWhen, and Then) followed by a step. The step is then matched to a step definition, which map the plain text step to programming code.

The plain text steps are defined in the Gherkin language. Gherkin allows developers and business stakeholders to describe and share the expected behaviour of the application. It should not describe the implementation.

The feature file contains the Gherkin source.

  • The Given keyword precedes text defining the context; the known state of the system (or precondition).
  • The When keyword precedes text defining an action.
  • The Then keyword precedes text defining the result of the action on the context (or expected result).

The scenario will look this:

Scenario: a few cukes
Given I have 42 cukes in my belly
When I wait 1 hour
Then my belly should growl

Running the test

To run the tests from JUnit we need to add a runner to our project.

Create a new Java class in your src/test/java/<project> directory, called RunCucumberTest.java:

package <project>;

import cucumber.api.CucumberOptions;
import cucumber.api.junit.Cucumber;
import org.junit.runner.RunWith;

@RunWith(Cucumber.class)
@CucumberOptions(plugin = {"pretty"})
public class RunCucumberTest{
}

Our project structure is now as follows:

├── pom.xml             (containing Cucumber and JUnit dependencies)
└── src
├── main
│ └── java (marked as sources root)
│ └── resources (marked as resources root)
└── test
├── java (marked as test sources root)
│ └── <project>
│ └── RunCucumberTest.java
└── resources (marked as test resources root)
└── <project>
└── belly.feature

The JUnit runner will by default use classpath:package.of.my.runner to look for features. You can also specify the location of the feature file(s) and glue file(s) you want Cucumber to use in the @CucumberOptions.

You can now run your test by running this class. You can do so by right-clicking the class file and selecting RunCucumberTest from the context menu.

You should get something like the following result:

1 Scenarios (1 undefined)
3 Steps (3 undefined)
0m0.015s
You can implement missing steps with the snippets below:@Given("^I have (\\d+) cukes in my belly$")
public void i_have_cukes_in_my_belly(int arg1) throws Exception {
// Write code here that turns the phrase above into concrete actions
throw new PendingException();
}@When("^I wait (\\d+) hour$")
public void i_wait_hour(int arg1) throws Exception {
// Write code here that turns the phrase above into concrete actions
throw new PendingException();
}@Then("^my belly should growl$")
public void my_belly_should_growl() throws Exception {
// Write code here that turns the phrase above into concrete actions
throw new PendingException();
}
Process finished with exit code 0

As we can see, our tests have run, but have not actually done anything — because they are not yet defined.

Define Snippets for Missing Steps

We now have one undefined scenario and three undefined steps. Luckily, Cucumber has given us examples, or snippets, that we can use to define the steps.

To add them to a Java class in IntelliJ IDEA:

  1. Create a new Java class in your src/test/java/<project> folder (for instance, StepDefinitions.java)
  2. Paste the generated snippets into this class

IntelliJ IDEA will not automatically recognize those symbols (like @Given@When@Then), so we’ll need to add import statements. In IntelliJ IDEA:

  • Add import statements for @Given@When@Then (underlined in red)

In IntelliJ IDEA you can do so by putting your cursor on the @Given symbol and press ALT + ENTER, then select Import class.

Our project structure is now as follows:

├── pom.xml             (containing Cucumber and JUnit dependencies)
└── src
├── main
│ └── java (marked as sources root)
│ └── resources (marked as resources root)
└── test
├── java (marked as test sources root)
│ └── <project>
│ └── RunCucumberTest.java
│ └── StepDefinitions.java
└── resources (marked as test resources root)
└── <project>
└── belly.feature

Now, when you run the test, these step definitions should be found and used.

Note: Run configurations

If this does not work, select Run > Edit Configurations, select Cucumber java from the Defaults drop-down, and add the project name to the Glue field on the Configuration tab.

Your result will include something like the following:

cucumber.api.PendingException: TODO: implement me
at skeleton.Stepdefs.i_have_cukes_in_my_belly(Stepdefs.java:10)
at ✽.I have 42 cukes in my belly(/Users/maritvandijk/IdeaProjects/cucumber-java-skeleton/src/test/resources/skeleton/belly.feature:4)

The reason for this is that we haven’t actually implemented this step; it throws a PendingException telling you to implement the step.

Implement the steps

We will need to implement all steps to actually do something.

  • Update your StepDefinitions.java class to implement the step definition.

The step can be implemented like this:

@Given("^I have (\\d+) cukes in my belly$")
public void I_have_cukes_in_my_belly(int cukes) throws Throwable {
Belly belly = new Belly();
belly.eat(cukes);
}

To make this step compile we also need to implement a class Belly with a method eat().

  • Implement the class Belly.java inside your src/main/java/<project> folder; create your <project> directory here (if needed)

Our project structure is now as follows:

├── pom.xml             (containing Cucumber and JUnit dependencies)
└── src
├── main
│ └── java (marked as sources root)
│ │ └── <project>
│ └── Belly.java
│ └── resources (marked as resources root)
└── test
├── java (marked as test sources root)
│ └── <project>
│ └── RunCucumberTest.java
│ └── StepDefinitions.java
└── resources (marked as test resources root)
└── <project>
└── belly.feature

Now you run the test and implement the code to make the step pass. Once it does, move on to the next step and repeat!

PendingException

Once you have implemented this step, you can remove the statement throw new PendingException(); from the method body. The step should no longer thrown a PendingException, as it is no longer pending.

Result

Once you have implemented all your step definitions (and the expected behaviour in your application!) and the test passes, the summary of your results should look something like this:

Tests run: 5, Failures: 0, Errors: 0, Skipped: 0, Time elapsed: 0.656 secResults :Tests run: 5, Failures: 0, Errors: 0, Skipped: 0[INFO] -------------------------------------------------------------
[INFO] BUILD SUCCESS
[INFO] -------------------------------------------------------------
[INFO] Total time: 5.688 s
[INFO] Finished at: 2017-05-22T15:43:29+01:00
[INFO] Final Memory: 15M/142M
[INFO] -------------------------------------------------------------

Examples

To get started with a working project, try the cucumber-java skeleton project which is available from GitHub.

For more examples of how to use Cucumber, have a look at the examples provided in the cucumber-jvm project on GitHub.

If you’d like to try Cucumber with Kotlin, have a look at my blog post.

Note: This tutorial was originally written as part of the new Cucumber documentation. You can find the cucumber documentation project on GitHub. It was adapted a little here to make a stand-alone tutorial.

Take-aways from European Testing Conference 2018 — Do try this at home!

This article was first published on Medium.

This week I was lucky enough to attend European Testing Conference in Amsterdam. To get an impression of the conference, you can visit their website, read up on the #EuroTestConf hashtag on Twitter, or check any of the links at the end of this post.

In this blogpost, I’d like to share some of the take-aways from this conference. Do try this at home!

  1. “Painless Visual Testing” — Gojko Adzic

During the first keynote, Gojko Adzic likened visual testing to traveling with children: “always more painful and expensive than expected”.

Tools can help you collect data, but cannot determine whether the result looks “good”. We will often have to visually inspect the UI. Existing tests break when we makes changes to the UI.

To deal with this, Gojko introduced the idea of visual approval testing and gave a demo of a tool built for that purpose: https://github.com/AppraiseQA/appraise

It would be fun to play with this tool, or at least this idea, to see how this could help make visual testing easier.

An earlier version of this talk can be found here.

2. How Would You Test a Text Field? — Maaret Pyhäjärvi

Maaret used the interview question “ How Would You Test a Text Field?” to generate ideas on how to test a text field, and illustrate how the types of answers people give indicate their level of test experience and mindset.

Some resources mentioned in the talk:

3. Writing Better BDD Scenarios — Seb Rose and Gáspár Nagy

During the workshop, Seb mentioned Example Mapping as described by Matt Wyne

4. Generating Test Scenarios” — Llewellyn Falco

Llewellyn showed us how to quickly increase test coverage by generating test cases. This is also something I’d love to play with!

Of course, he had to first show us his infamous sparrow deck:

Also, the BugMagnet tool was mentioned:

Having just recently heard of BugMagnet, I definitely plan to use this at work!

For more on approval testing: http://approvaltests.com/

5. Automating repetitive communication tasks with a Bot” — Pooja Shah

Pooja Shaj showed us chatbot Alice. You can find the repository on GitHub: https://github.com/moengage/alice

6. Interactive sessions

The conference made a point of being interactive; a lot of the insights came from great keynotes and workshops, as well as fellow attendees.

The interactive parts of the conference included a speed meet (talk to different people for 5 minutes each), lean coffee (facilitated discussion) and open space (free format to present, discuss or ask for help).

More on Lean Coffee: http://leancoffee.org/

One of the questions raised in our group was “How to motivate developers to test?”. Apart from the obvious “managing programmers is like herding cats”, one of the ideas mentioned was to have a bug bash.

Wrap up

The conference ended with a retrospective.

As you can see, we had a lot of fun, learned a lot and went home with new ideas to try out!

Read more:

If you want to read more about the conference, check out the following (especially the sketch notes by @marianneduijst and @KatjaBudnikov):

Conferences as a change toolMaaret Pyhäjärvi

European Testing Conference 2018 – Coming HomeLisi Hocke

ETC 2018, it was simply awesomeAmit Wertheimer

ETC 2018, did I say it was awesome?Amit Wertheimer

European Testing Conference 2018Markus Tacker

What I learned on first day of European Testing Conference 2018 – Karlo Smid

Arena lifeSeb Rose

Jackpot!Seb Rose

European Testing Conference 2018 #EuroTestConfKatja Budnikov

Collection of Sketchnotes of #EuroTestConfMarianne Duijst