If you’re working on a real world project, you’re probably using external dependencies. You might need to analyze which dependencies your application uses. For example, you may want to find out how a particular version of a dependency ended up in your application. Let’s take a look at how IntelliJ IDEA can help you to analyze dependencies.
There are several reasons why you might want to move a commit to a different branch. Let’s take a look at some of them.
Committed to the wrong branch
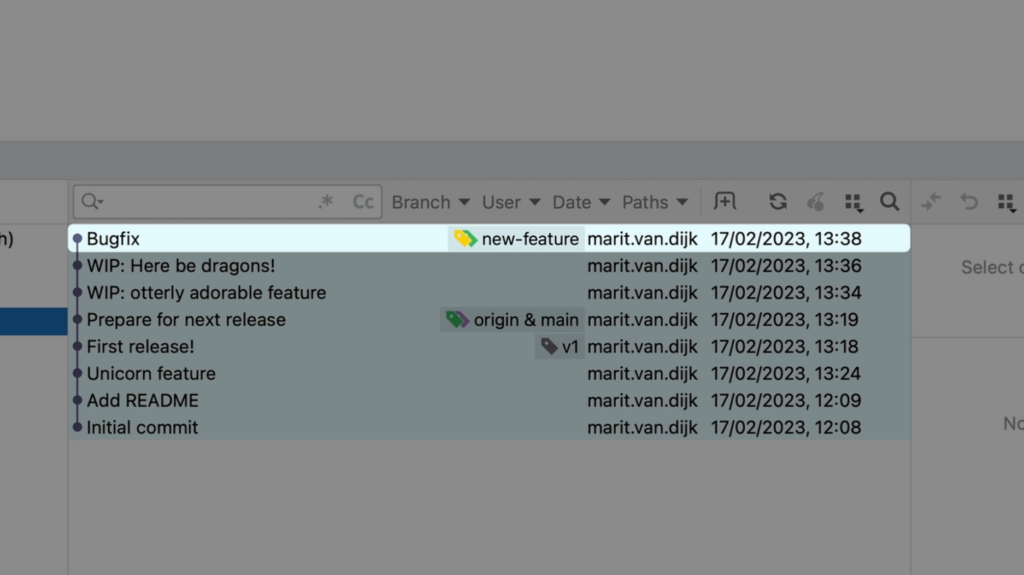
You’re working on a new feature, but an urgent bug came in. You fixed the bug and committed the fix, but oops… you forgot to create a new branch for the bugfix! Now this bugfix is on the wrong branch. How do we fix this?
Bugfix commit is on the wrong branch
Use cherry-pick to move the commit
I could redo the work, especially if it’s a small change, but … I don’t want to! Luckily, there is a better way.
We only want to move this one commit from the feature branch to a separate bugfix branch. We can do this using Git’s “cherry pick” option from IntelliJ IDEA.
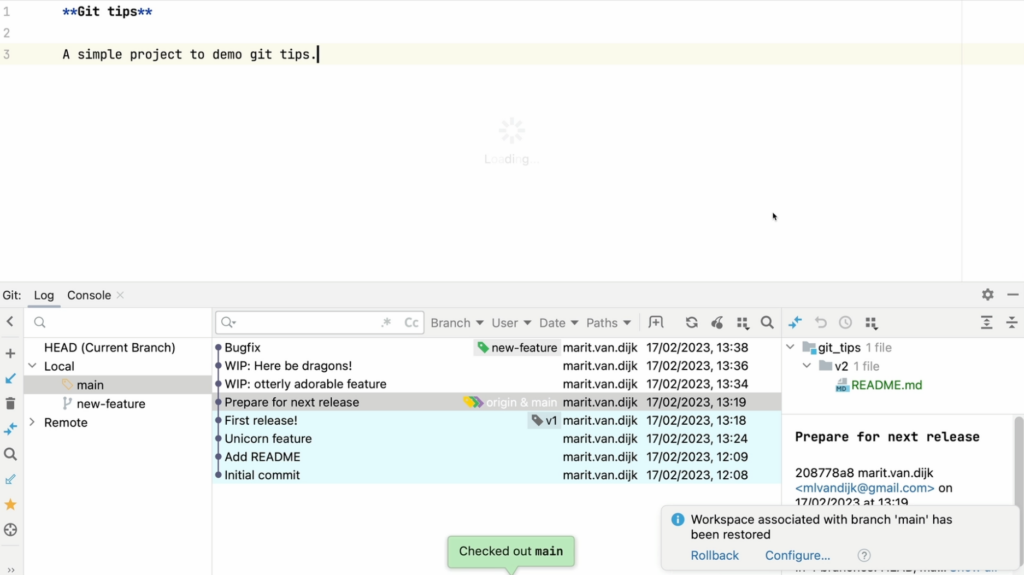
First, let’s go back to main and create the bugfix branch that we should have created in the first place.
Back on the main branch
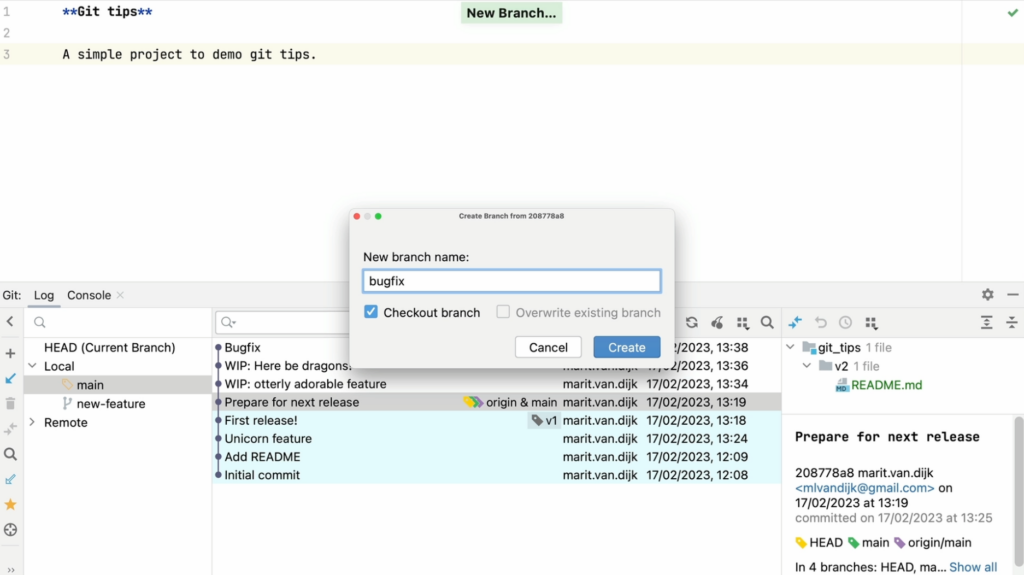
Once we’re back on the main branch, we can create a new branch named “bugfix”.
Create a new Bugfix branch
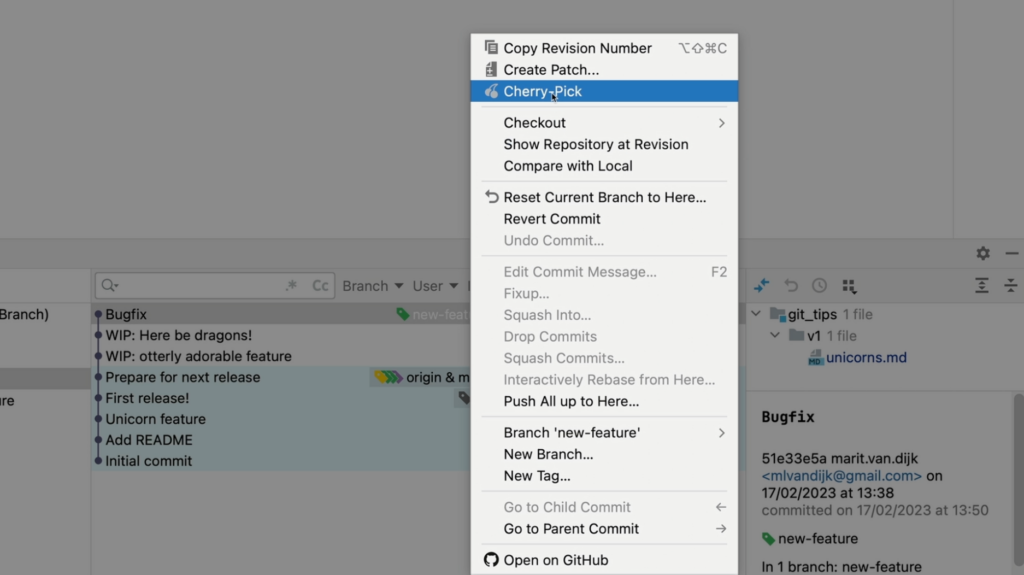
On the newly created branch, we can select the bugfix commit from the other branch and select Cherry-Pick to apply that commit to our current branch.
Cherry Pick the selected commit from the context menu
Cherry-pick from the command line
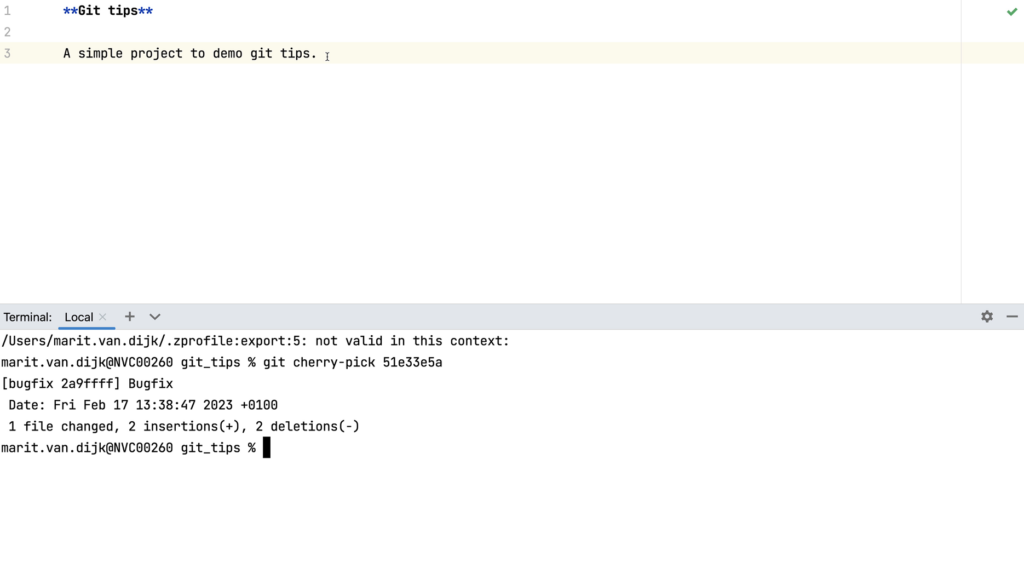
Yes, we can do this from the command linetoo, but there’s no cute cherry icon on the command line. To cherry-pick a commit from the command line, we can use the command git cherry-pick <commit hash>. We would need to find the commit hash of the commit we want to cherry-pick, which we can find for example in the Commit Details pane in the Git log window (see below).
Cherry-pick on the command line
As we can see, the bugfix commit is now on the bugfix branch.
Cherry-pick successful
Other use cases for cherry-picking
Cherry picking can be useful in other situations too. Let’s take a look at some other use cases for cherry-picking.
Backporting a fix
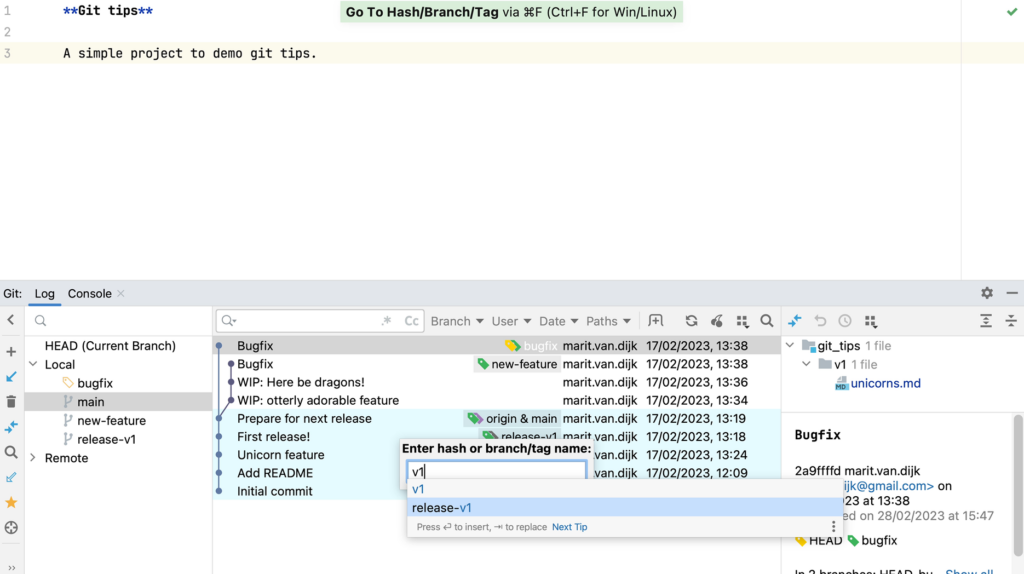
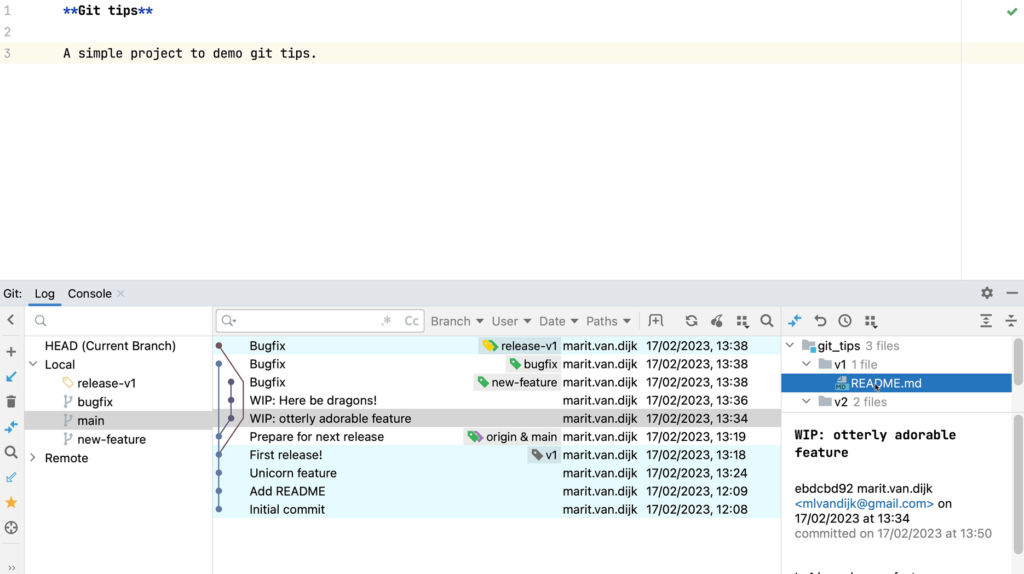
We can also use cherry-picking to backport a fix to a previous release branch. For example, let’s move our bugfix commit also to the v1-release.
To do so, first we need to look for the last release (v1). We can search for a specific commit hash, branch or tag name in the Git log (⌘ F on Mac or Ctrl+F on Windows/Linux).
Search Git log for Hash/Branch/Tag
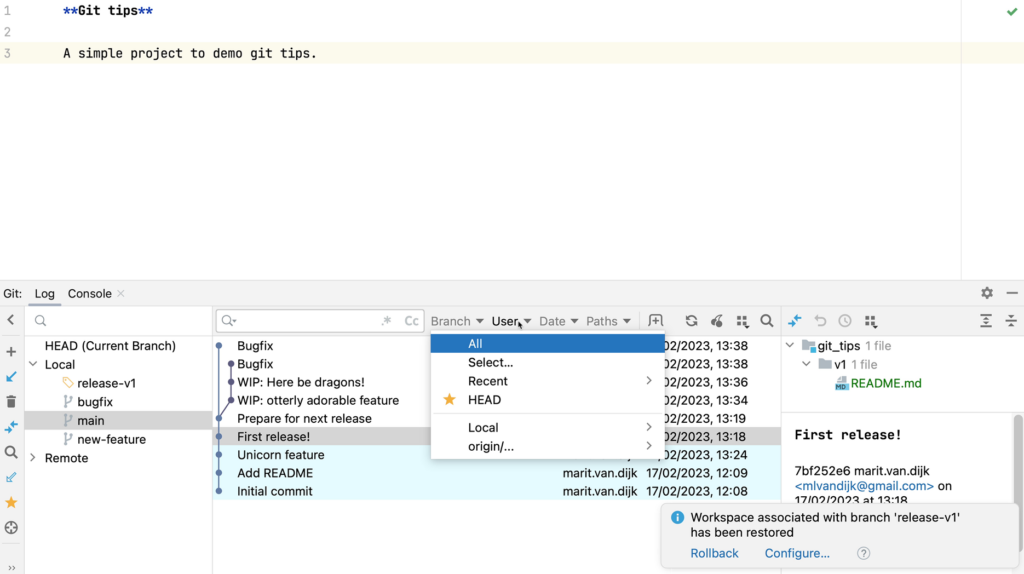
We can also filter commits in the commit log by branch, user, date or path.
Filter by branch, user, date or path
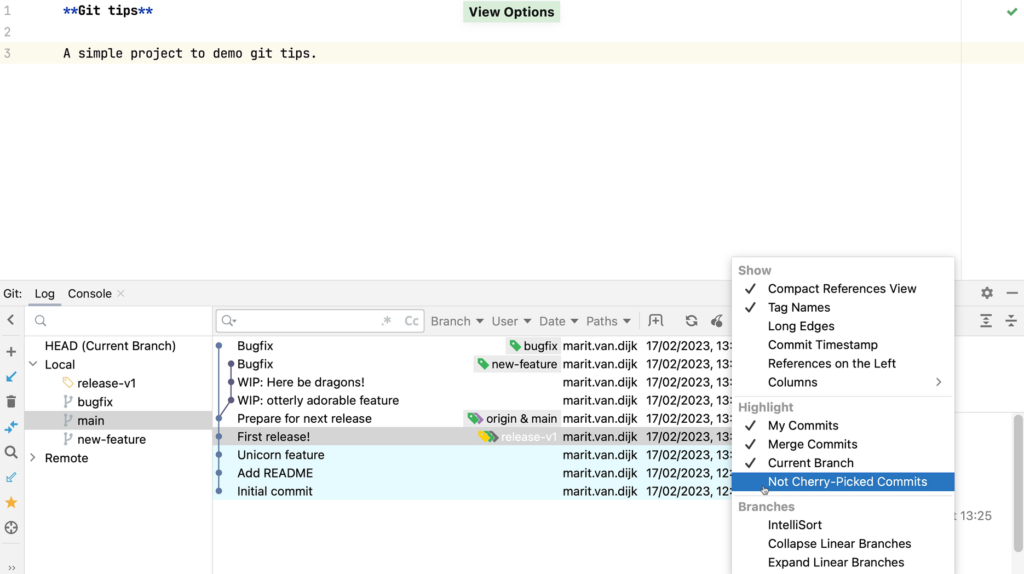
To see which commits have not yet been applied to this branch, we can click View Options and select Highlight | Not Cherry-Picked Commits. We’ll compare with the new-feature branch. Commits that have already been applied to the current branch are greyed out.
Select the Not Cherry-Picked Commits
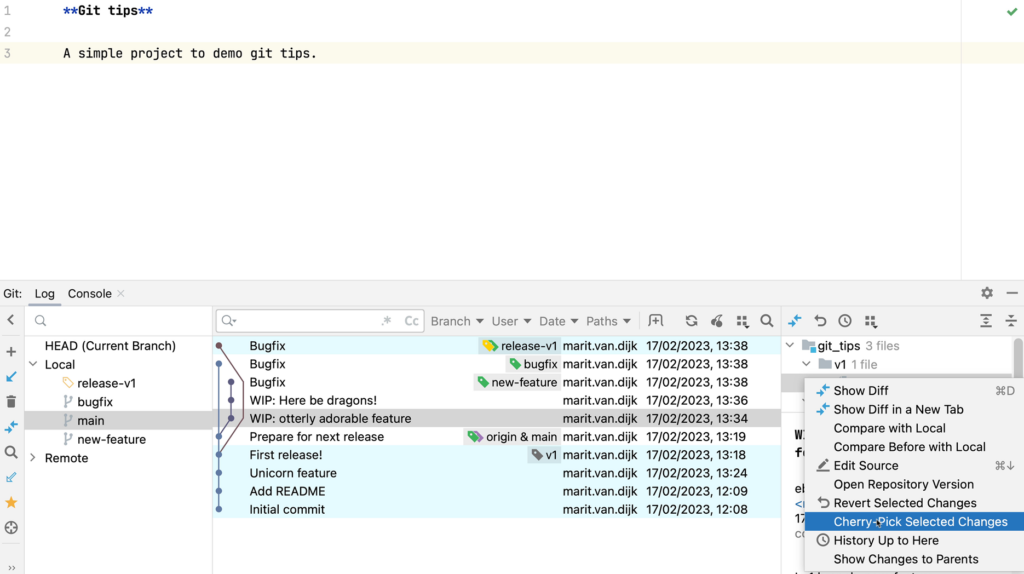
When we select a commit, we can look at the information in the Commit Details area (at the bottom right) to make sure these are the changes we want to transfer to this branch. In the Commit Details area we can see which files were changed in a particular commit. We can right-click a file and select Show Diff from the context menu to open the changes that were made to that file.
Look at the details of a commit
If we are sure these are the changes we want, we can cherry-pick them to the previous release branch.
Cherry pick part of a commit
In the Commit details pane on the right, select the files containing the changes you want to apply to the target branch, right-click and select Cherry-Pick Selected Changes from the context menu.
Cherry-Pick Selected Changes
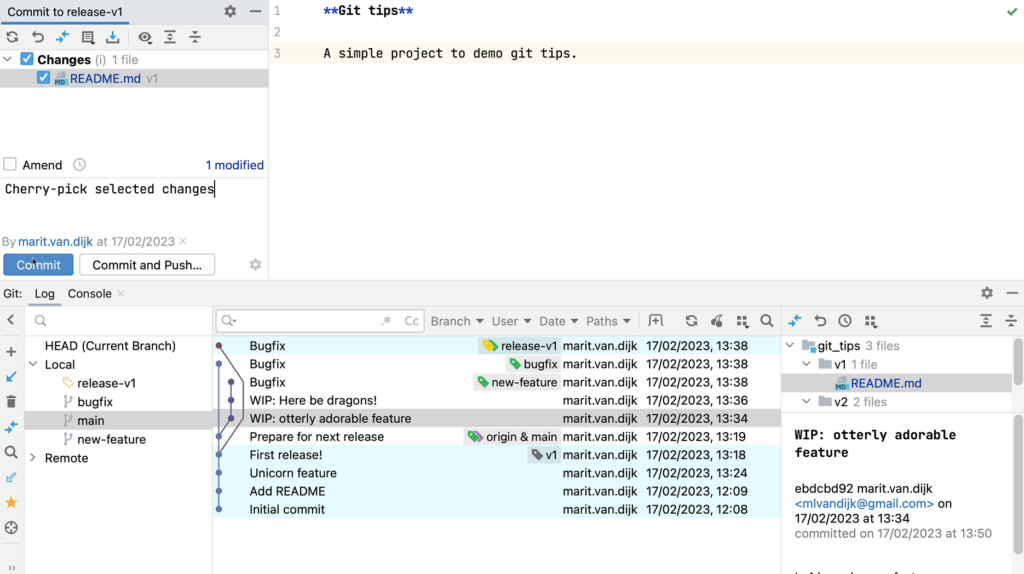
The cherry picked changes are transferred to the change list and we can commit them from there.
Partial commit added to the Change List to be committed
Dealing with conflicts
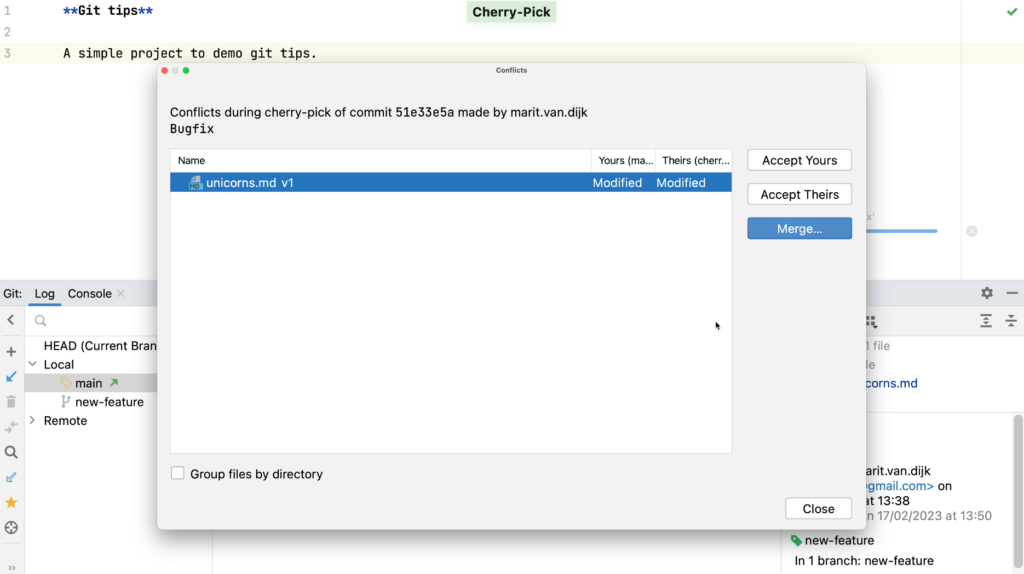
So far, cherry picking went smoothly because there are no conflicting changes. What if there are conflicts?!
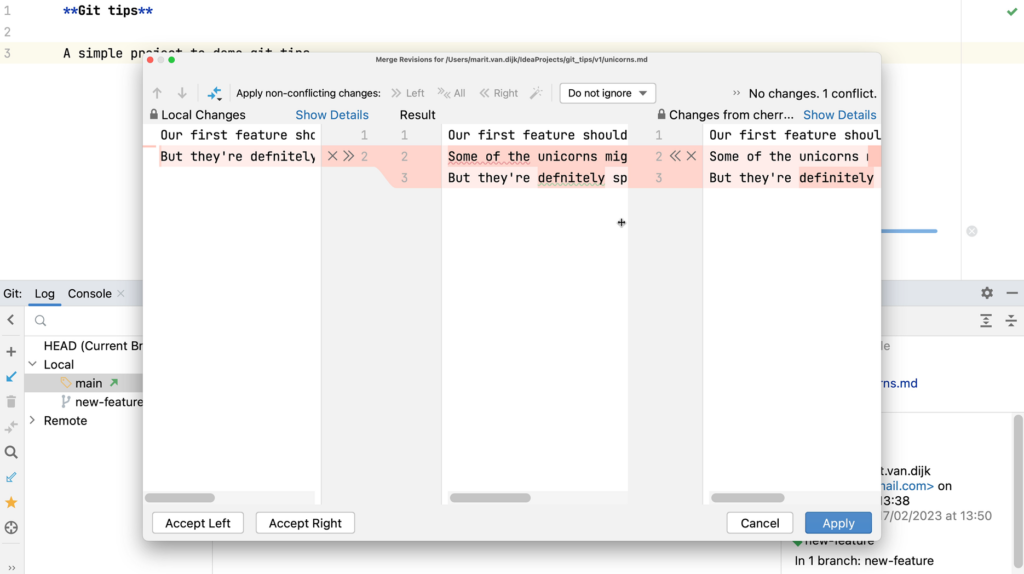
When we cherry-pick a commit that has conflicts with our current branch, the Merge Conflicts dialog opens.
Merge Conflict
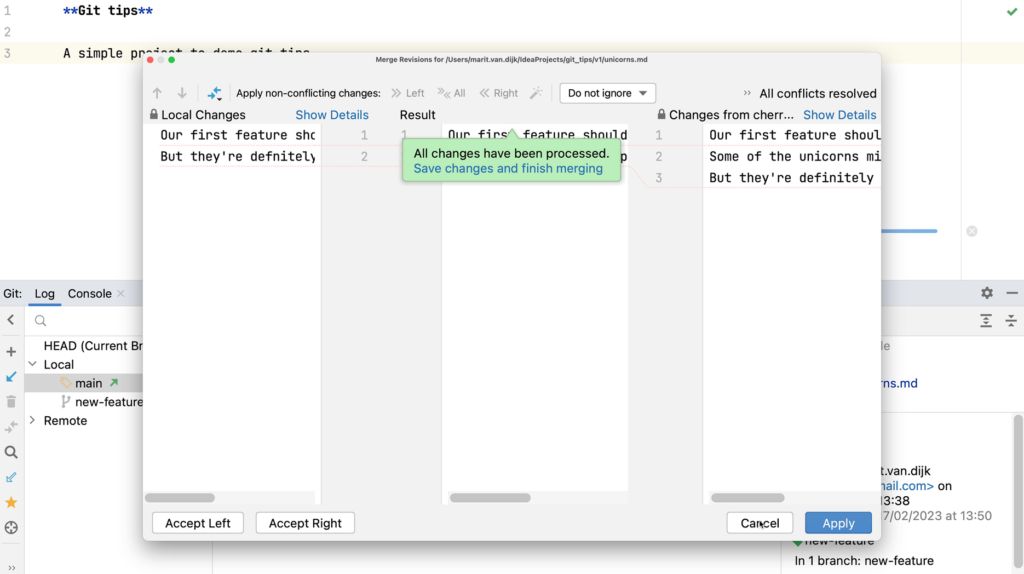
We can resolve the merge conflicts here. We want to keep some changes, and reject others.
Merge Conflicts dialogMerge conflicts have been resolved
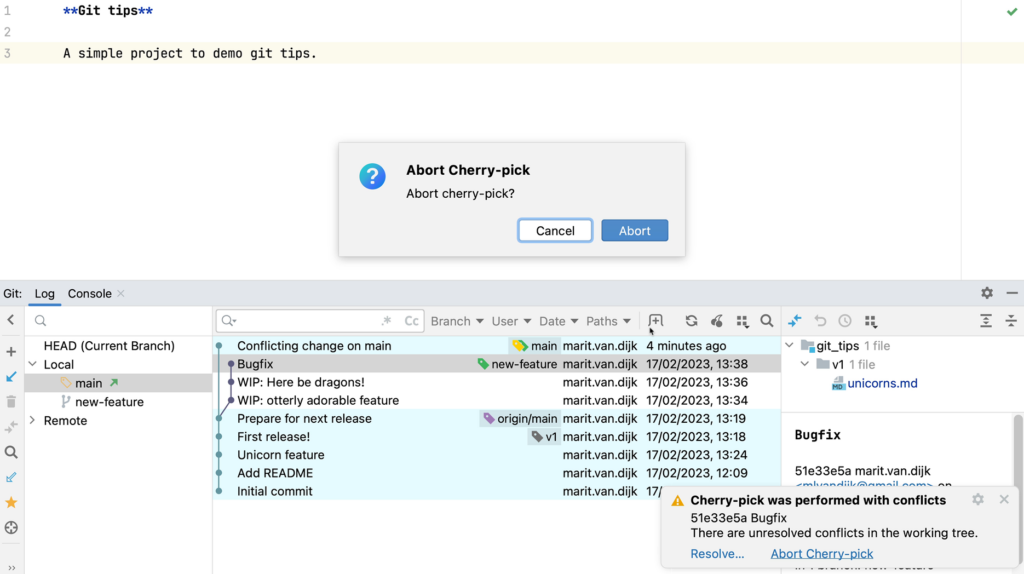
If you’re not able to resolve the merge conflicts, you can also abort the cherry pick.
Abort Cherry-pick
Continue after cherry-picking
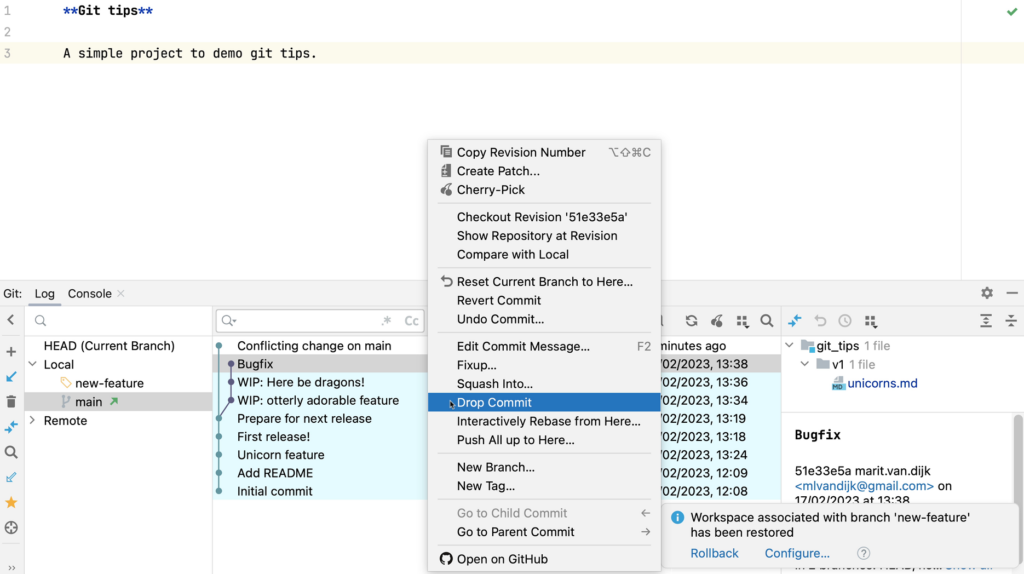
Once we’re done cherry-picking, we can go back to the “feature” branch. Since we haven’t pushed these changes yet, we can remove the commit from the feature branch by selecting Drop commit.
Drop Commit
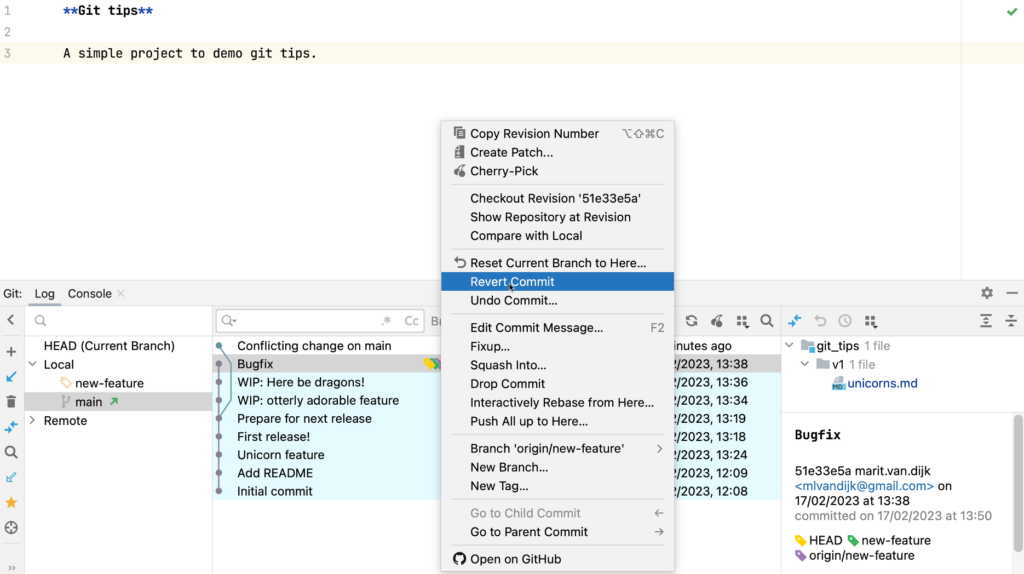
What if you have pushed the changes already? Then you might want to revert it on this branch instead. Right-click the commit and from the context menu select Revert Commit.
Revert Commit
Now we can continue working on the new feature!
Conclusion
Moving a commit to a different branch. Not nearly as scary as it sounds! Let the IDE help to turn this into a quick, low-stress task.
Cherry pick a commit to a different branch in any JetBrains IDE
Oops, you committed your code to the wrong branch… You could redo the work, but you don’t want to! Luckily, the IDE can help you move your commit to a different branch. Use Git’s cherry-pick option from your IDE to move changes over to a different branch in a quick, low-stress way.
Oops, you committed your code to the wrong branch… You could redo the work, but you don’t want to! Luckily, the IDE can help you move your commit to a different branch. Use Git’s cherry-pick option from your IDE to move changes over to a different branch in a quick, low-stress way.
In this blog post, we’re going to take a look at using bookmarks in IntelliJ IDEA. Bookmarks can come in handy while navigating a codebase, when you see something interesting that you want to come back to later. You could use Recent Files (⌘E on macOS, or Control+E on Windows/Linux) to find it, but then you have to remember which file it was. This is where bookmarks come in handy. Let’s take a look!
Add anonymous bookmarks
We can bookmark a line by pressing F3 (on macOS) or F11 (on Windows/Linux). This shortcut creates an anonymous line bookmark, marked with a Bookmark icon. If we don’t remember the shortcut, we can right-click the gutter next to the line of code we want to bookmark and select Add Bookmark.
Anonymous bookmarkAdd bookmark from gutter menu
We can also bookmark files, packages, folders, and modules. We can open the Project Tool Window (⌘1 on macOS, or Alt+1 on Windows/Linux) and add an anonymous bookmark. We can use the shortcut (F3 on macOS, or F11 on Windows/Linux) or, we can also right-click the item we want to bookmark, and select Bookmarks | Add Bookmark. Note that anonymous bookmarks don’t have an identifier, and we can create as many anonymous bookmarks as we like.
Bookmark a project item
Add mnemonic bookmarks
We can also create bookmarks that are assigned to a digit (0 to 9) or letter (A to Z). To add a mnemonic line bookmark, press ⌥ F3 (on macOS) or Control+F11 (on Windows/Linux) and press the digit or letter to use as an identifier for this bookmark. Again, we can also or right-click the gutter next to the line of code that you want to bookmark and select Add Mnemonic Bookmark.
Add mnemonic bookmark menu
Optionally, we can provide a description for the new bookmark. We can double-click the digit or letter we want to assign.
Add mnemonic bookmark
Lines marked with mnemonic bookmarks have the corresponding digit or letter icon in a frame.
Mnemonic bookmark
If the selected digit or letter is already in use, IntelliJ IDEA will ask you whether you want to overwrite an existing bookmark with the new one. When we select the Don’t ask again option, the IDE will silently overwrite mnemonics.
Rewrite mnemonic
Navigate to bookmarks
There are several options to navigate to the bookmarks we have created.
Show line bookmarks
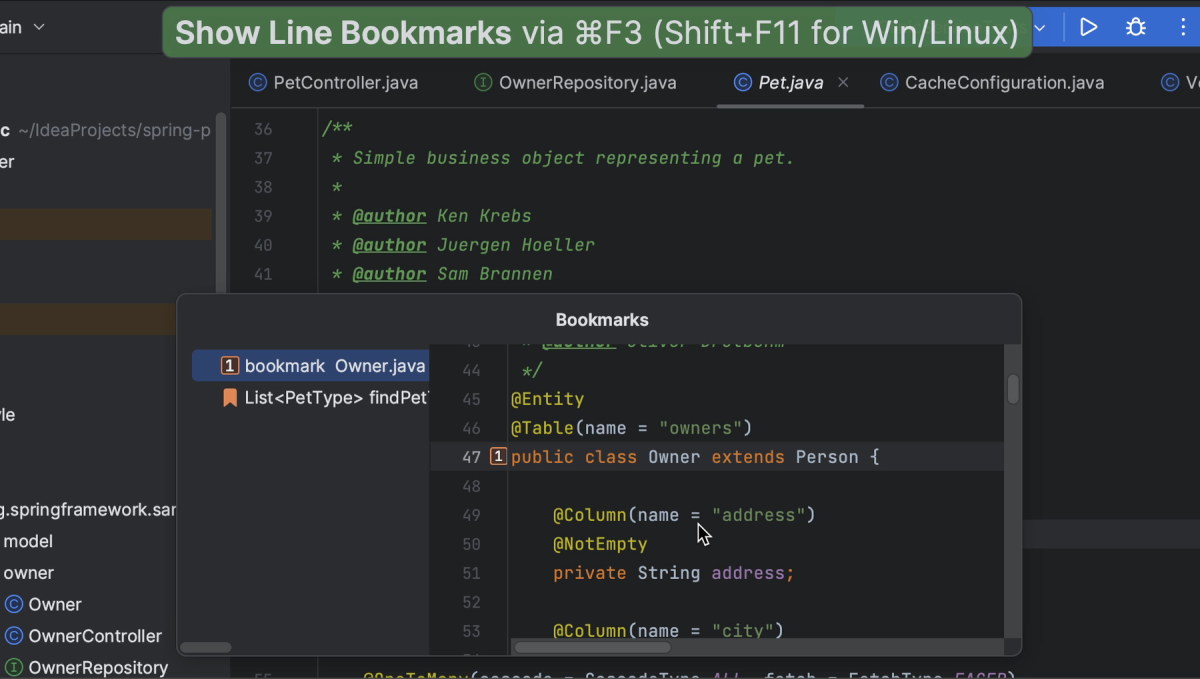
To see all line bookmarks that we have in the code, we can open the Bookmarks popup by pressing ⌘ F3 (on macOS) or Shift+F11 (on Windows/Linux) or go to Edit | Bookmarks | Show Line Bookmarks.
Show Line Bookmarks shortcutShow Line Bookmarks menu
Notice that this list does not contain any project items like files or classes that we have bookmarked. In the Bookmarks popup, we can select the bookmark we want to navigate to, either with up and down arrows and pressing Return (on macOS) or Enter (on Windows/Linux), or by double-clicking it with our mouse. For mnemonic bookmarks, we can select the corresponding digit or letter.
Bookmarks popup
Jump to mnemonic bookmark
To jump straight to a mnemonic bookmark, hold ^ (on macOS) or Control (on Windows/Linux) and press the mnemonic digit or letter on the keyboard. This doesn’t work with anonymous bookmarks, but we can assign a mnemonic to an existing anonymous bookmark, either using the shortcut, or by clicking the bookmark in the gutter and selecting Assign Mnemonic. This works in the Bookmarks popup too!
Go to BookmarkAssign Mnemonic
Bookmarks tool window
To see all our bookmarks, we can open the Bookmarks tool window by pressing ⌘ 2 (on macOS) or Alt+2 (on Windows/Linux), or by selecting View | Tool Windows | Bookmarks from the main menu.
Open Bookmarks tool window (shortcut)Open Bookmarks tool window menu
IntelliJ IDEA adds your bookmarks to the predefined list in the Bookmarks tool window that is created automatically and has the same name as the project. In this example, multiple bookmarks in the same file are grouped together. We can also turn that off in the Options menu, by deselecting Group Line Bookmarks by File. As we can see, there are several other options as well. We won’t dive into all of them, but be aware there are some options you can configure to your liking.
Bookmark tool window options
Bookmark lists
Another option we do want to show you here is that you can create more lists. We can add a new list using the shortcut (⌘ N on macOS or Alt+Insert on Windows/Linux) or by clicking the Create Bookmark List button. We can add a name for the new list.
Create Bookmark List
If there are multiple lists, and we create a new bookmark, we can select which list to add it to in the Add Bookmark popup. We can also select the list to use as the default by checking the option Use as default list.
Select Bookmark List
In the Bookmarks tool window, we can move bookmarks to another list by dragging them to the other list. And we can sort bookmarks by selecting a bookmark and using Move down (⌥ ⌘ ↓ on macOS, or Control+Alt+↓ on Windows/Linux) or Move up (⌥ ⌘ ↑ on macOS, or Control+Alt+↑ on Windows/Linux).
Move down
Fun fact: The Bookmarks tool window also shows all breakpoints that are automatically added to the dedicated list once you place them in your code.
Breakpoints
Bookmark editor tabs
Finally, we can also bookmark editor tabs. Click the … to the right of the tabs and select Bookmark Open Tabs. We can enter a name for this list in the Create Bookmark List popup.
Bookmark Open TabsCreate Bookmark List popup
Summary and Shortcuts
As we’ve seen, bookmarks allow us to “save” certain interesting locations in the code base, so we can easily go back to them later. Now we know how to create bookmarks and how to navigate to bookmarks we have created.
IntelliJ IDEA Shortcuts Used
Here are the IntelliJ IDEA shortcuts that we used.
When navigating a codebase we might see something interesting that we want to come back to later. This is where bookmarks can come in handy. Let’s take a look!
We can bookmark a line by pressing F3 (on macOS) or F11 (on Windows/Linux). This shortcut creates an anonymous line bookmark, marked with a Bookmark icon. If we don’t remember the shortcut, we can right-click the gutter next to the line of code we want to bookmark and select Add Bookmark.
Links
(documentation) JetBrains IntelliJ IDEA – Bookmarks
In this blogpost, we’re going to take a look at the Package Checker plugin, that’s bundled with IntelliJ IDEA Ultimate. We’ll have a look at how to view known vulnerabilities in your Maven or Gradle projects, how to get more information about the known vulnerabilities in a specific dependency and how to remediate these vulnerabilities inside IntelliJ IDEA Ultimate if a new version with a fix is available.
Package Checker plugin
There are several ways to view known vulnerabilities for the dependencies to your project.
View vulnerable dependencies in Maven projects
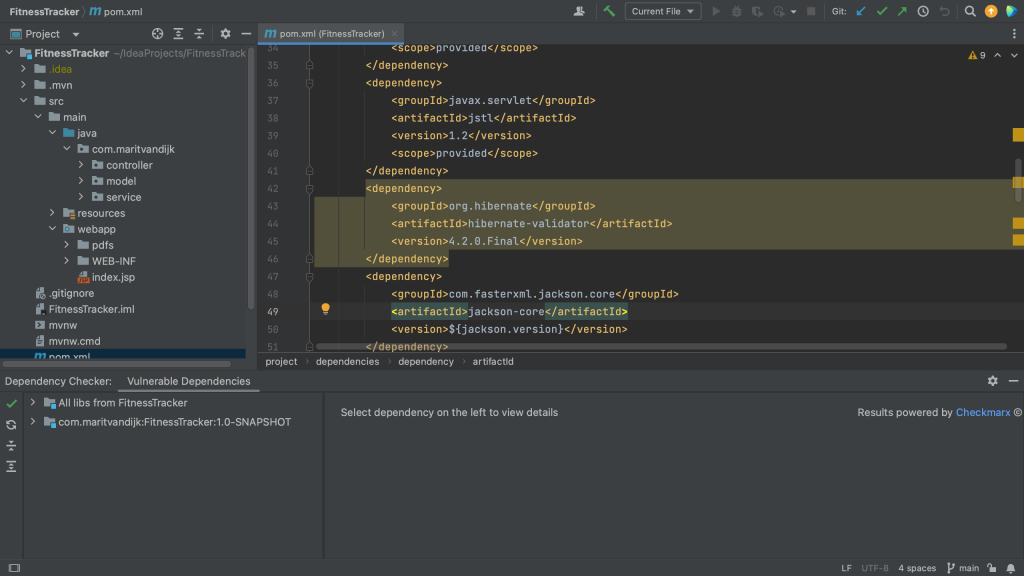
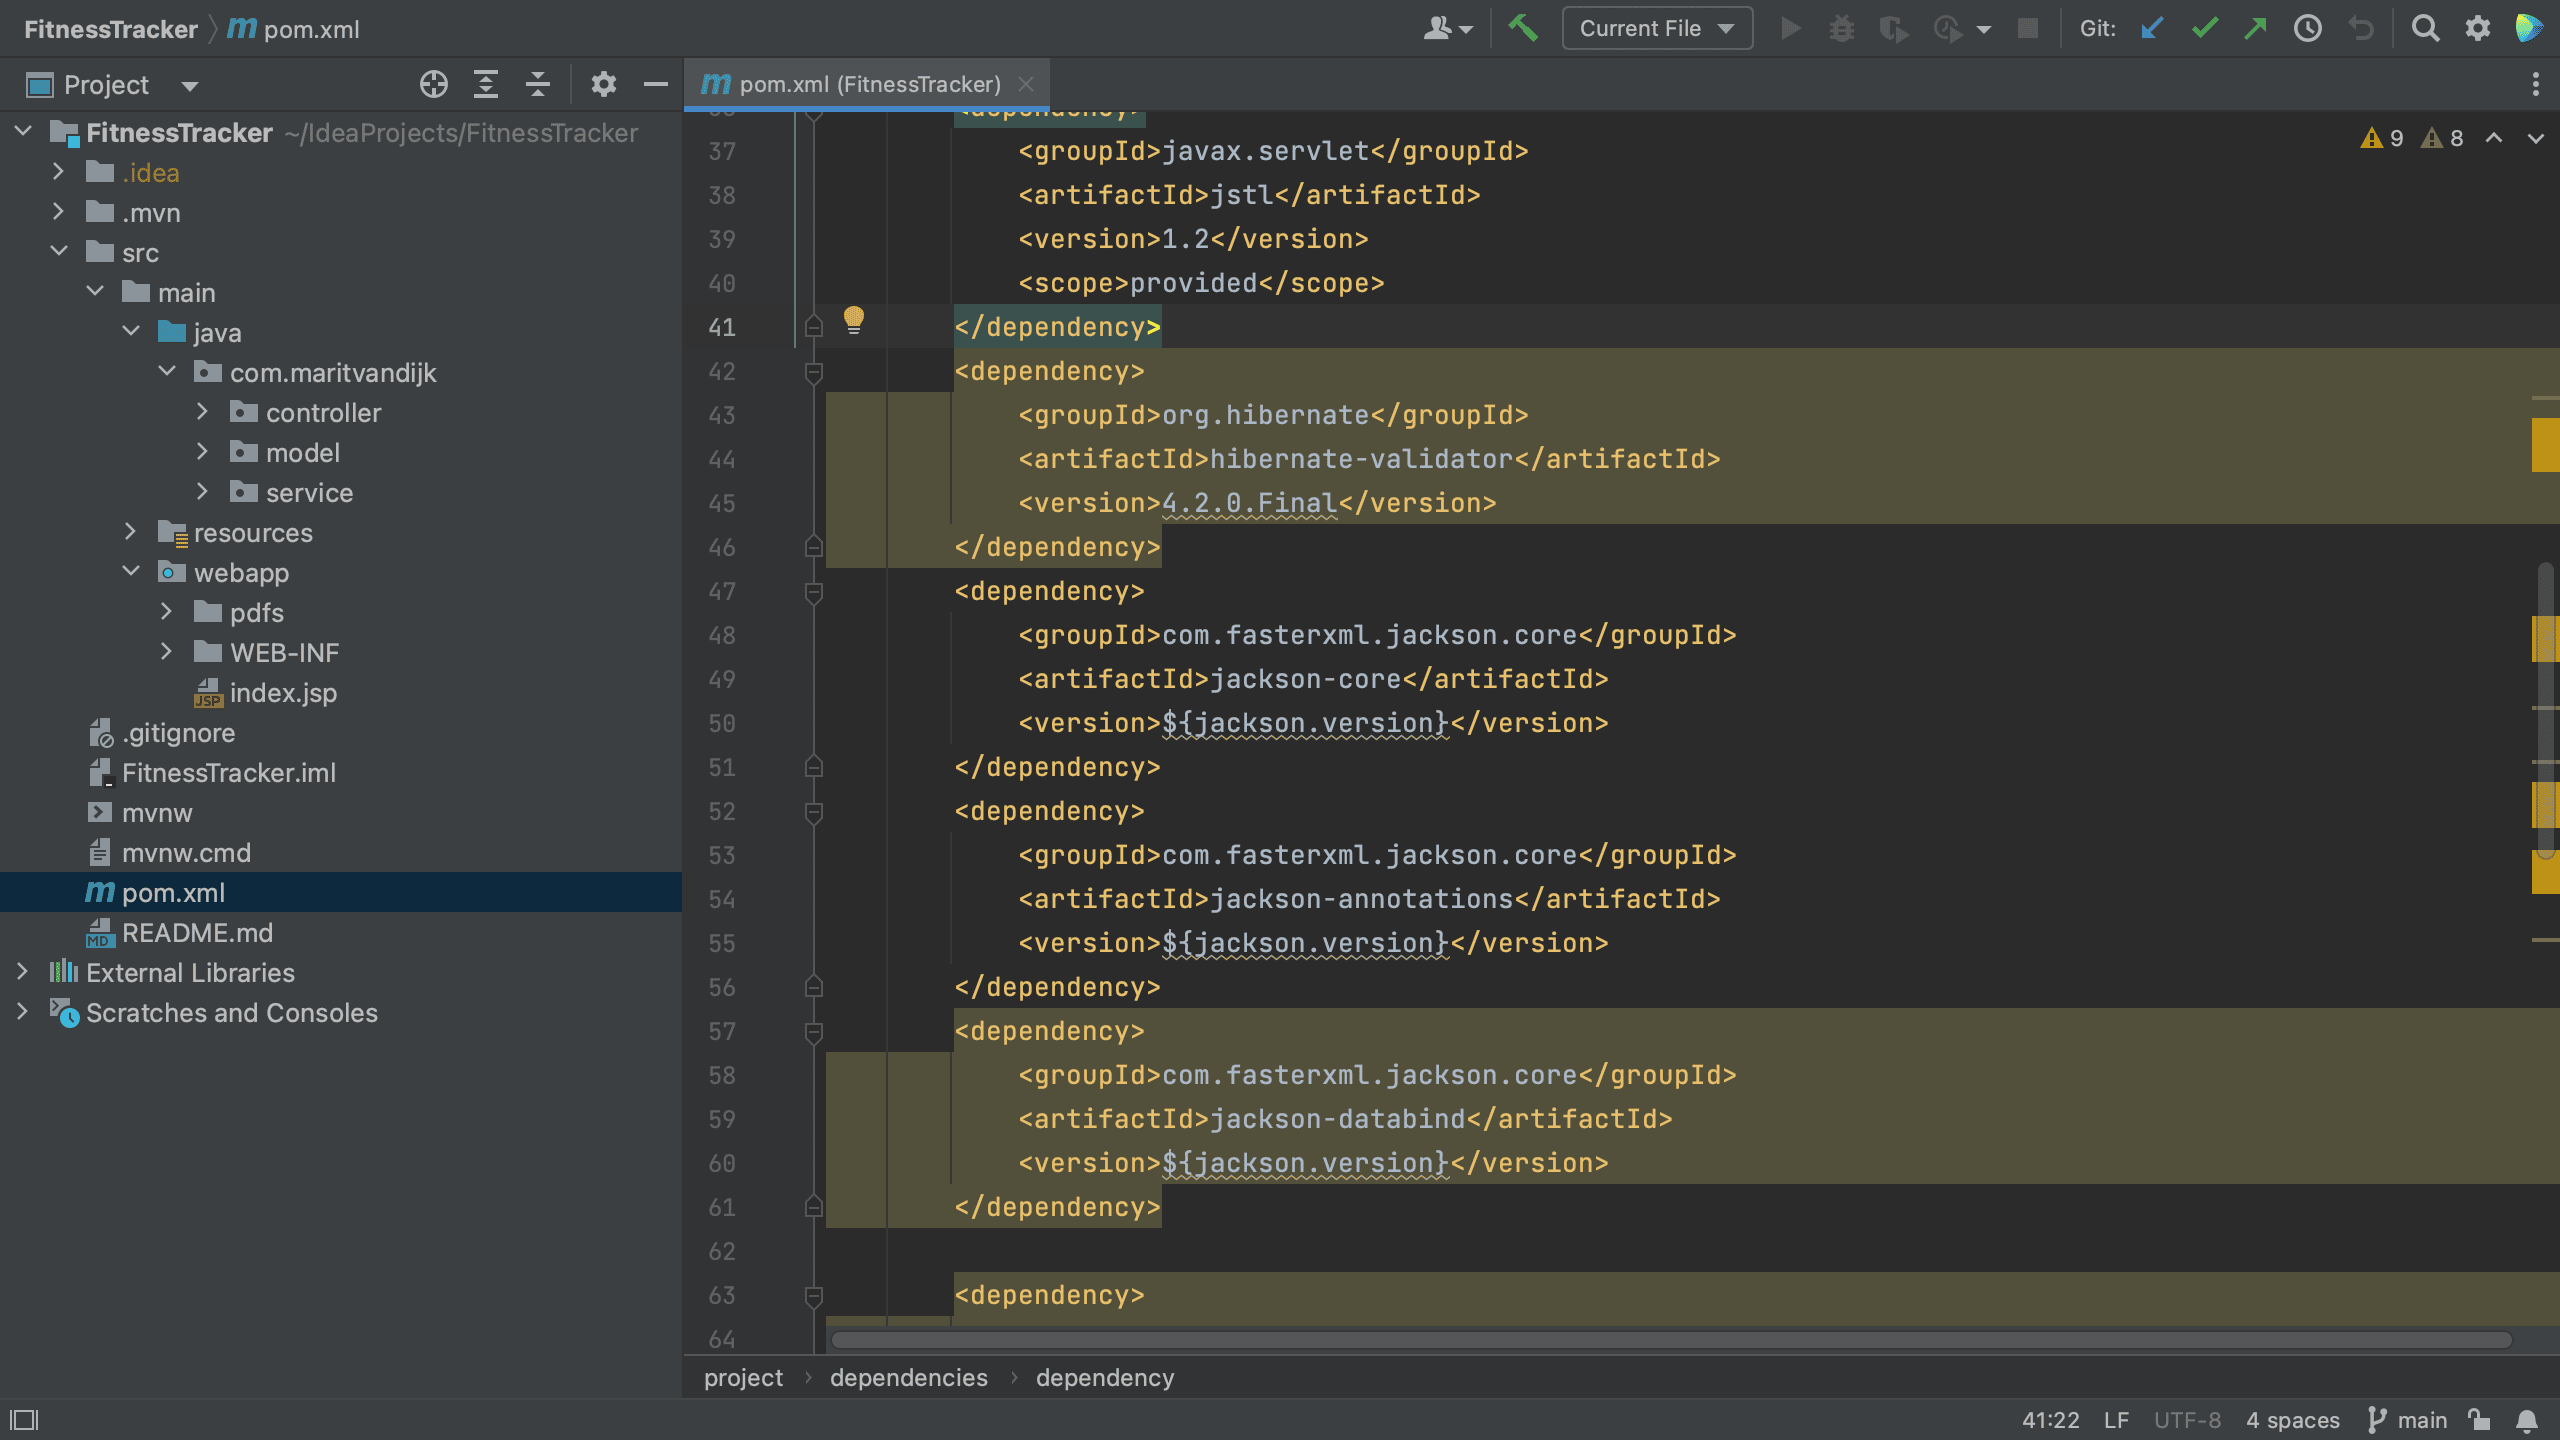
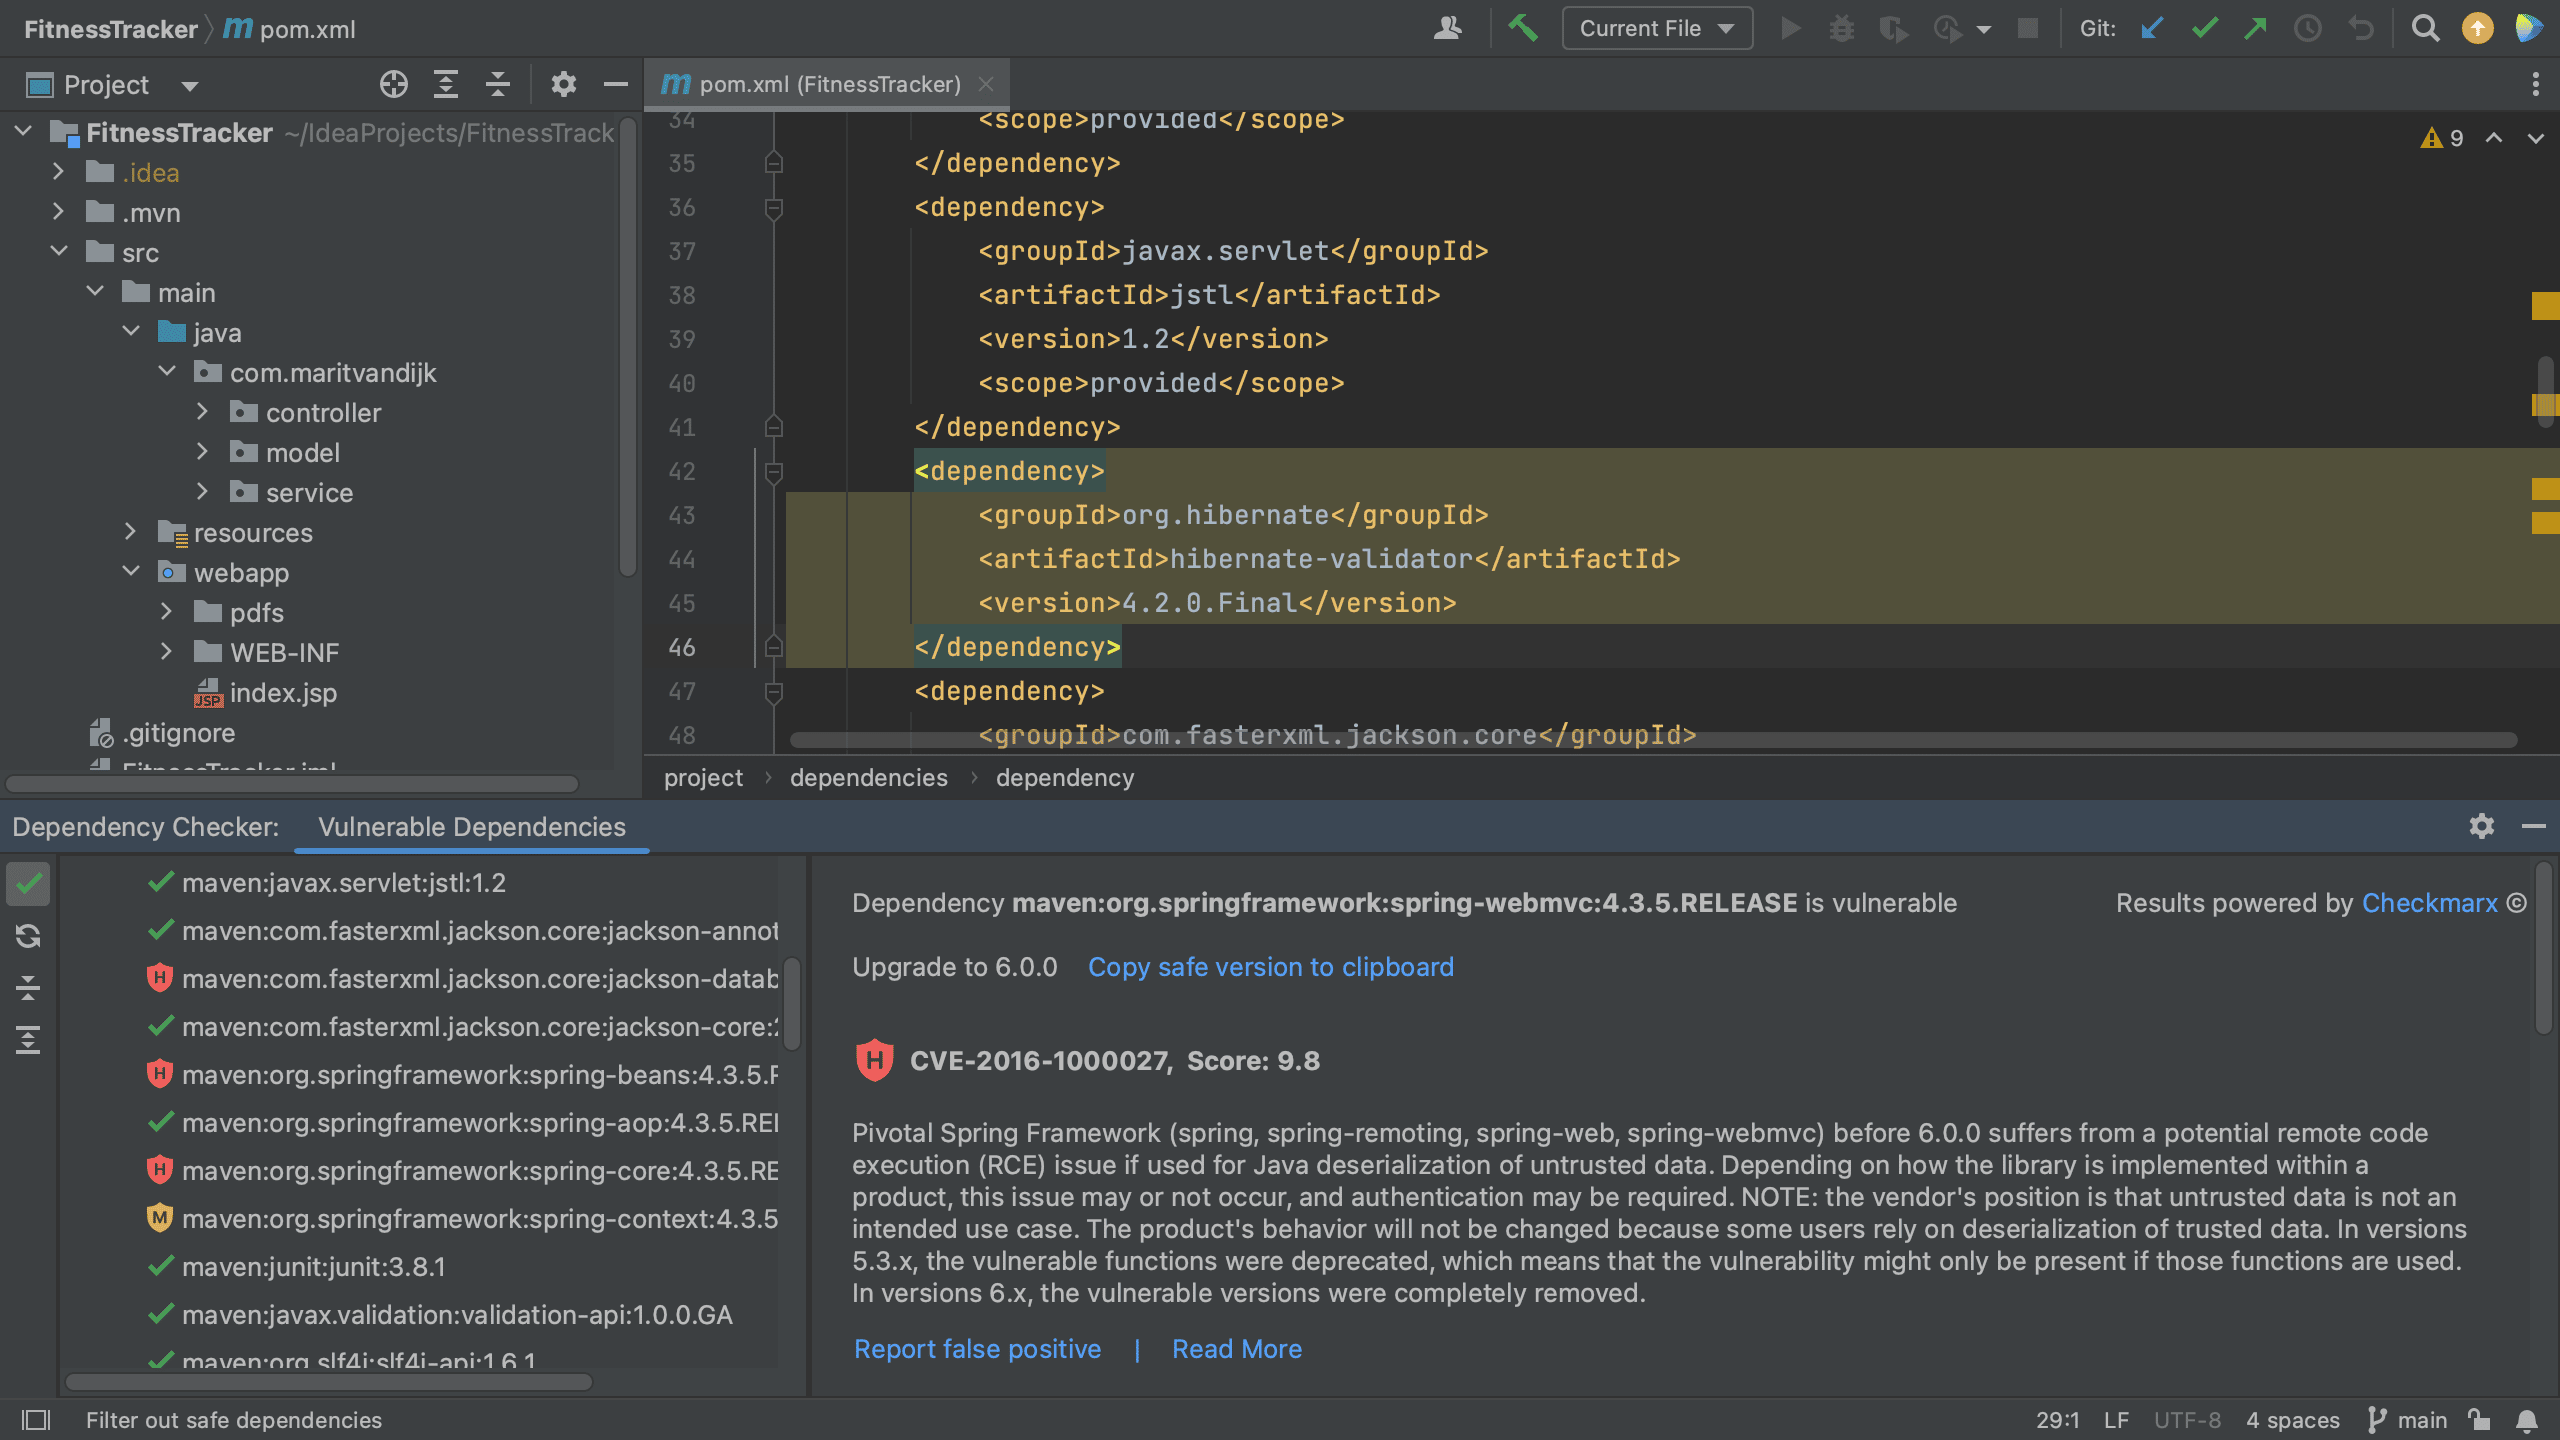
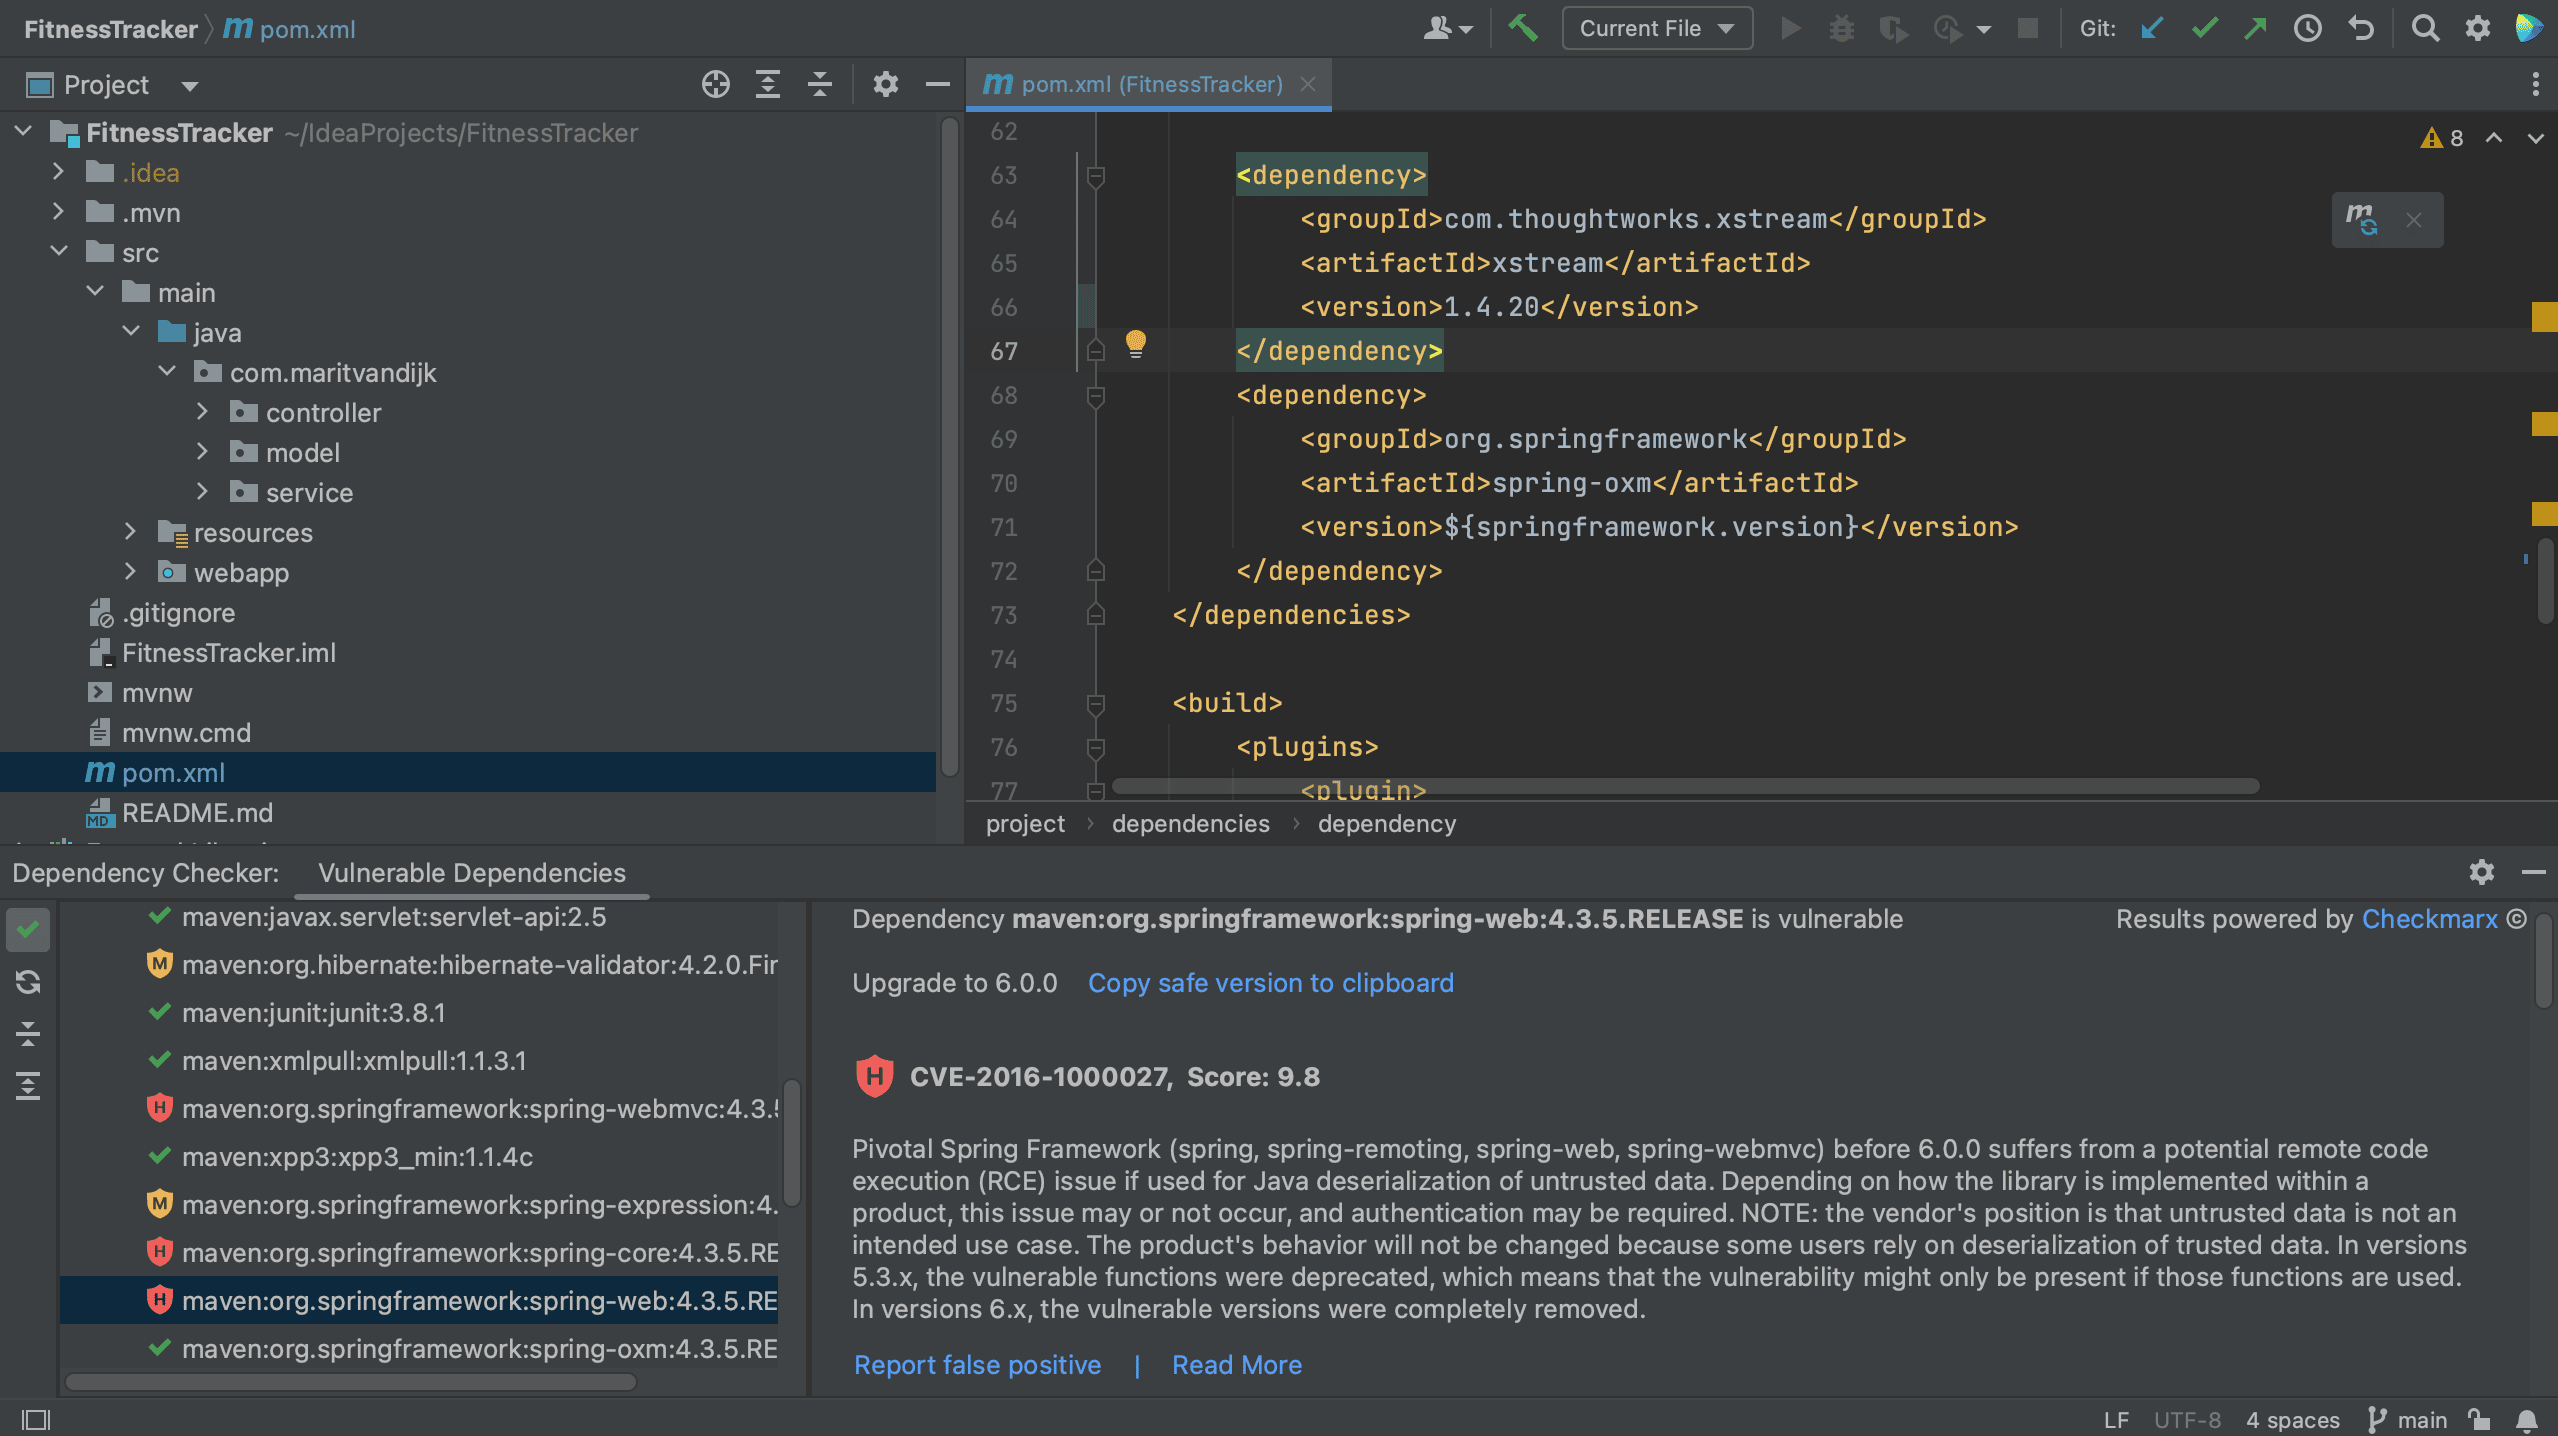
In a Maven project, all of your project’s dependencies are declared in the pom.xml. When we open the pom.xml file for a project which contains vulnerable dependencies, we see that several dependencies are highlighted.
Maven pom.xml with vulnerable dependencies highlighted
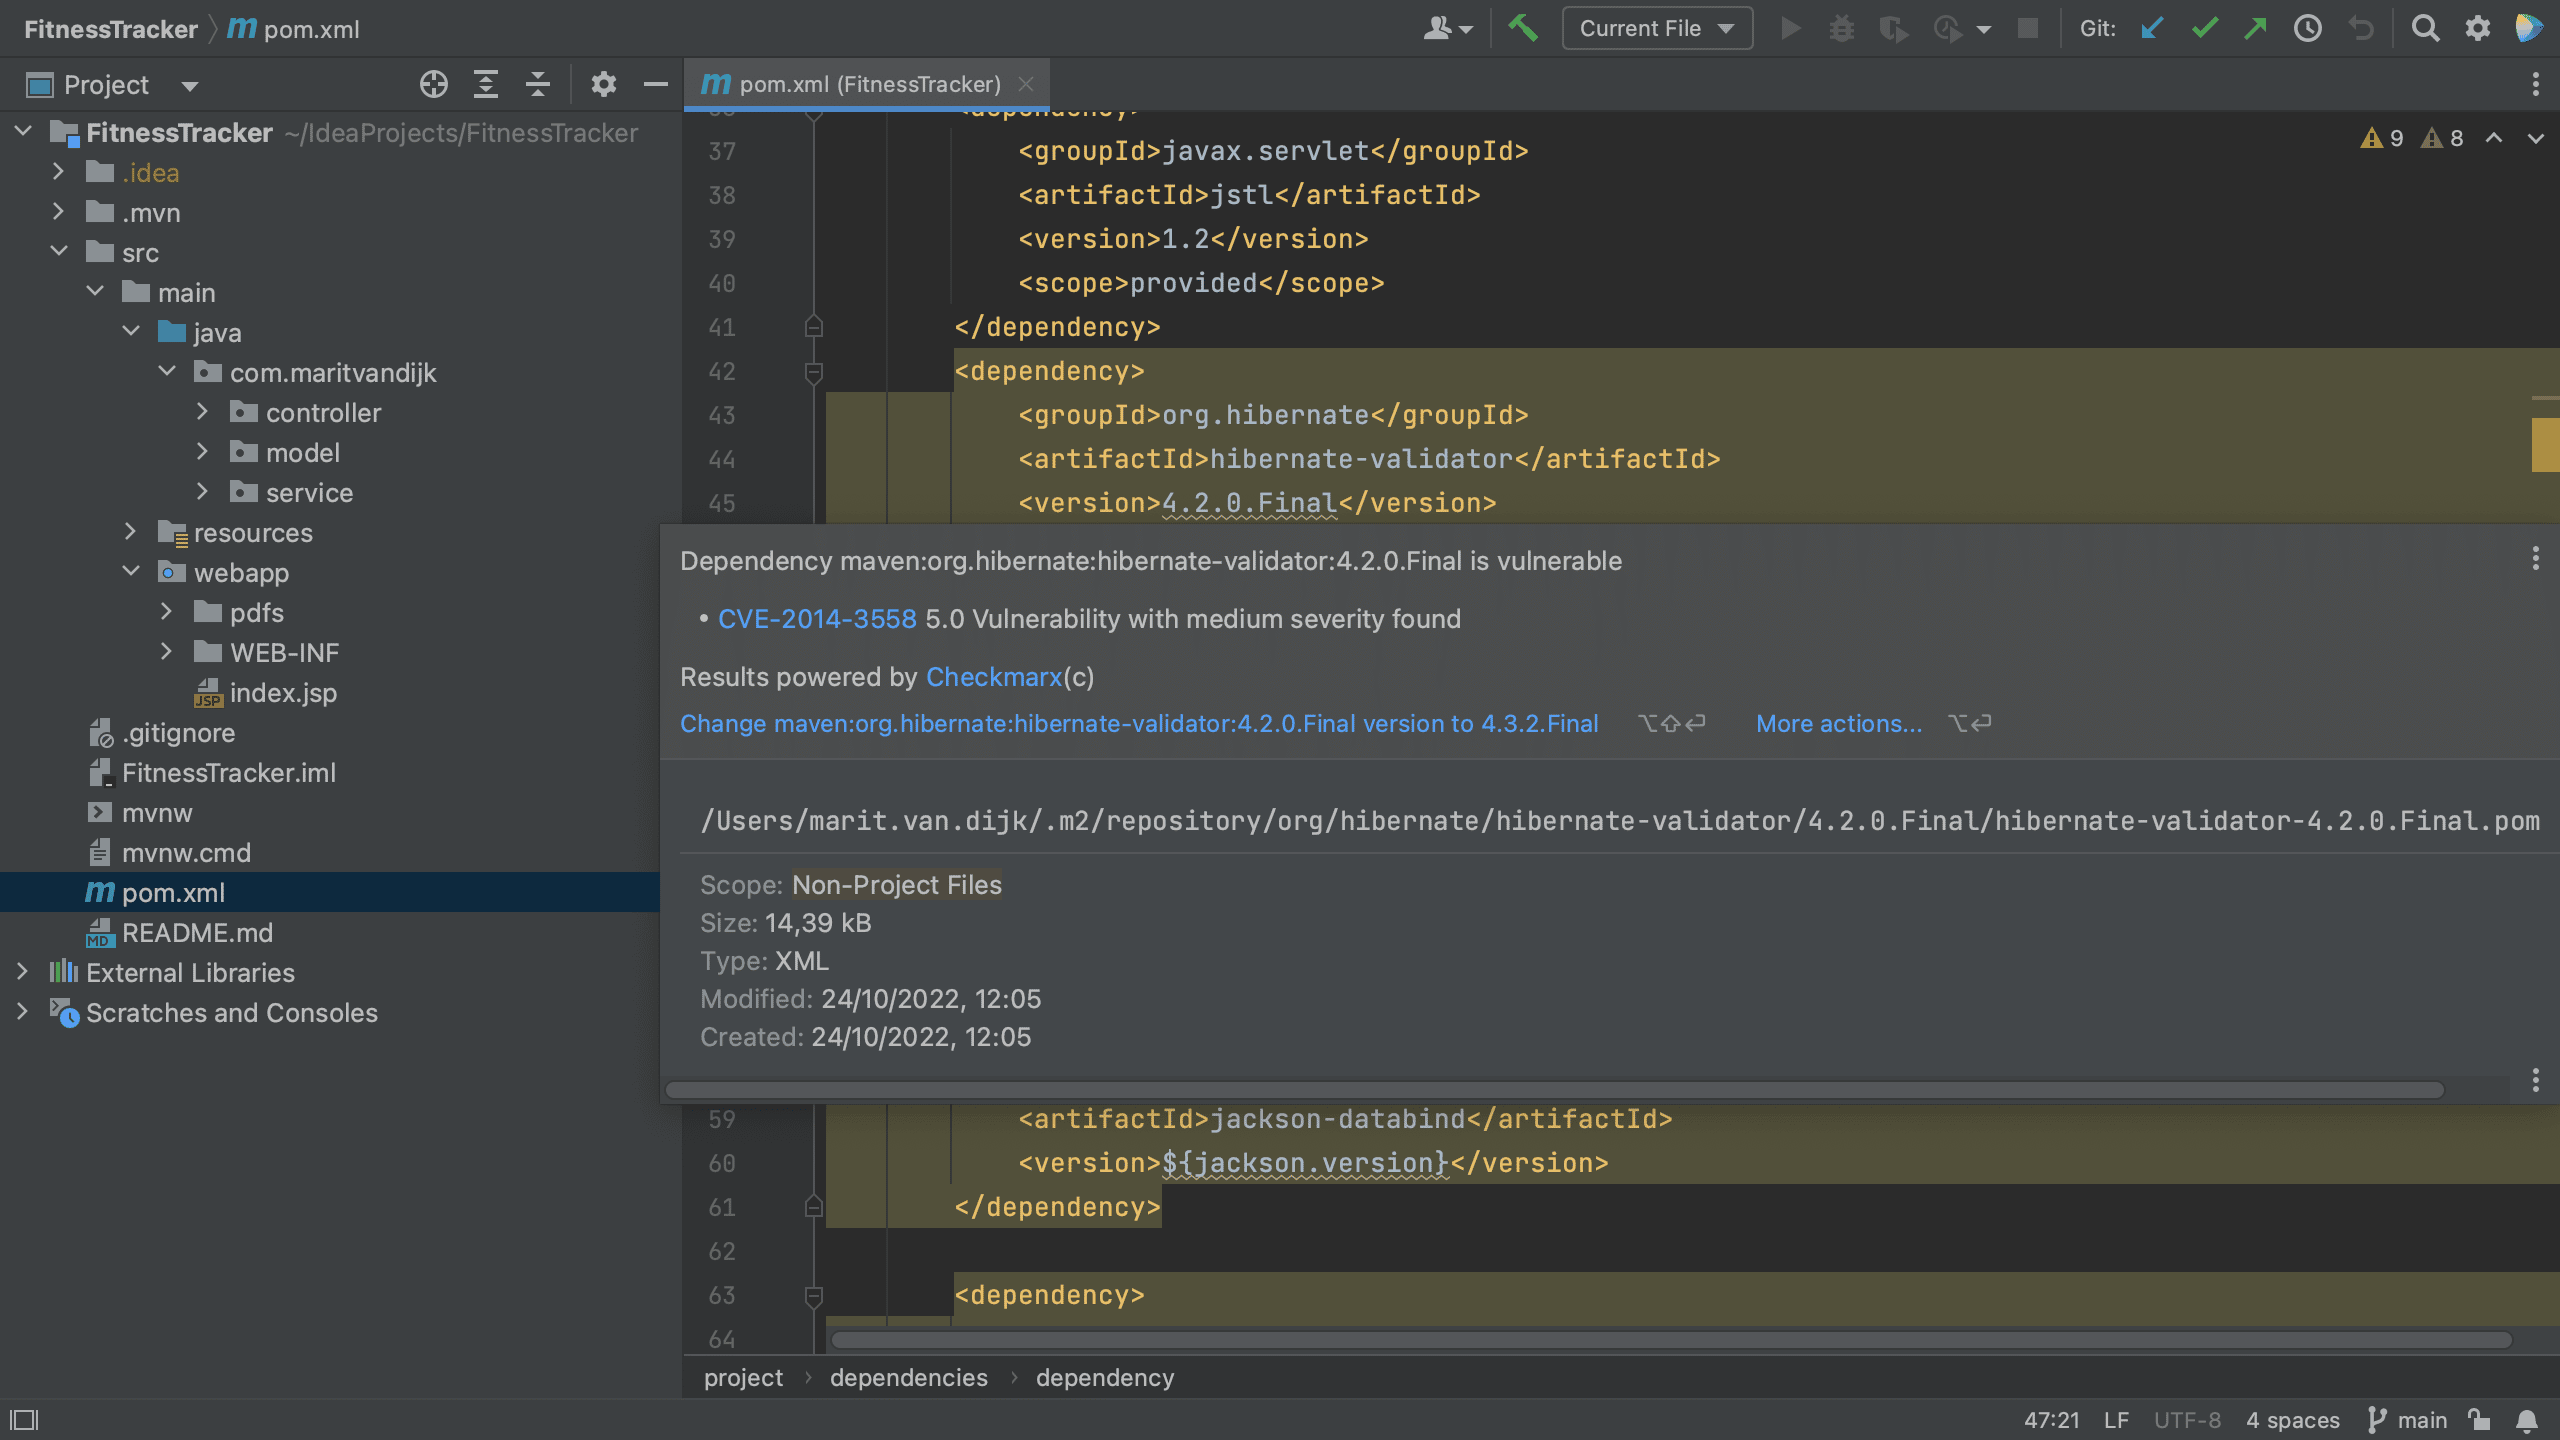
The Package Checker plugin highlights vulnerable dependencies and when we hover over the highlighted dependency, IntelliJ IDEA Ultimate shows all the vulnerabilities that were identified in this particular dependency. When we click on link for the CVE for a particular vulnerability, we’re redirected to the Checkmarx Advisory to learn more about this specific vulnerability.
Maven pom.xml with hover
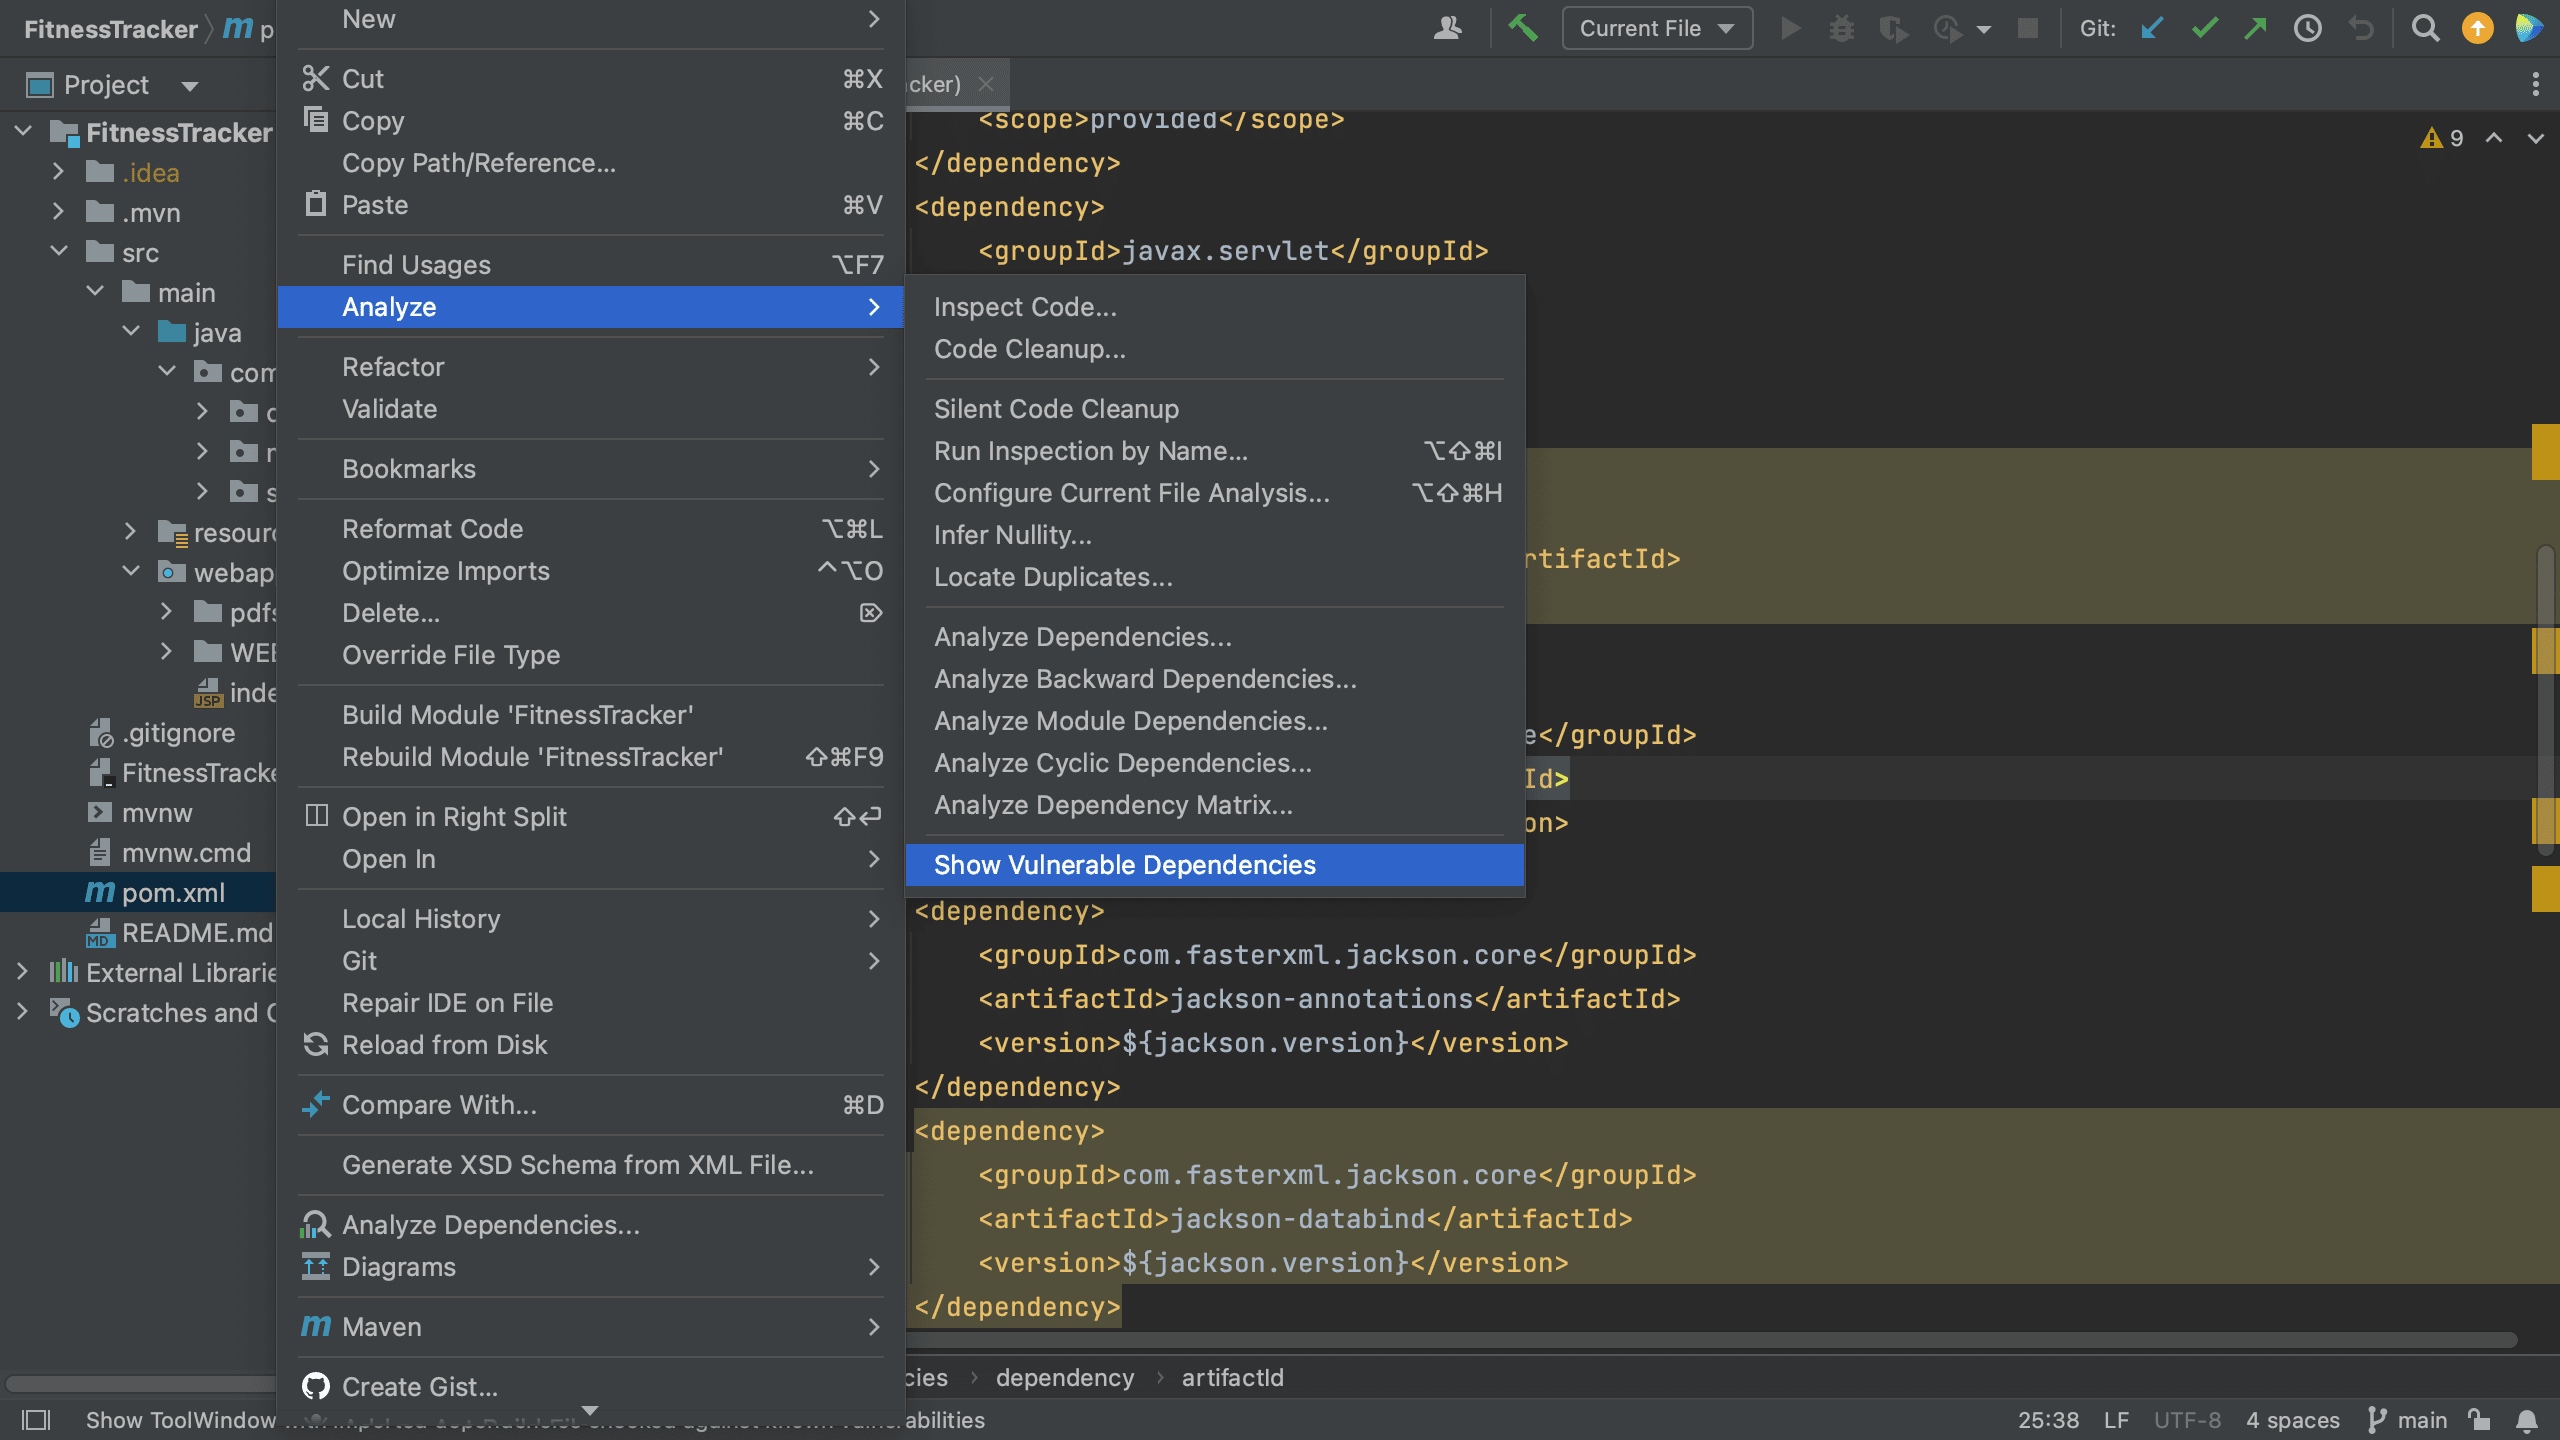
Another way to see all the vulnerable packages is by right-clicking on the pom.xml file and selecting Analyze > Show Vulnerable Dependencies. This will open the Vulnerable Dependencies tool window.
Open Vulnerable Dependencies tool window from pom.xmlVulnerable Dependencies tool window
View vulnerable dependencies in Gradle projects
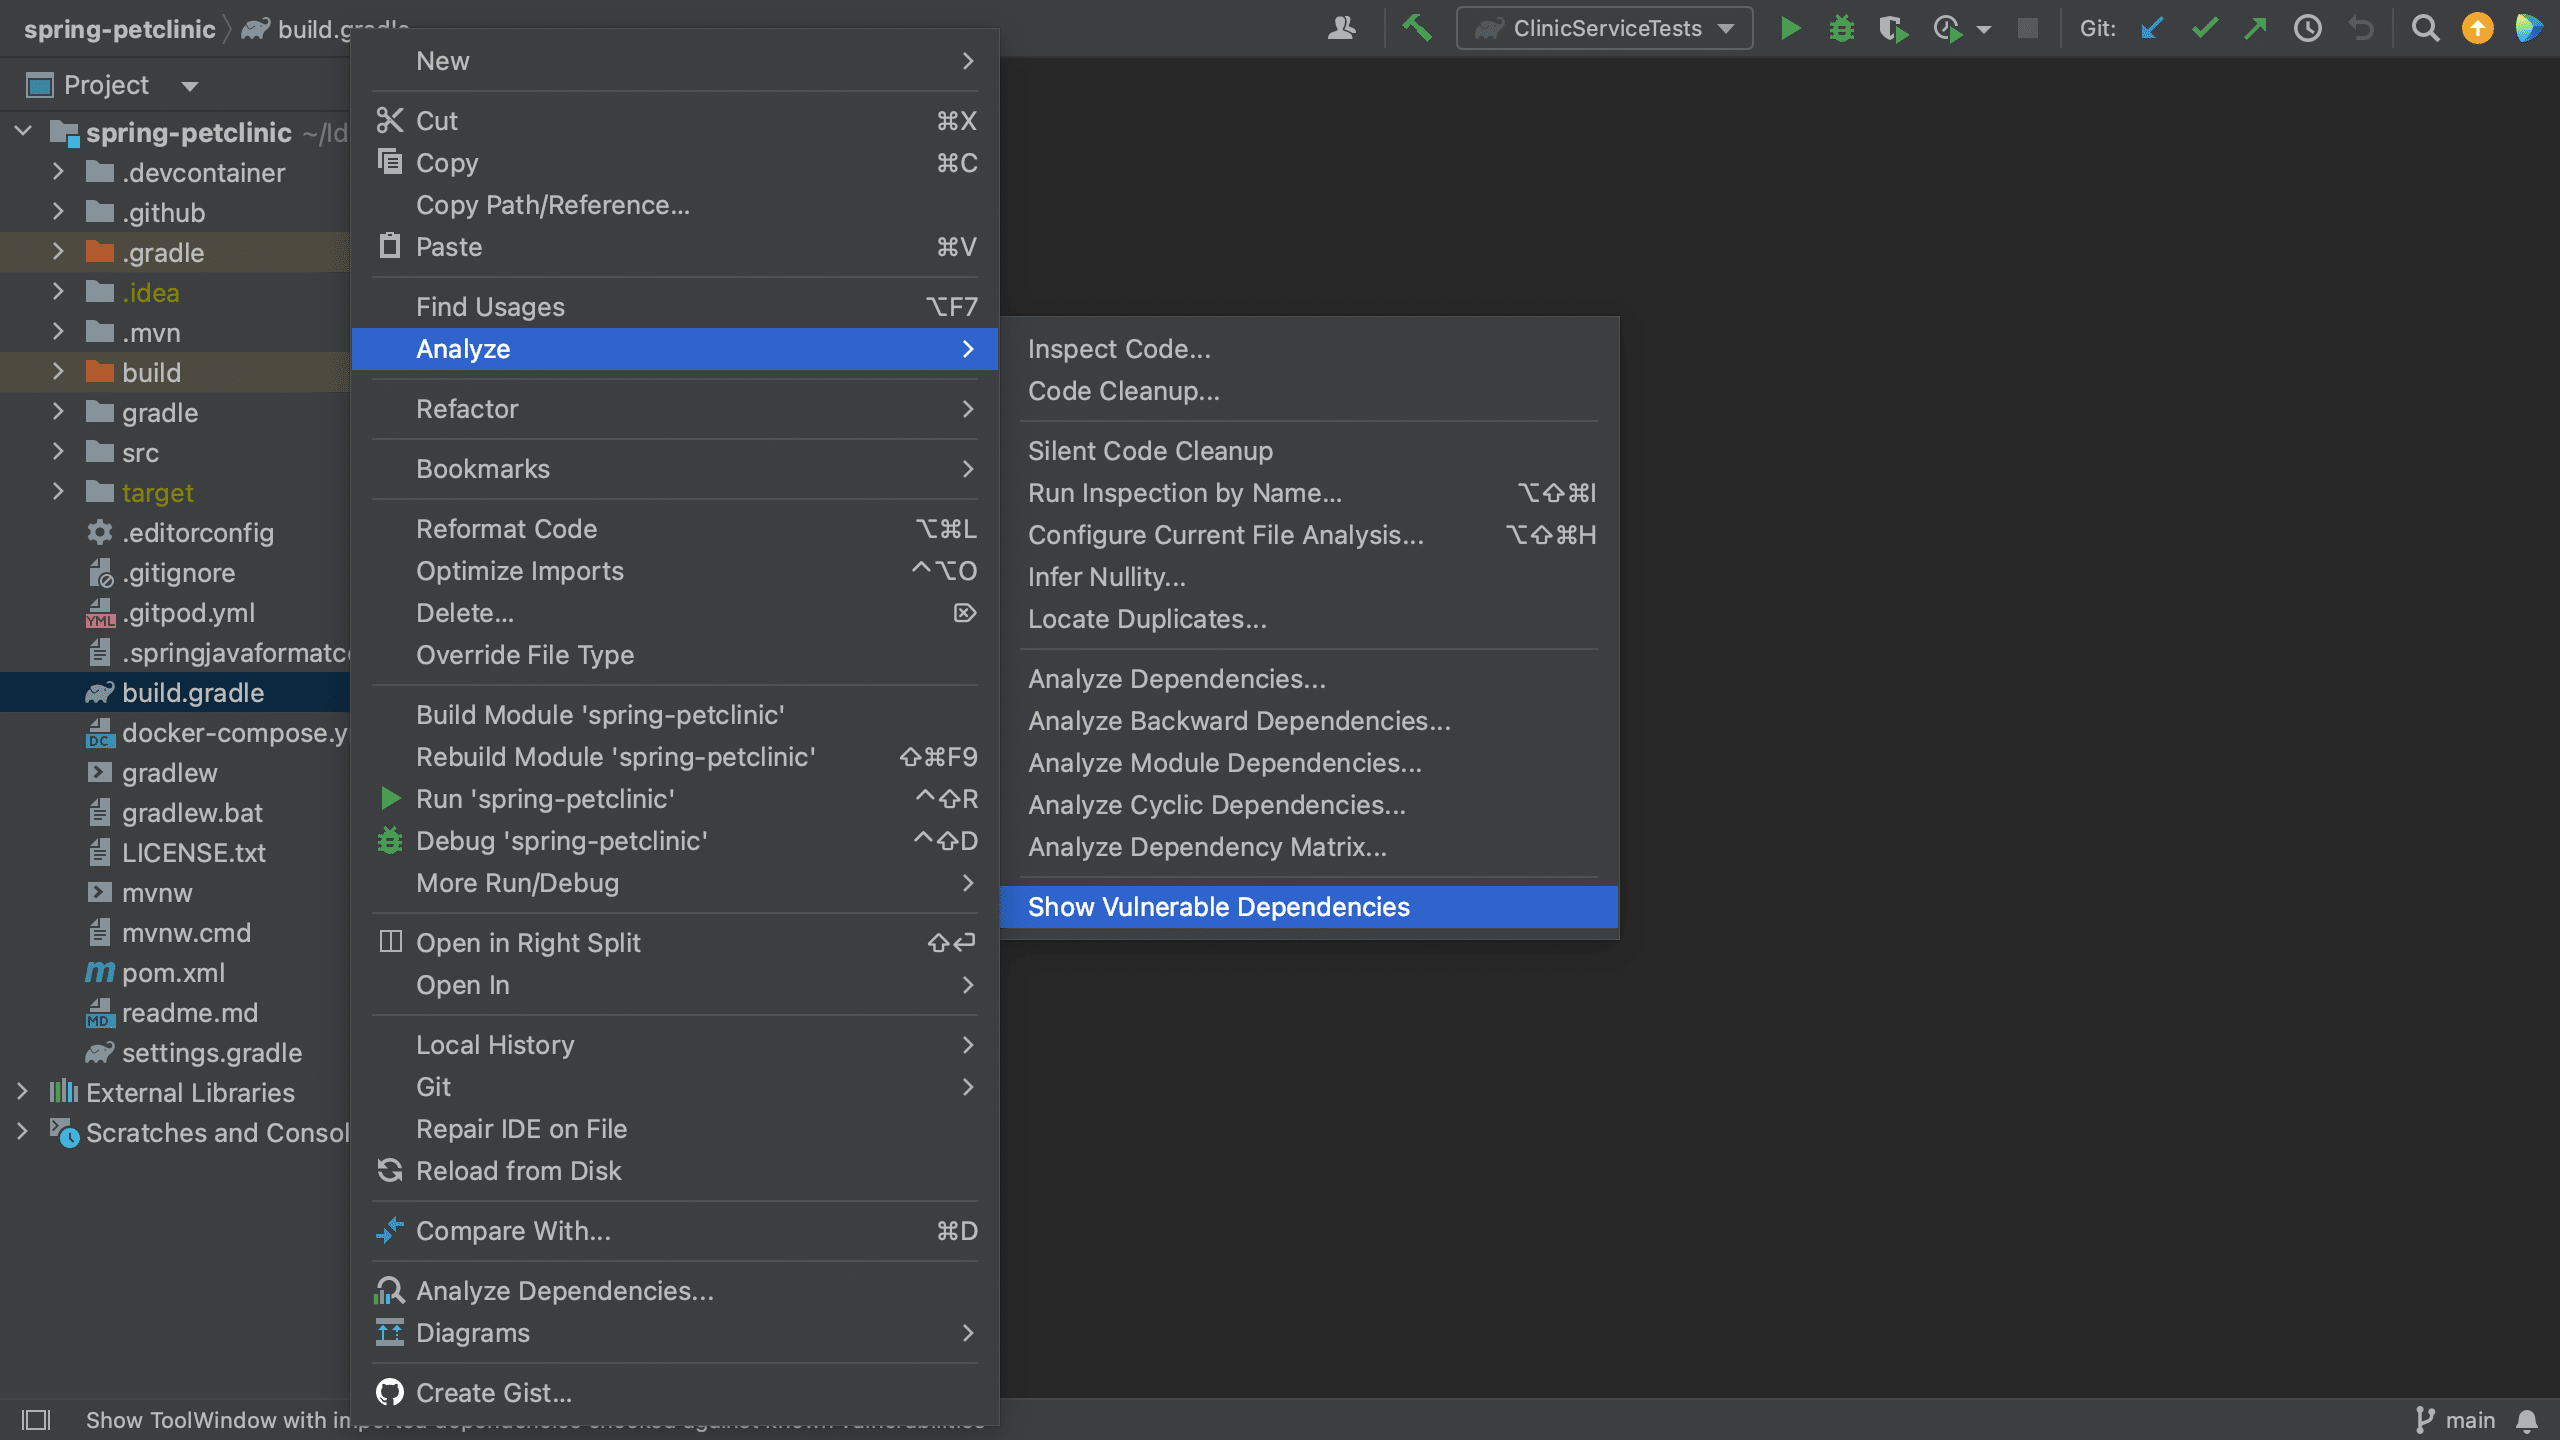
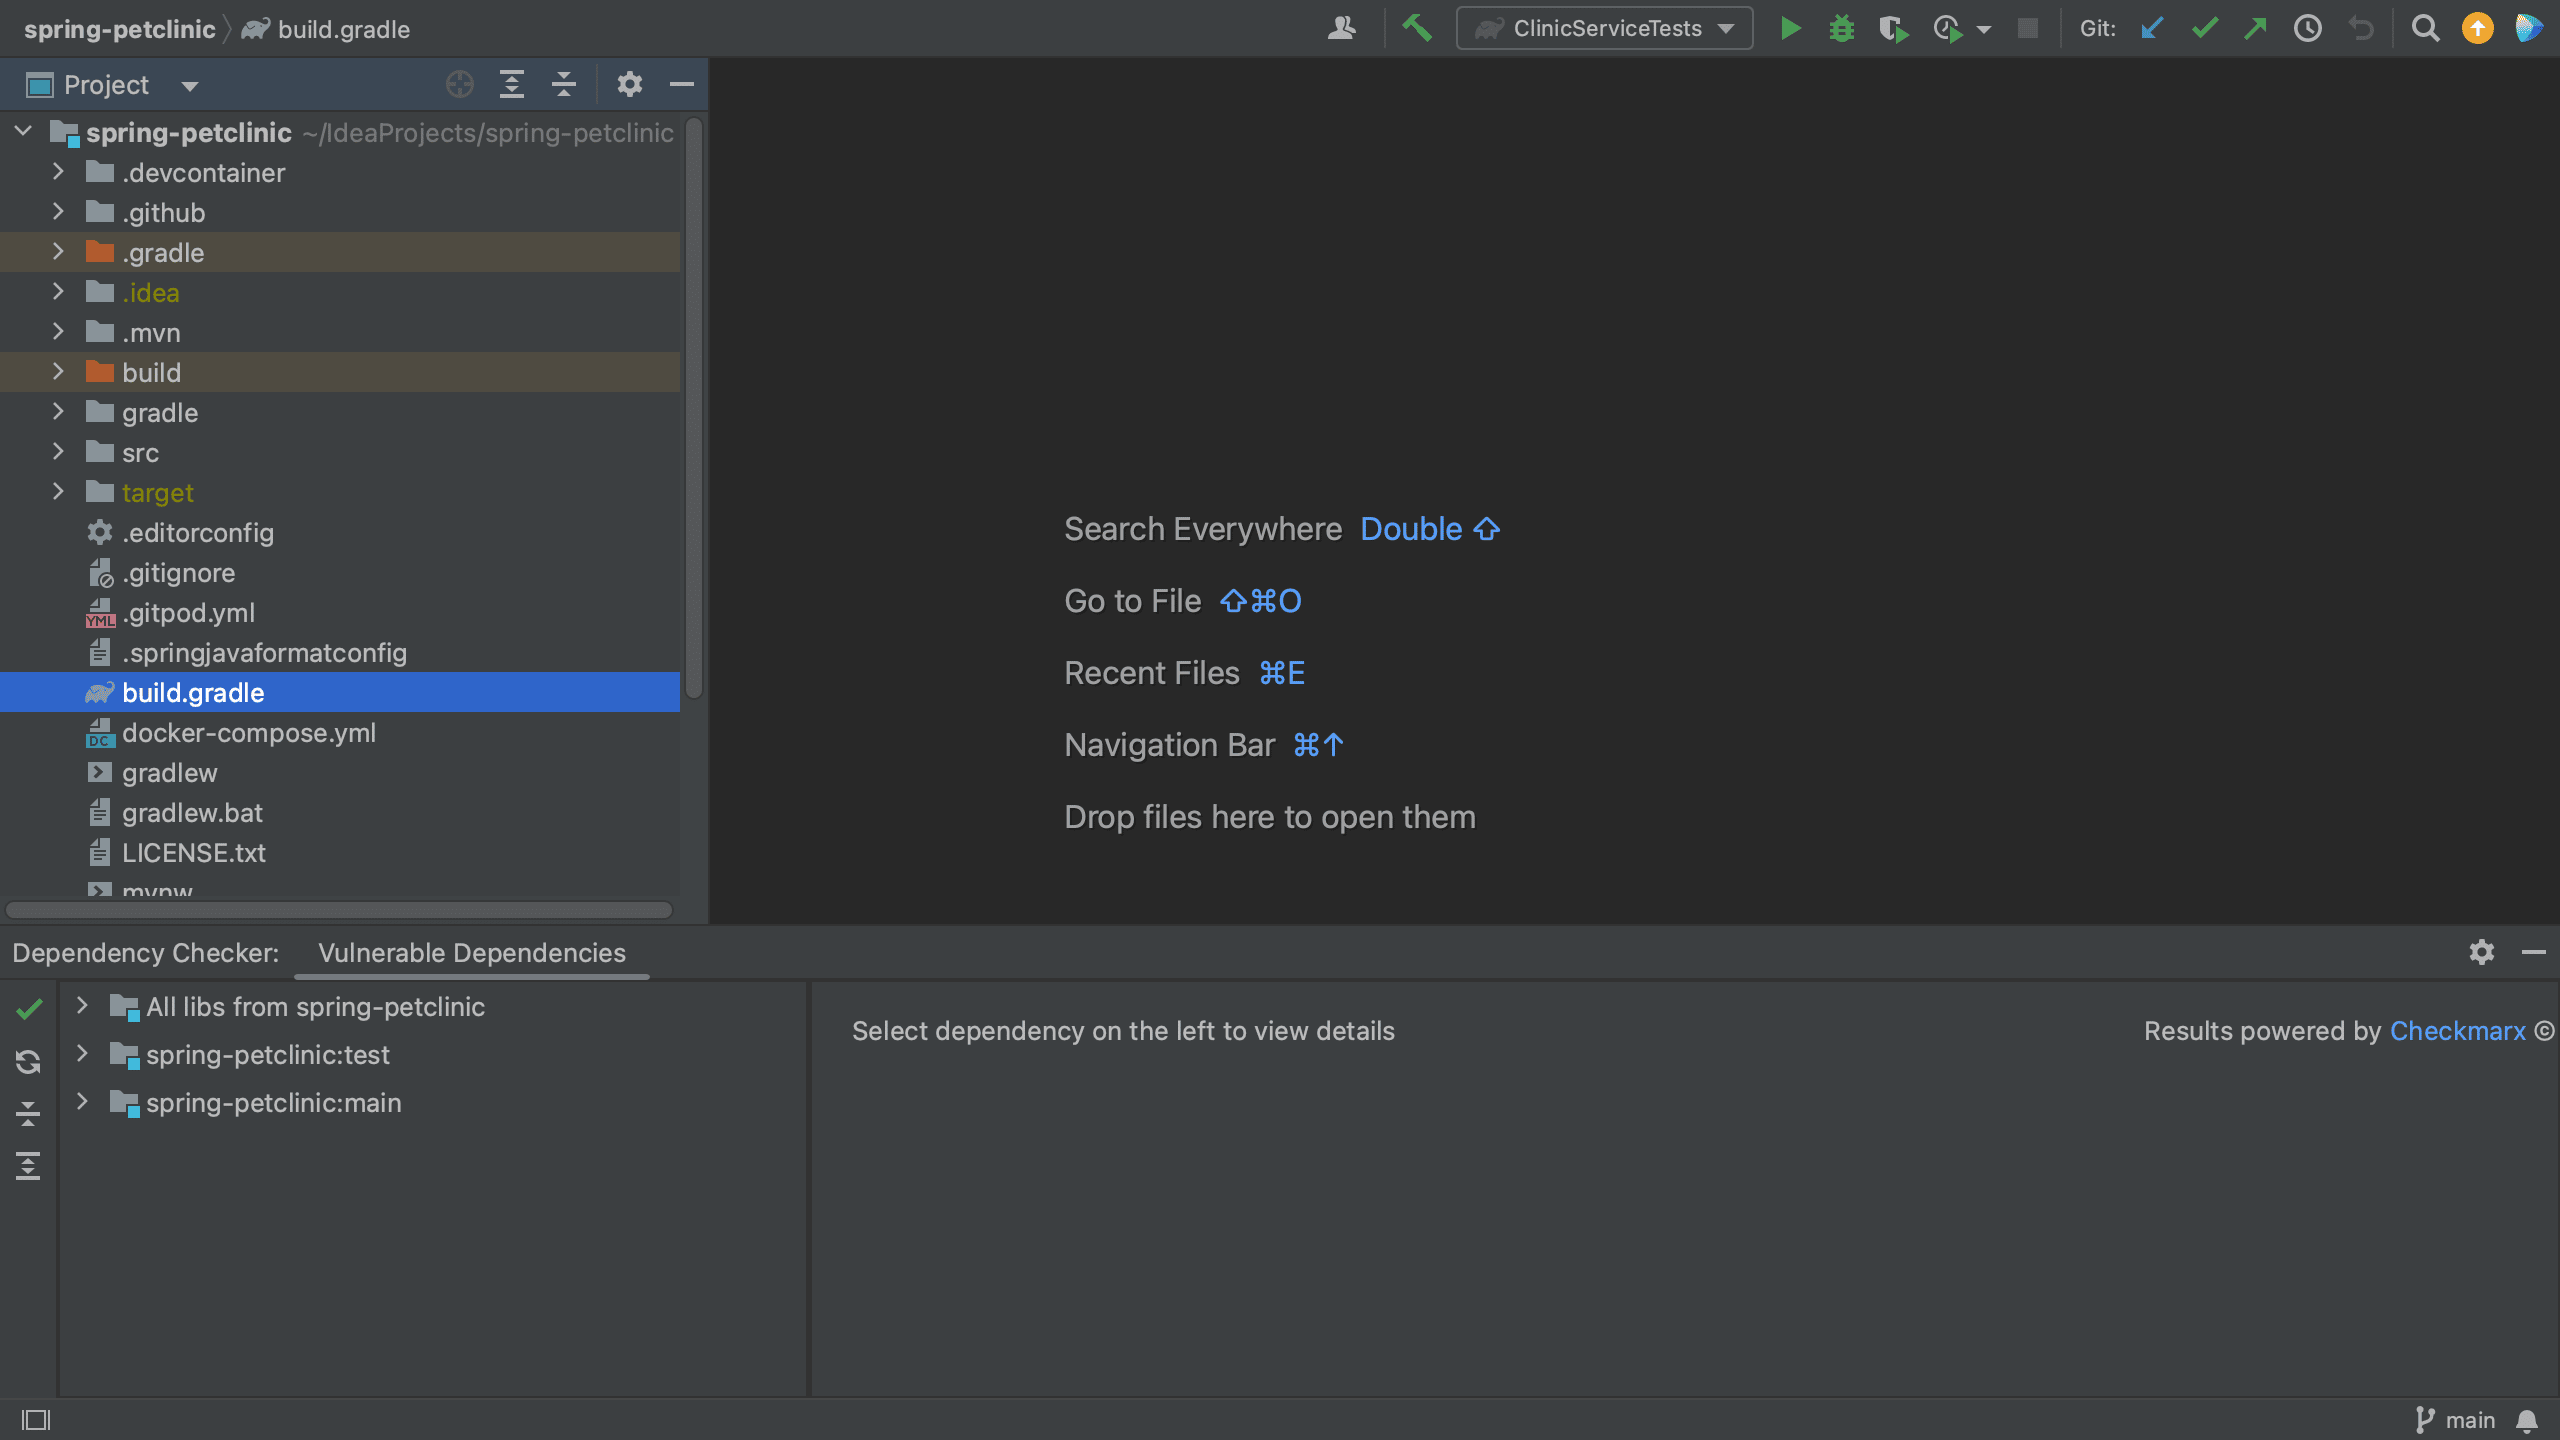
In a Gradle project, all of your project’s dependencies are declared in the build.gradle. When we open the build.gradle file for a project which contains vulnerable dependencies, we see that several dependencies are highlighted.
We can open the Vulnerable Dependencies tool window from the build.gradle file. For example, let’s have a look at the Spring PetClinic, which uses Gradle. We can right-click the build.gradle file and go to Analyze > Show Vulnerable Dependencies. This will open the Vulnerable Dependencies tool window.
Open Vulnerable Dependencies tool window from build.gradleVulnerable Dependencies tool window
View vulnerable dependencies in the Vulnerable Dependencies tool window
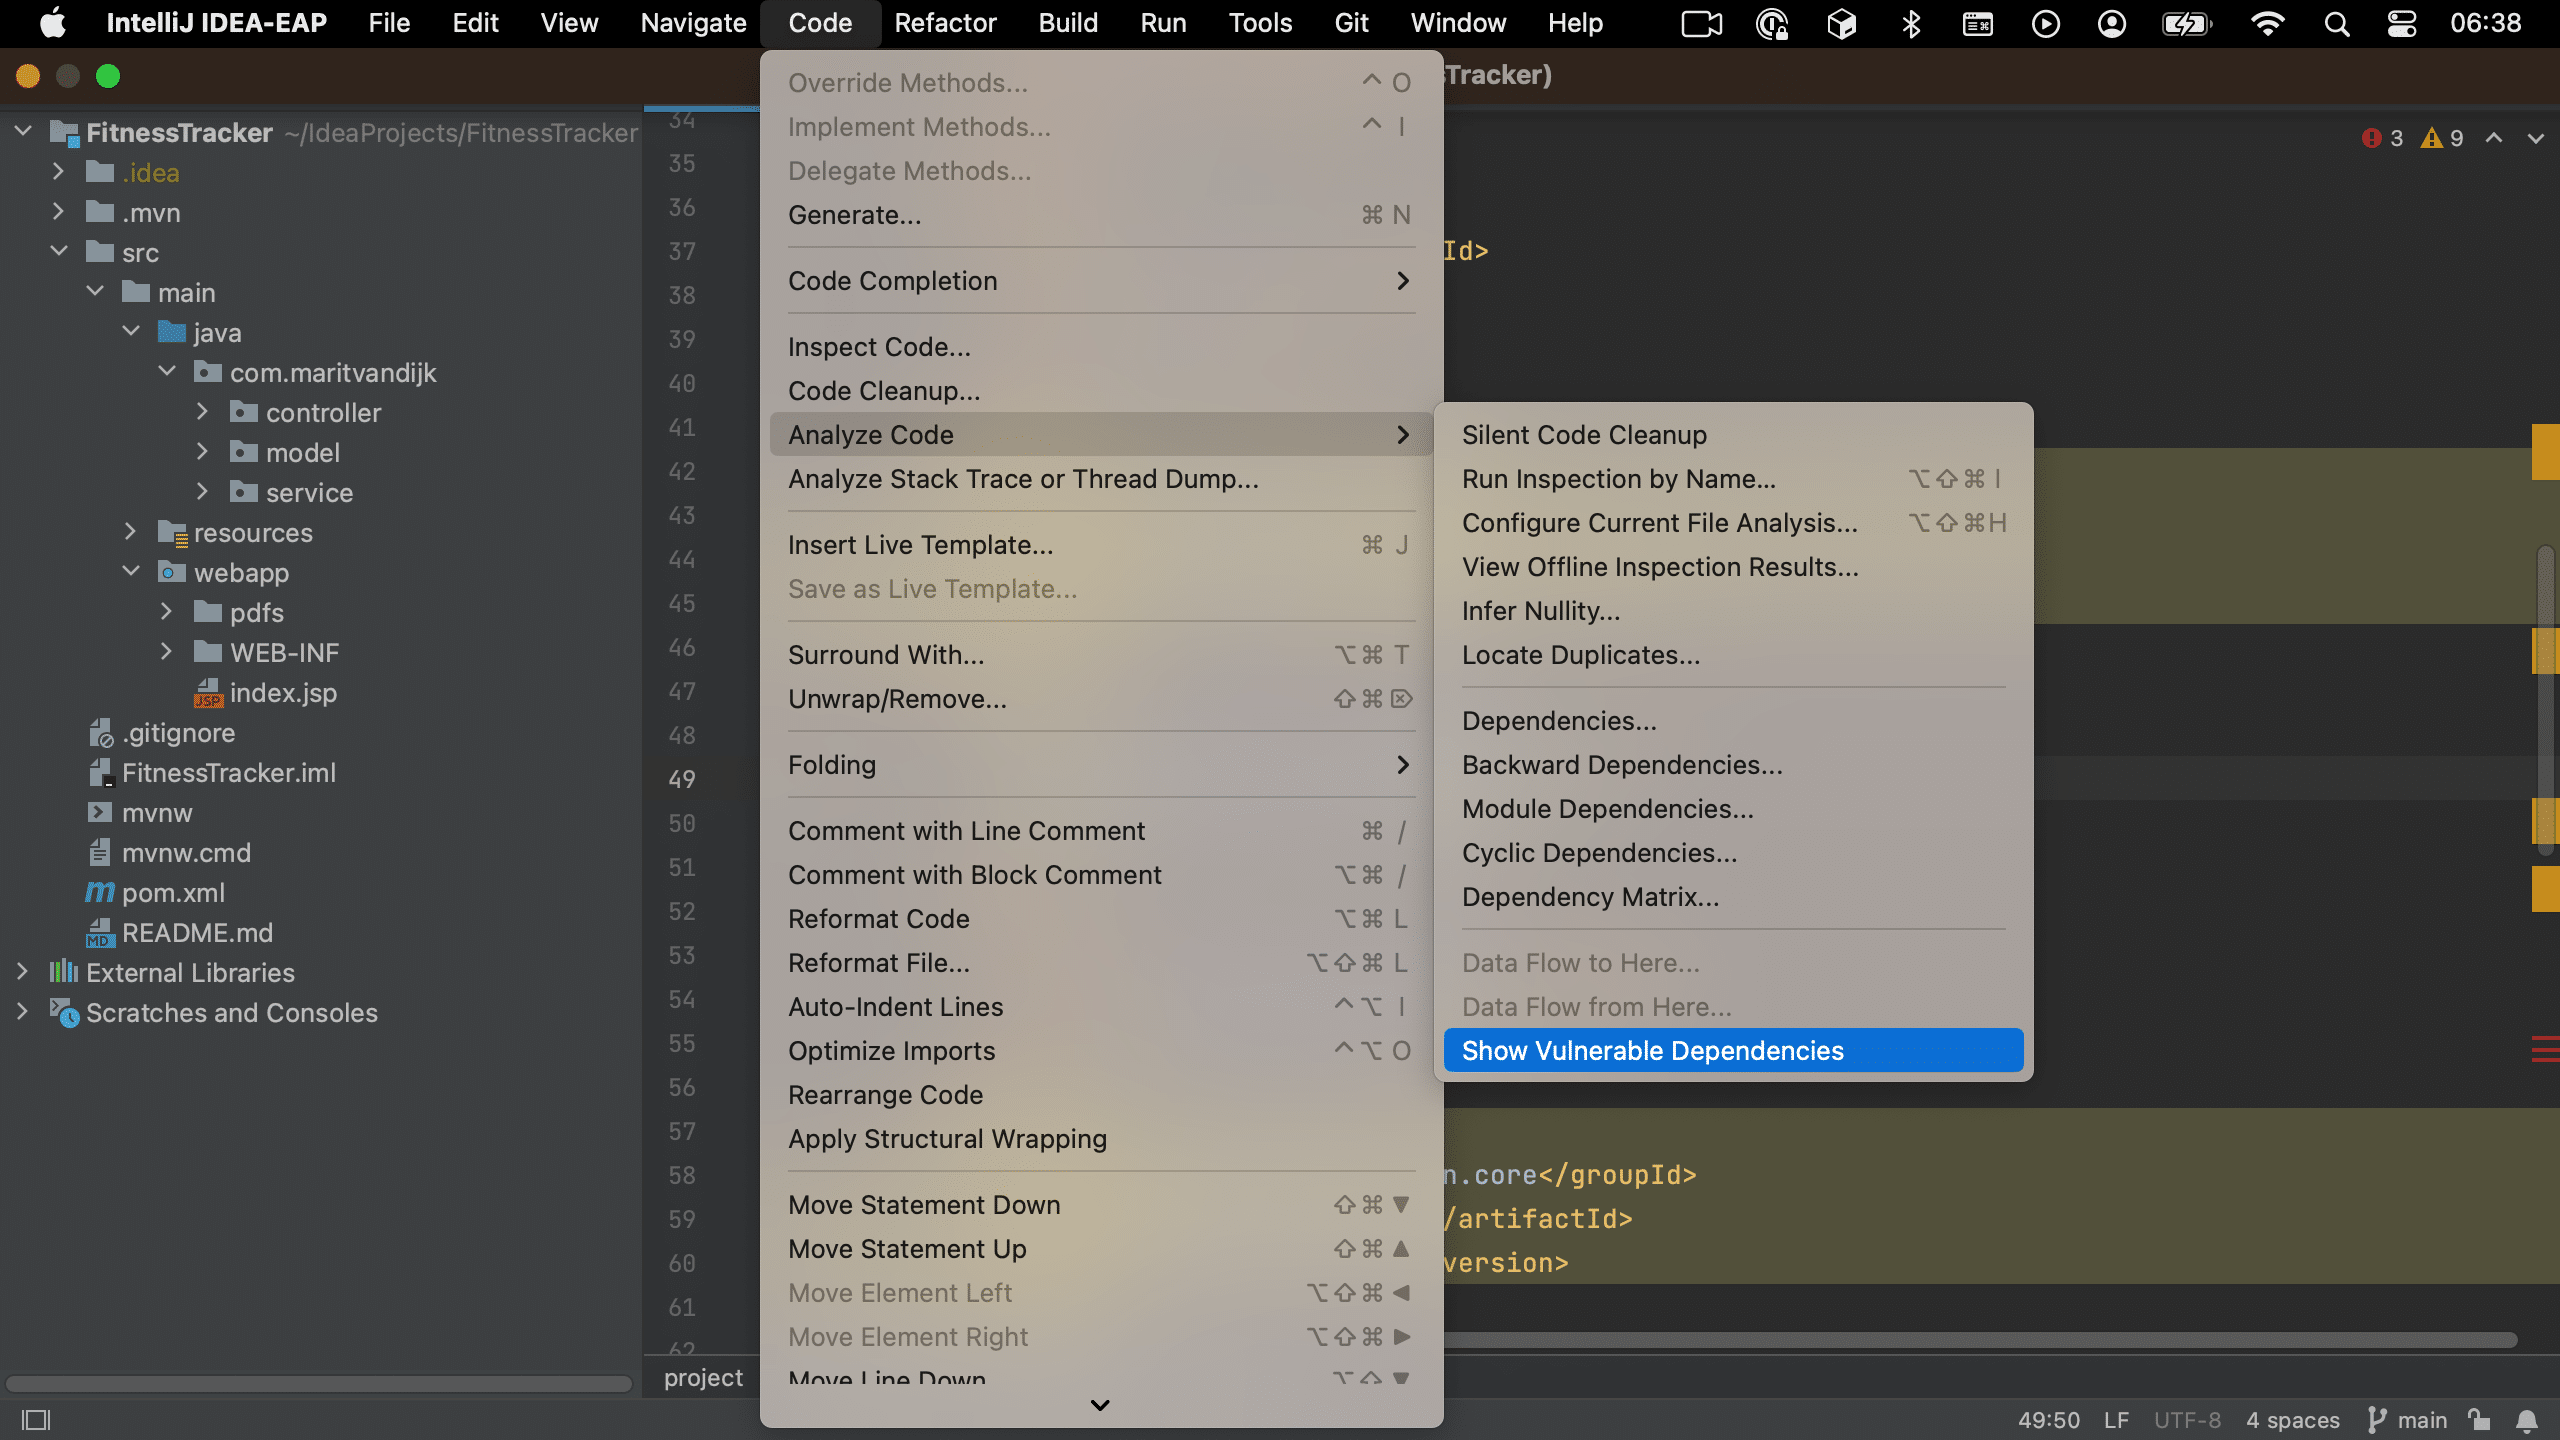
We can also open the Vulnerable Dependencies tool window without having to open the files where our dependencies are declared. To open the Vulnerable Dependencies tool window straight from the main menu, go to Code > Analyze Code > Show Vulnerable Dependencies.
Open Vulnerable Dependencies tool window from menu
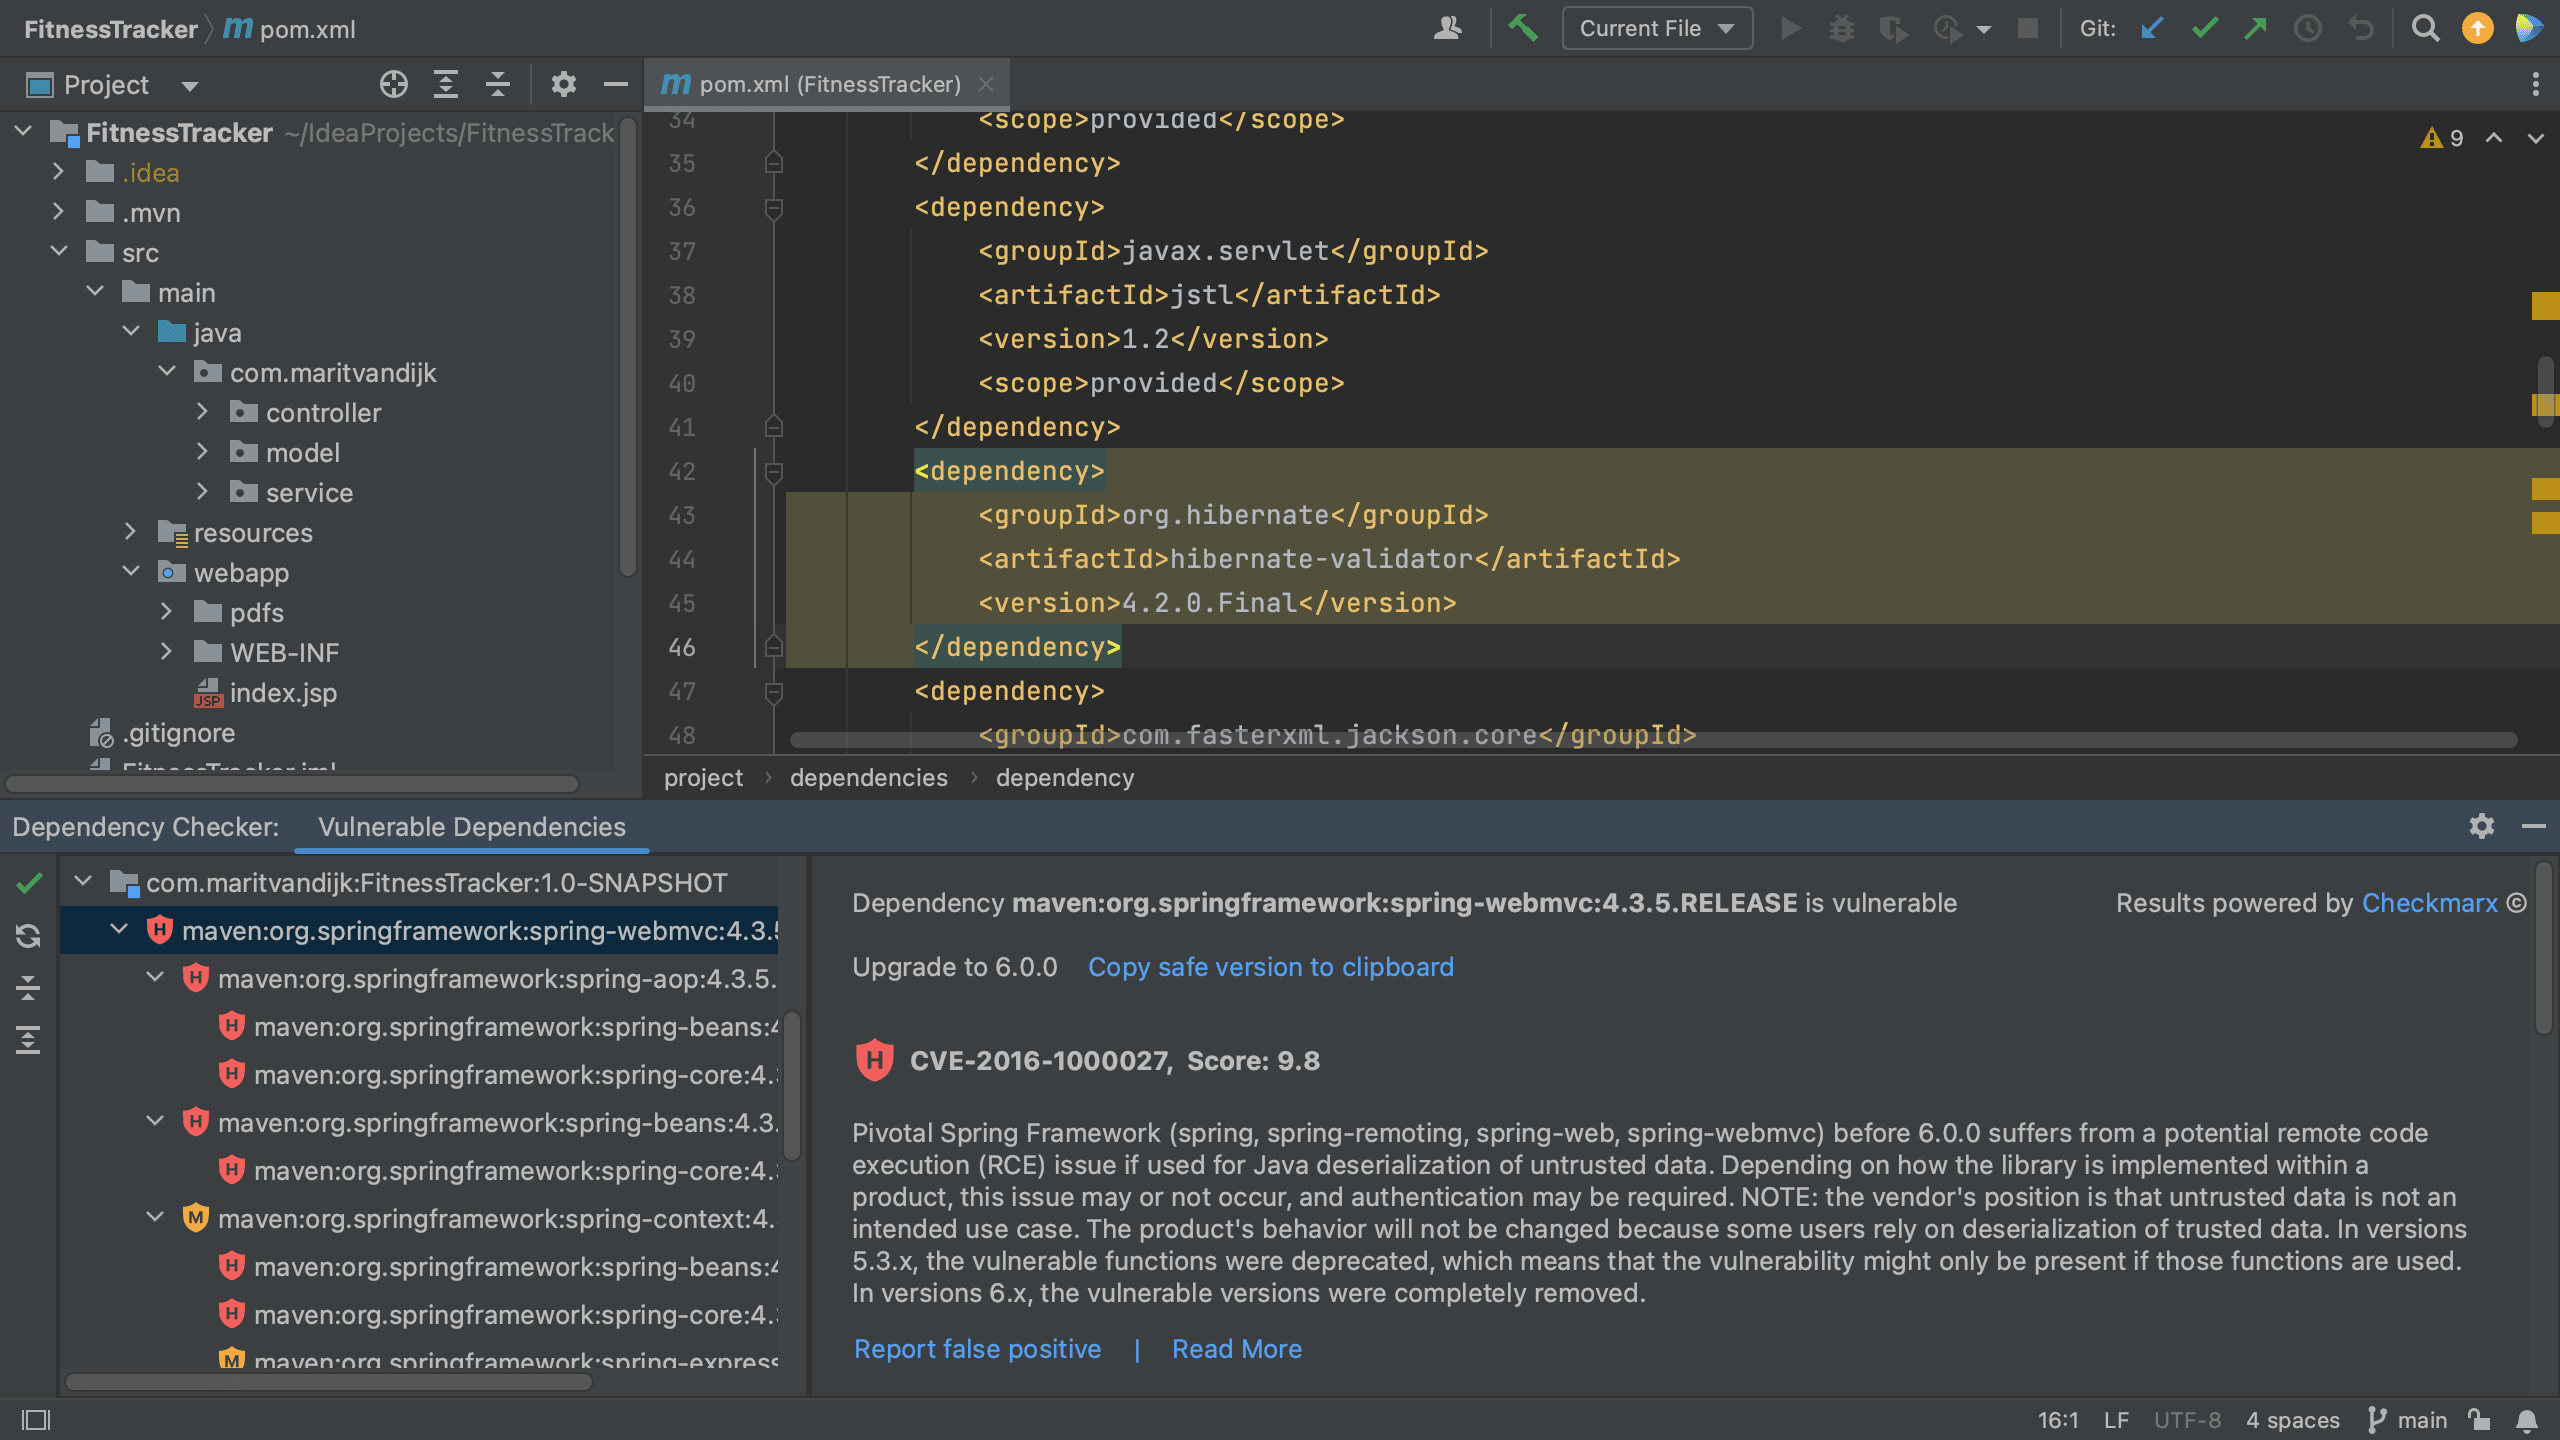
The Vulnerable Dependencies tool window shows all the vulnerable dependencies for the project. For each vulnerability, we can see an indication of the severity. There are two different views; the flat view shows all the vulnerable dependencies in this project and the dependency hierarchy view shows the dependency tree and the hierarchy between dependencies.
When we click a specific dependency, we can see more information about the vulnerabilities that were found in that dependency. In the Vulnerable Dependencies tool window details pane on the right, we can click the link to Read more under the information about a particular dependency, which will take us to the information about this specific vulnerability in the Checkmarx Advisory.
Vulnerable Dependencies tool window details
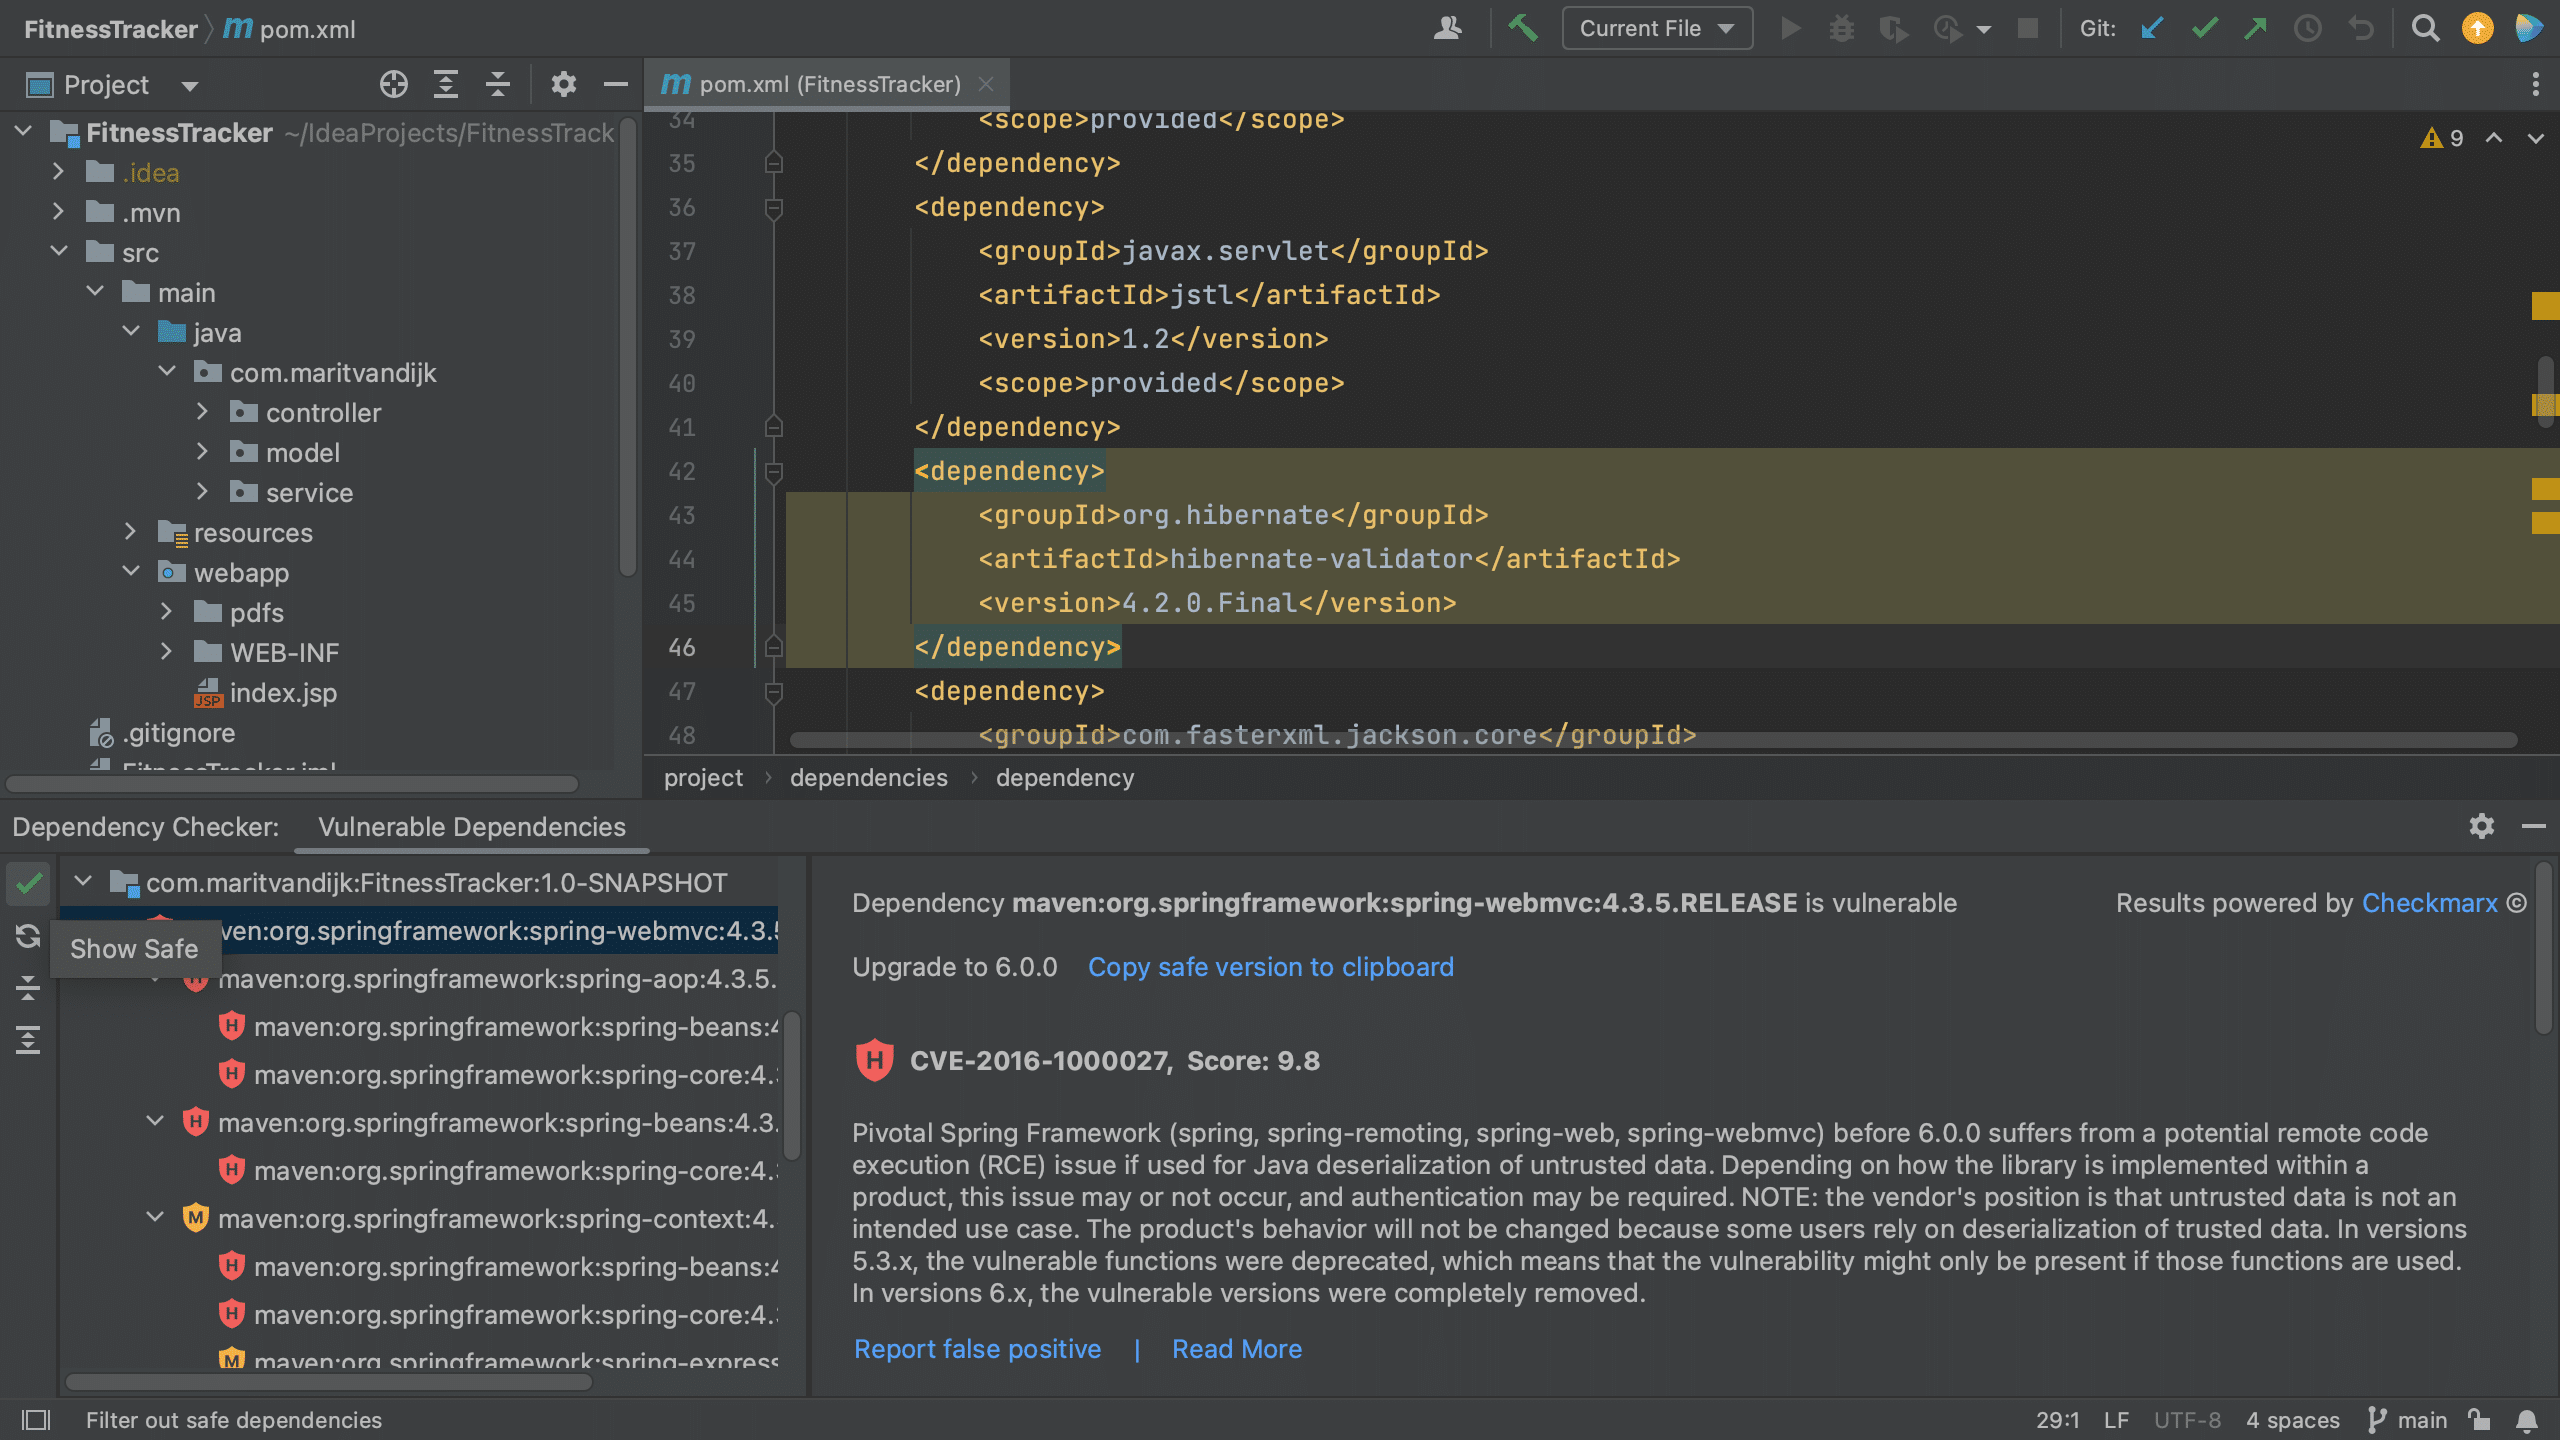
To see all the dependencies of the project regardless of whether they’re vulnerable or not, we can click the Show safe button on the top left of the Vulnerable Dependencies tool window.
Show safe button
The dependencies without known vulnerabilities are shown with a green checkmark next to it. We still have the same two views; the flat view and the dependency hierarchy view. We can use the Show safe button to toggle between showing all dependencies or vulnerable dependencies only. We can use the Collapse all or Expand all buttons to collapse or expand the views.
Show safe dependencies
Remediate dependencies using IntelliJ IDEA Ultimate
Finally, we can remediate these vulnerabilities. We can click Copy safe version to clipboard in the Vulnerable Dependencies tool window details pane to copy the safe version and paste it into our build file.
Copy safe version to clipboard
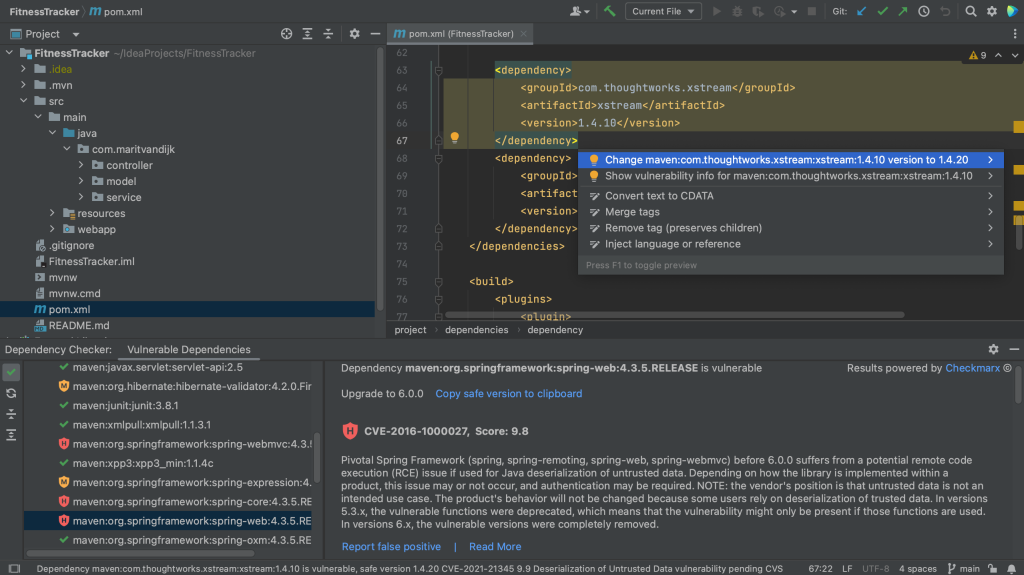
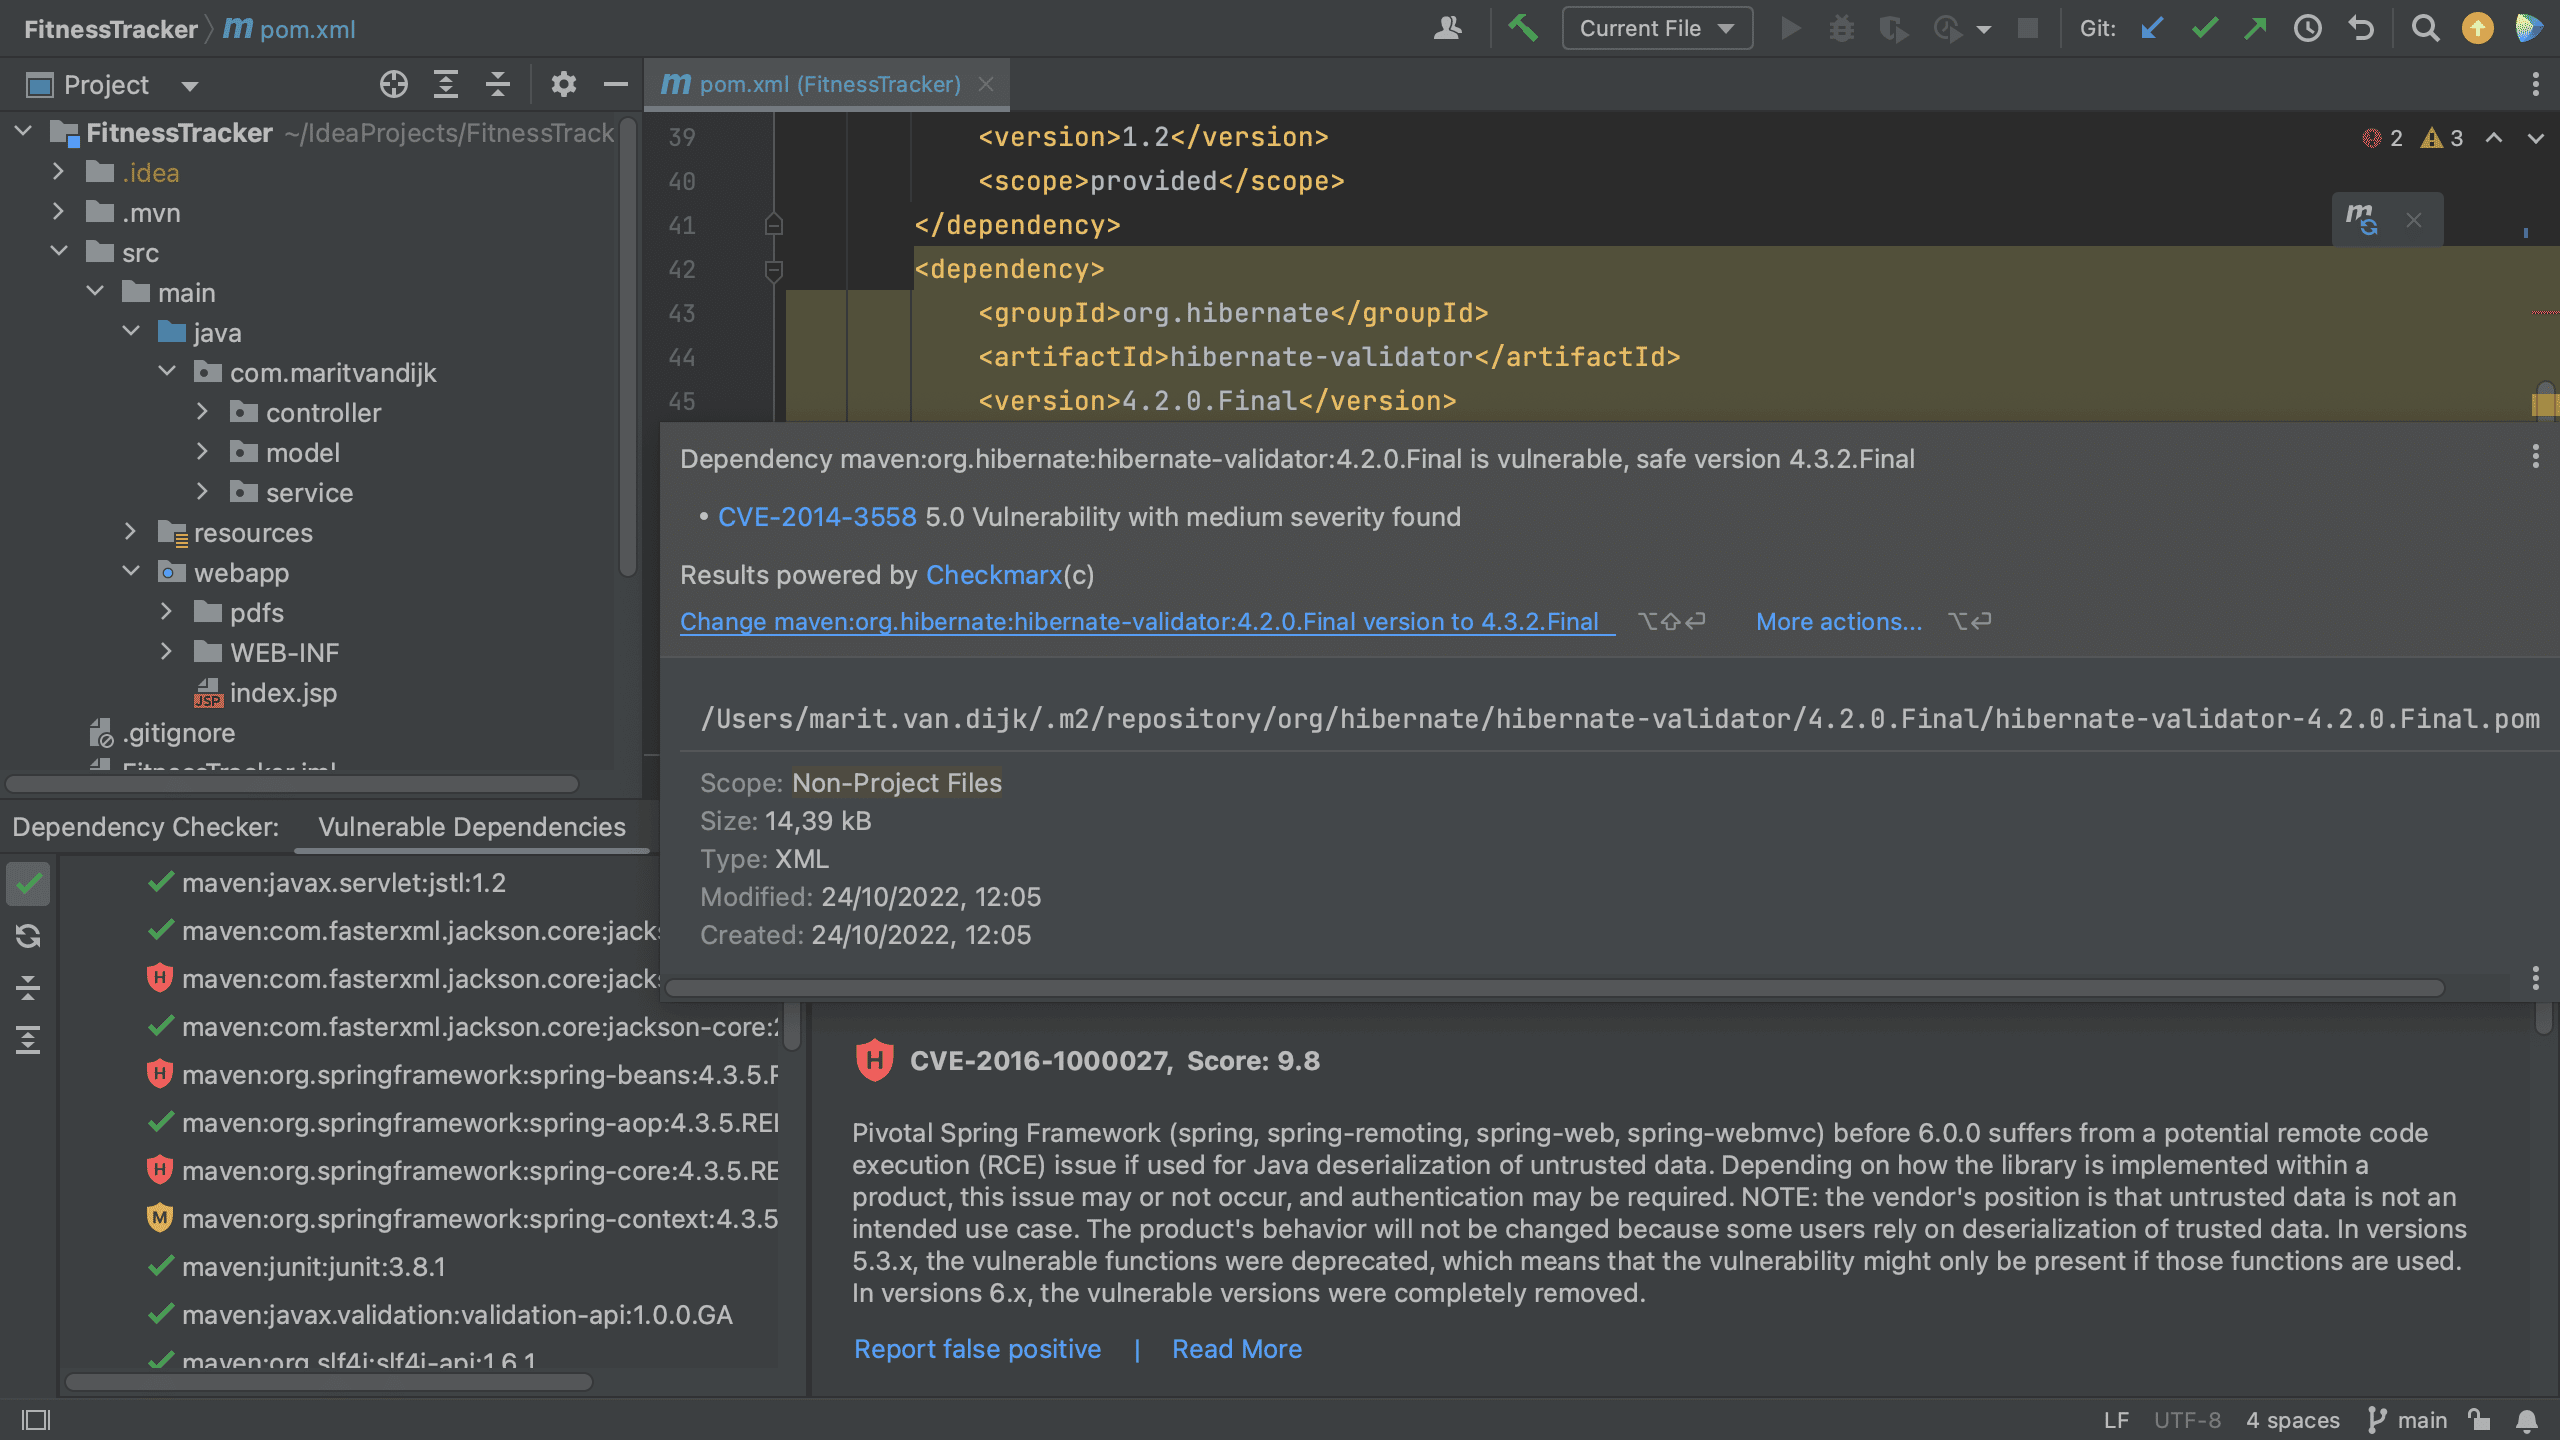
We can also fix it directly in our build file. When we hover over a specific vulnerable dependency, the hover menu includes an action that we can click to upgrade the version (if a new version is available).
Show hover
Fixed version from hover
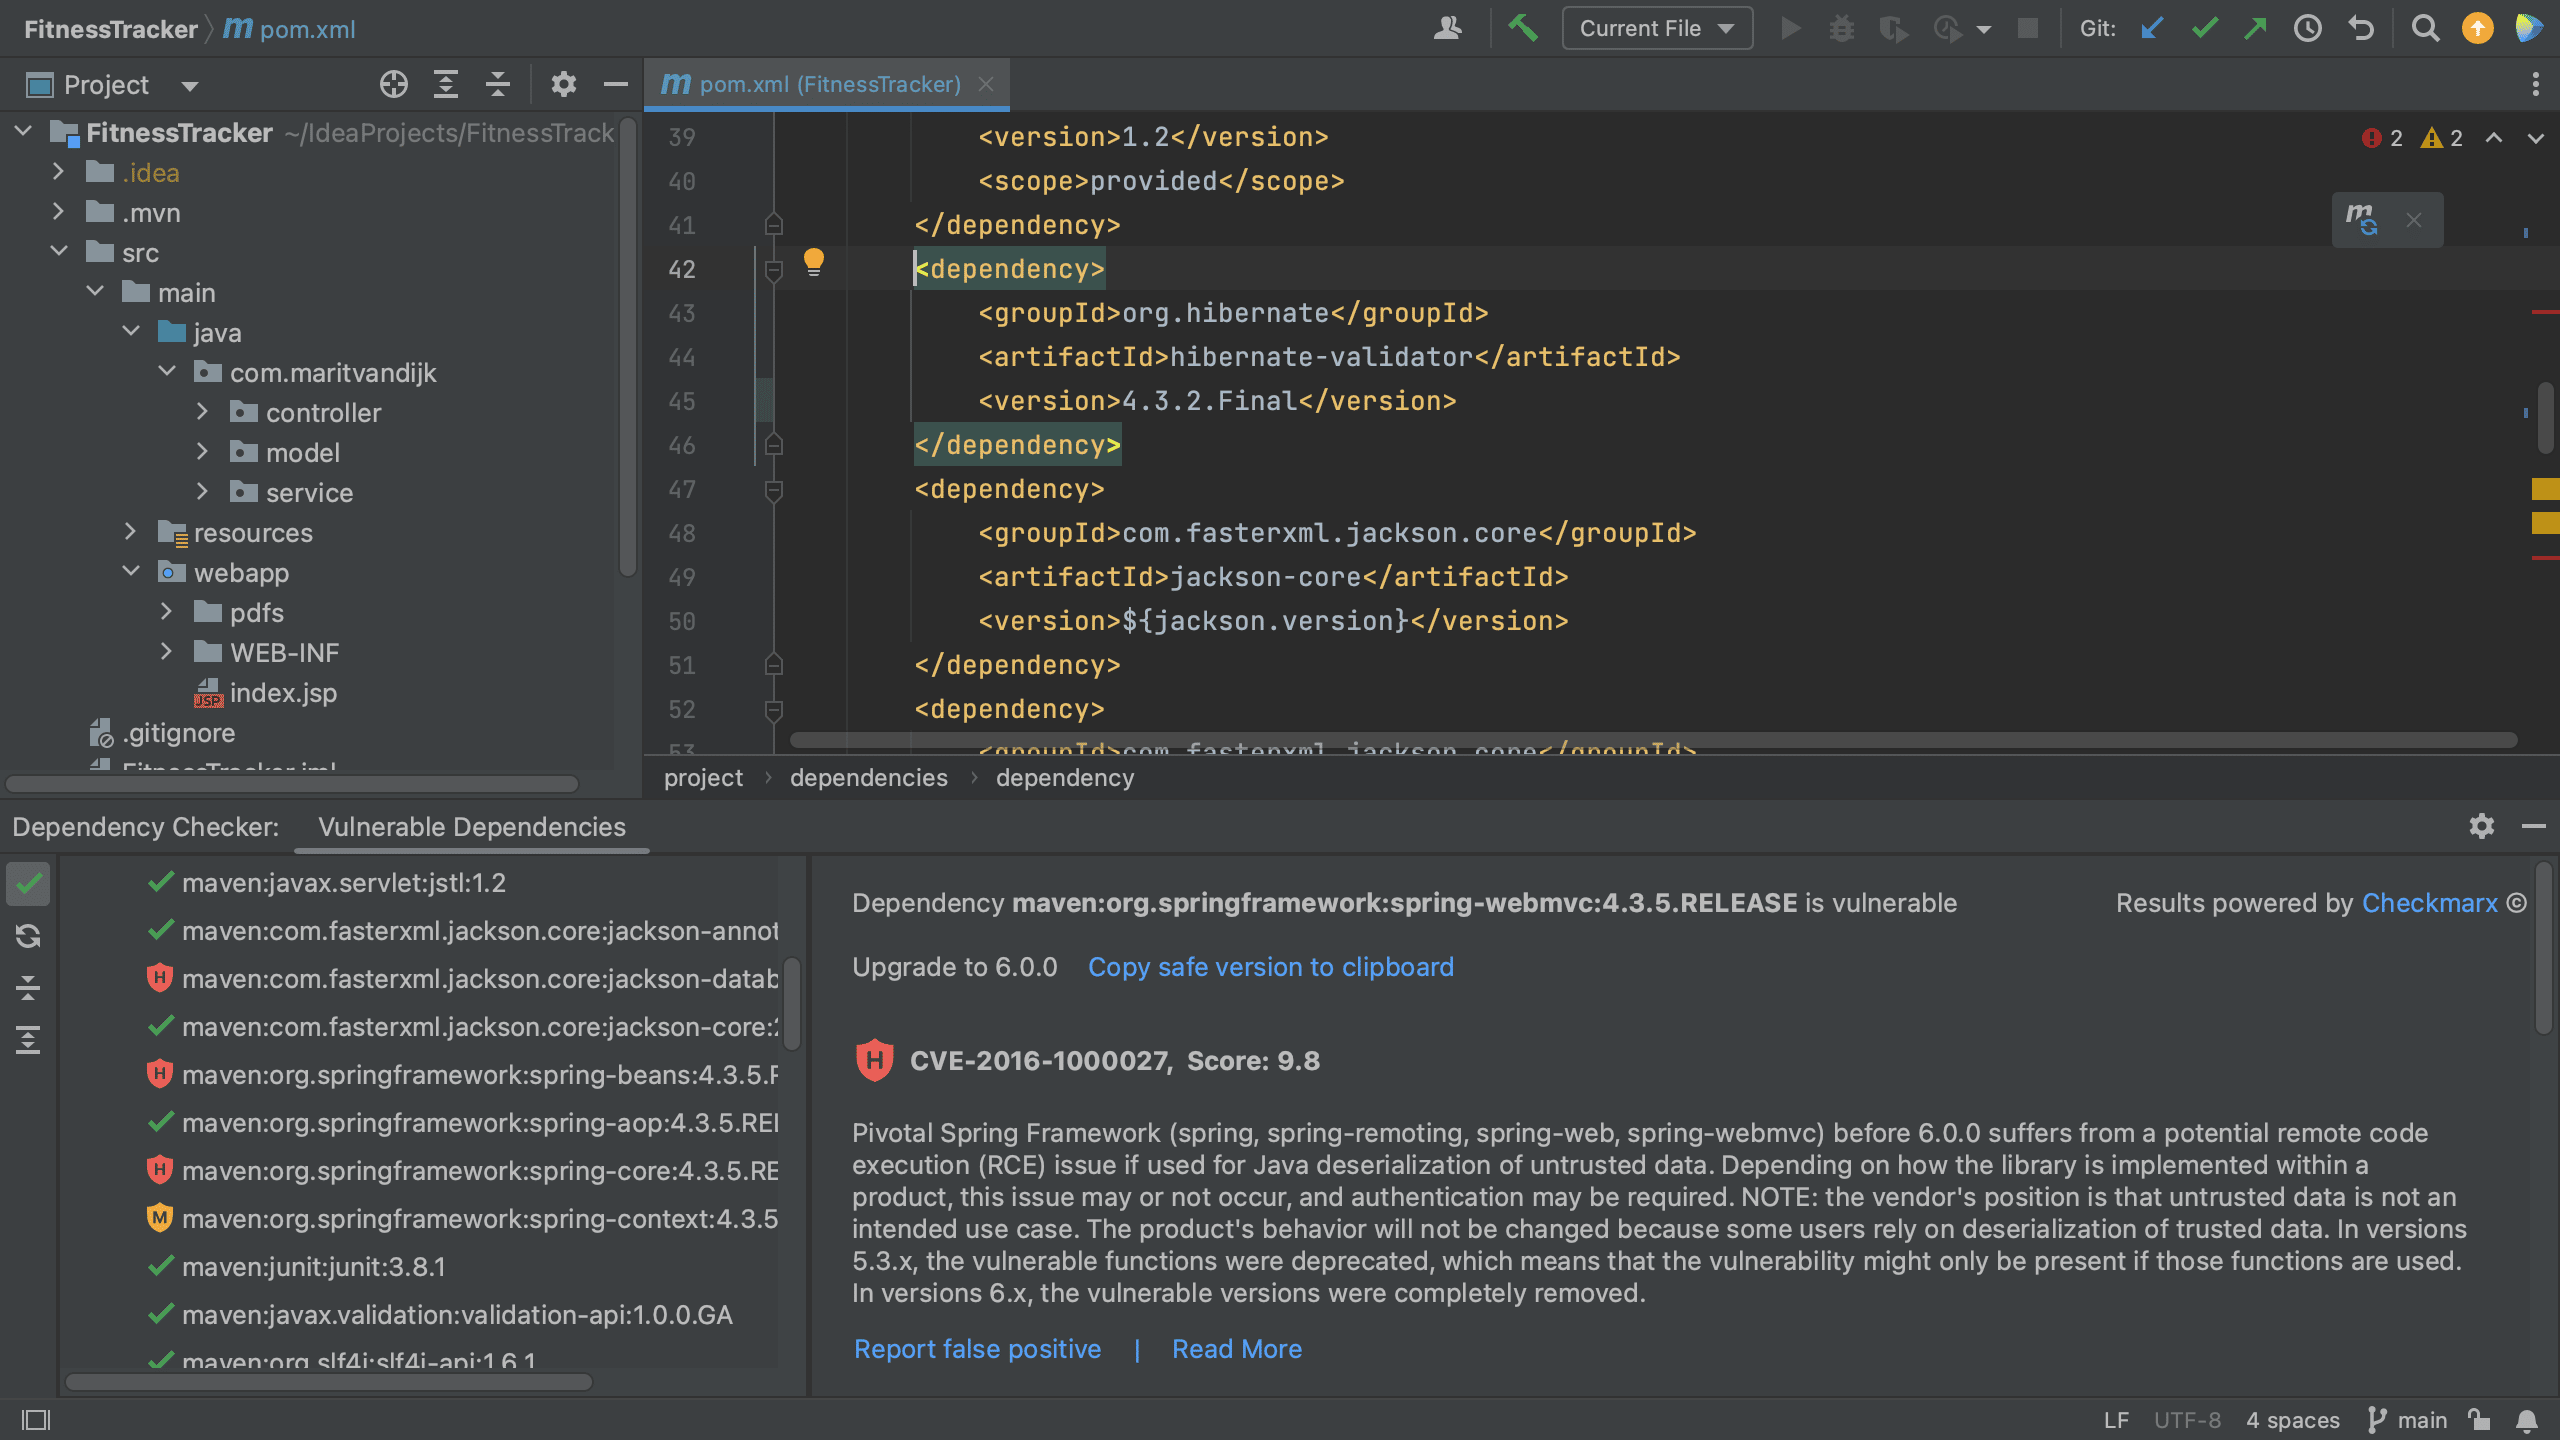
Alternatively, we can use the intention action shortcut, ⌥ ⏎ on MacOs, or Alt+Enter on Windows/Linux and select the action to upgrade the version (if a new version is available).
Show context actionsFixed version from context actions
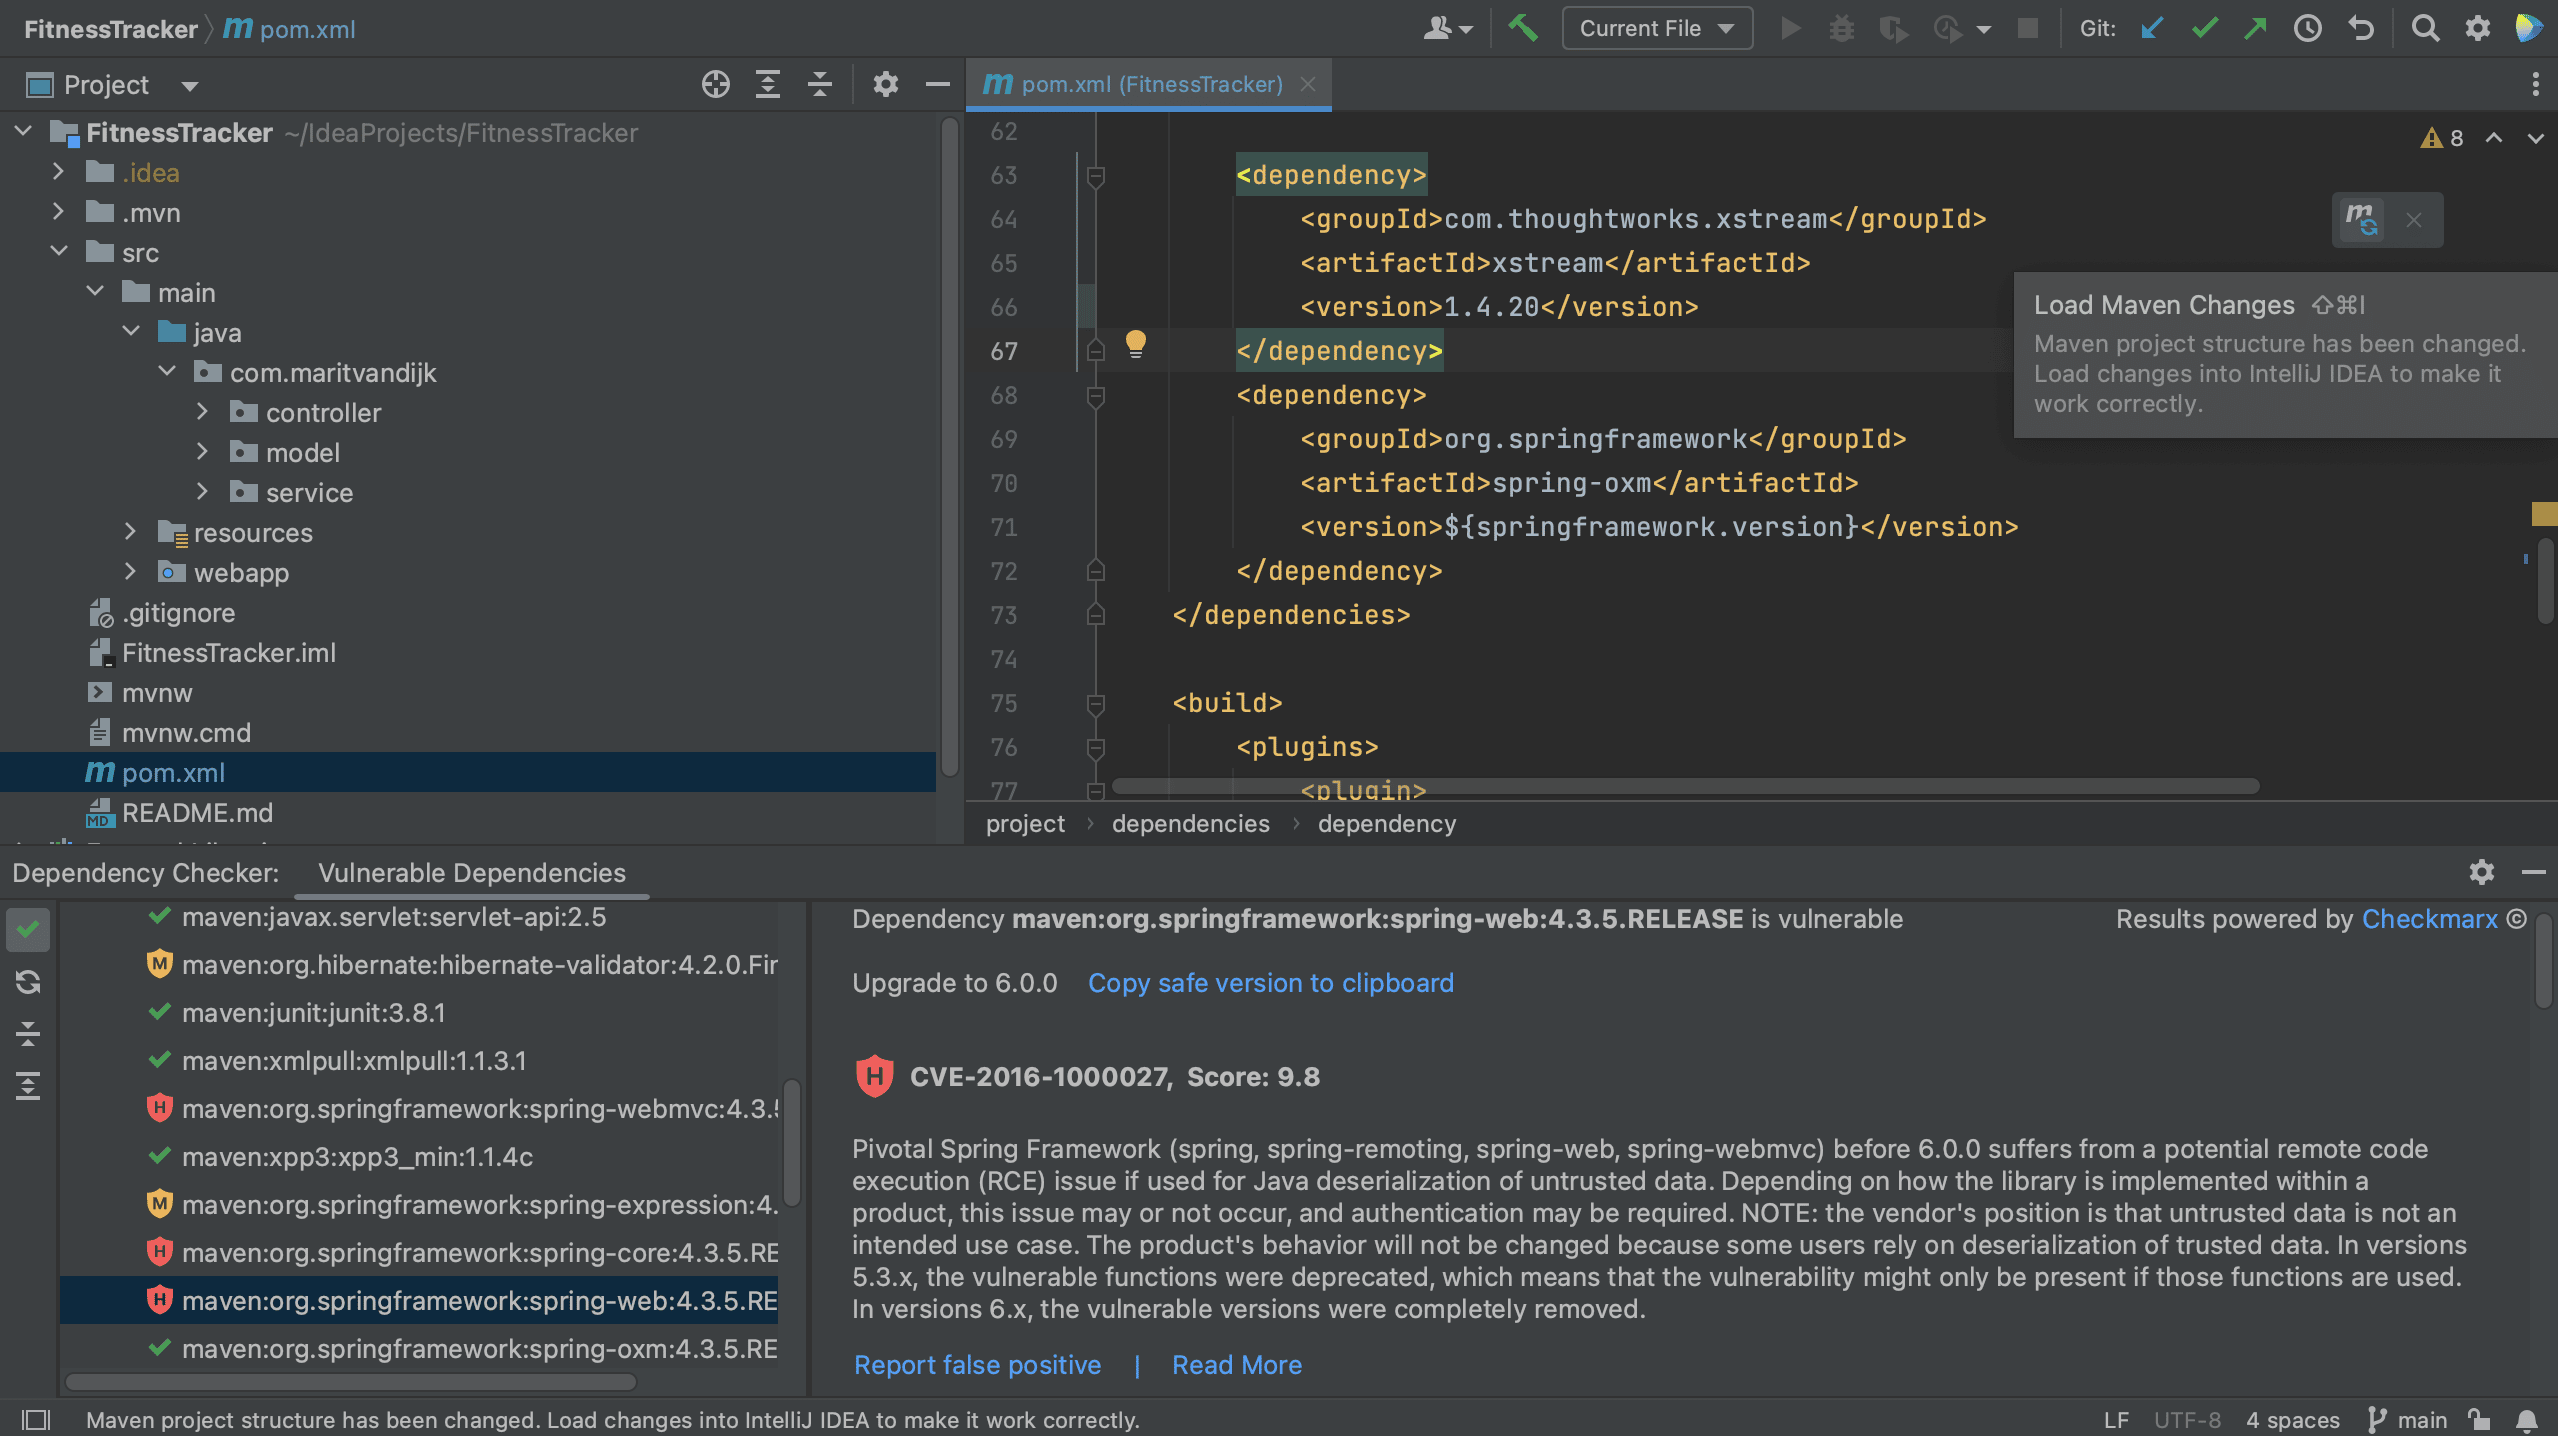
After we update the versions, we can Load Maven Changes, using ⌘⇧I on MacOs or Ctrl+Shift+O on Windows/Linux. We see that the overview in the Vulnerable Checker tool window is updated, and we see that dependencies that we have upgraded and are no longer vulnerable are removed, or shown with a green checkmark if we have enabled Show safe dependencies.
Load Maven Changes
Updated
Summary and Shortcuts
As we have seen, the Package Checker plugin bundled with IntelliJ IDEA Ultimate offers several different ways in which we can view vulnerable dependencies in our project inside IntelliJ IDEA Ultimate, get more information about these vulnerabilities, and remediate them. This plugin can help keep your projects safe and secure right inside your IDE!
We’ll have a look at how to view known vulnerabilities in your Maven or Gradle projects, how to get more information about the known vulnerabilities in a specific dependency and how to remediate these vulnerabilities inside IntelliJ IDEA Ultimate if a new version with a fix is available.
In this tutorial, we’re going to take a look at managing dependencies in IntelliJ IDEA. We’ll look at different ways to add dependencies to your project, and how to add, upgrade and remove dependencies using Package Search.
Add dependencies
There are several ways to add new dependencies to your project.
From the build file using copy-paste
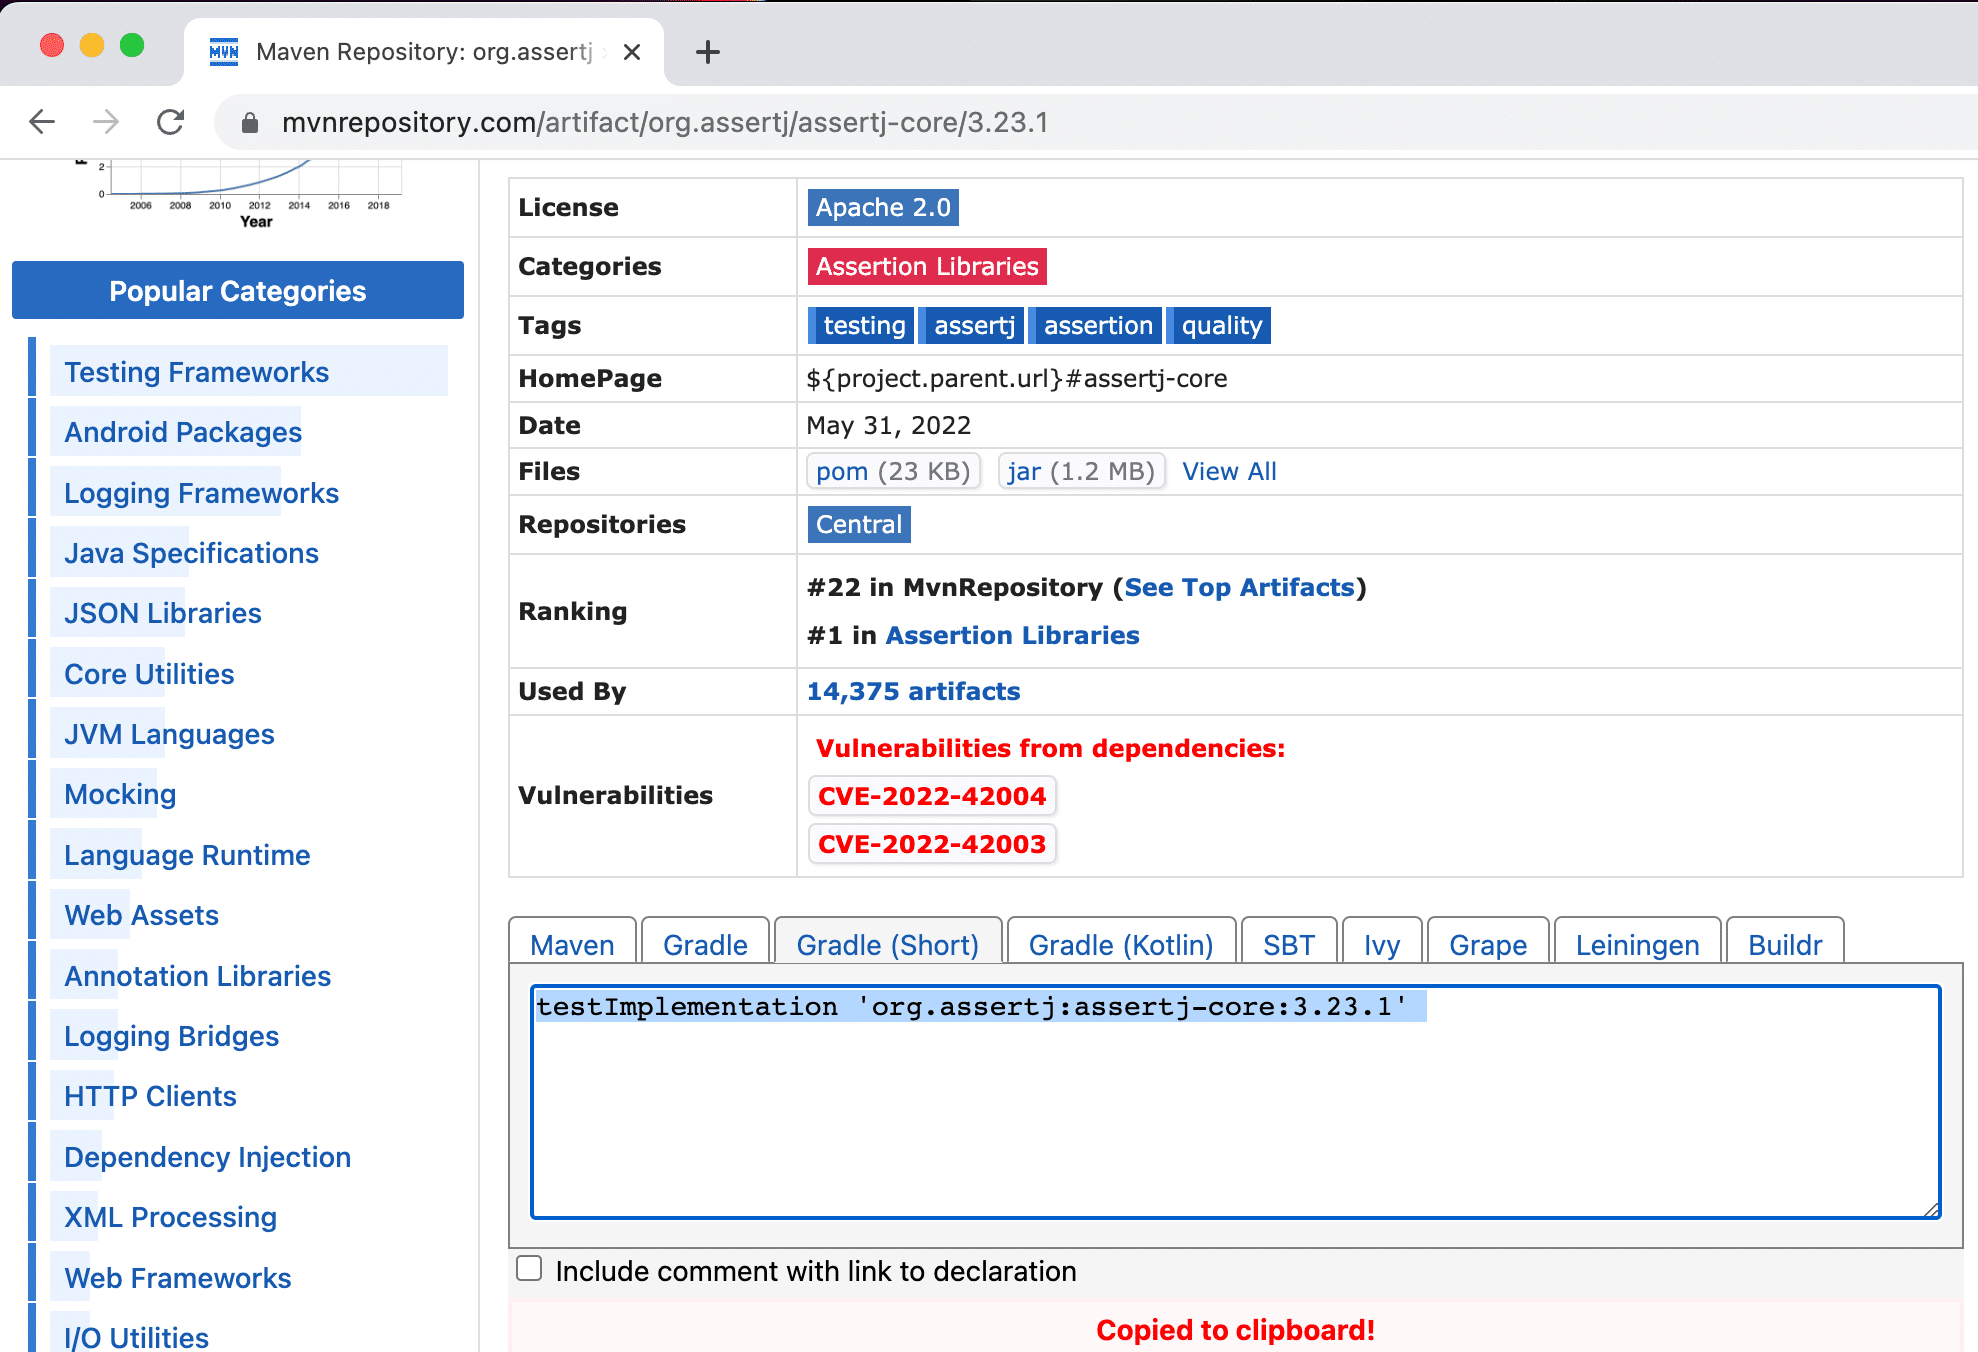
You have probably copied a dependency from Maven Repository (or another website) and pasted into your build file.
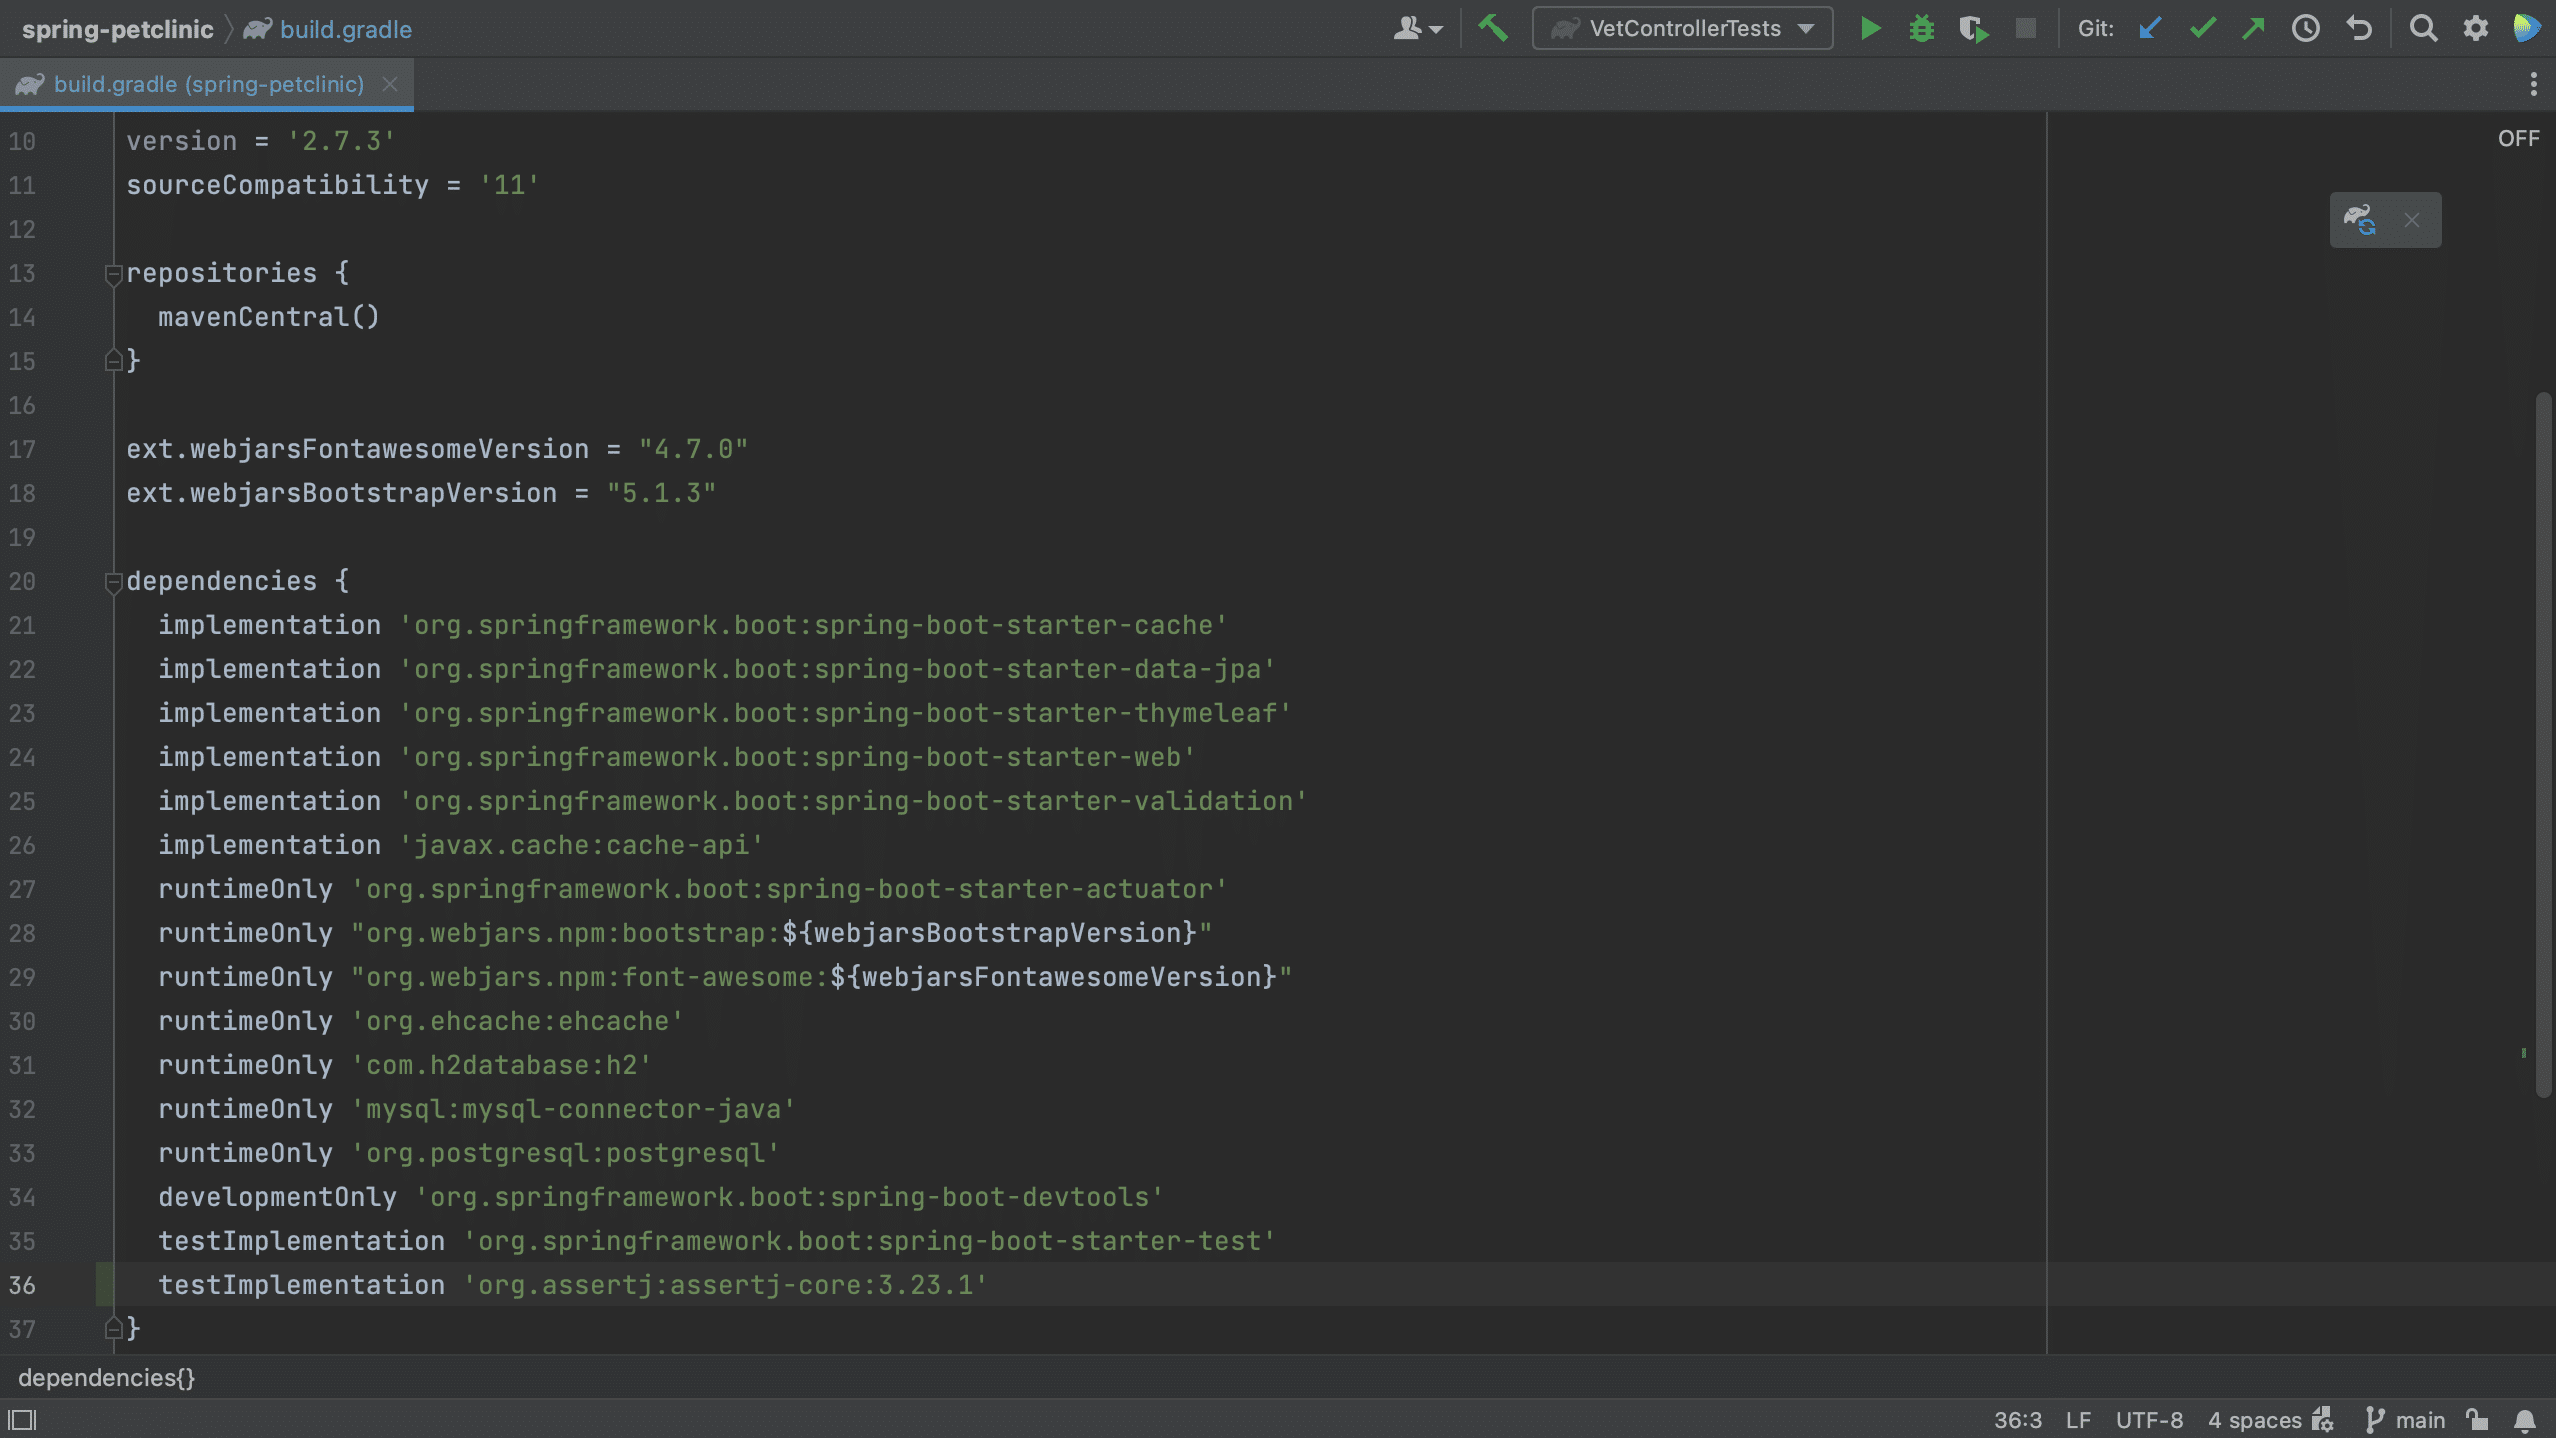
For example, we can copy the Gradle format for this dependency and paste it into our build.gradle file.
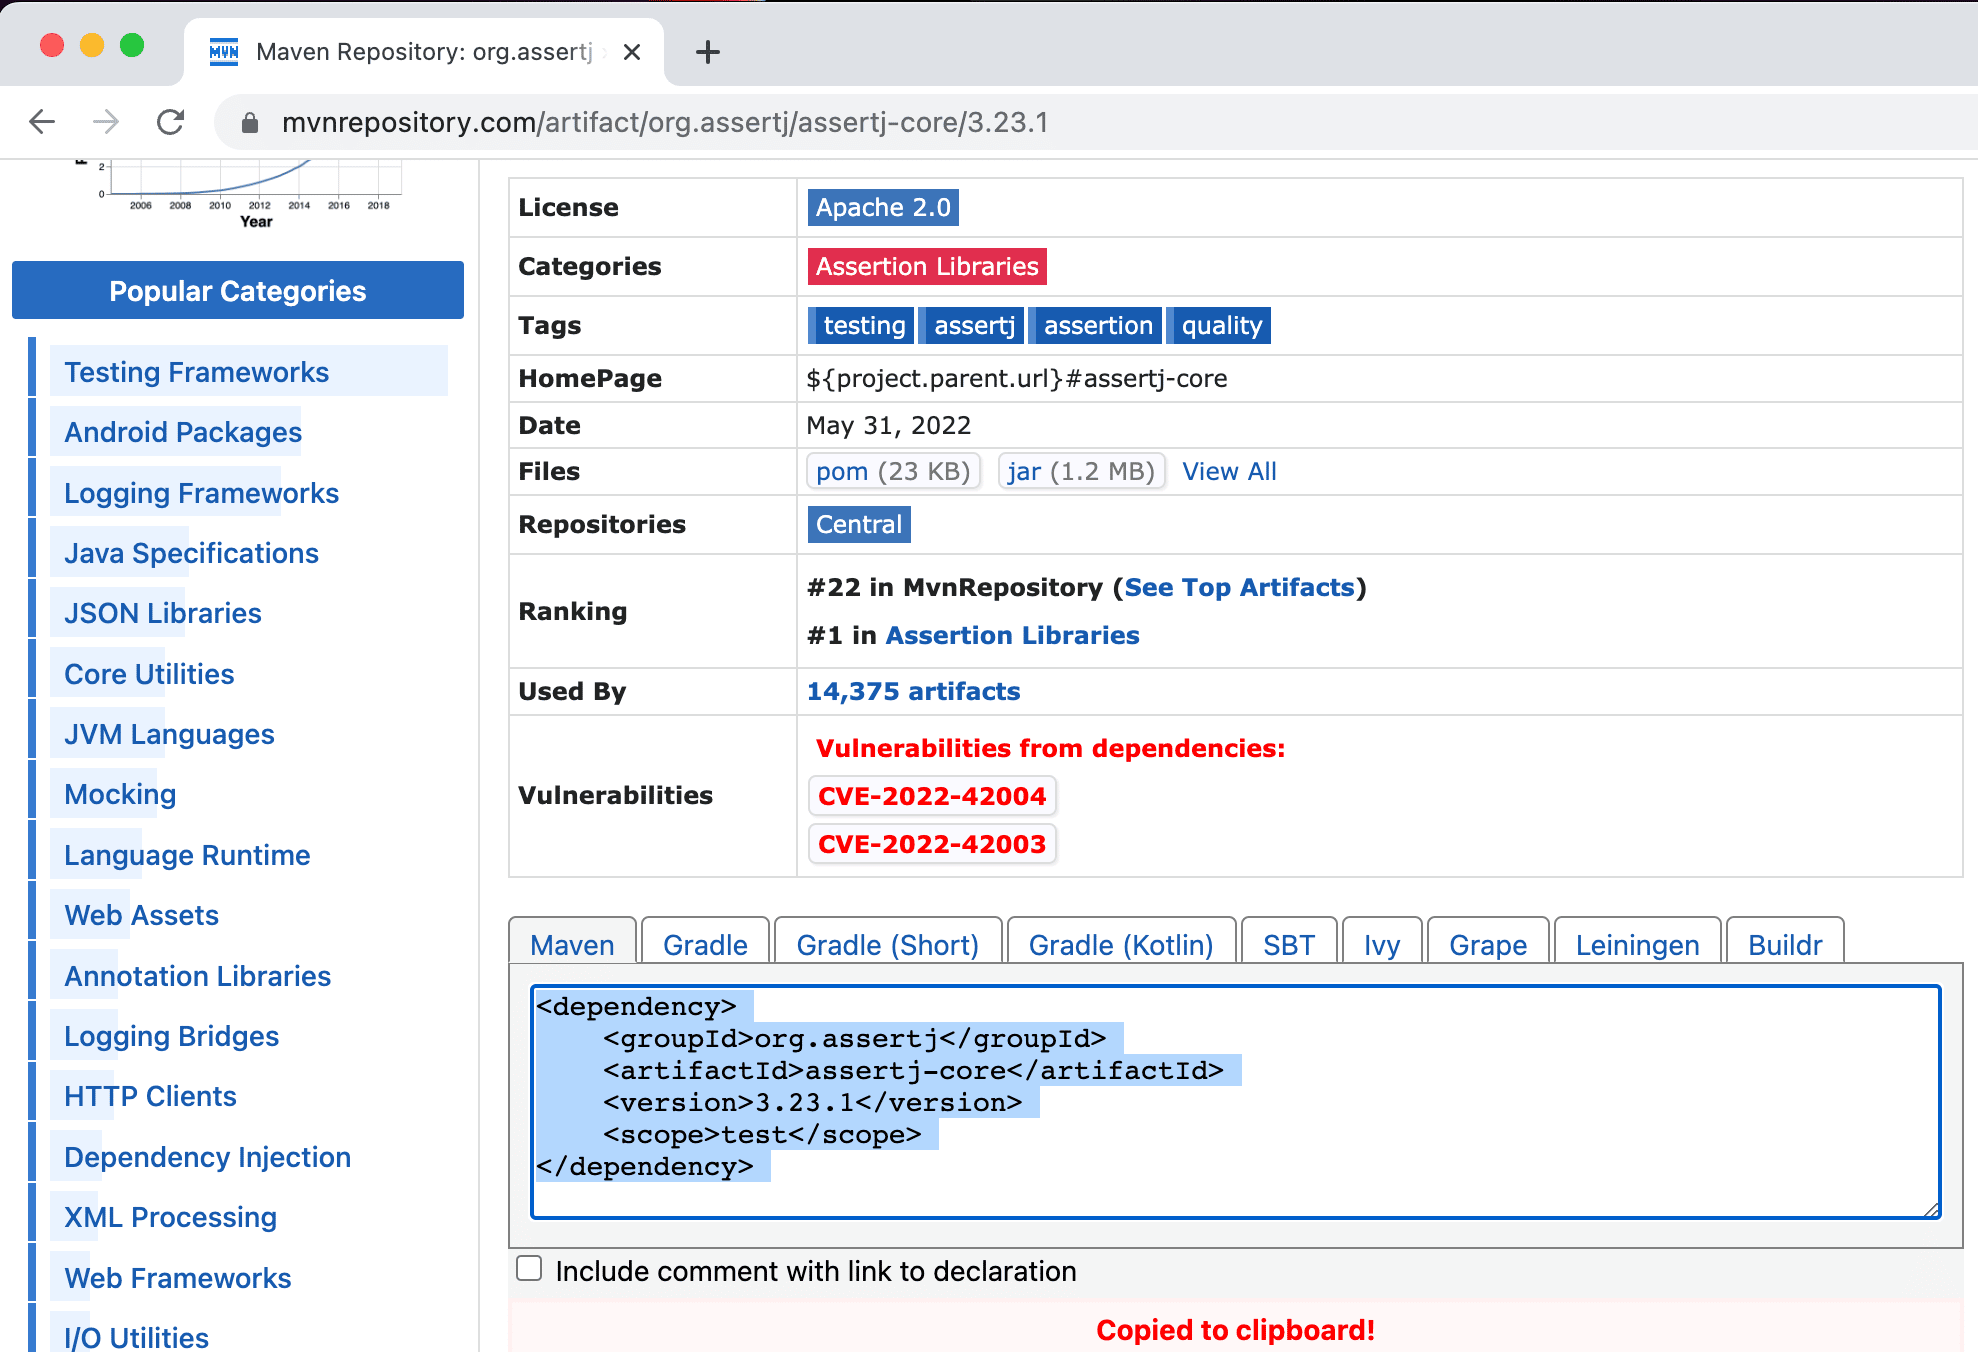
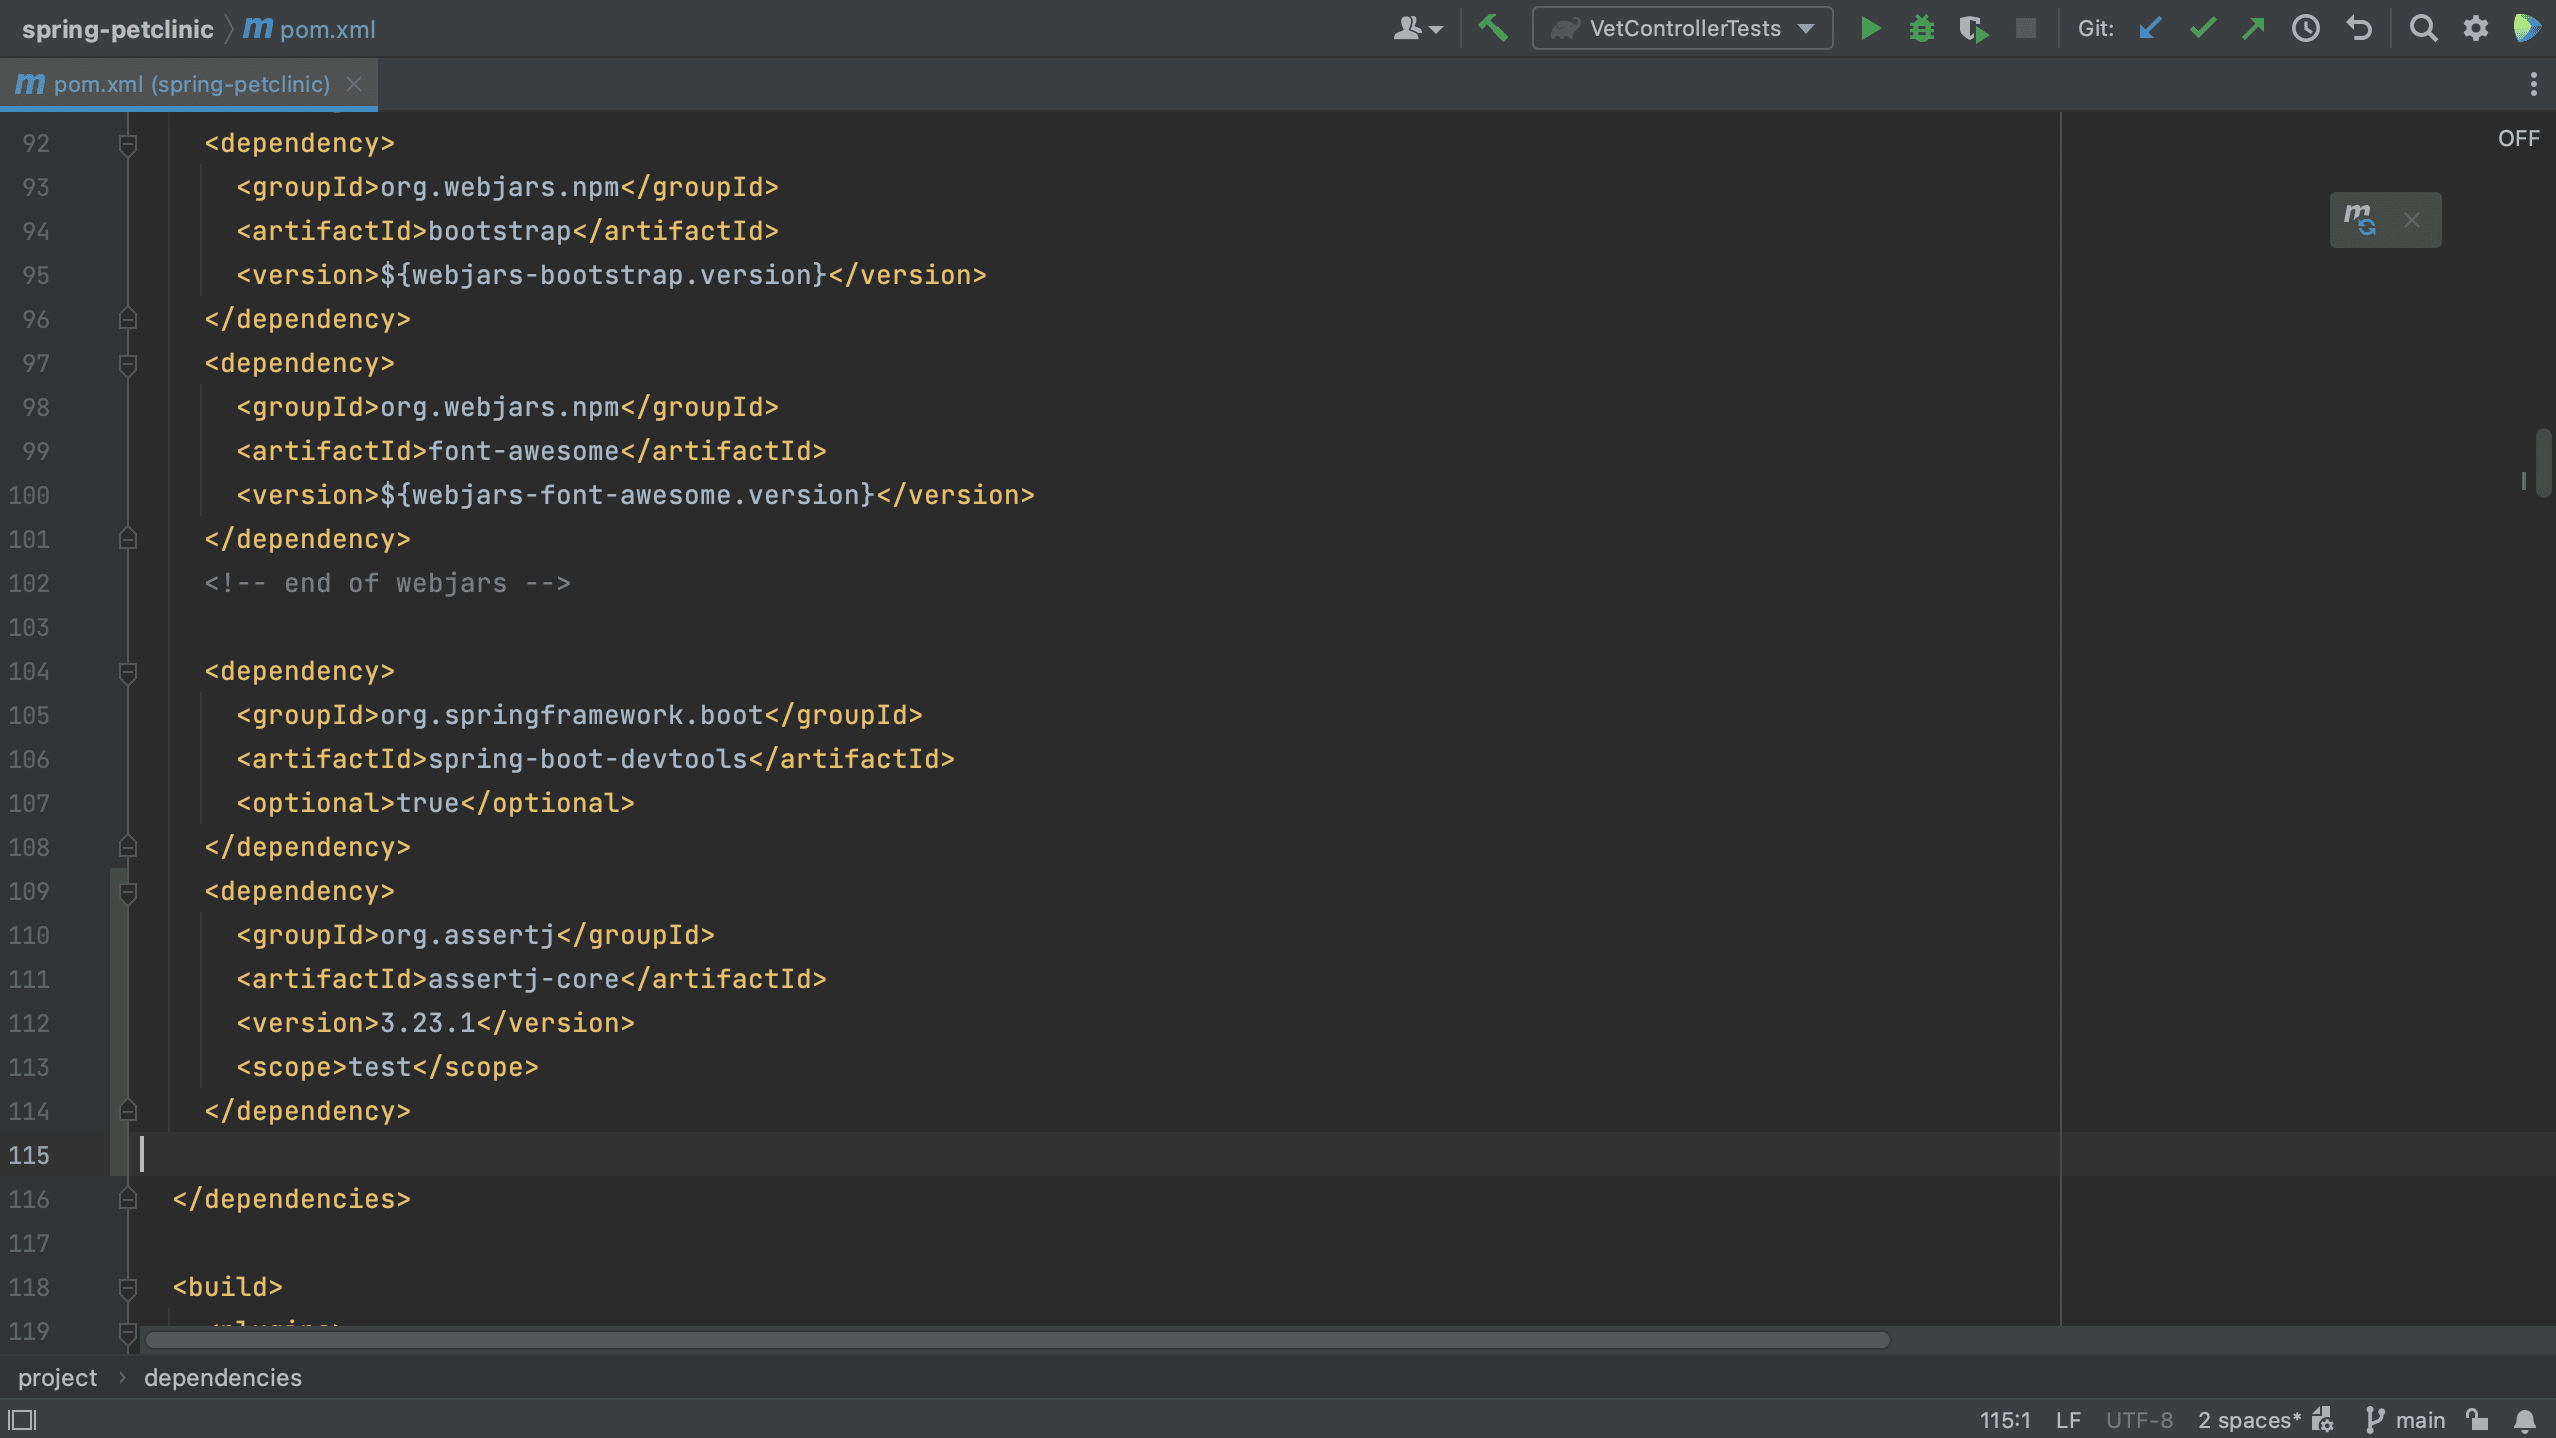
Or, if we are using Maven, we can copy the Maven xml format into our pom.xml.
Did you know that if you copy-paste a Maven XML dependency into your build.gradle file, IntelliJ IDEA automatically turns it into the correct format for Gradle?
From the build file using code completion
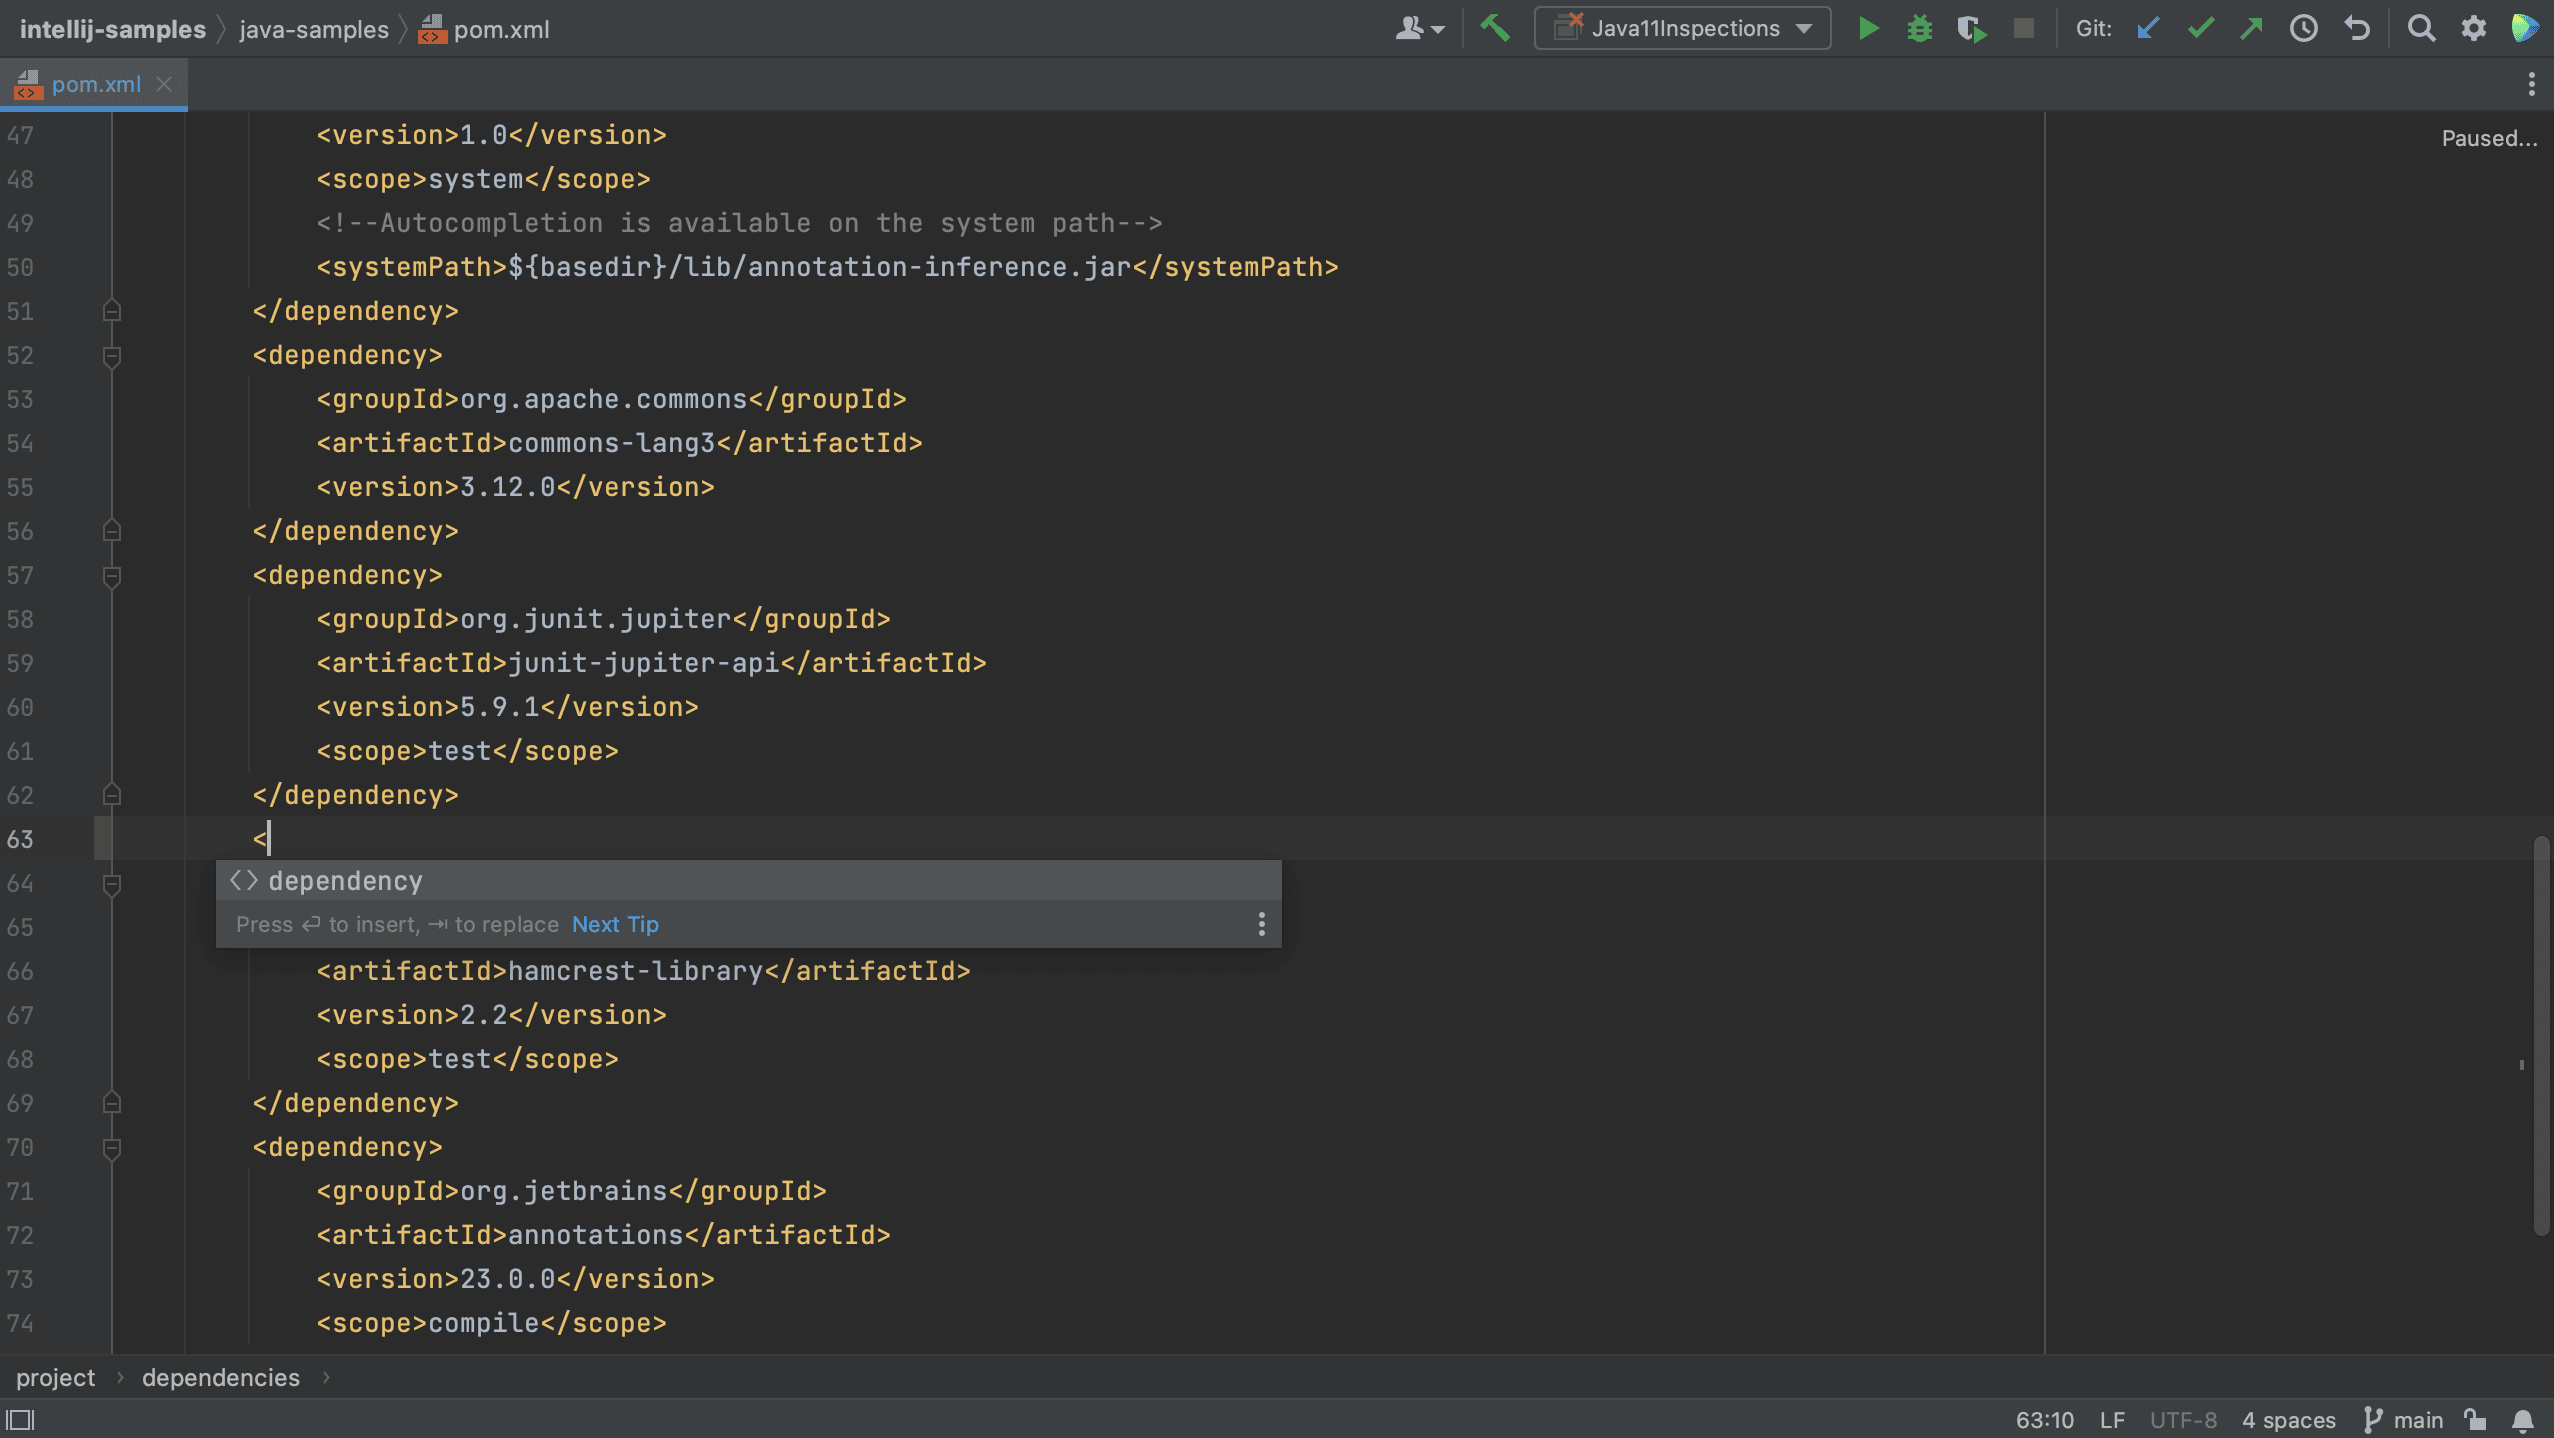
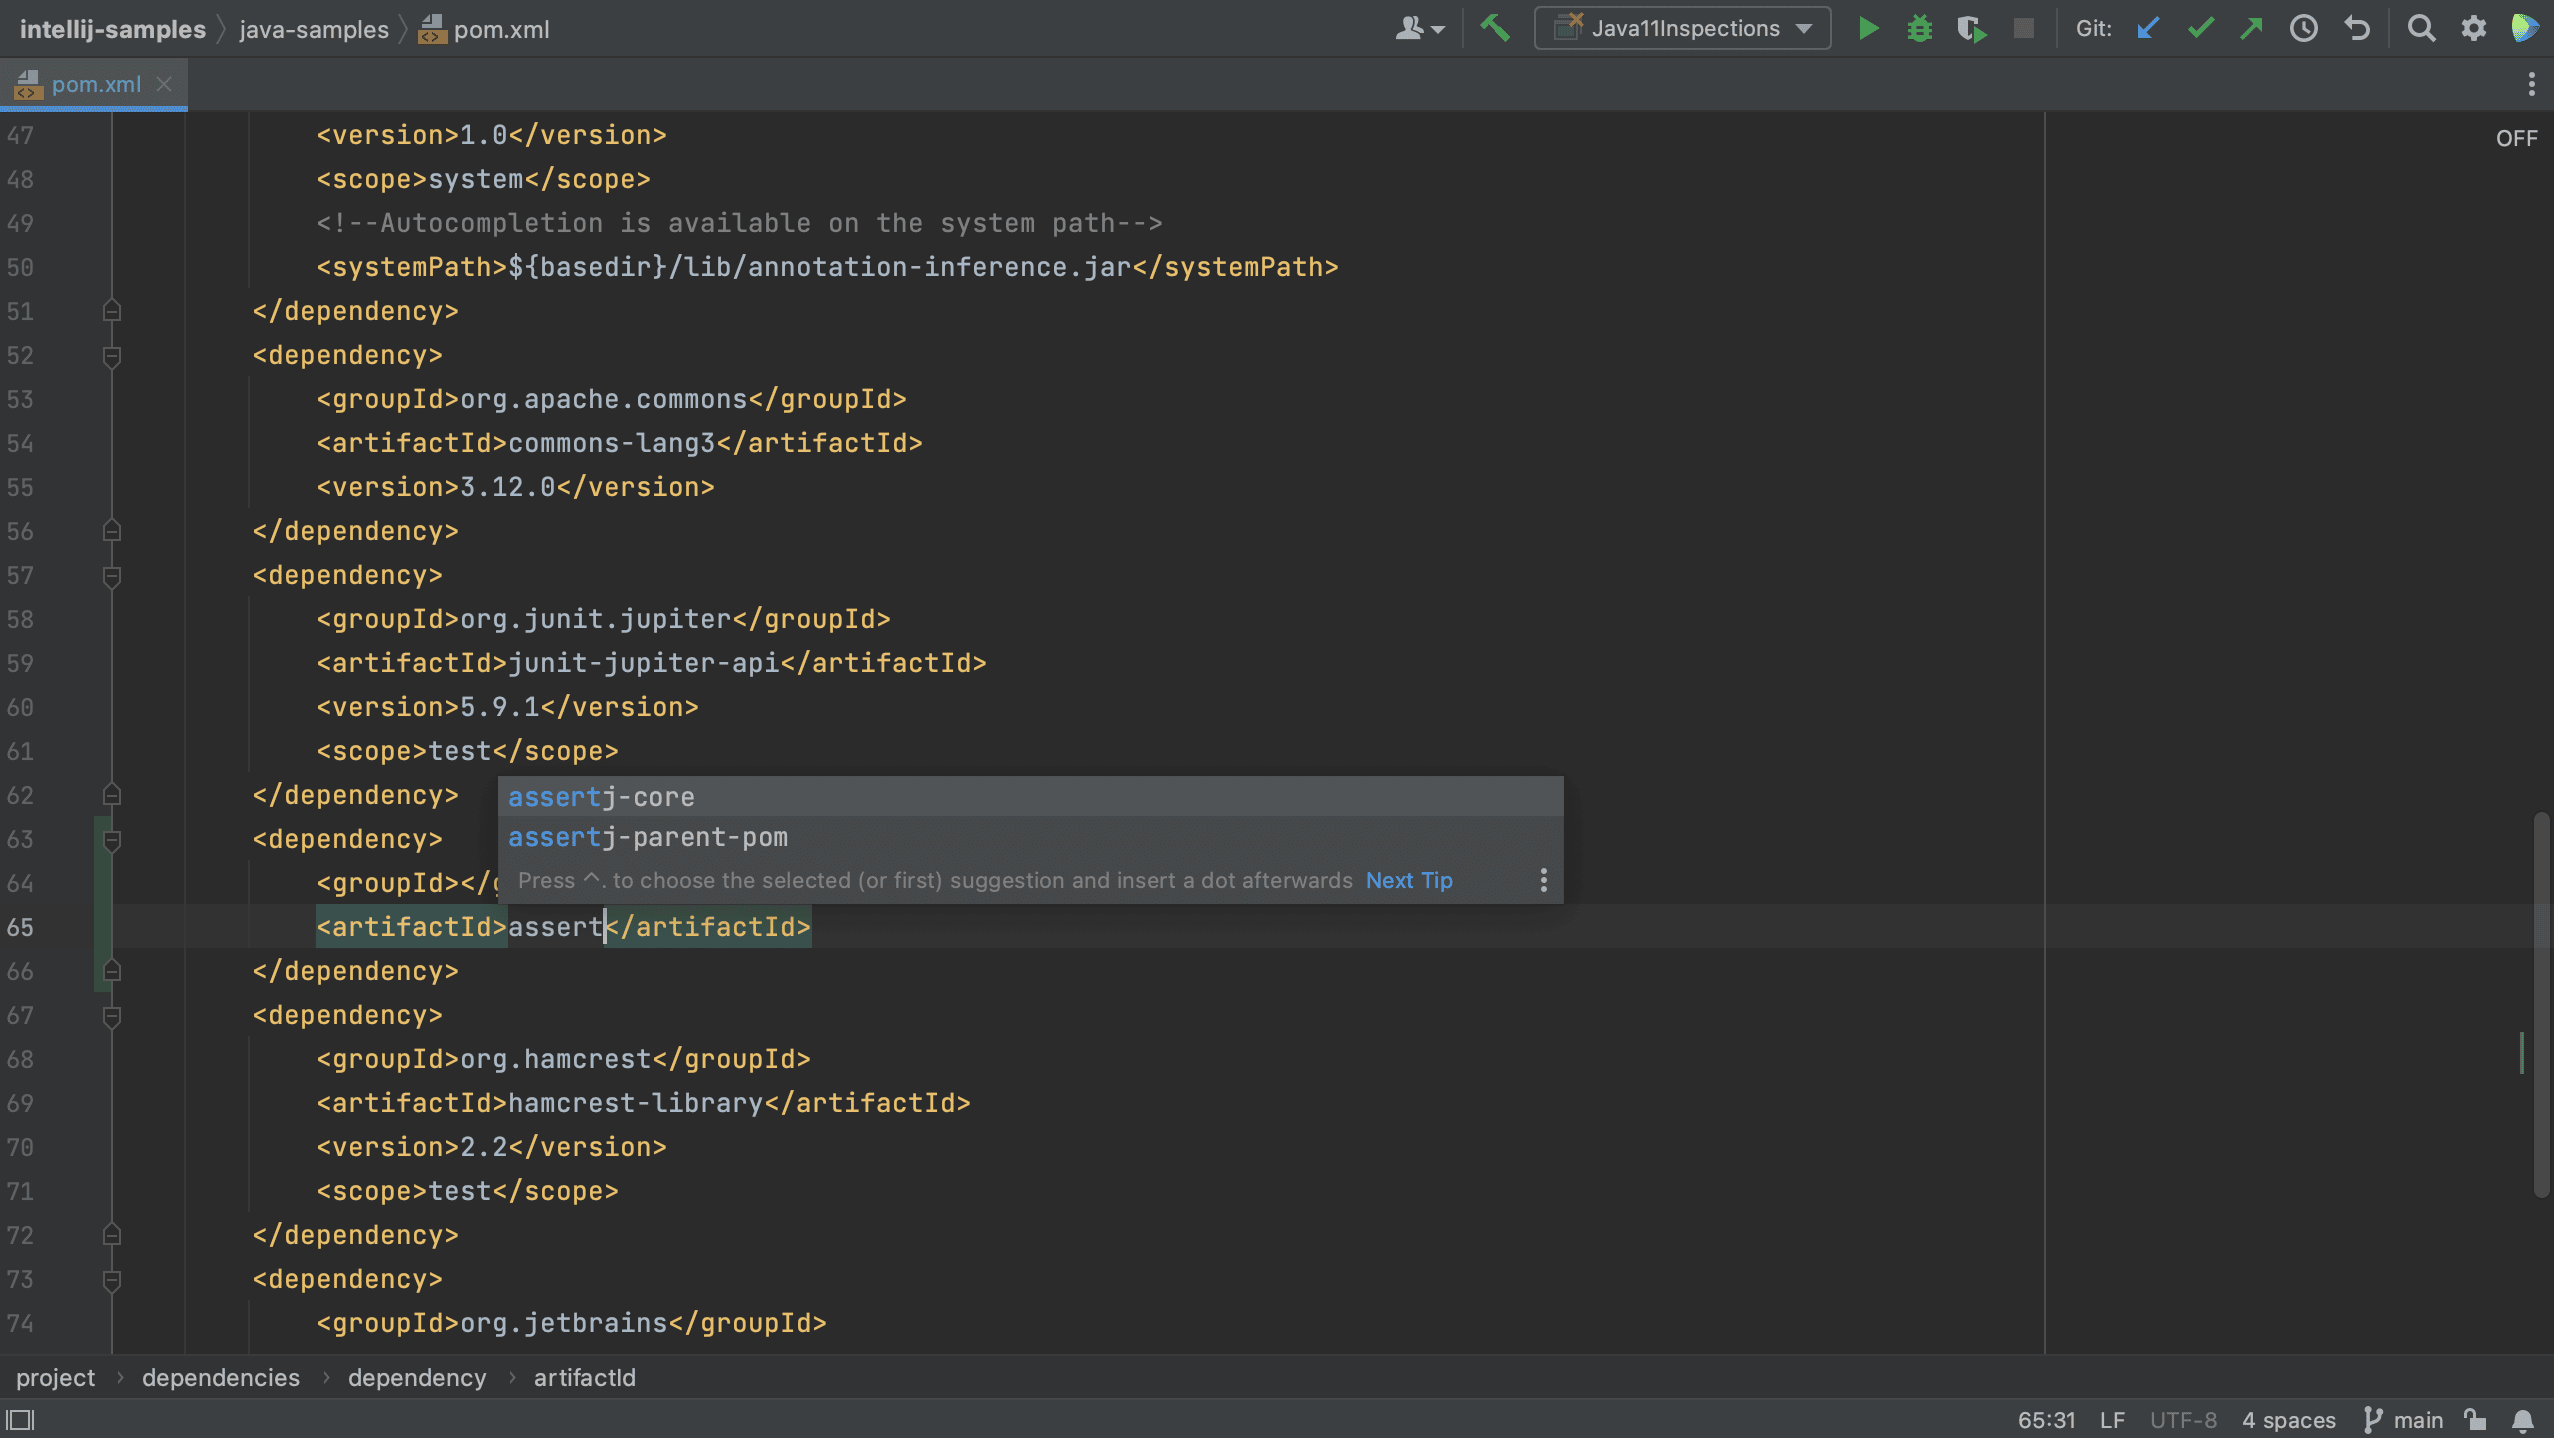
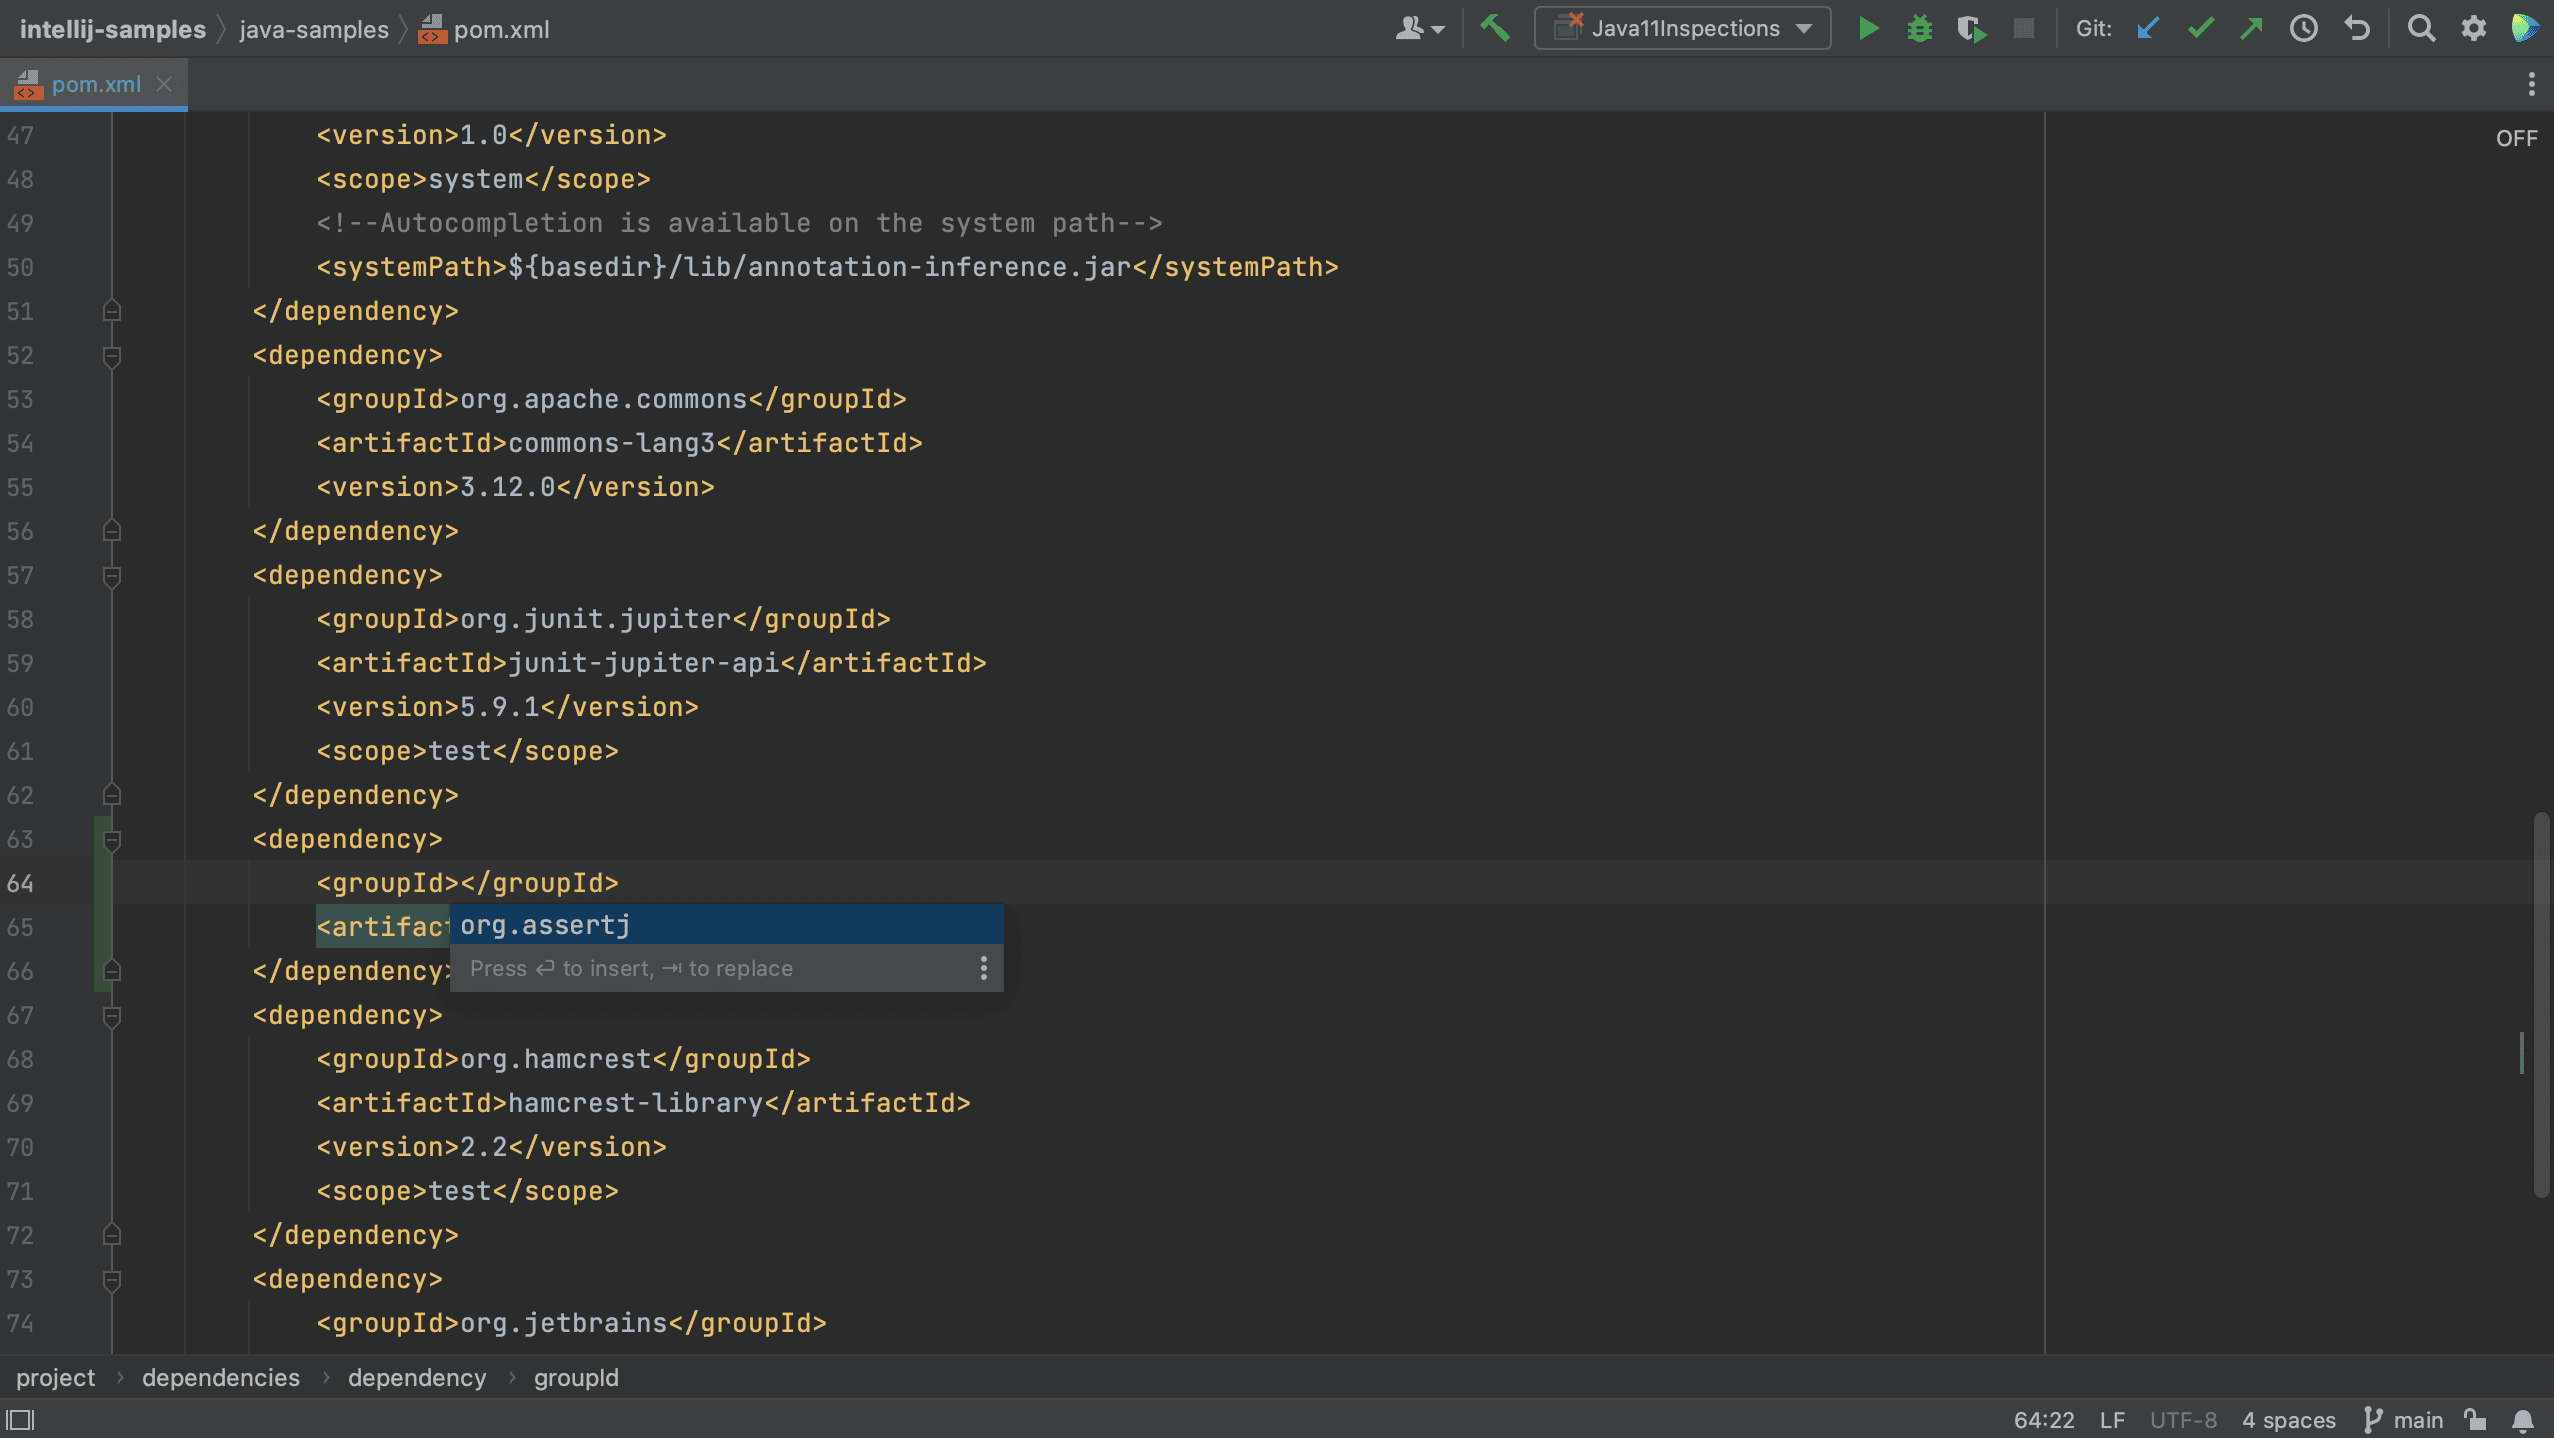
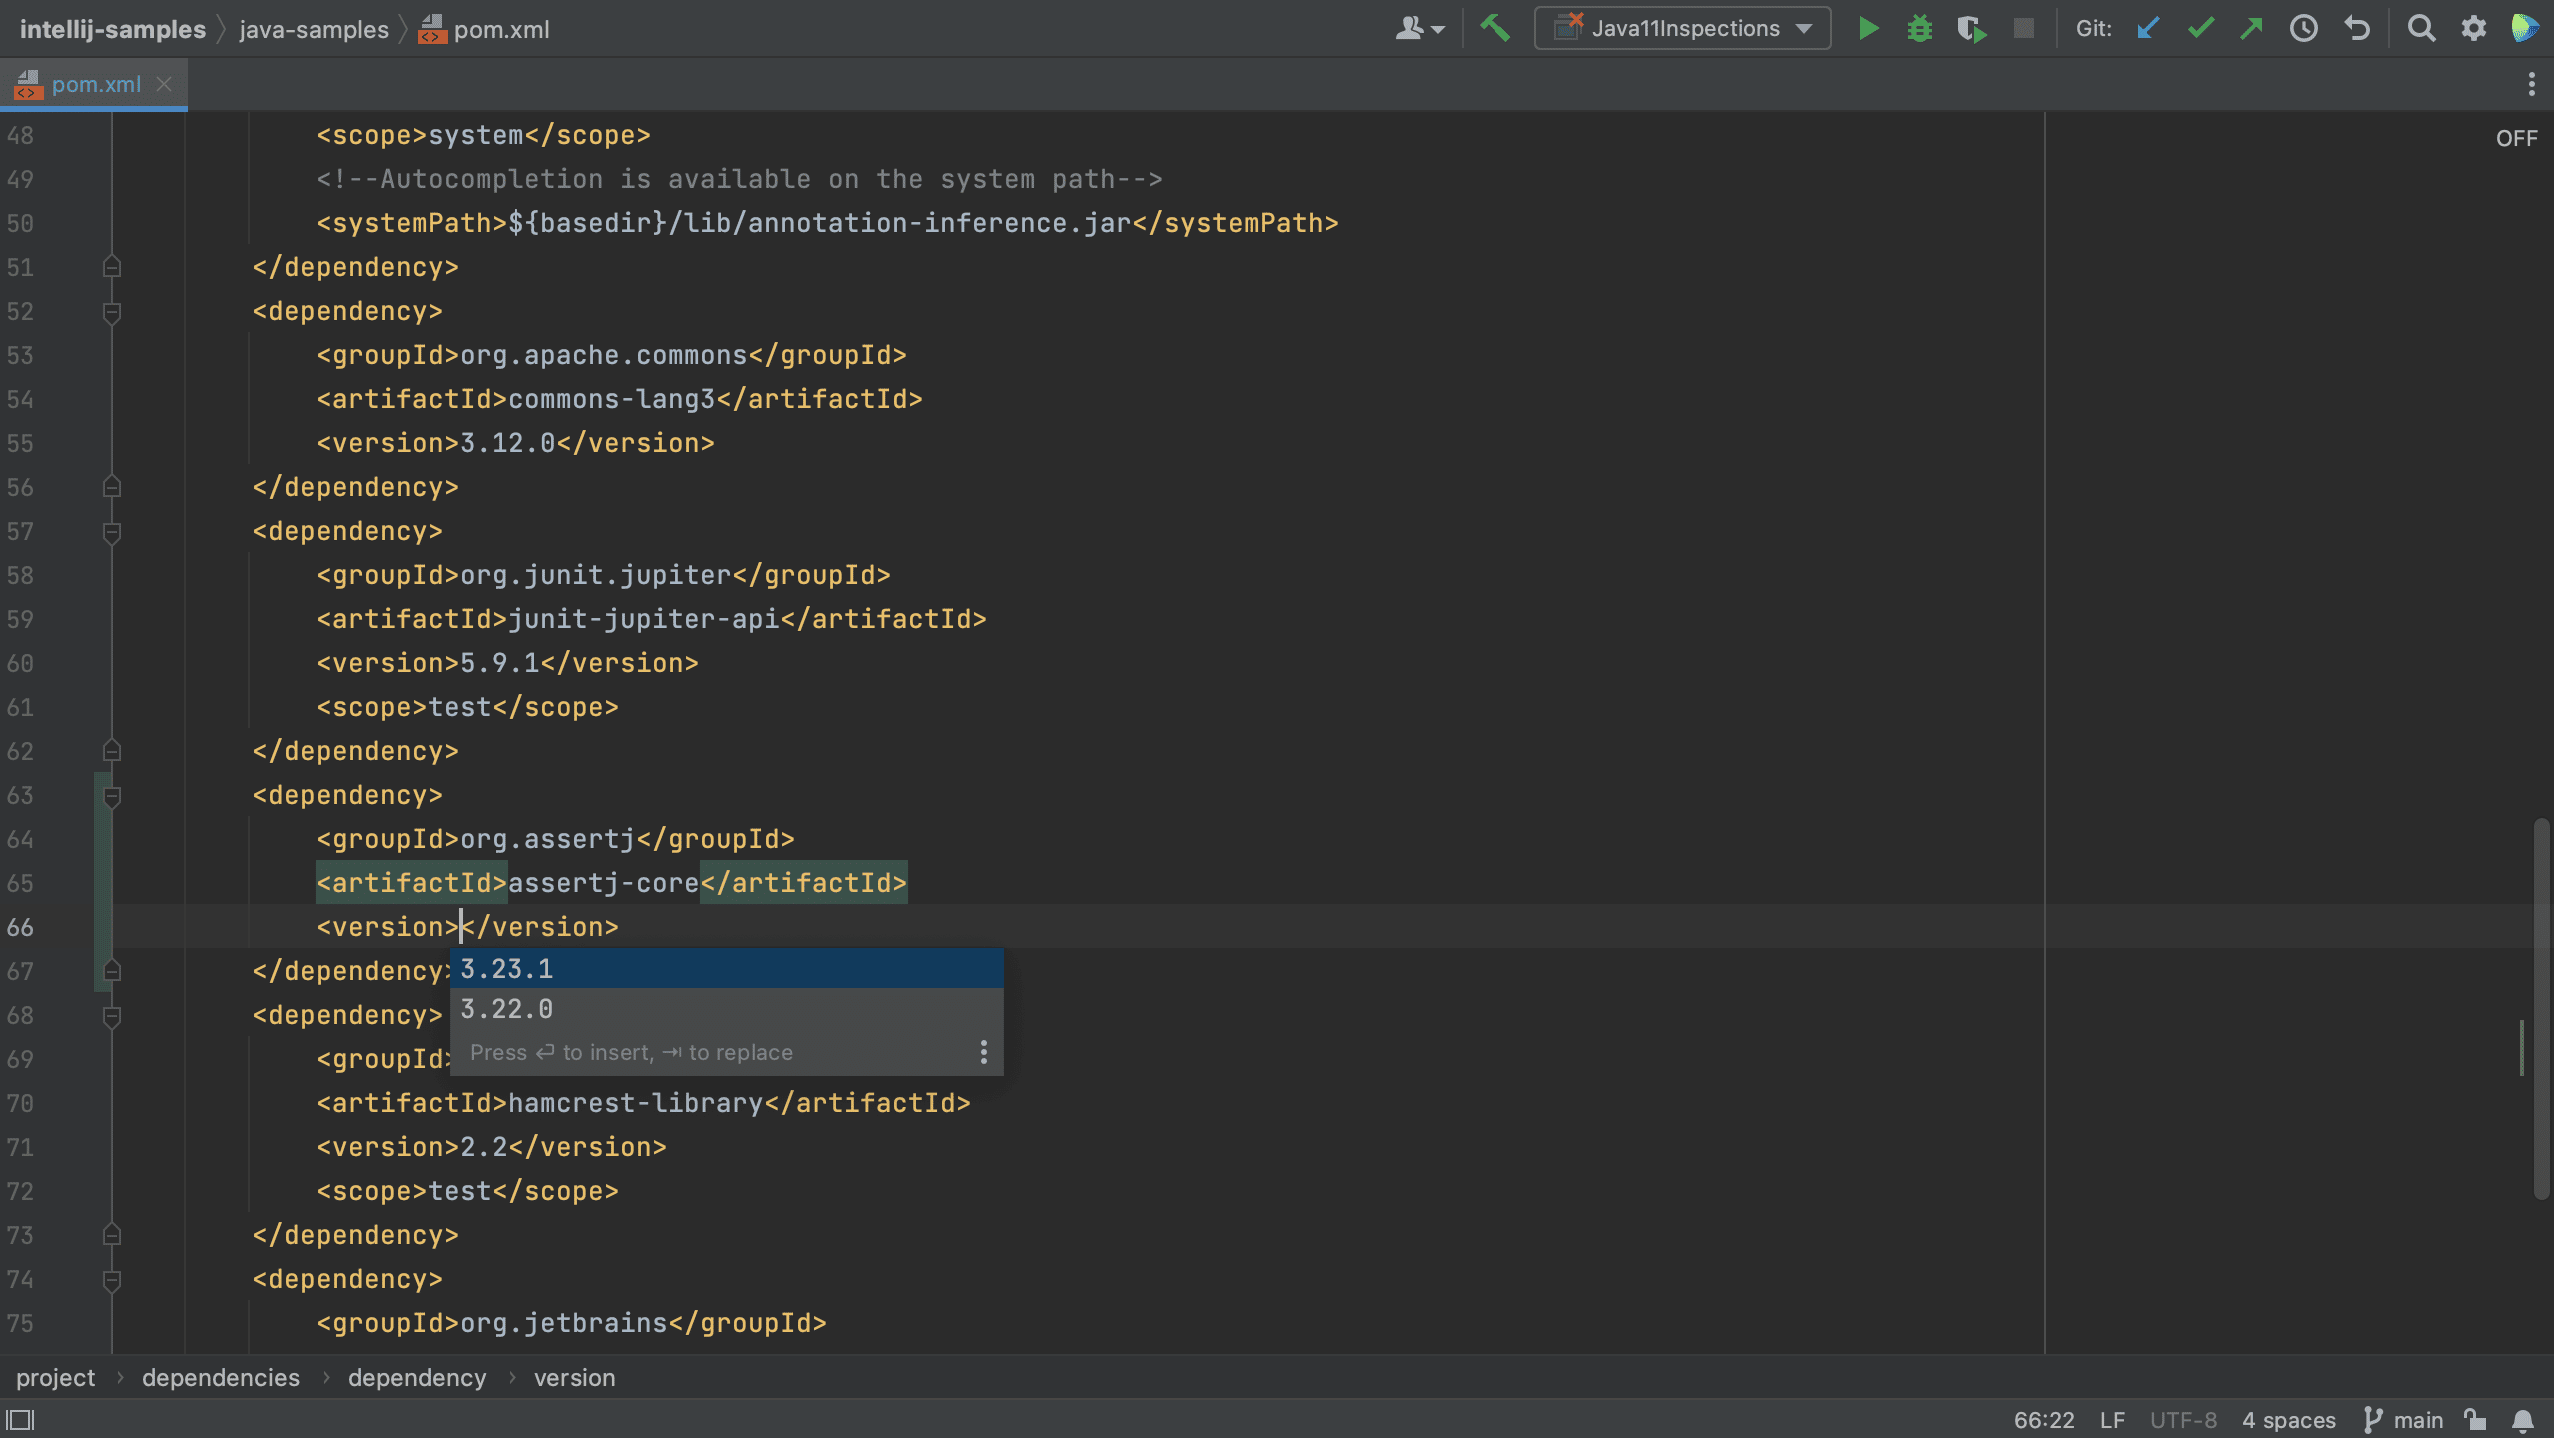
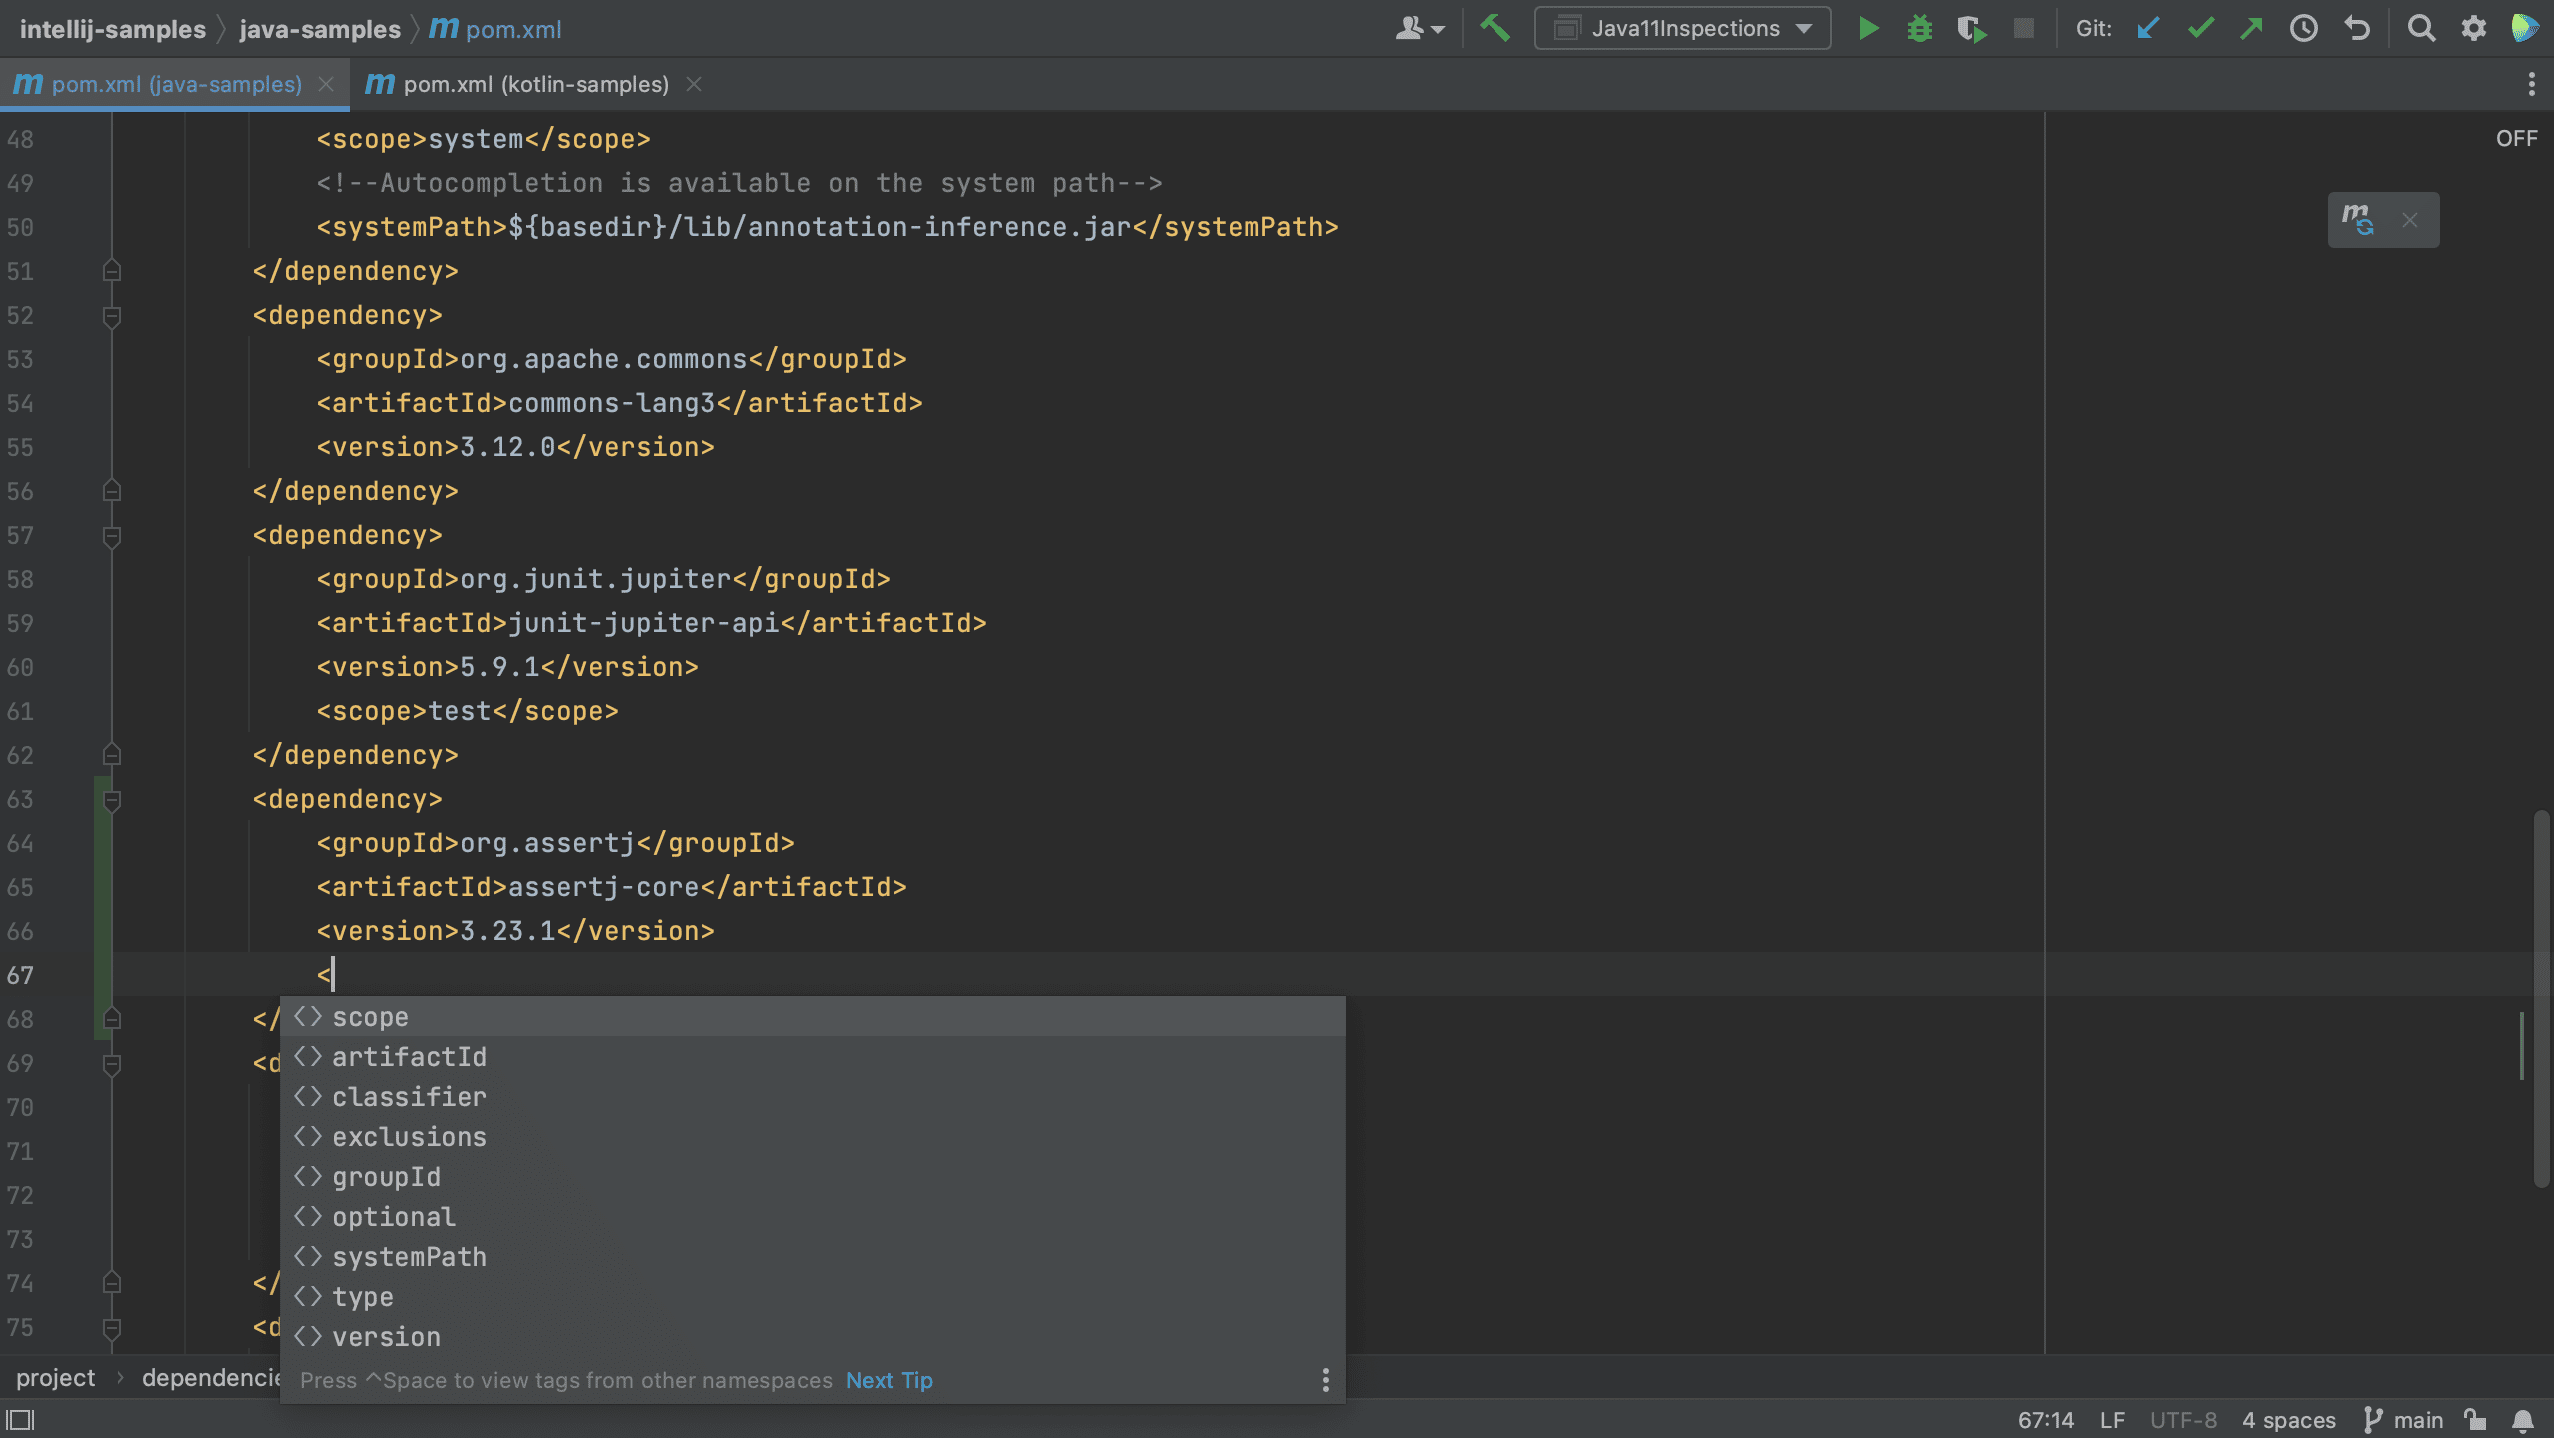
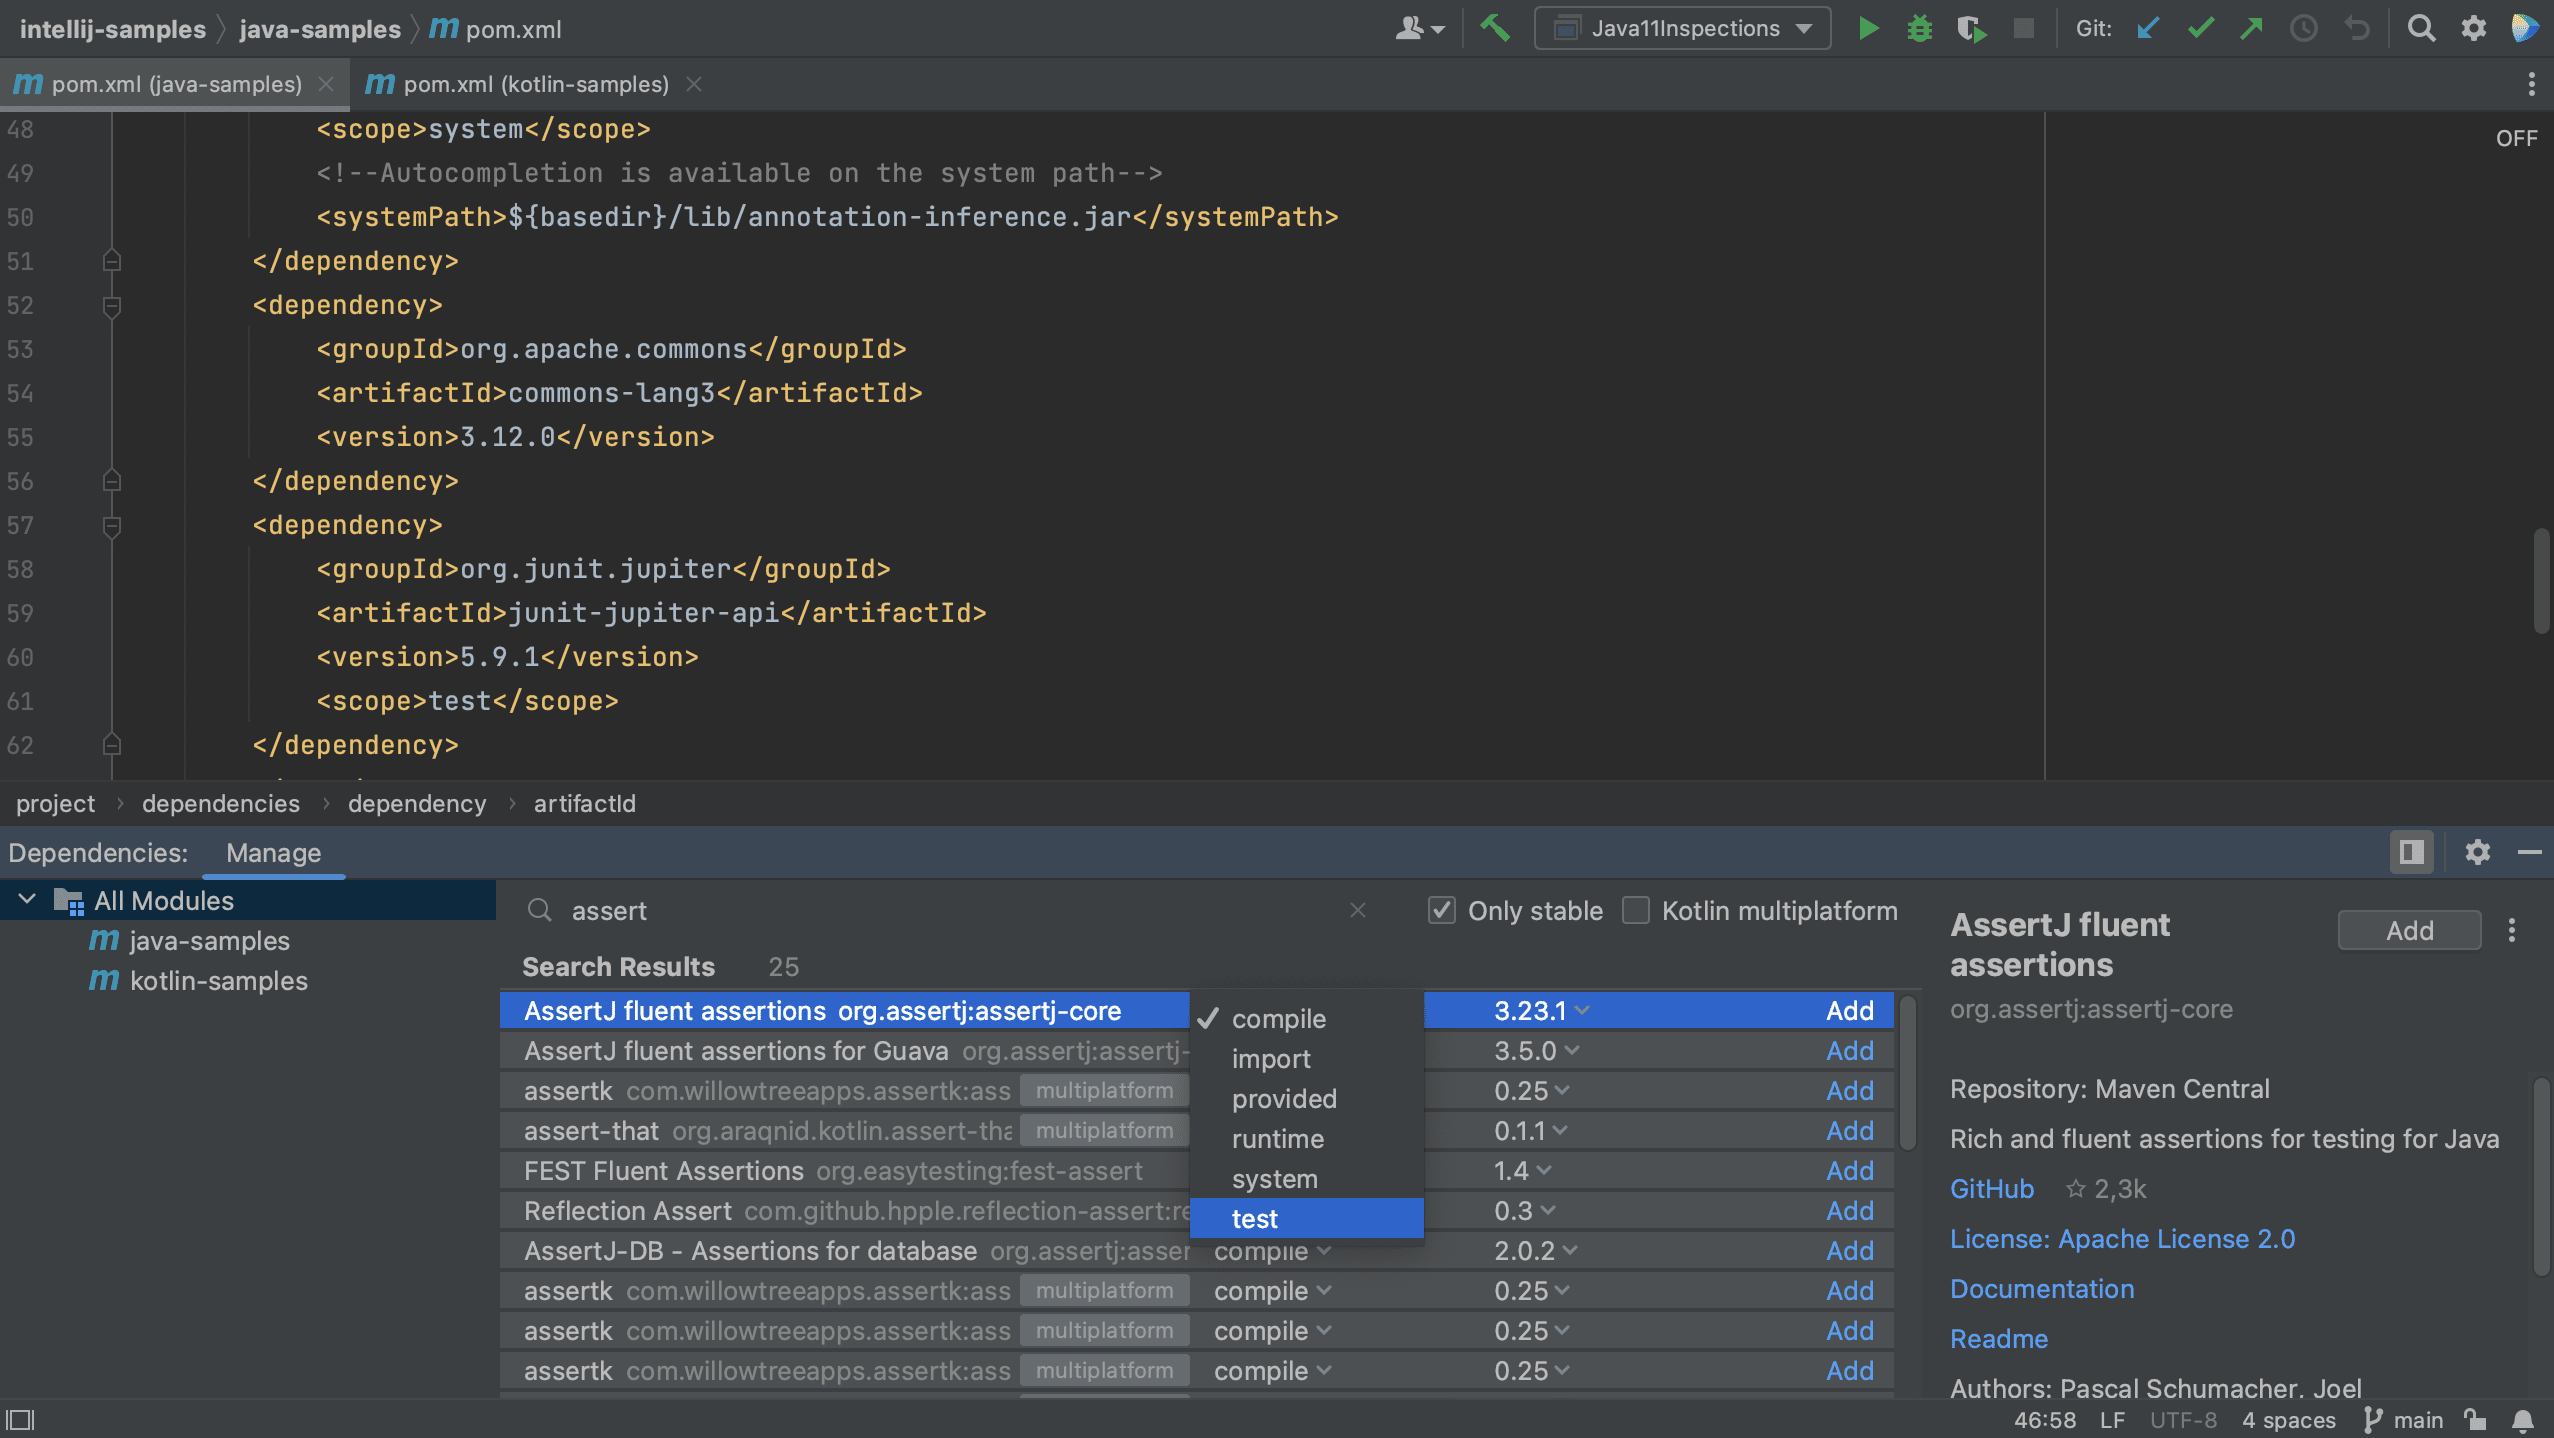
We can also add dependencies to our build file using code completion. For example, let’s add a new dependency to our pom.xml.
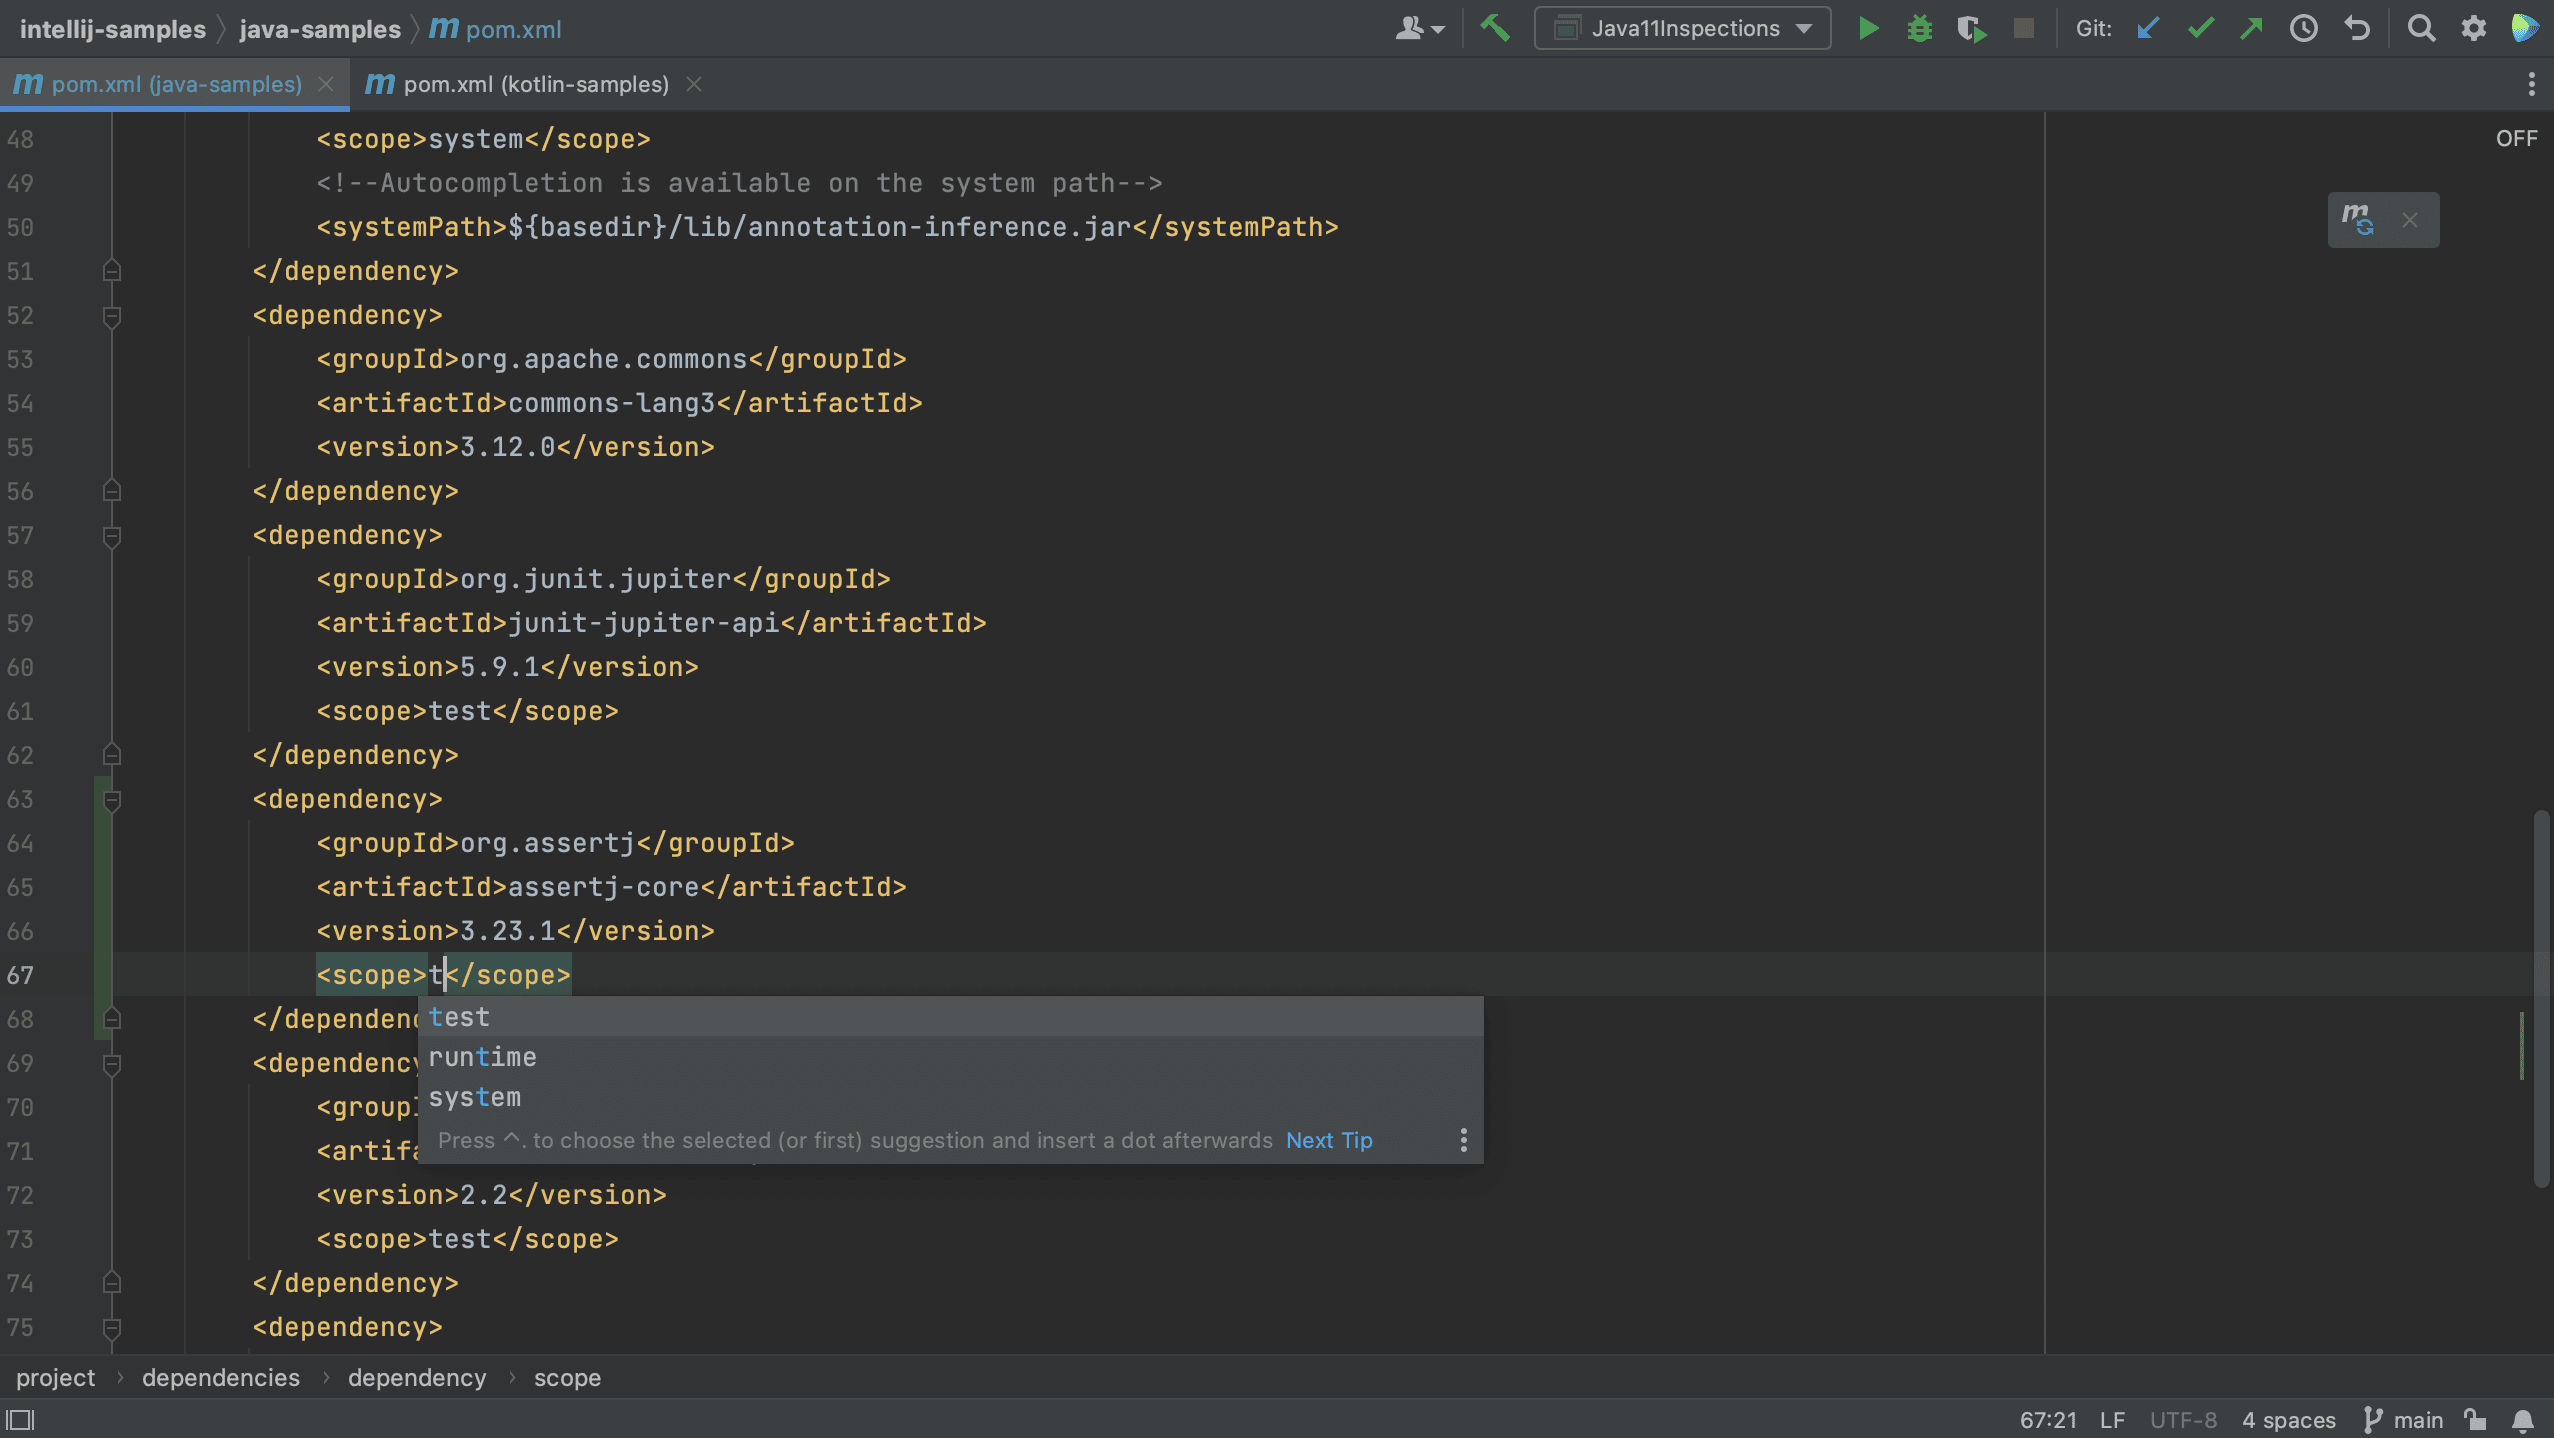
We see that IntelliJ IDEA autocompletes the dependency xml, and we can search for the dependency we want, in this example AssertJ. If needed, the version number will also be added. Since this is a test dependency, we need to add the test scope, still using code completion.
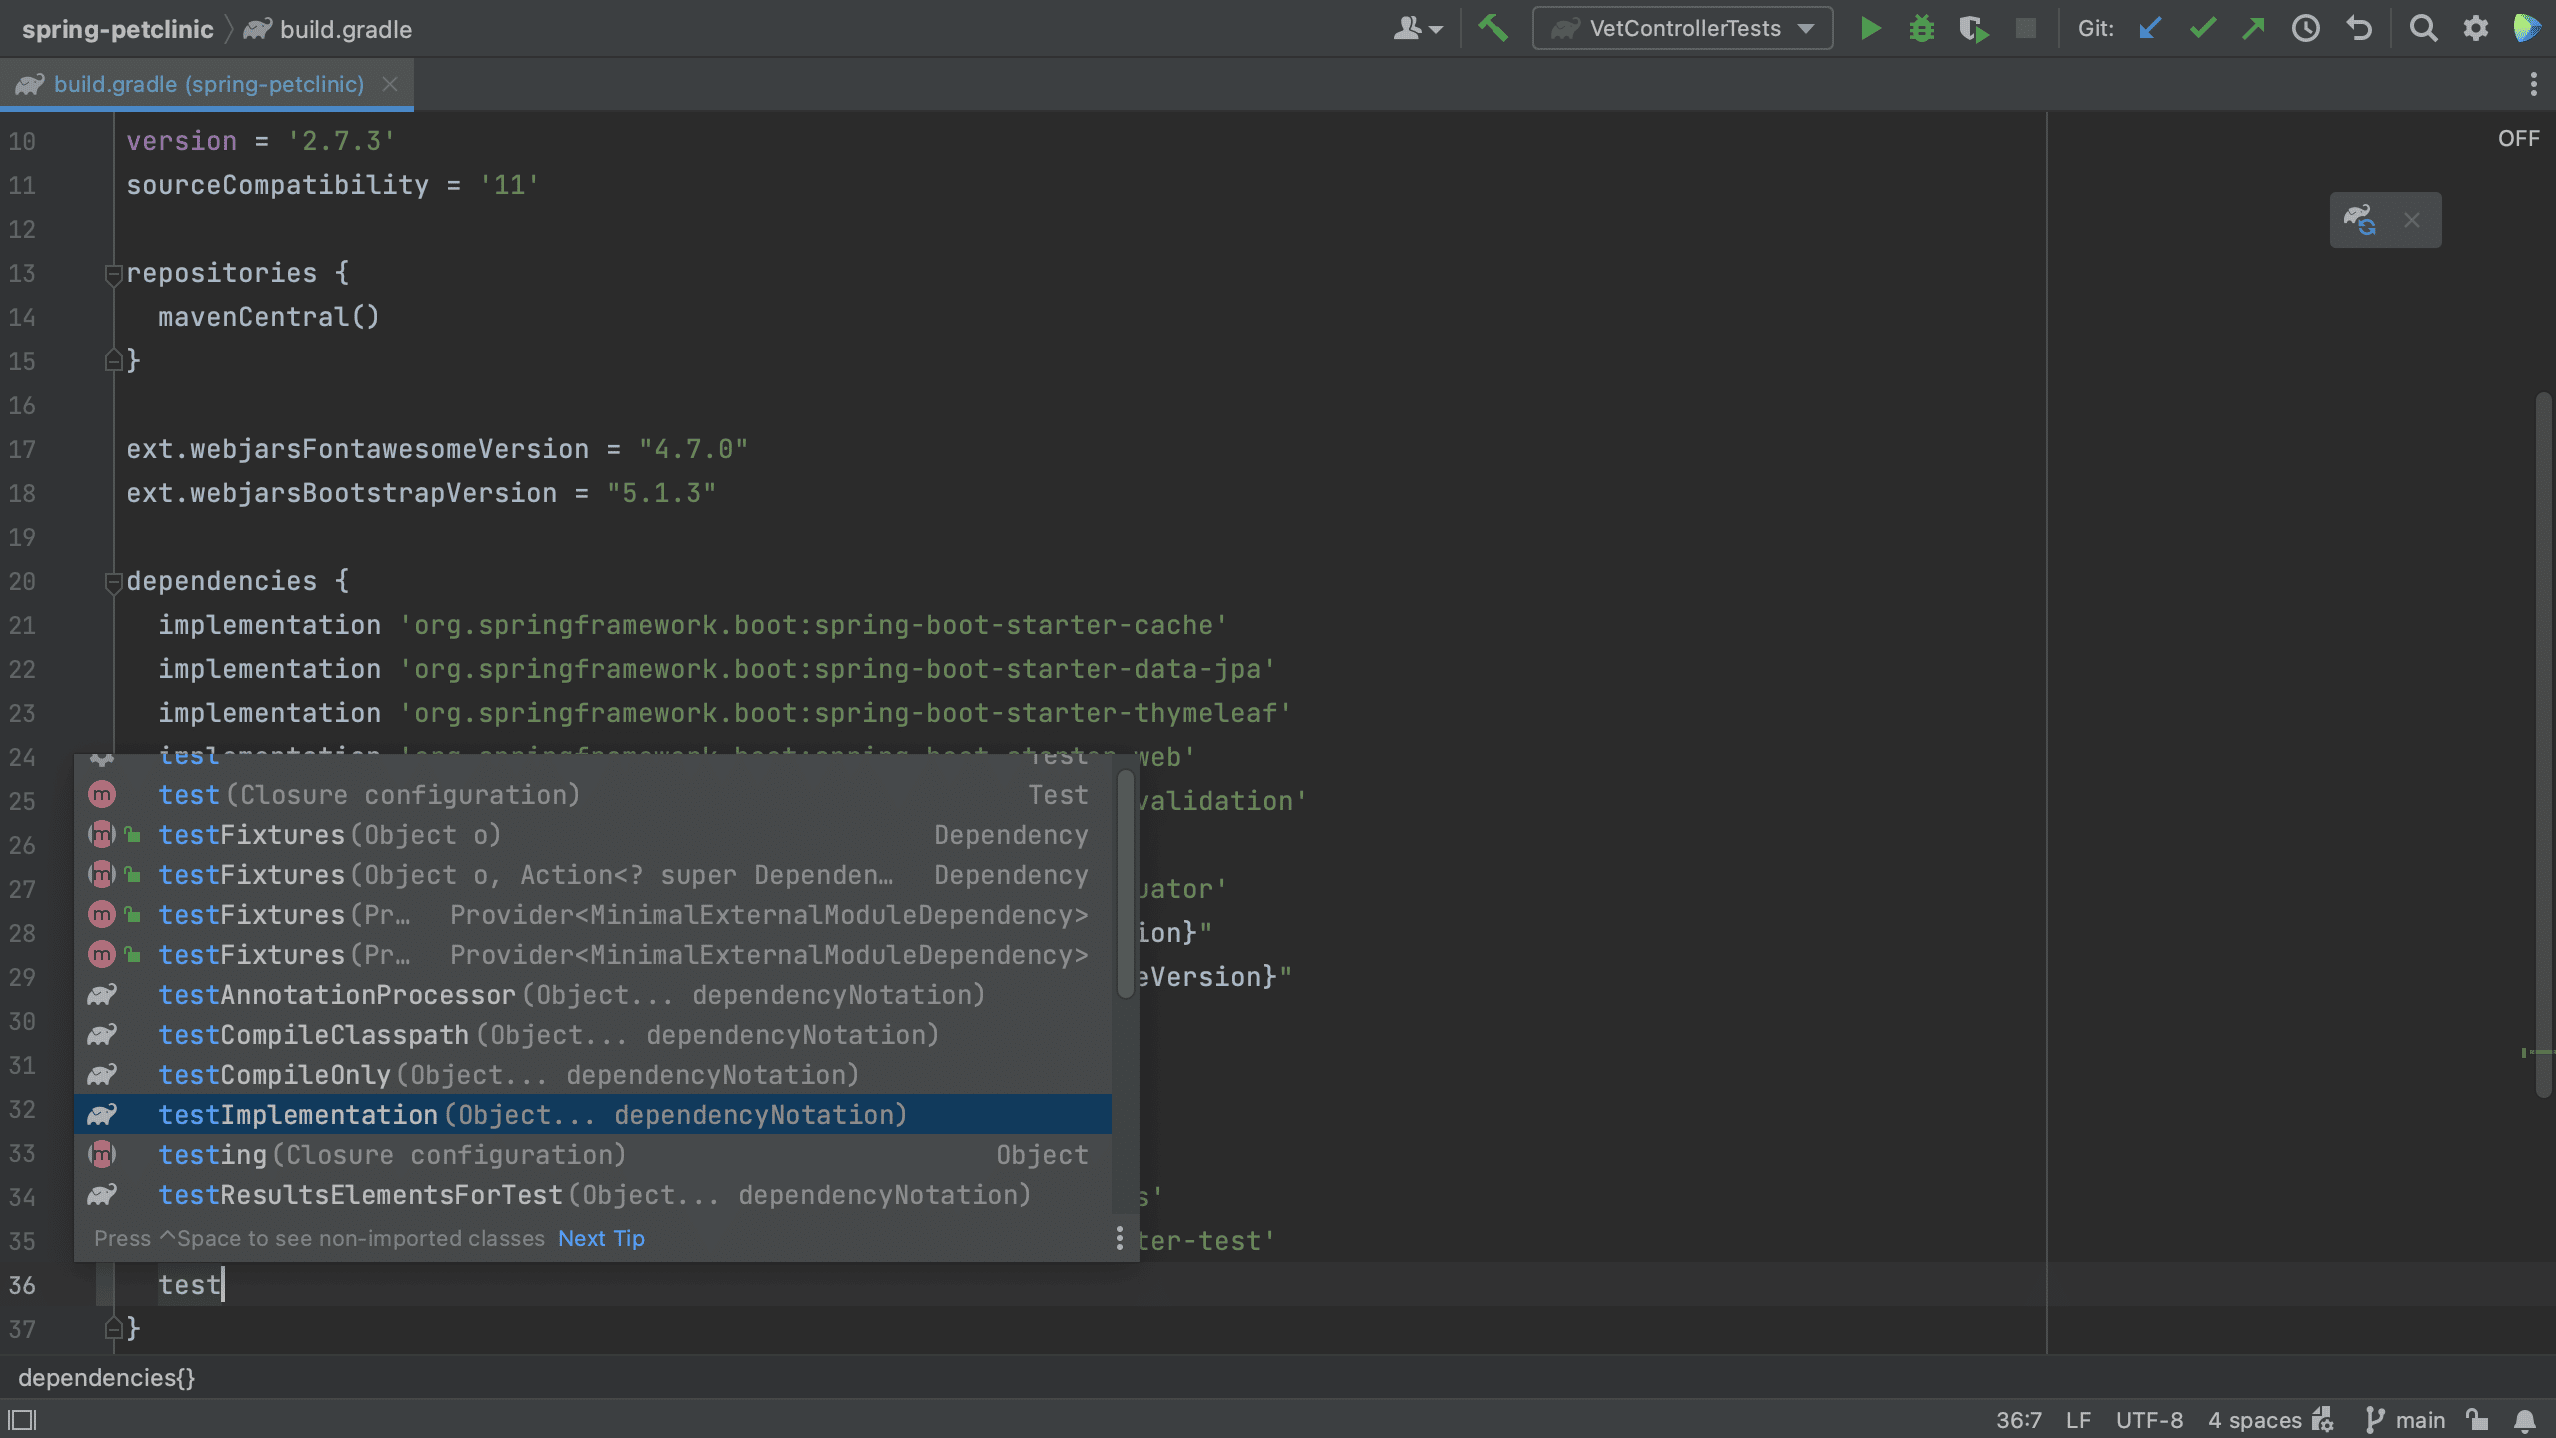
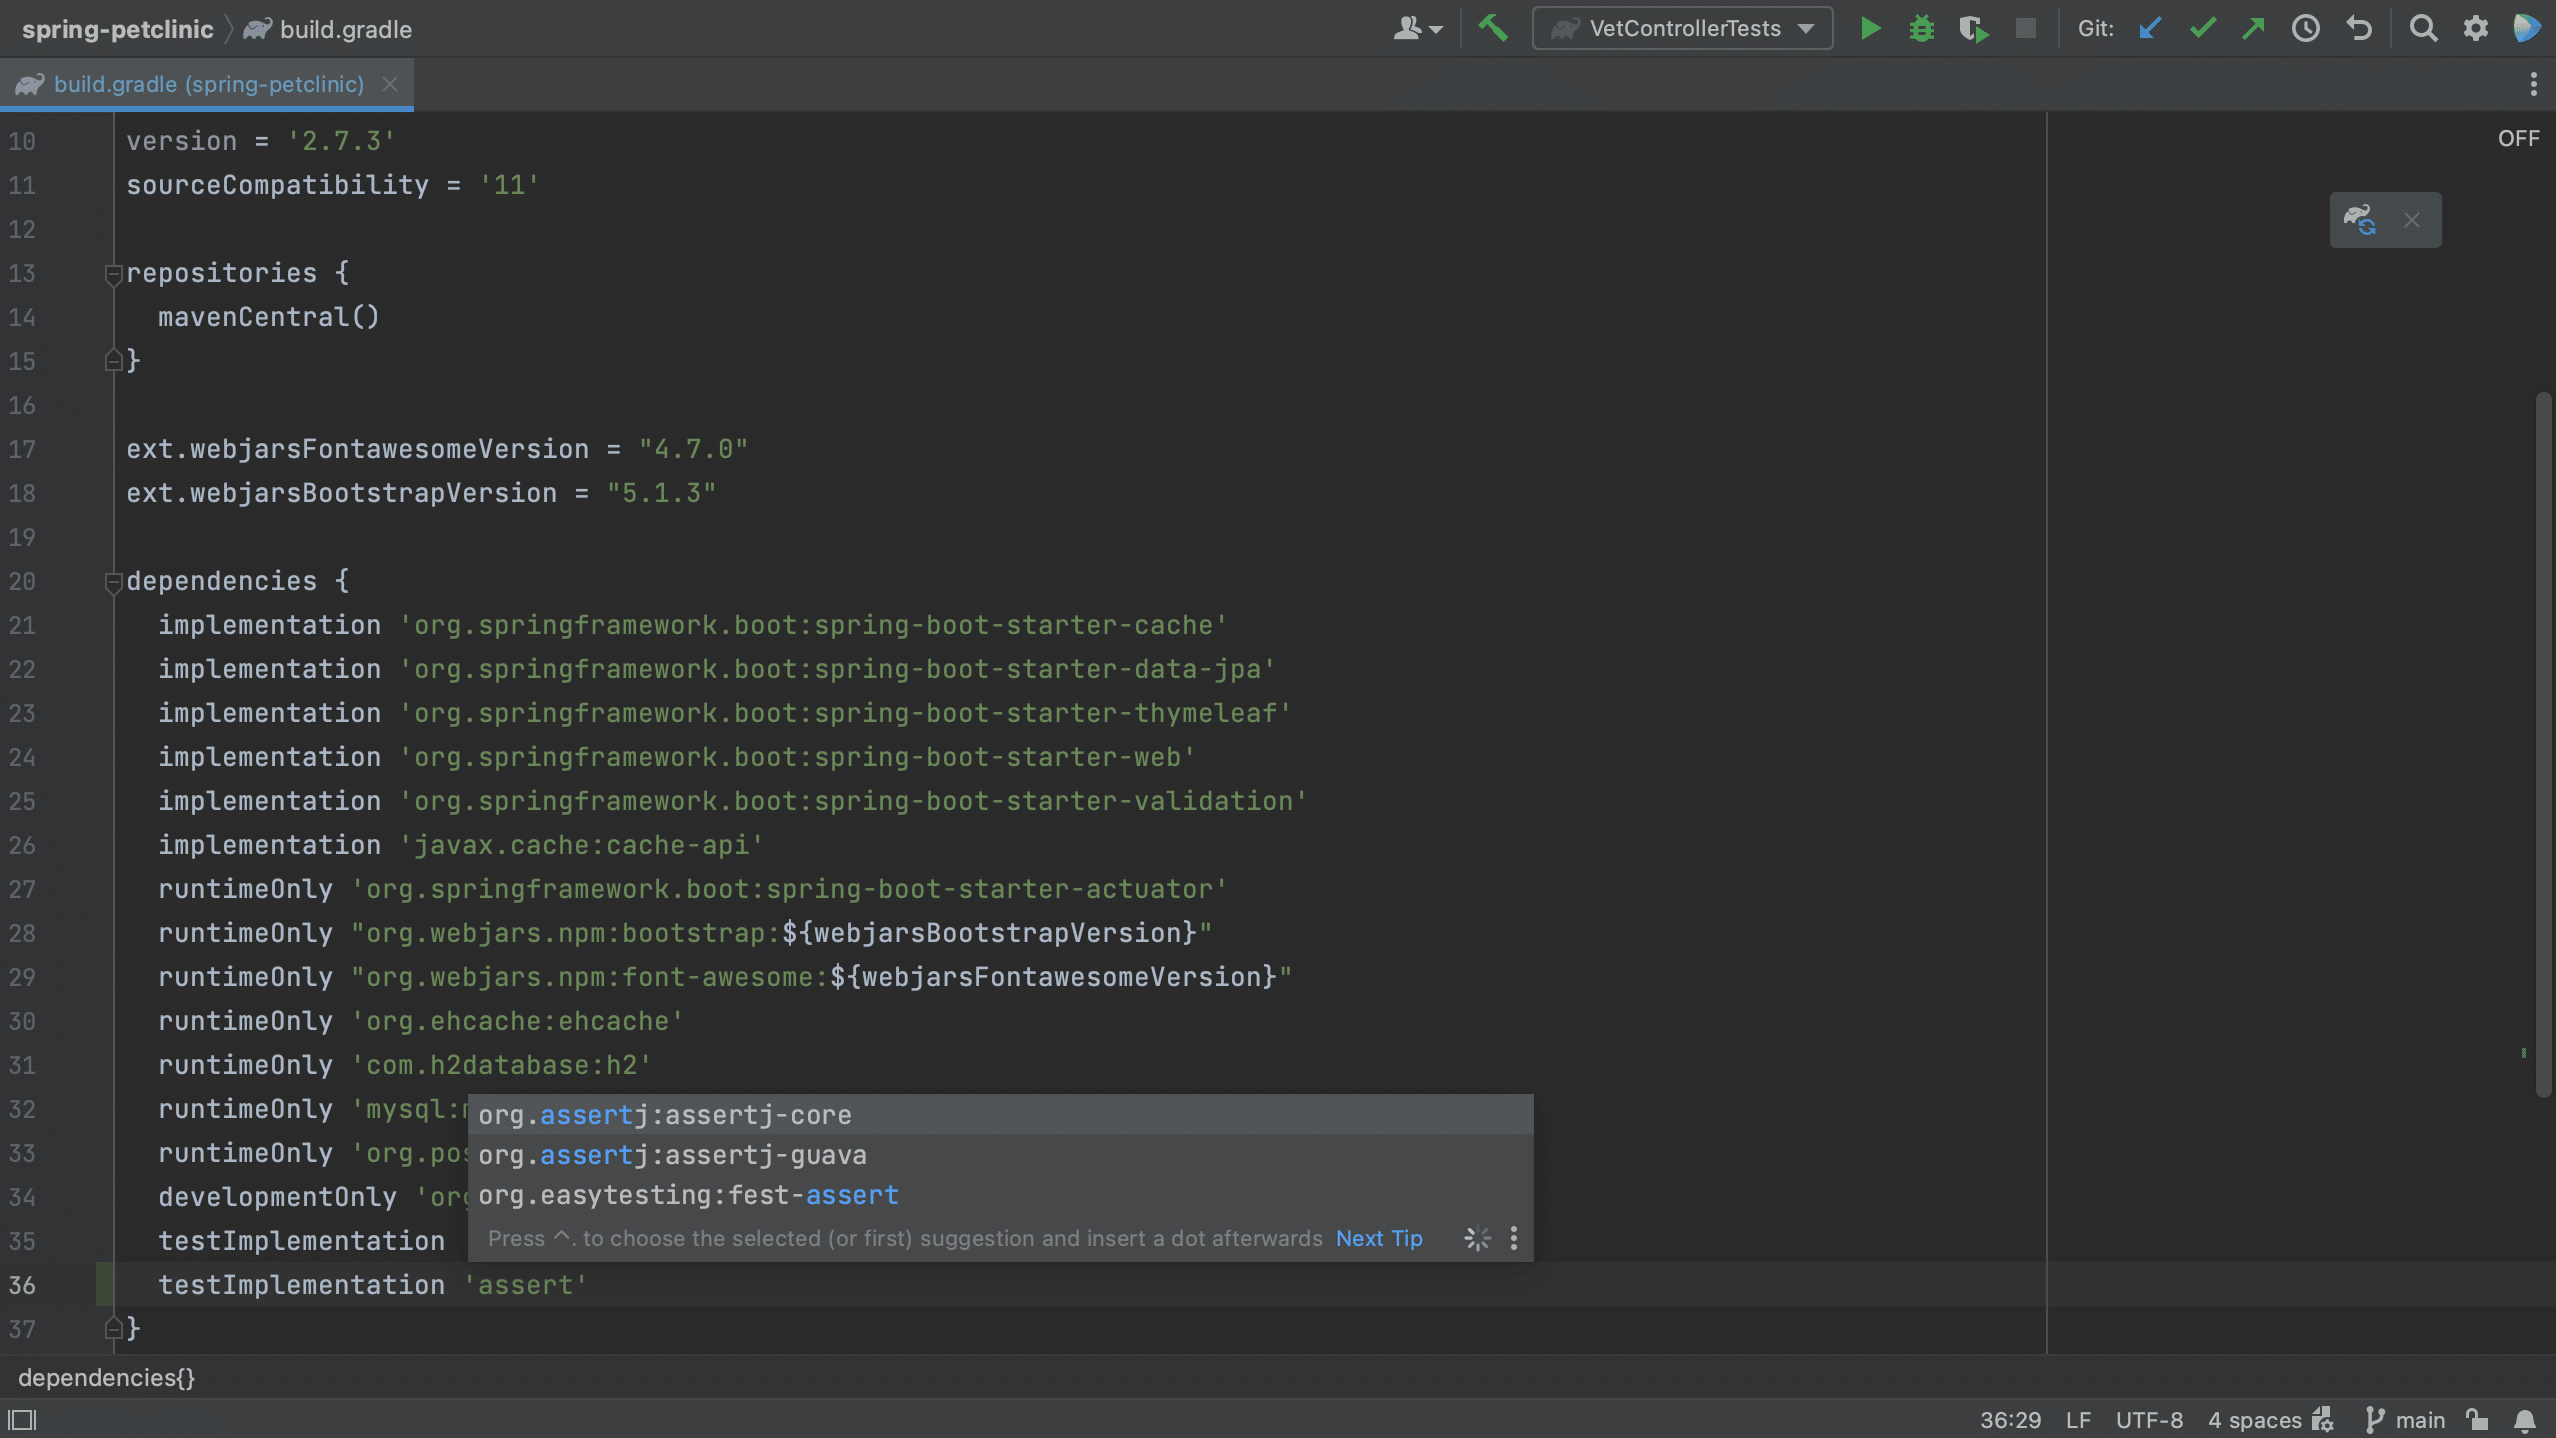
Code completion works in Gradle too, as you can see below.
From the build file using code generation
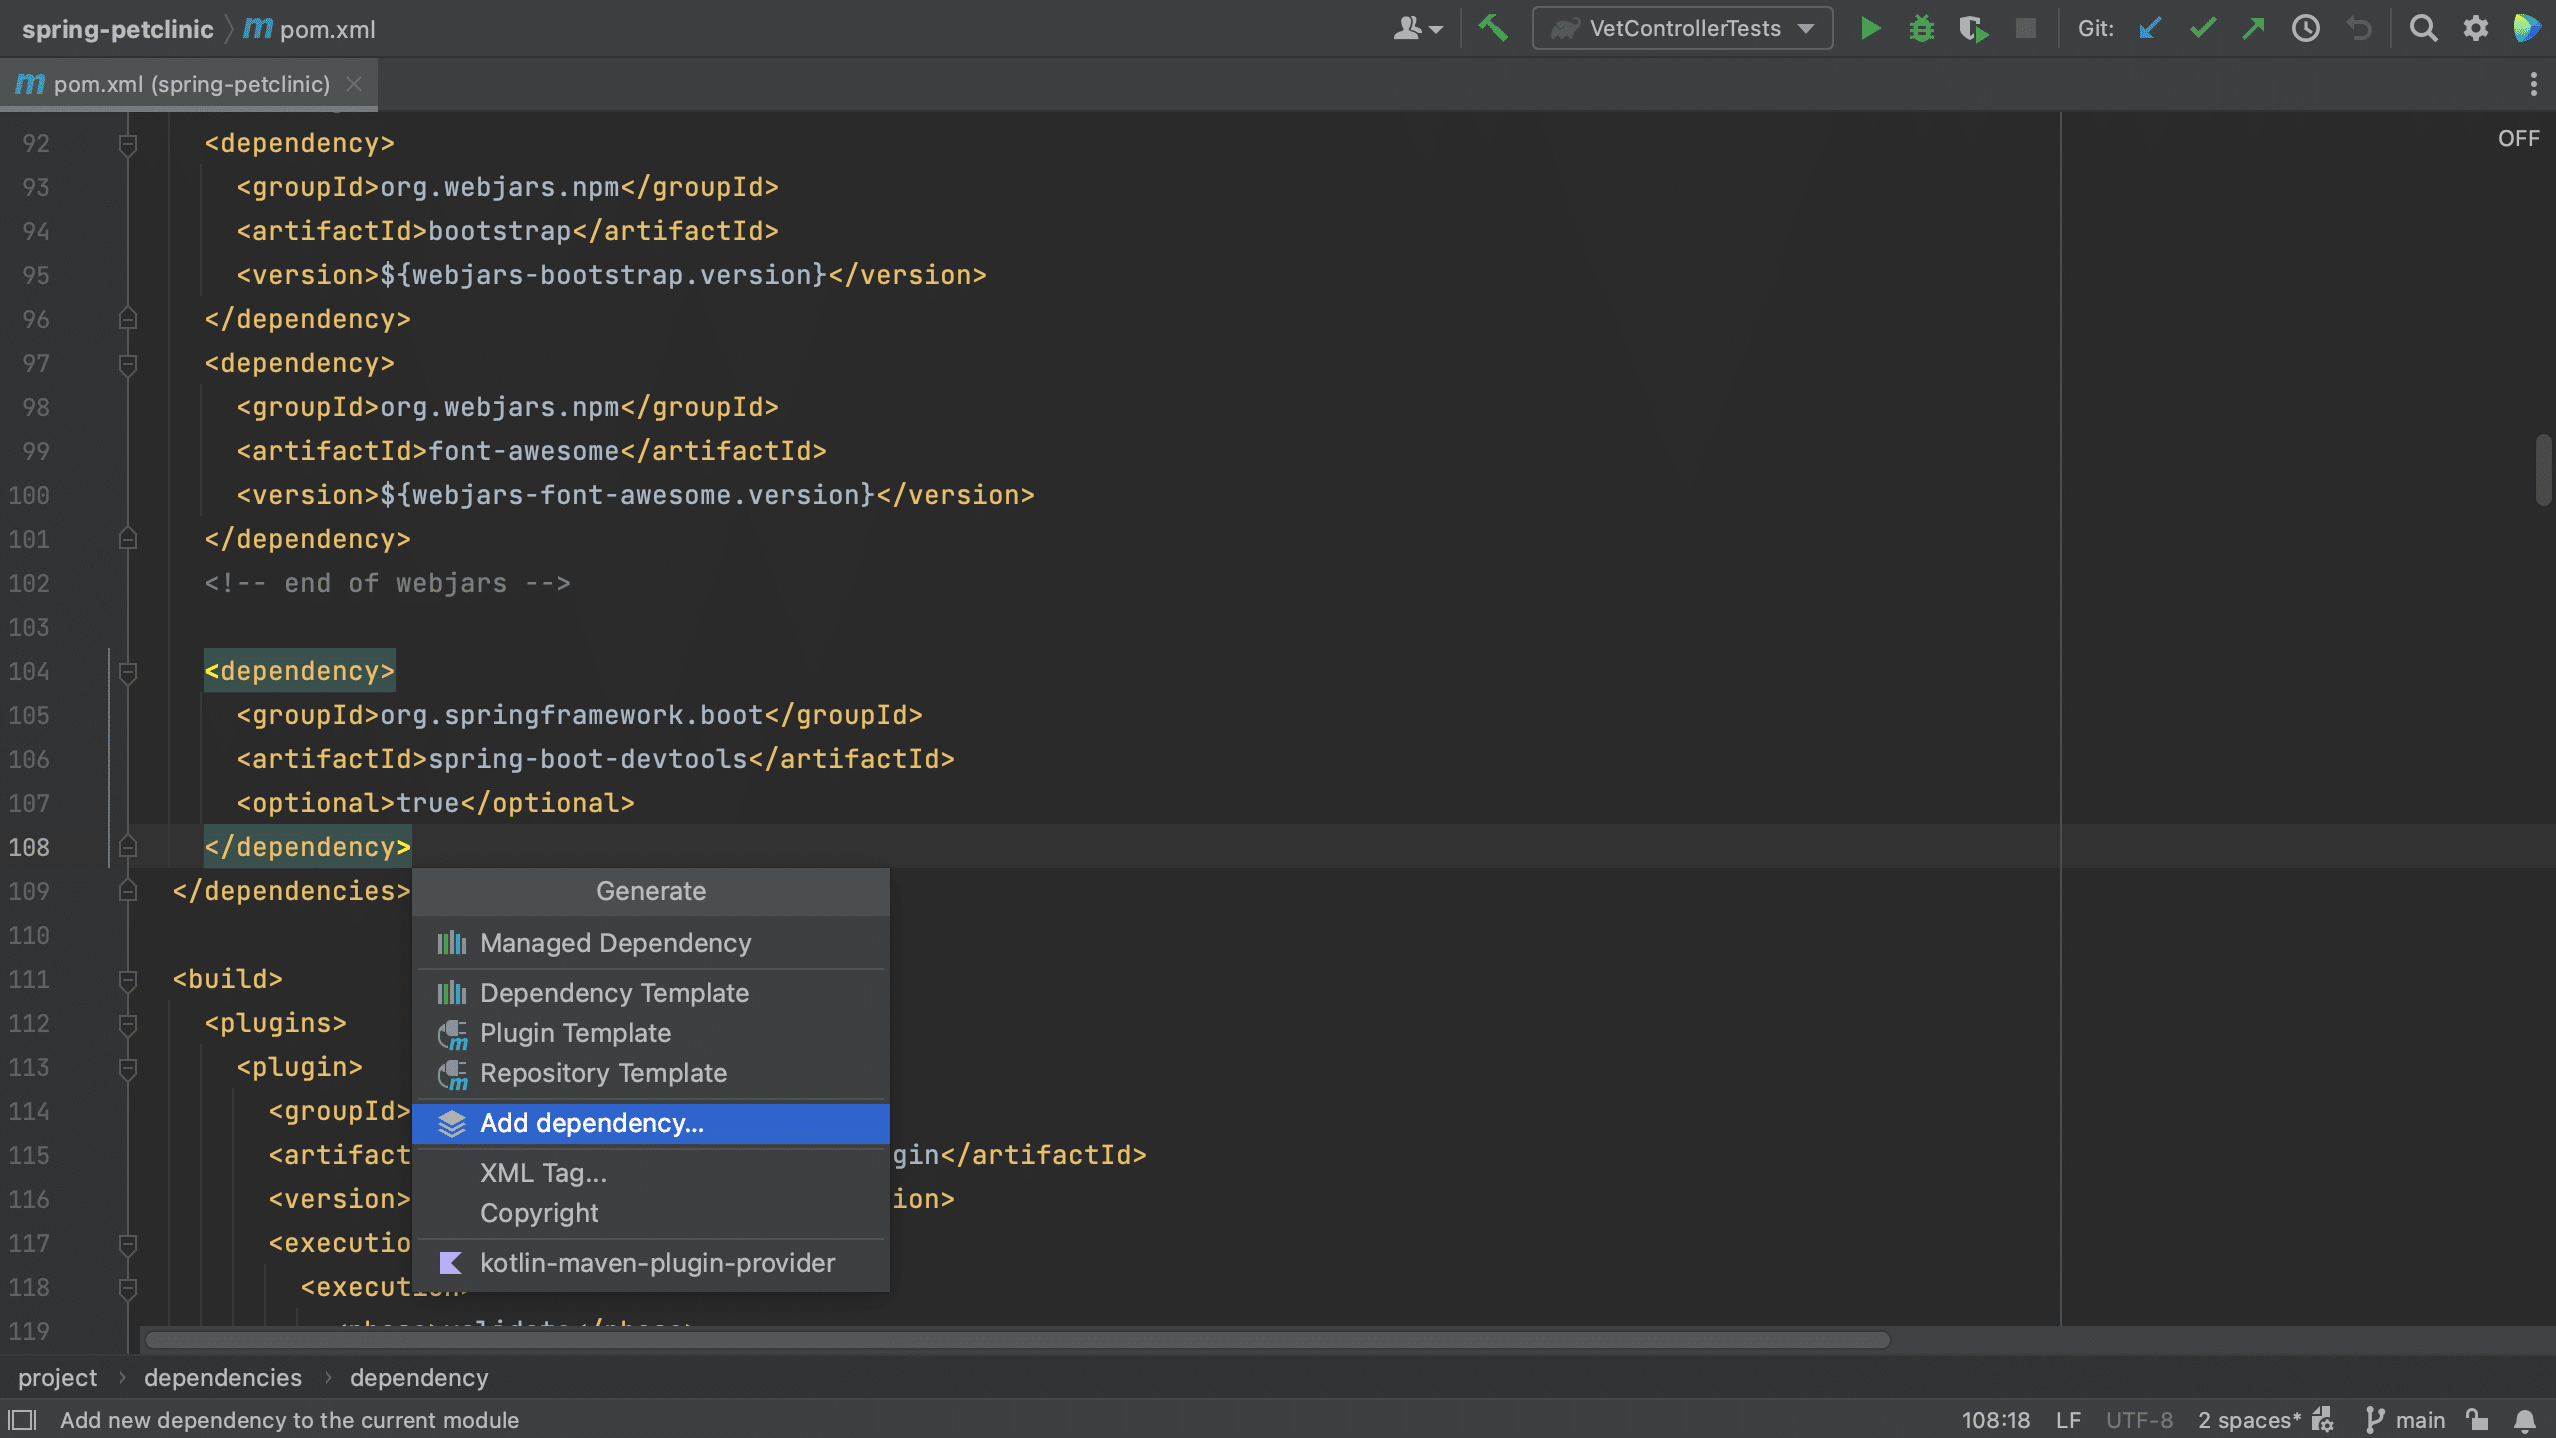
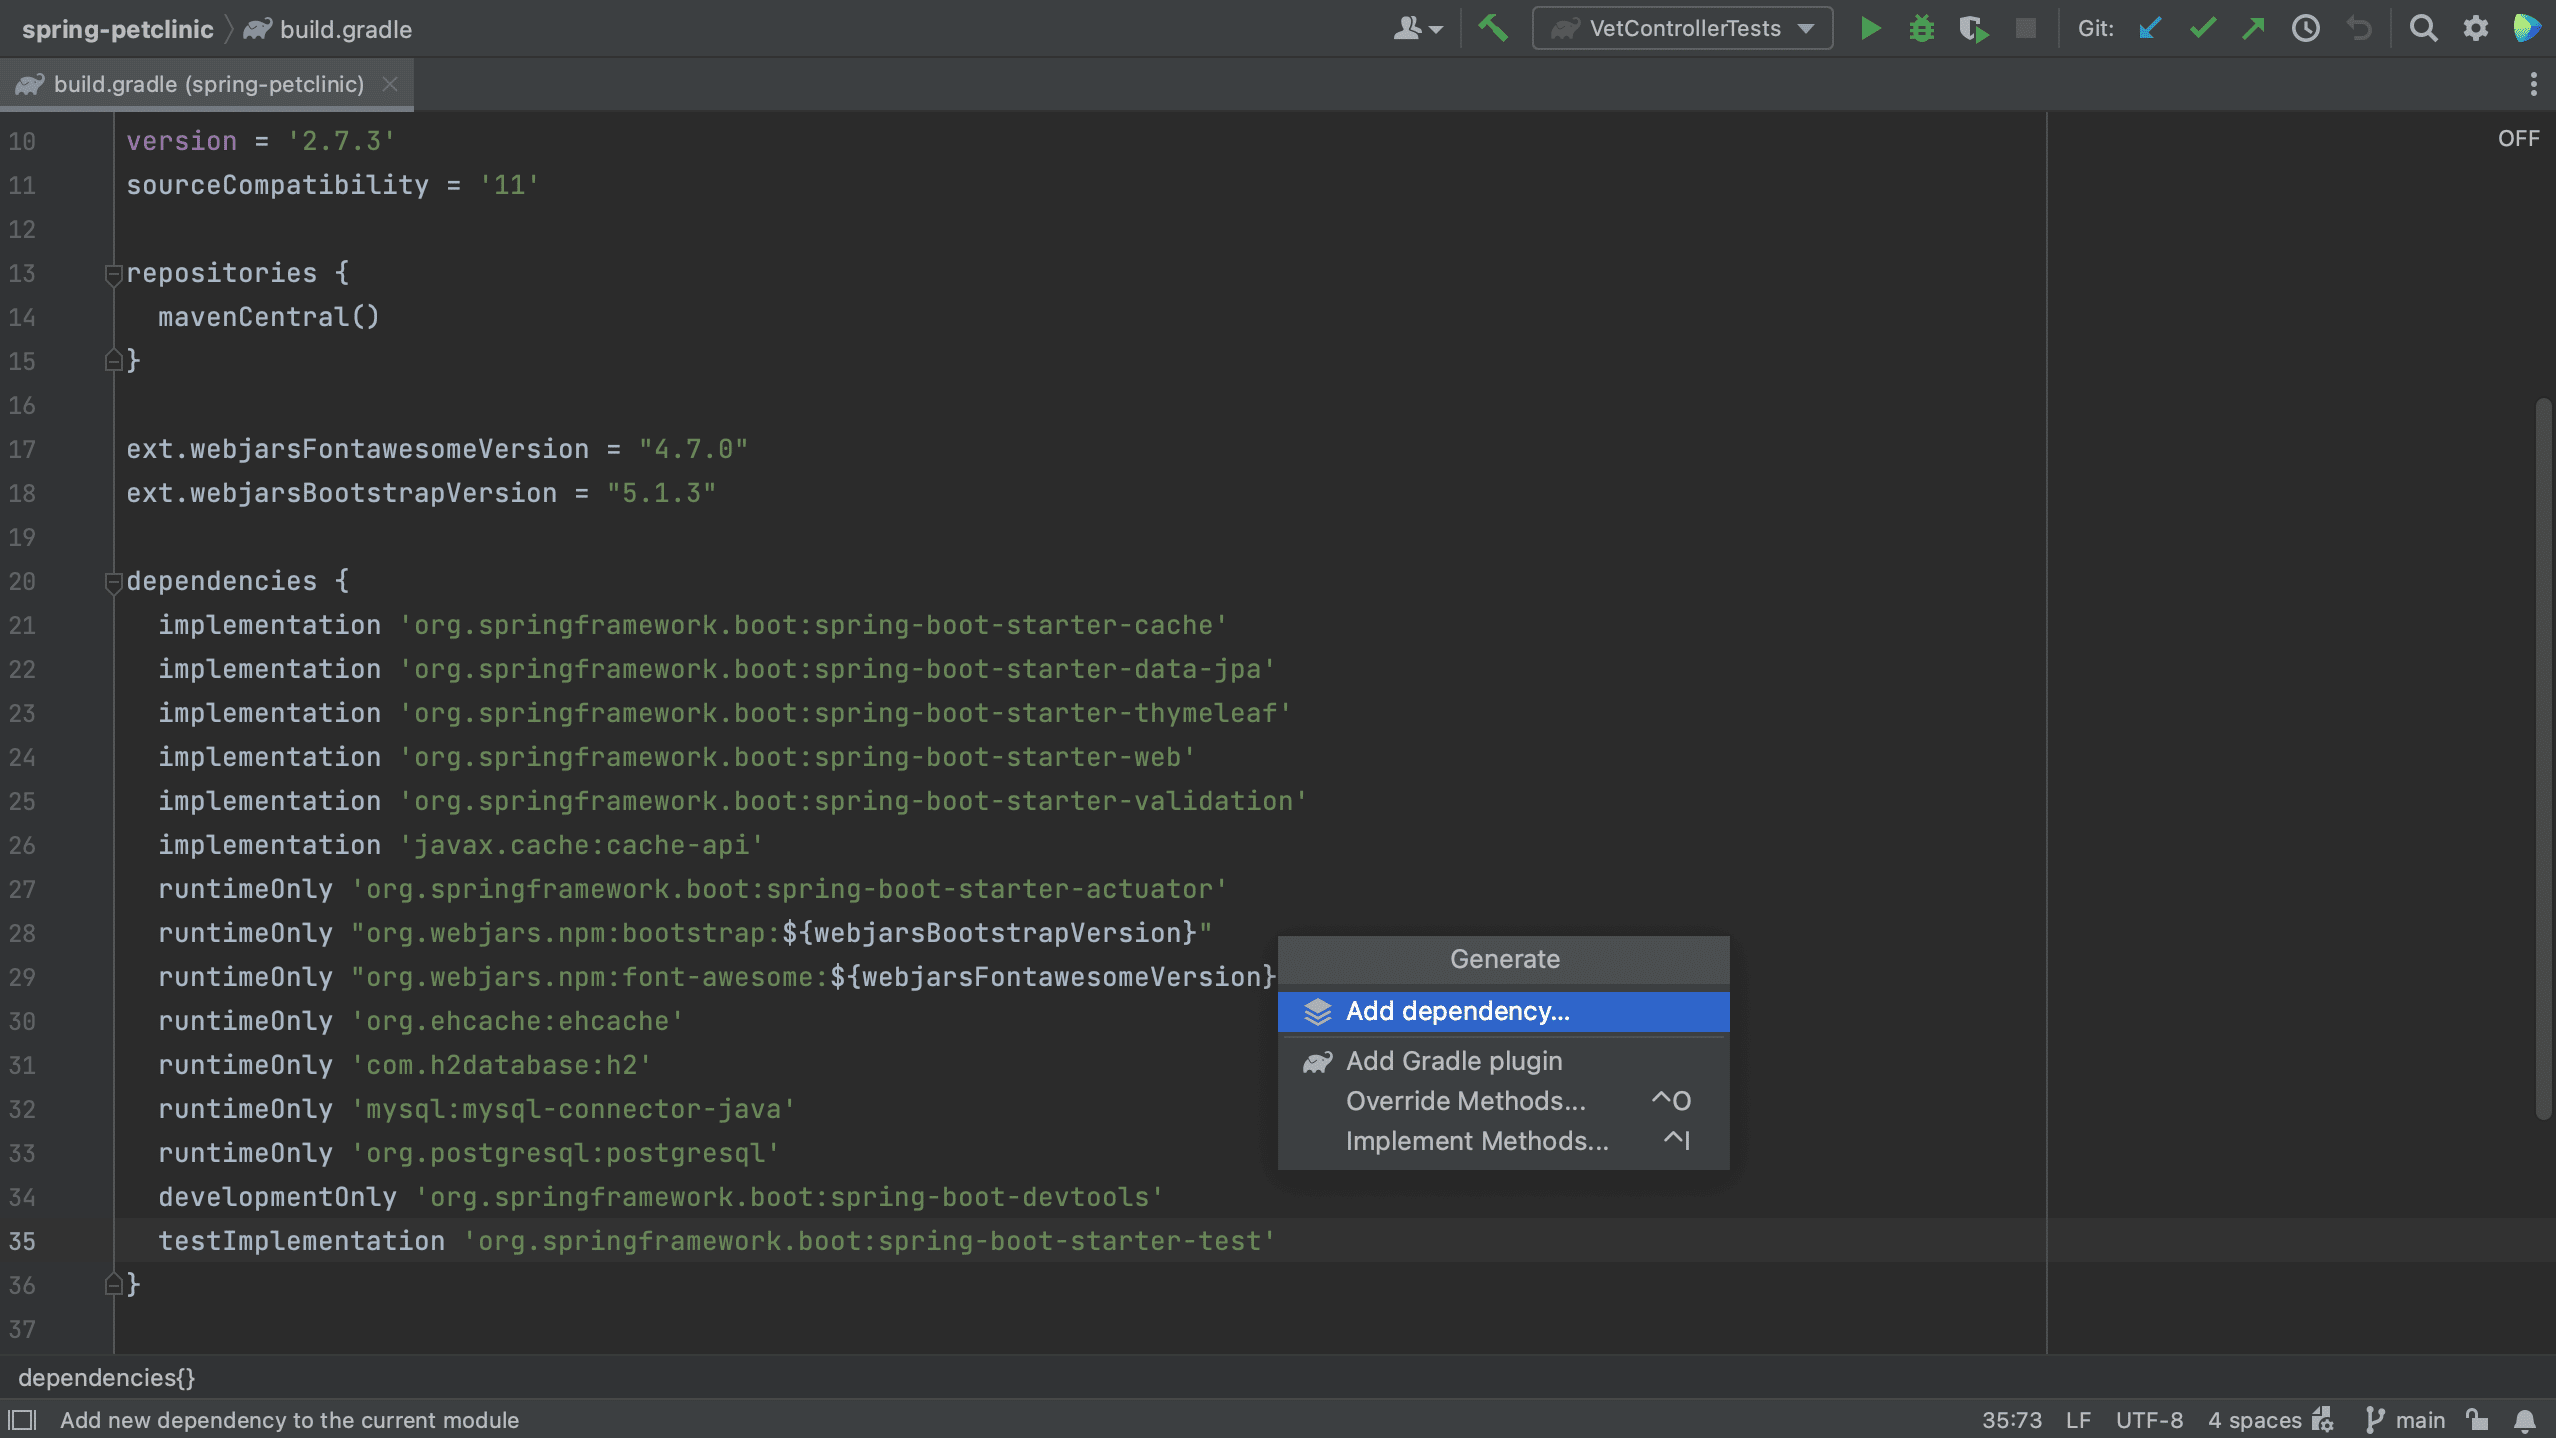
We can also use code generation from the build file to add dependencies. In the build file, the pom.xml in a Maven project, invoke Package Search using ⌘N (on macOS) or Alt+Insert (on Windows & Linux) and in the menu that opens, select Add dependency. This will open the Dependencies tool window.
Note that if we are using Gradle, we can do the same in our build.gradle file.
From the Dependencies tool window
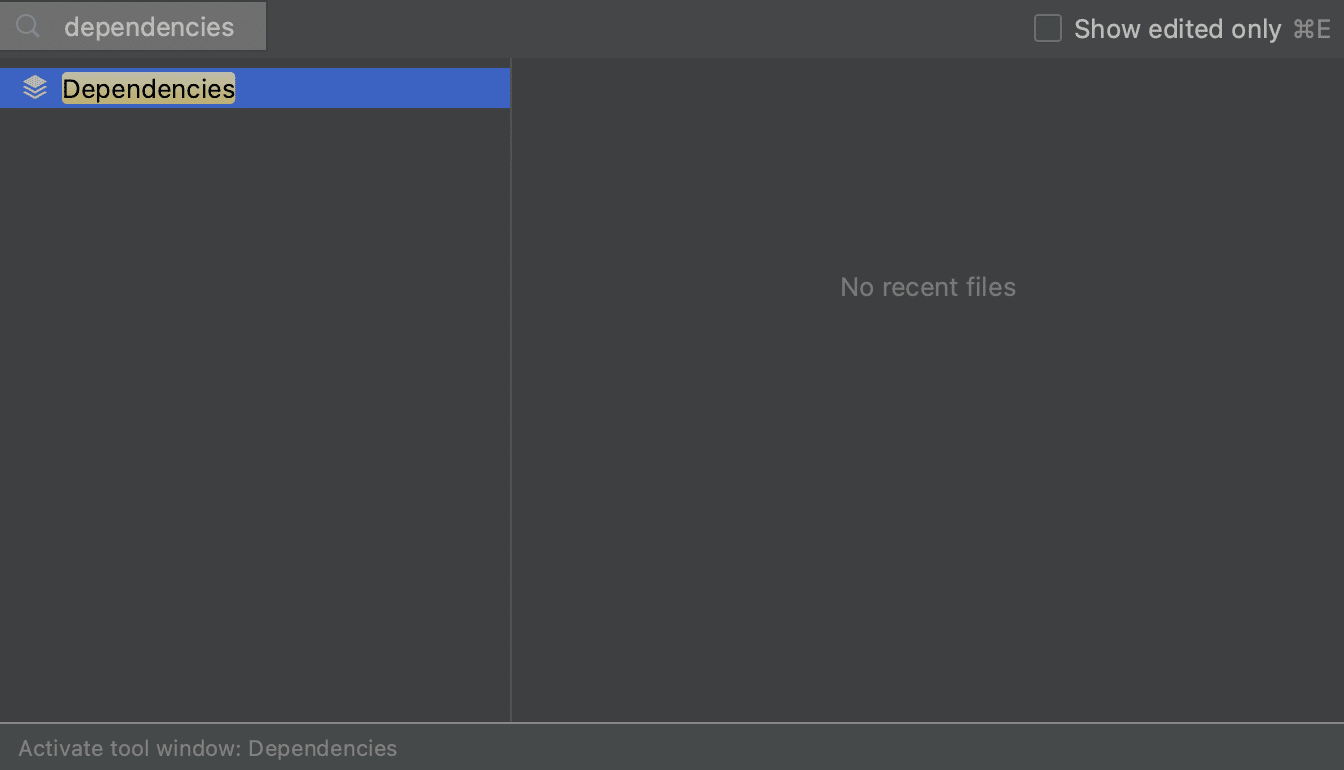
Alternatively, we can open the Dependencies tool window directly. There is no shortcut to open the Dependencies tool window, so we can either use Recent Files, ⌘E (on Mac) or Ctrl+E (on Windows/Linux), and type in “dependencies” to open the Dependencies tool window.
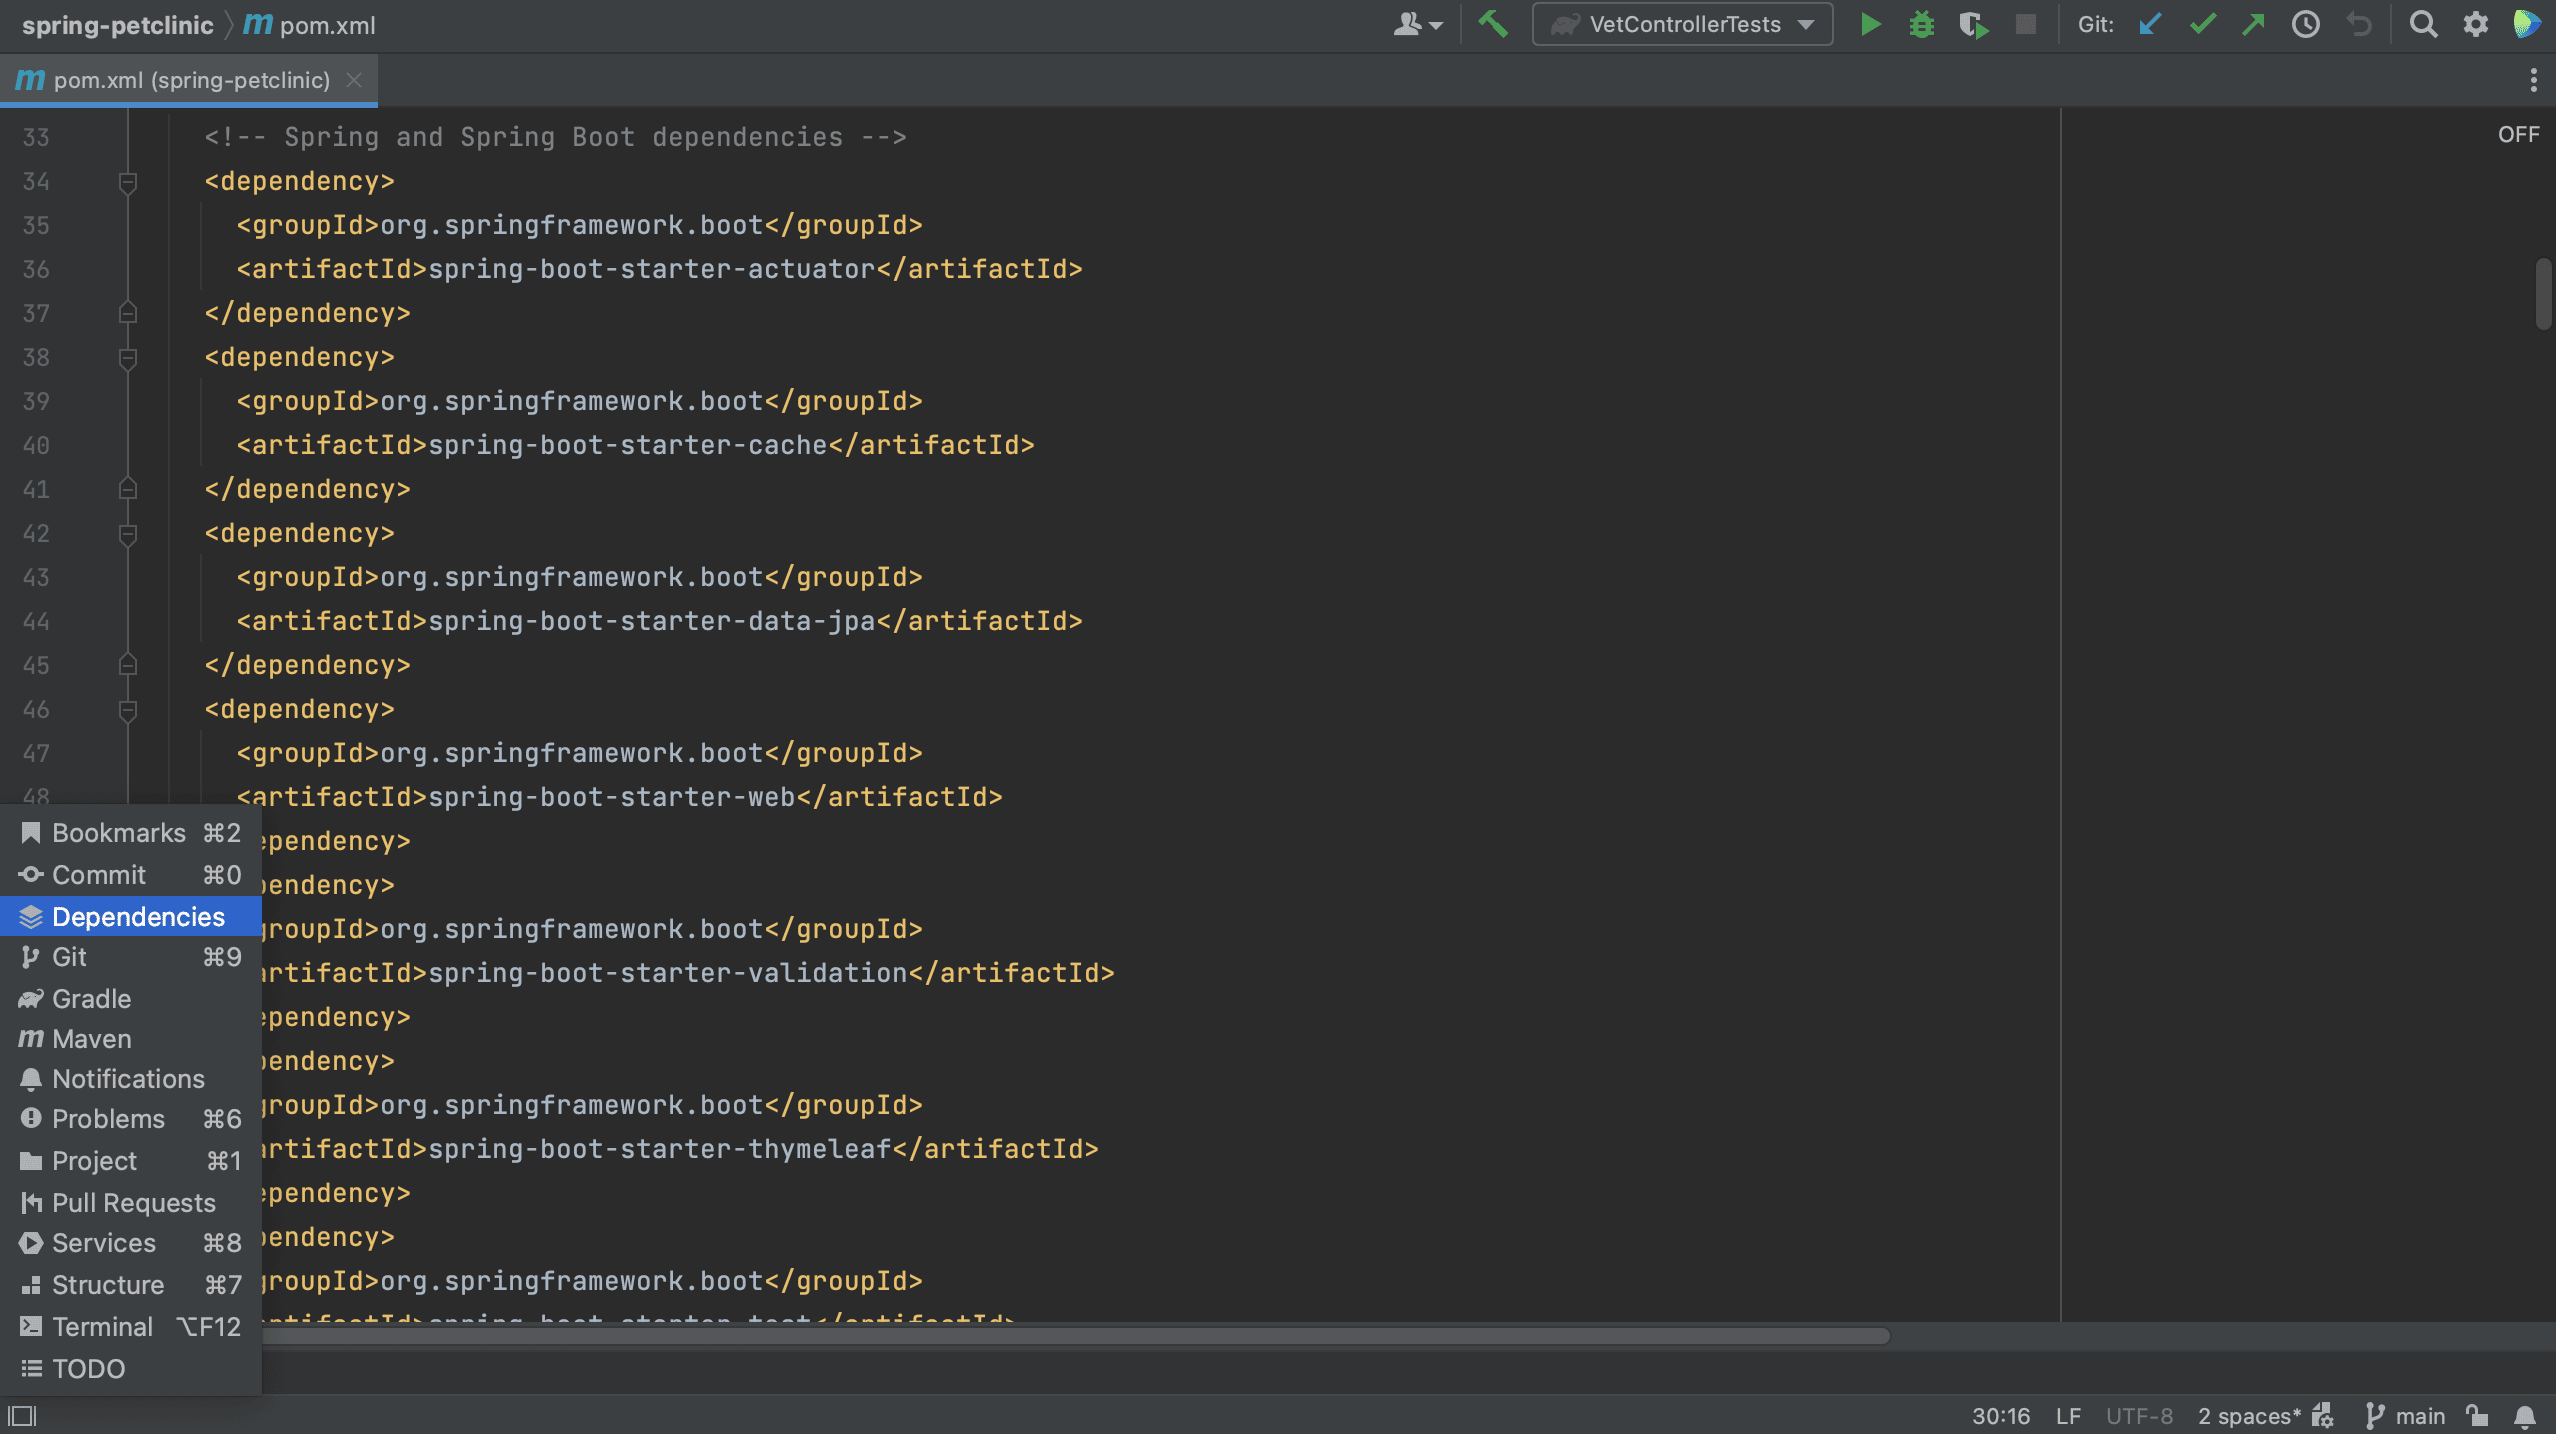
Alternatively, we can open it by clicking Quick Launch in the bottom-left and selecting Dependencies.
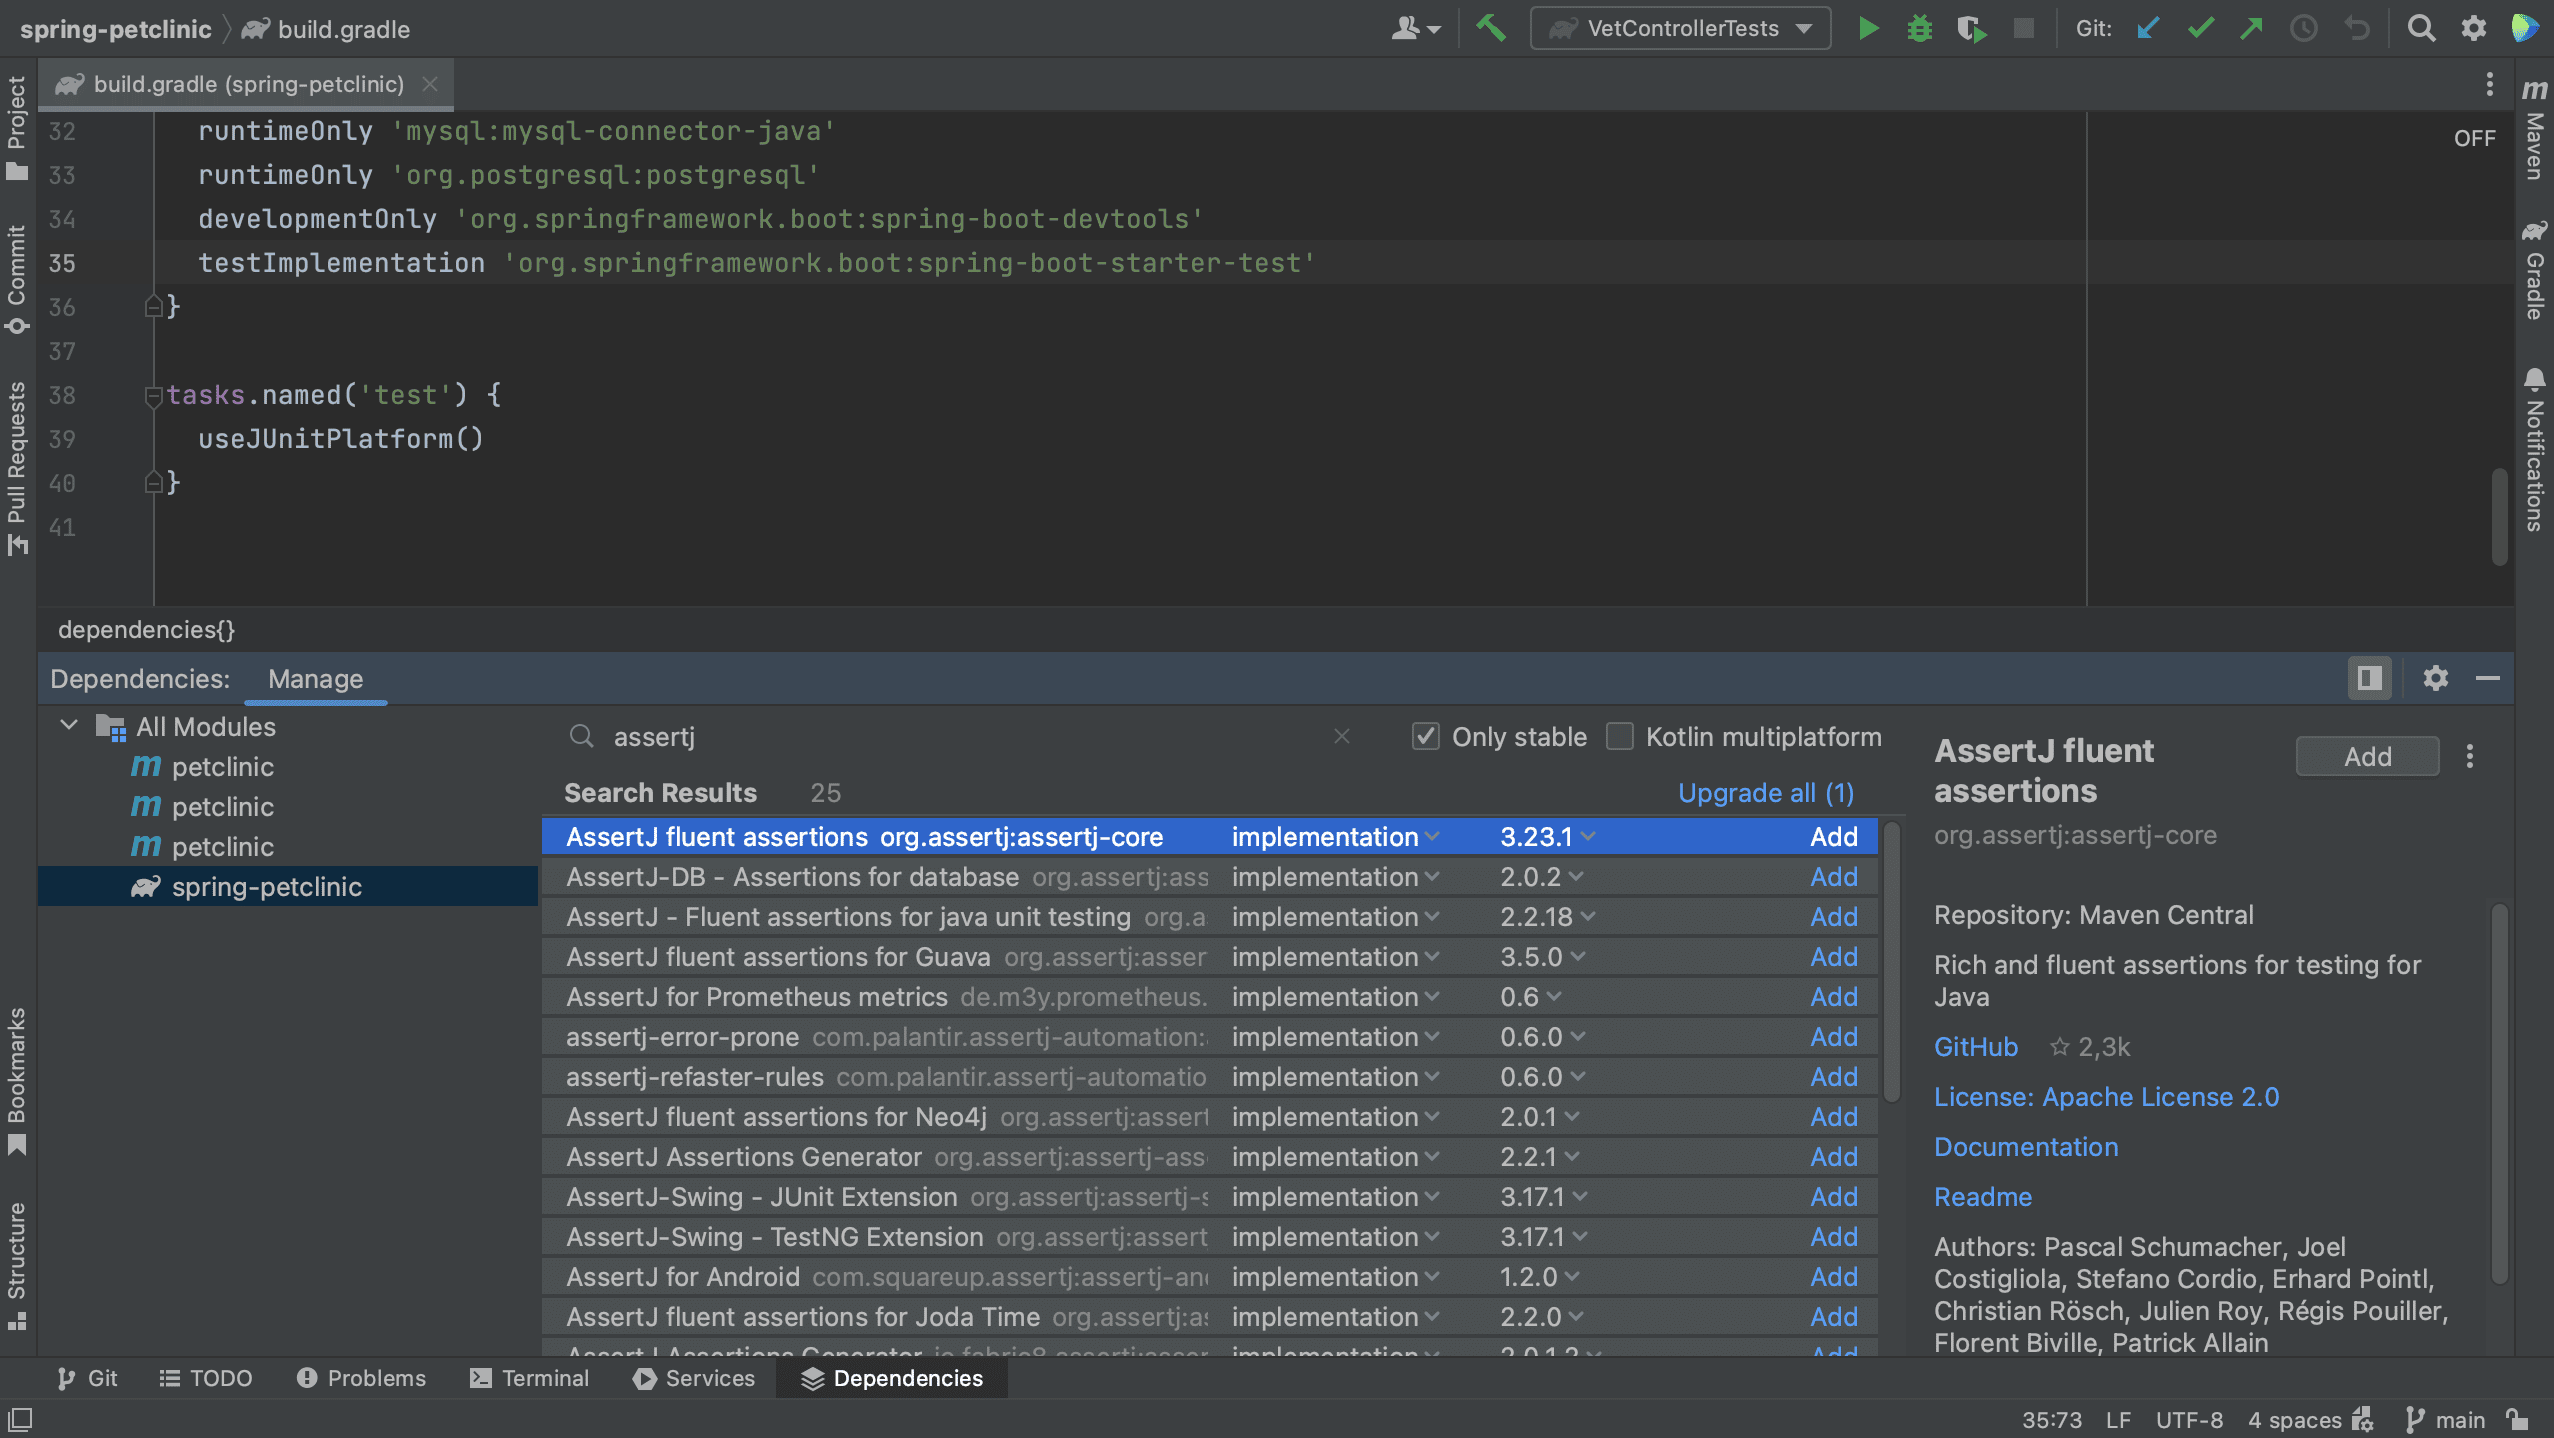
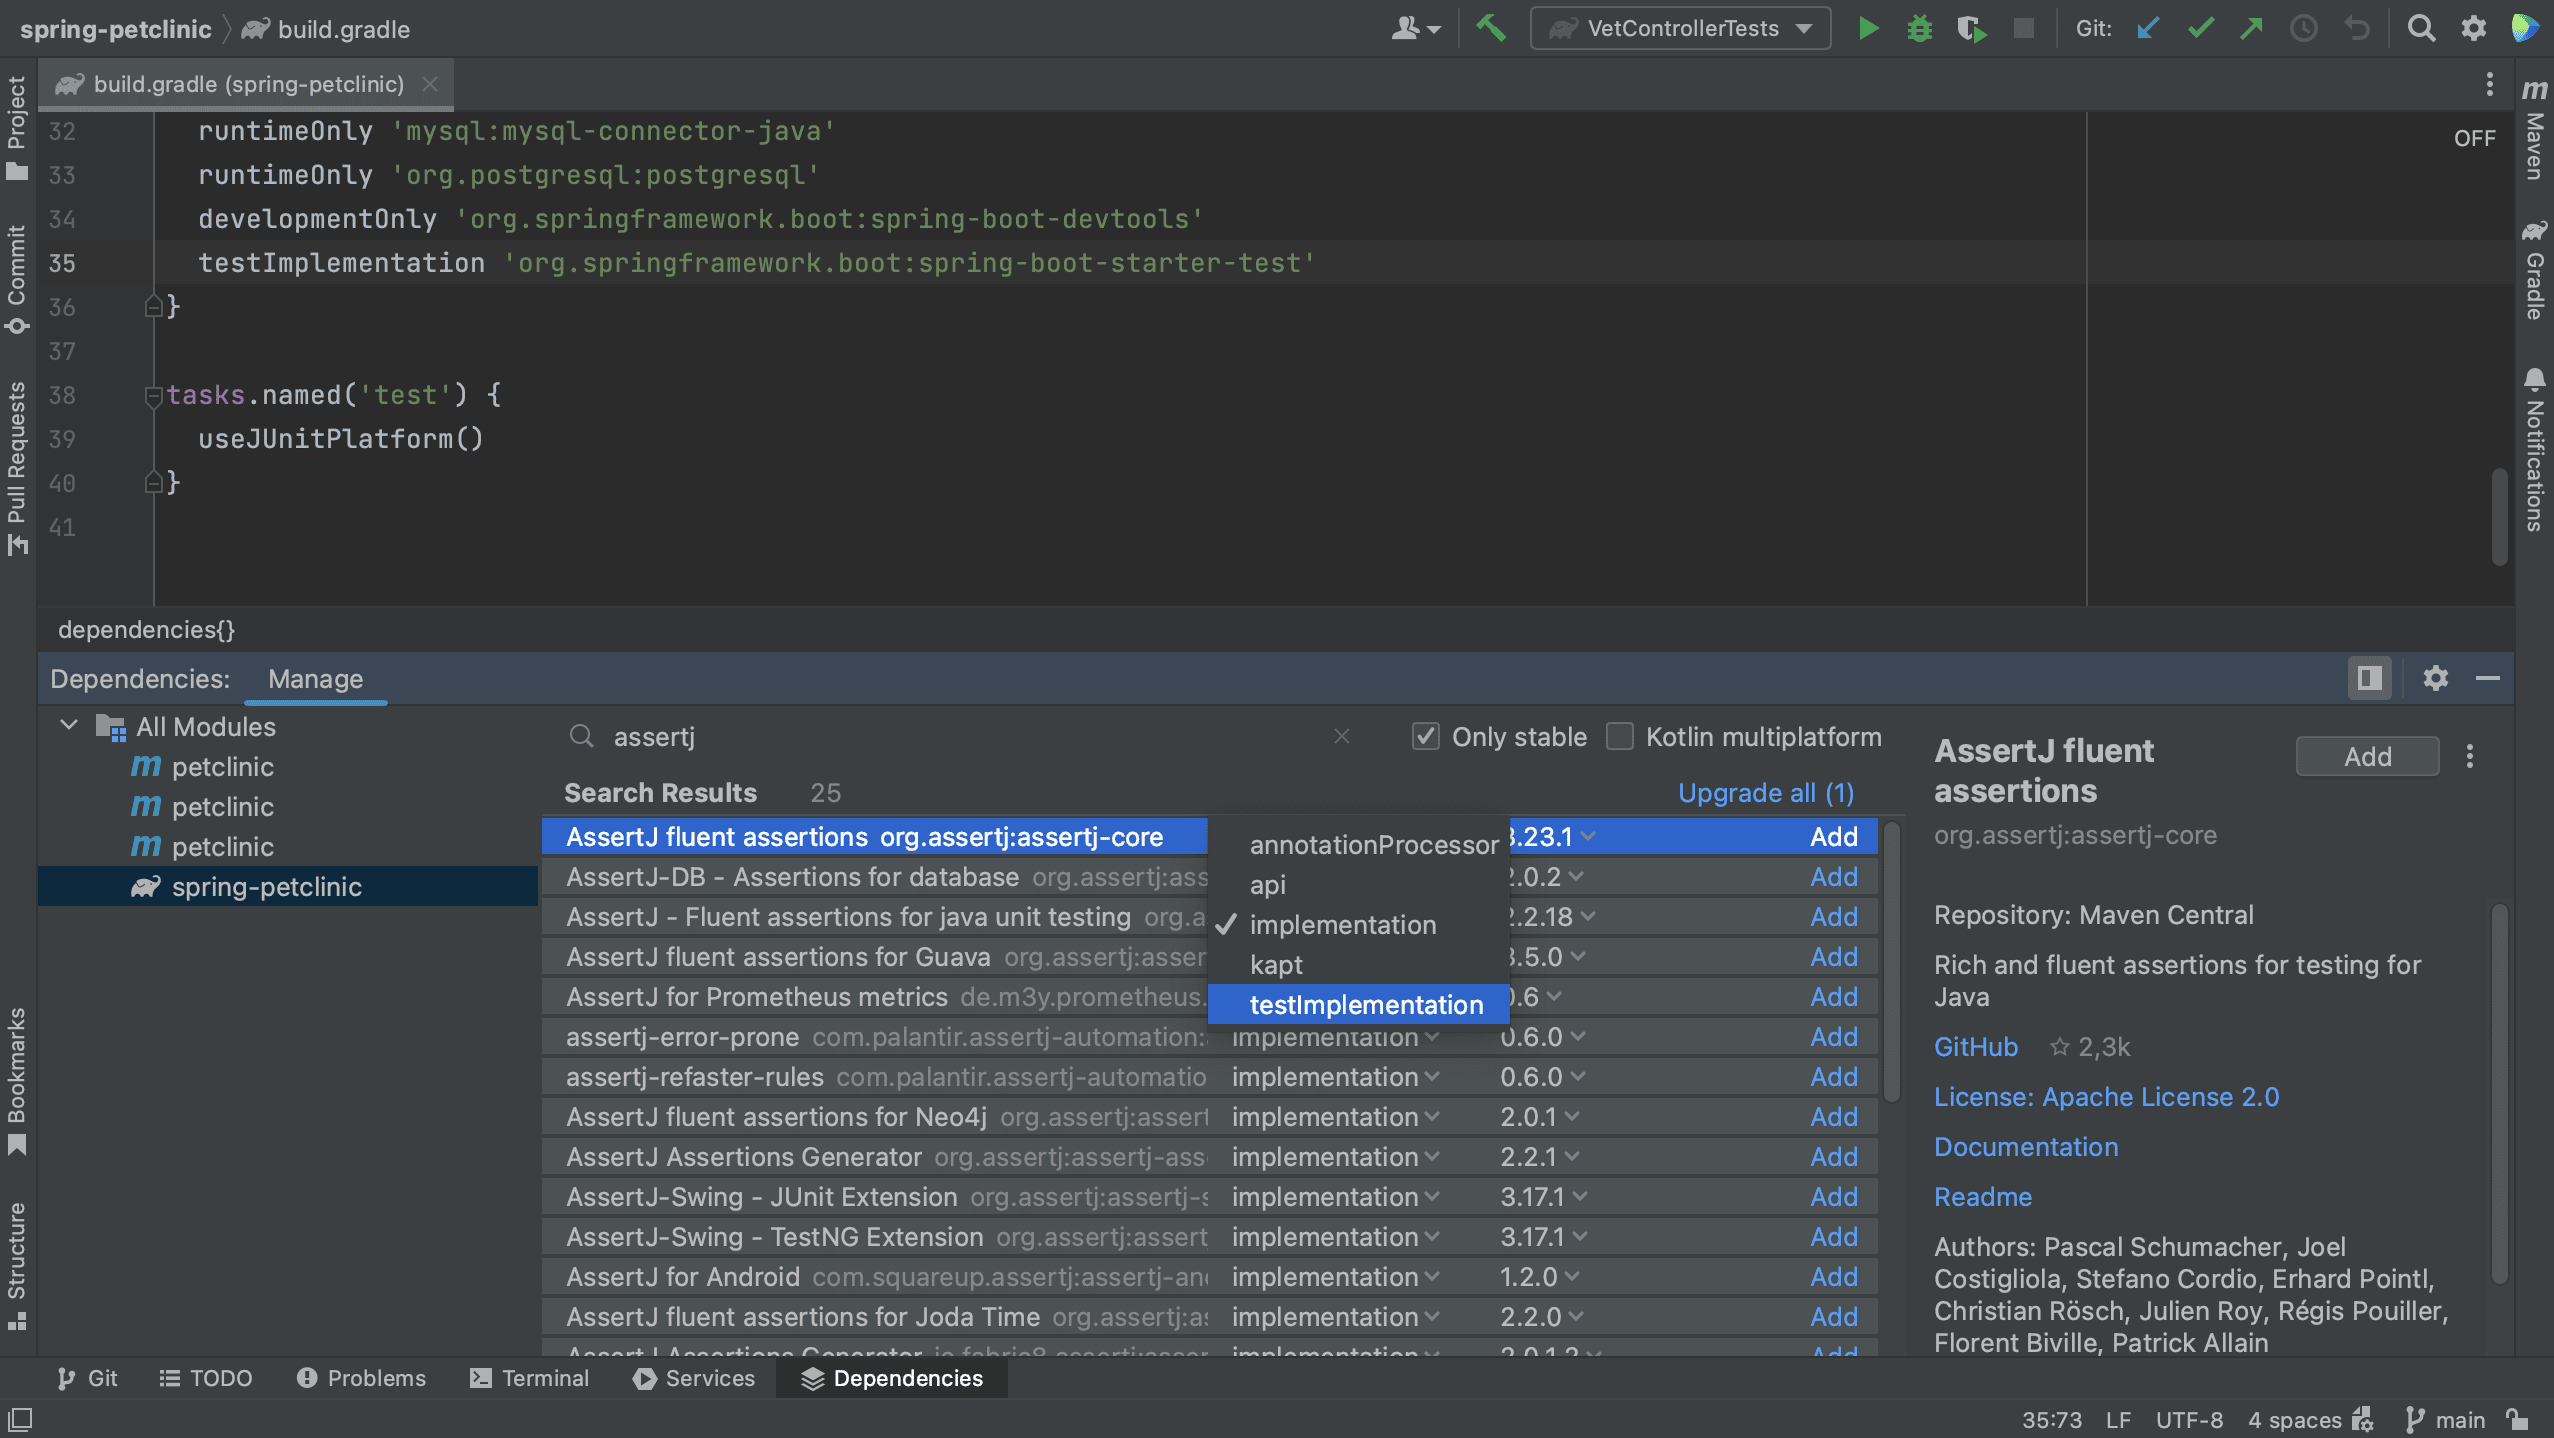
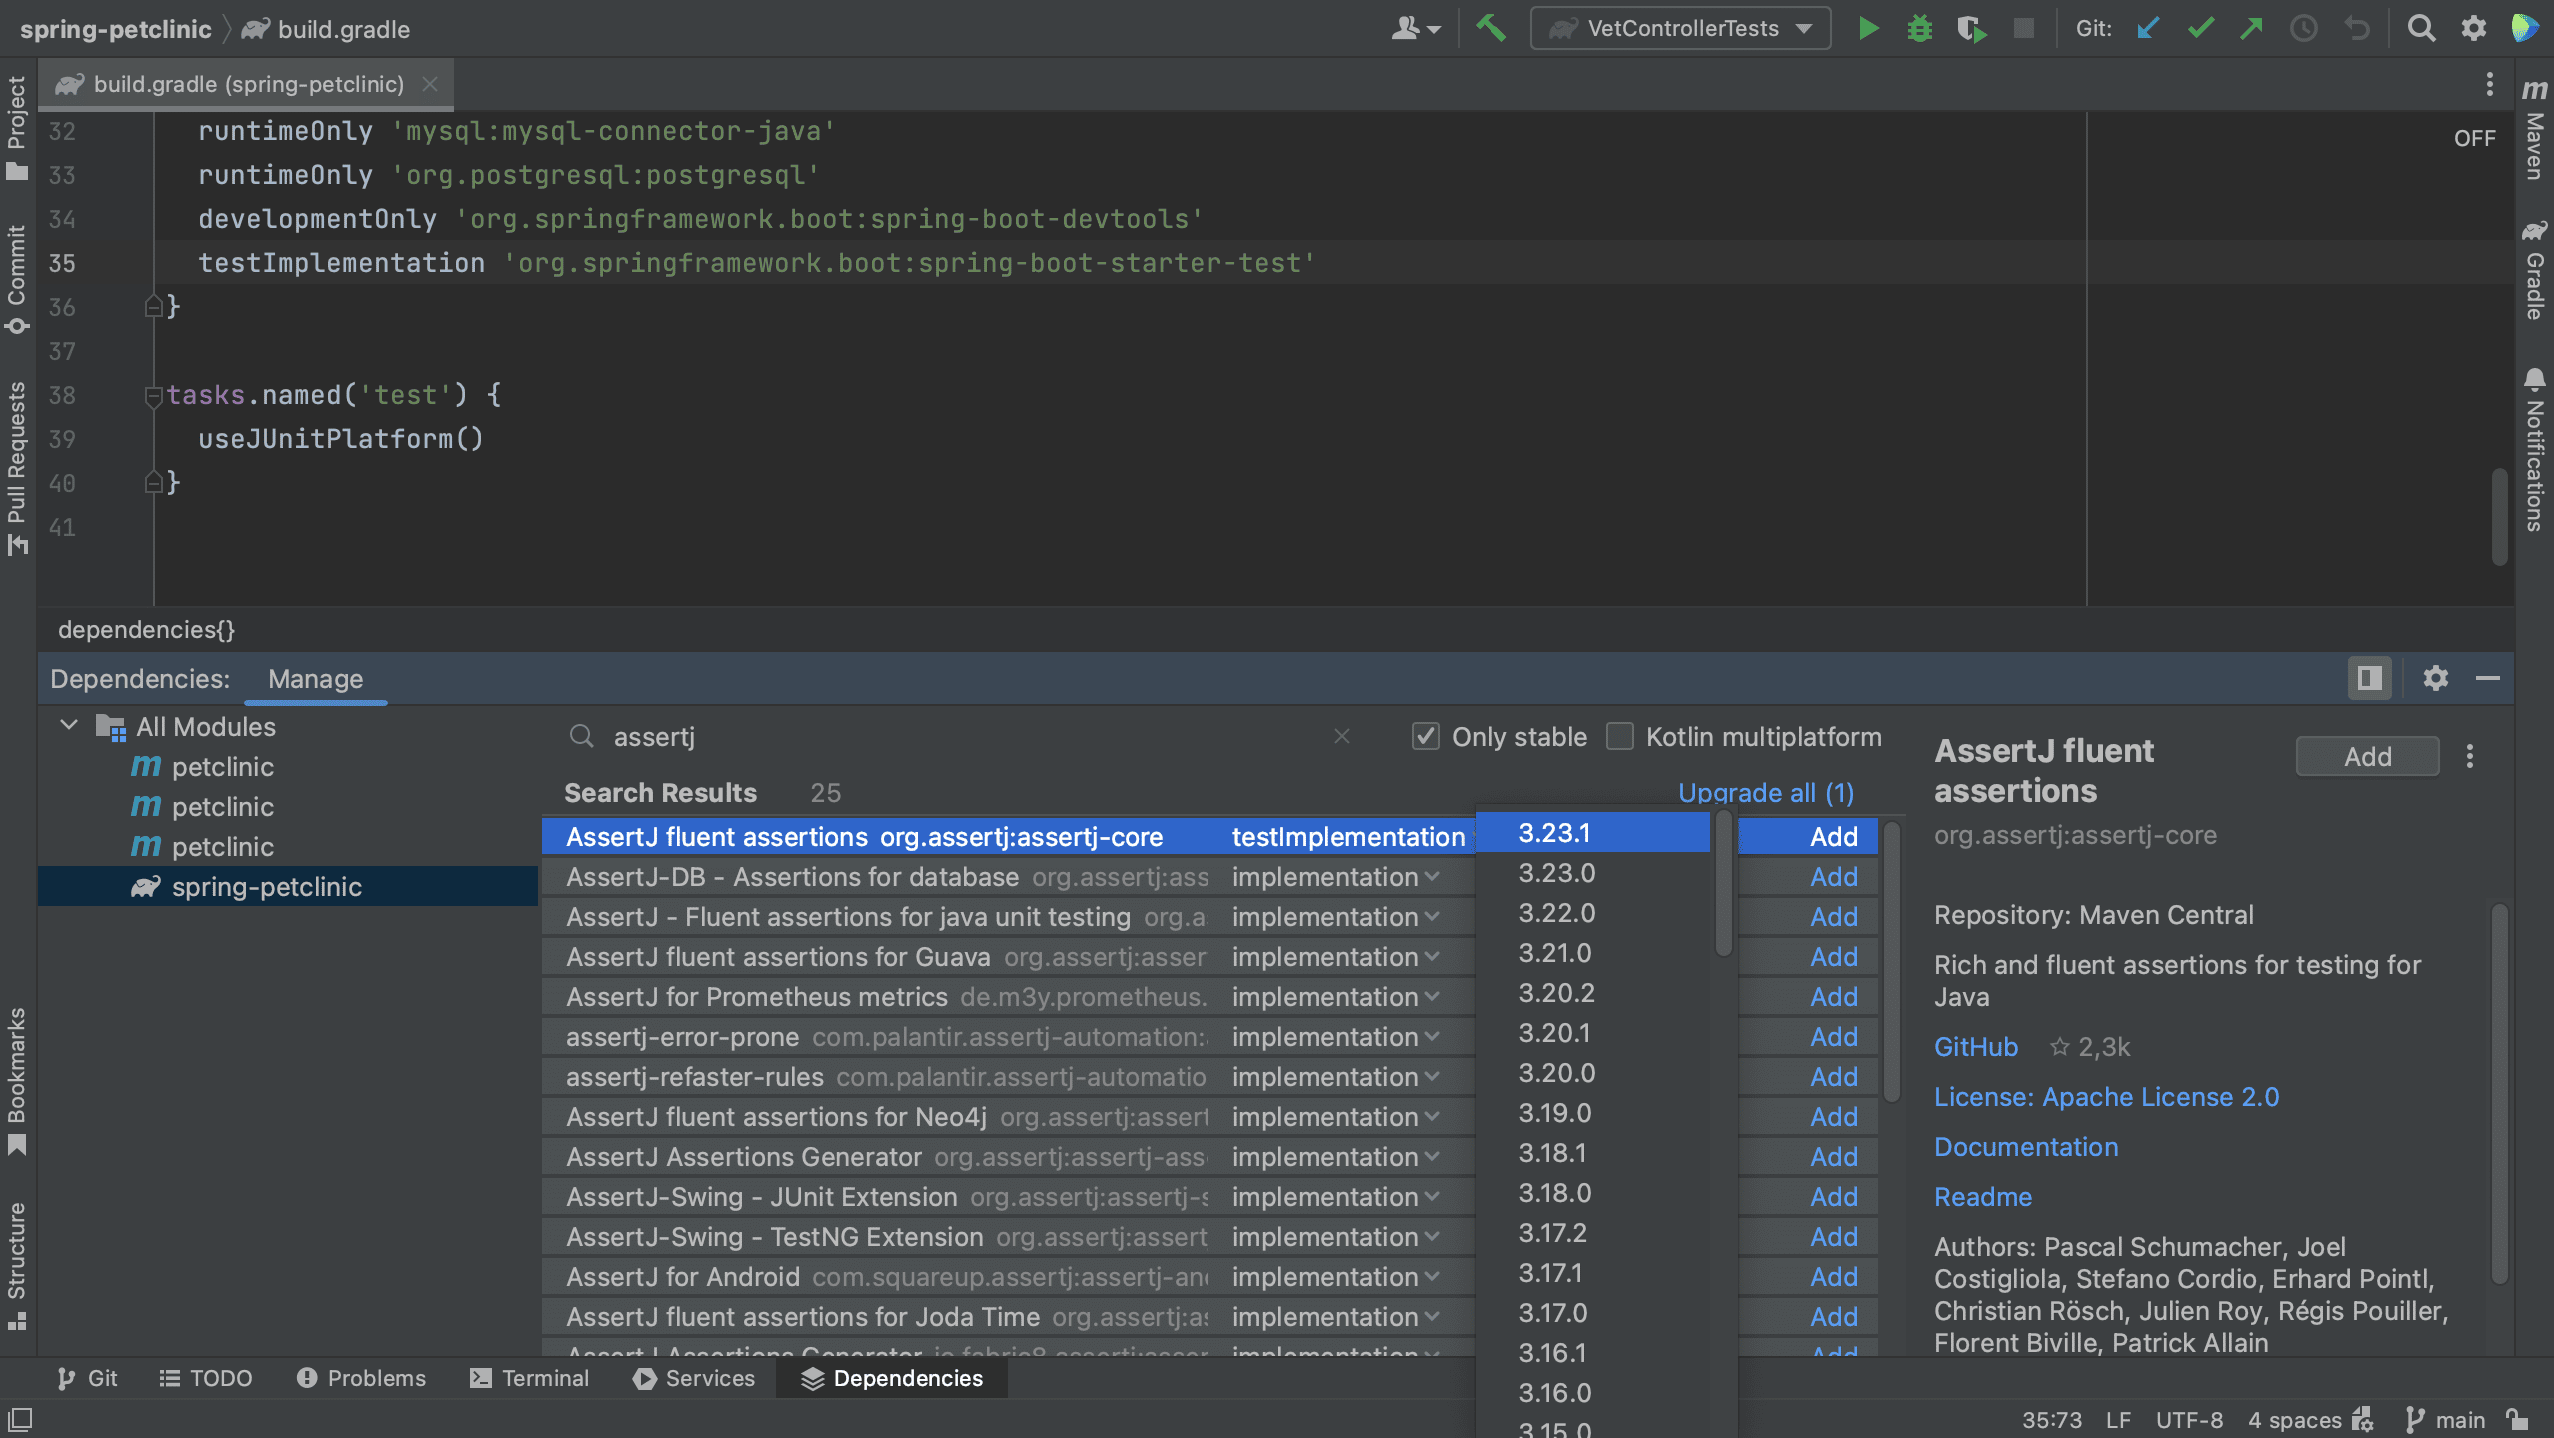
In the Dependencies tool window, we can search for a dependency. For example, let’s search for AssertJ.
Note that we can select a scope for this dependency. The names of the scopes are based on the build tool with which you are working. Since this is a test dependency, and we are using Gradle in this project, we can set the scope to testImplementation.
We can also select the version we want to use.
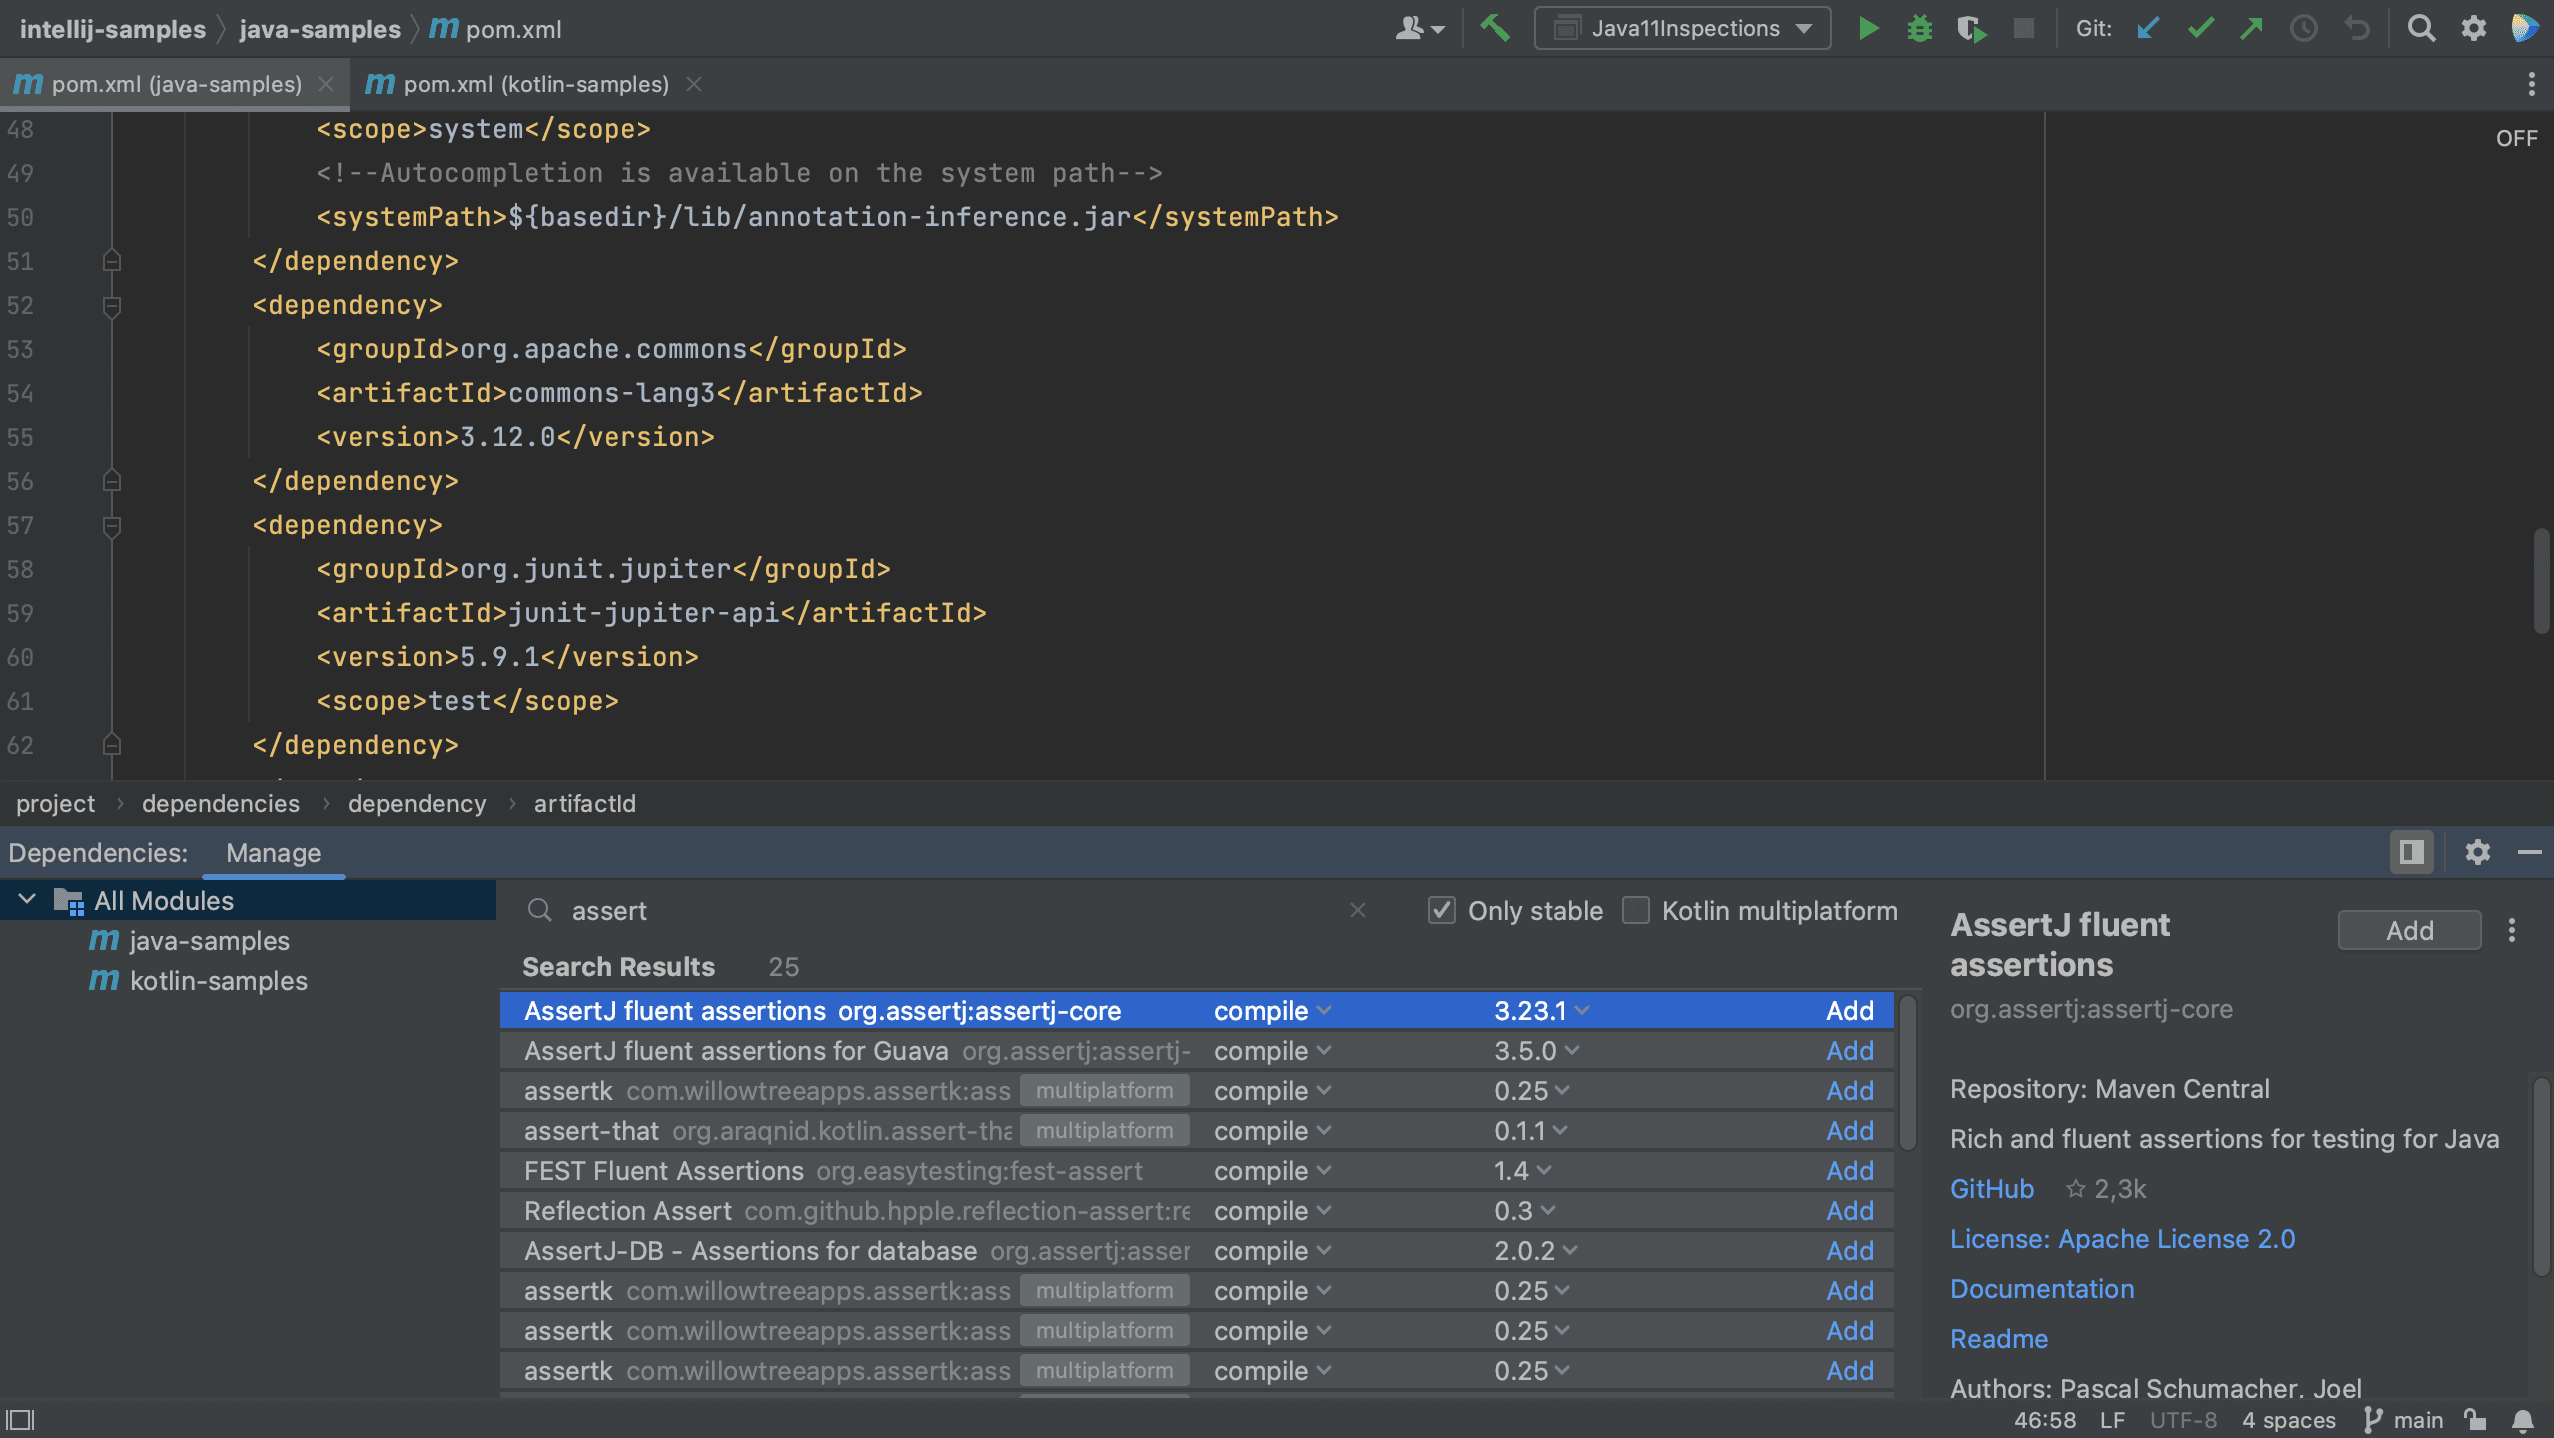
We can do the same in Maven.
Note that the names of scopes for Maven are different from Gradle. In Maven, we can set the scope for a test dependency to test.
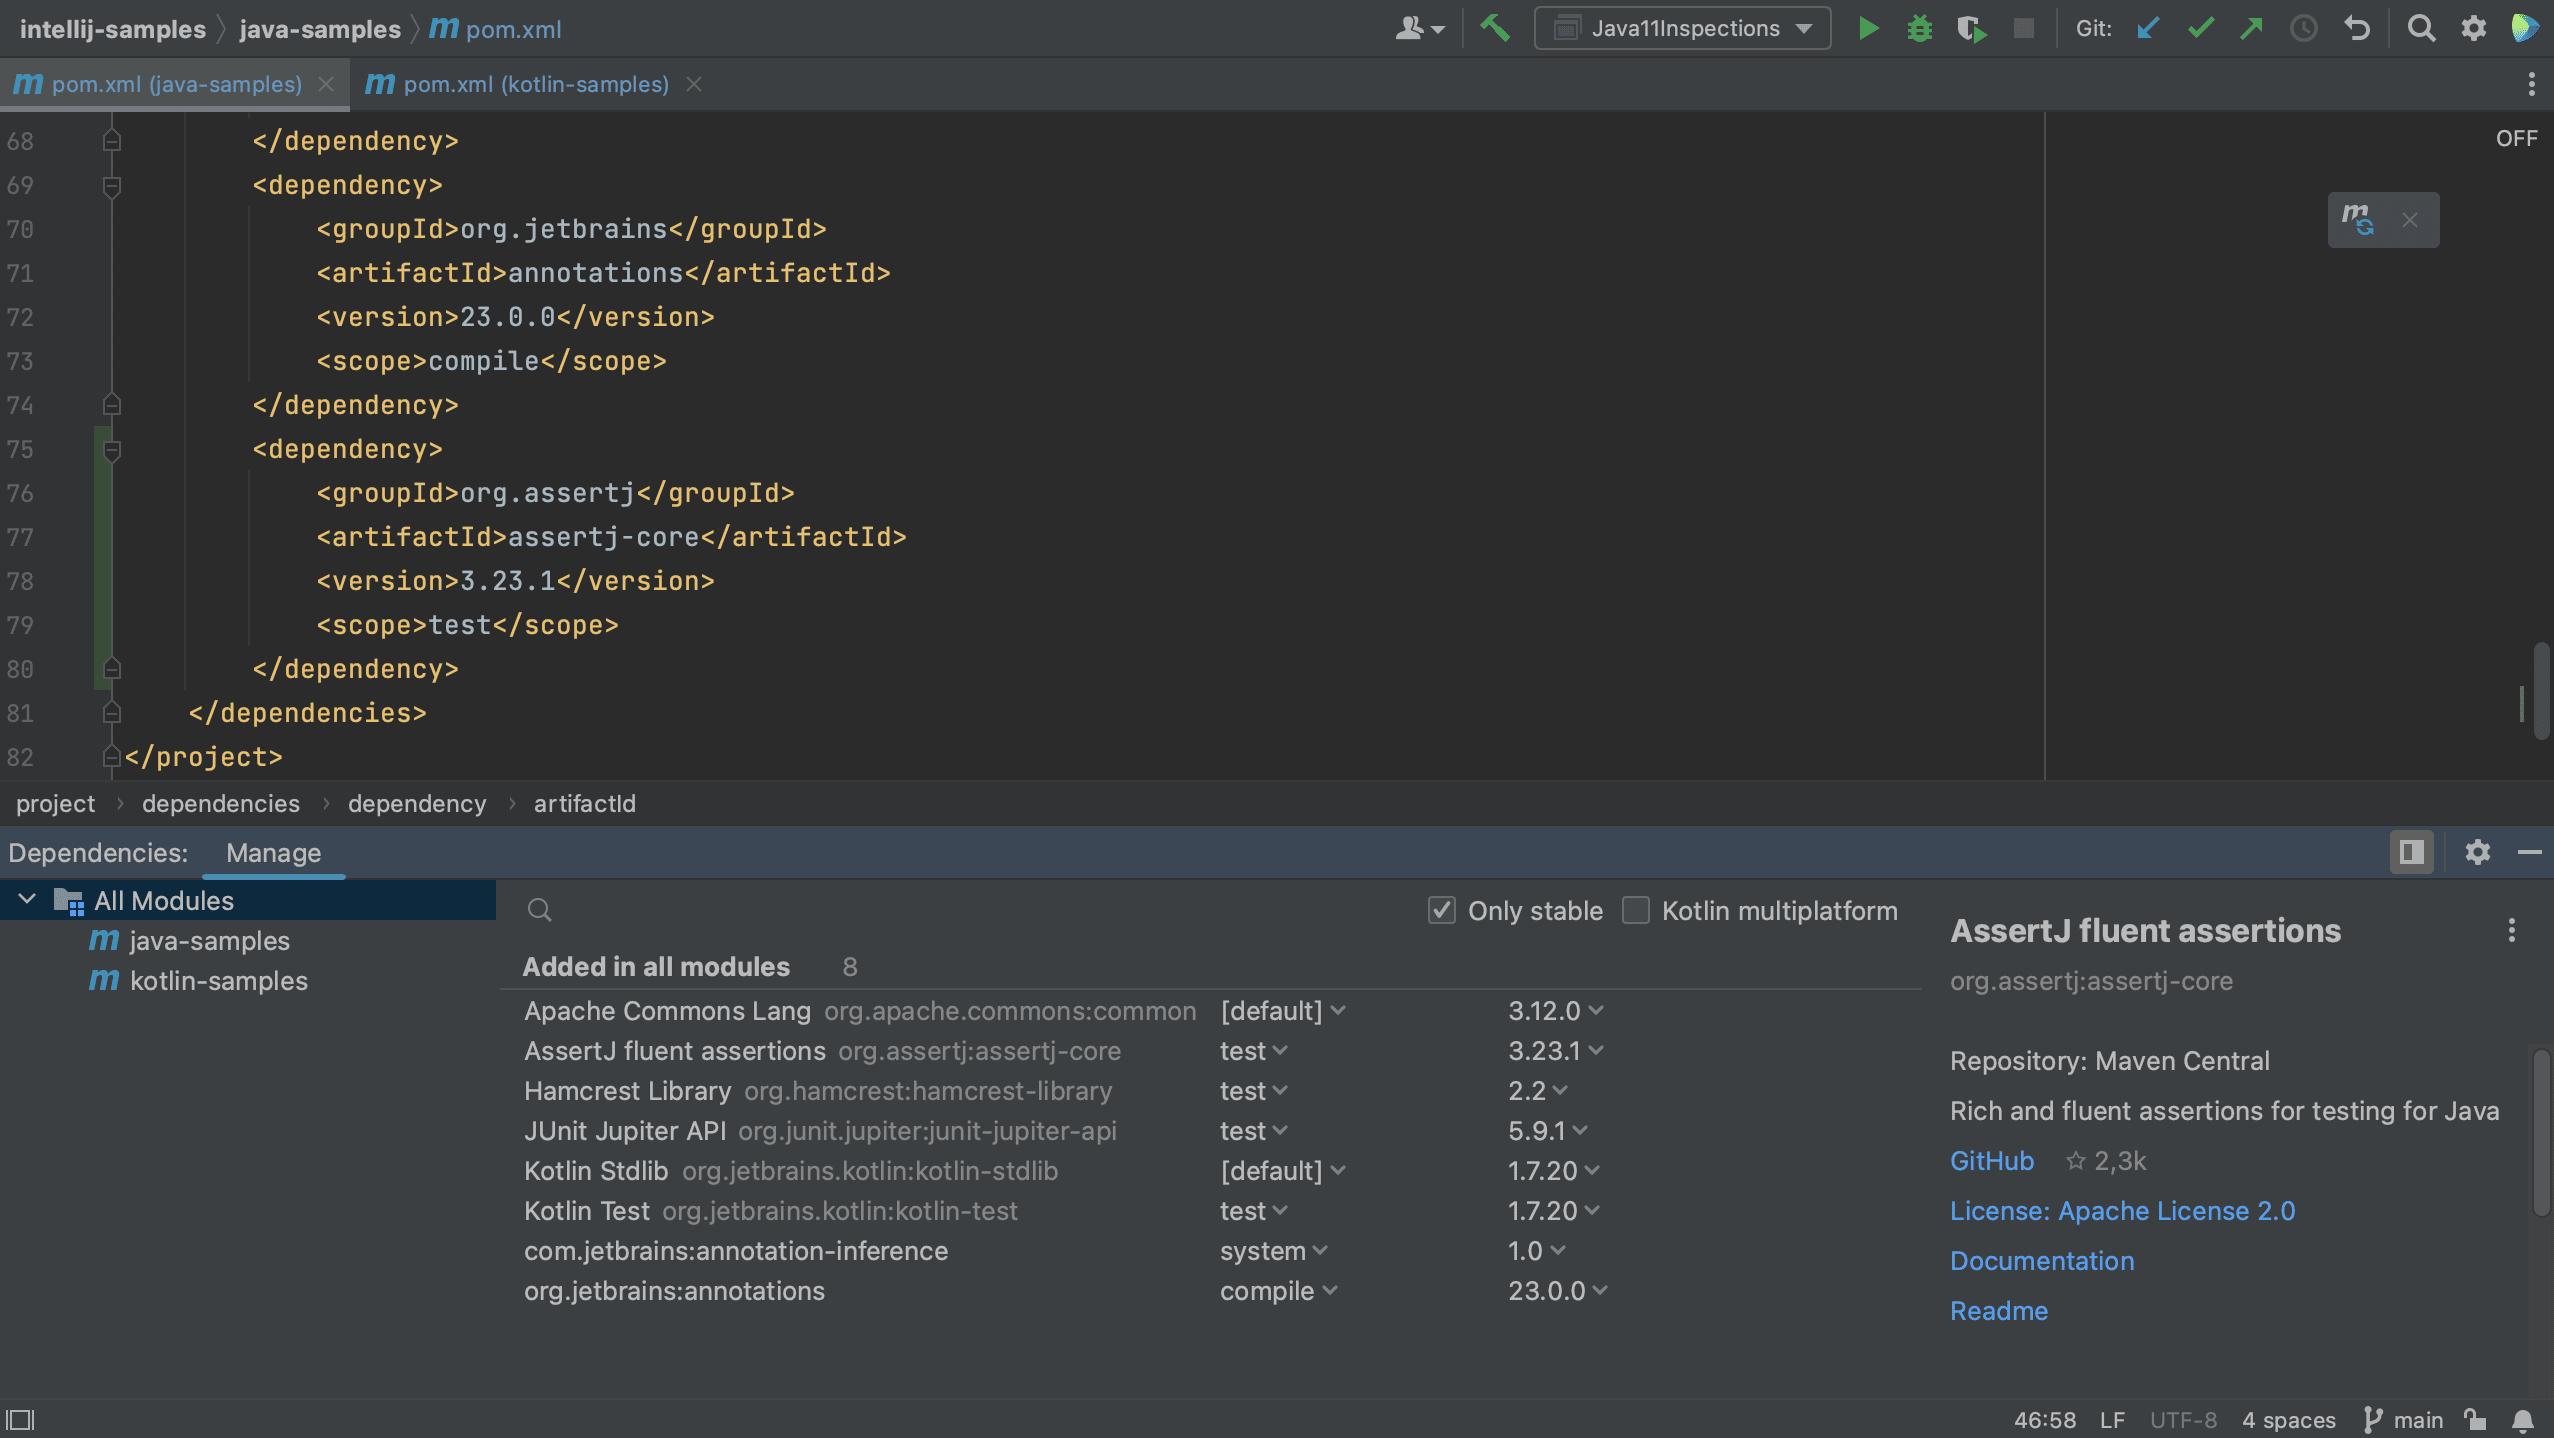
When we click Add, we see that the dependency is added to the build file.
If the version number is shown in red, that means IntelliJ IDEA hasn’t downloaded this library before. Click Load Maven Changes so IntelliJ IDEA will update its dependencies based on the changes to the pom.xml or build.gradle file.
Go back to the Dependencies tool window and clear the search box by clicking the x on the right-hand side. You’ll see the project’s dependencies are updated with your new dependency.
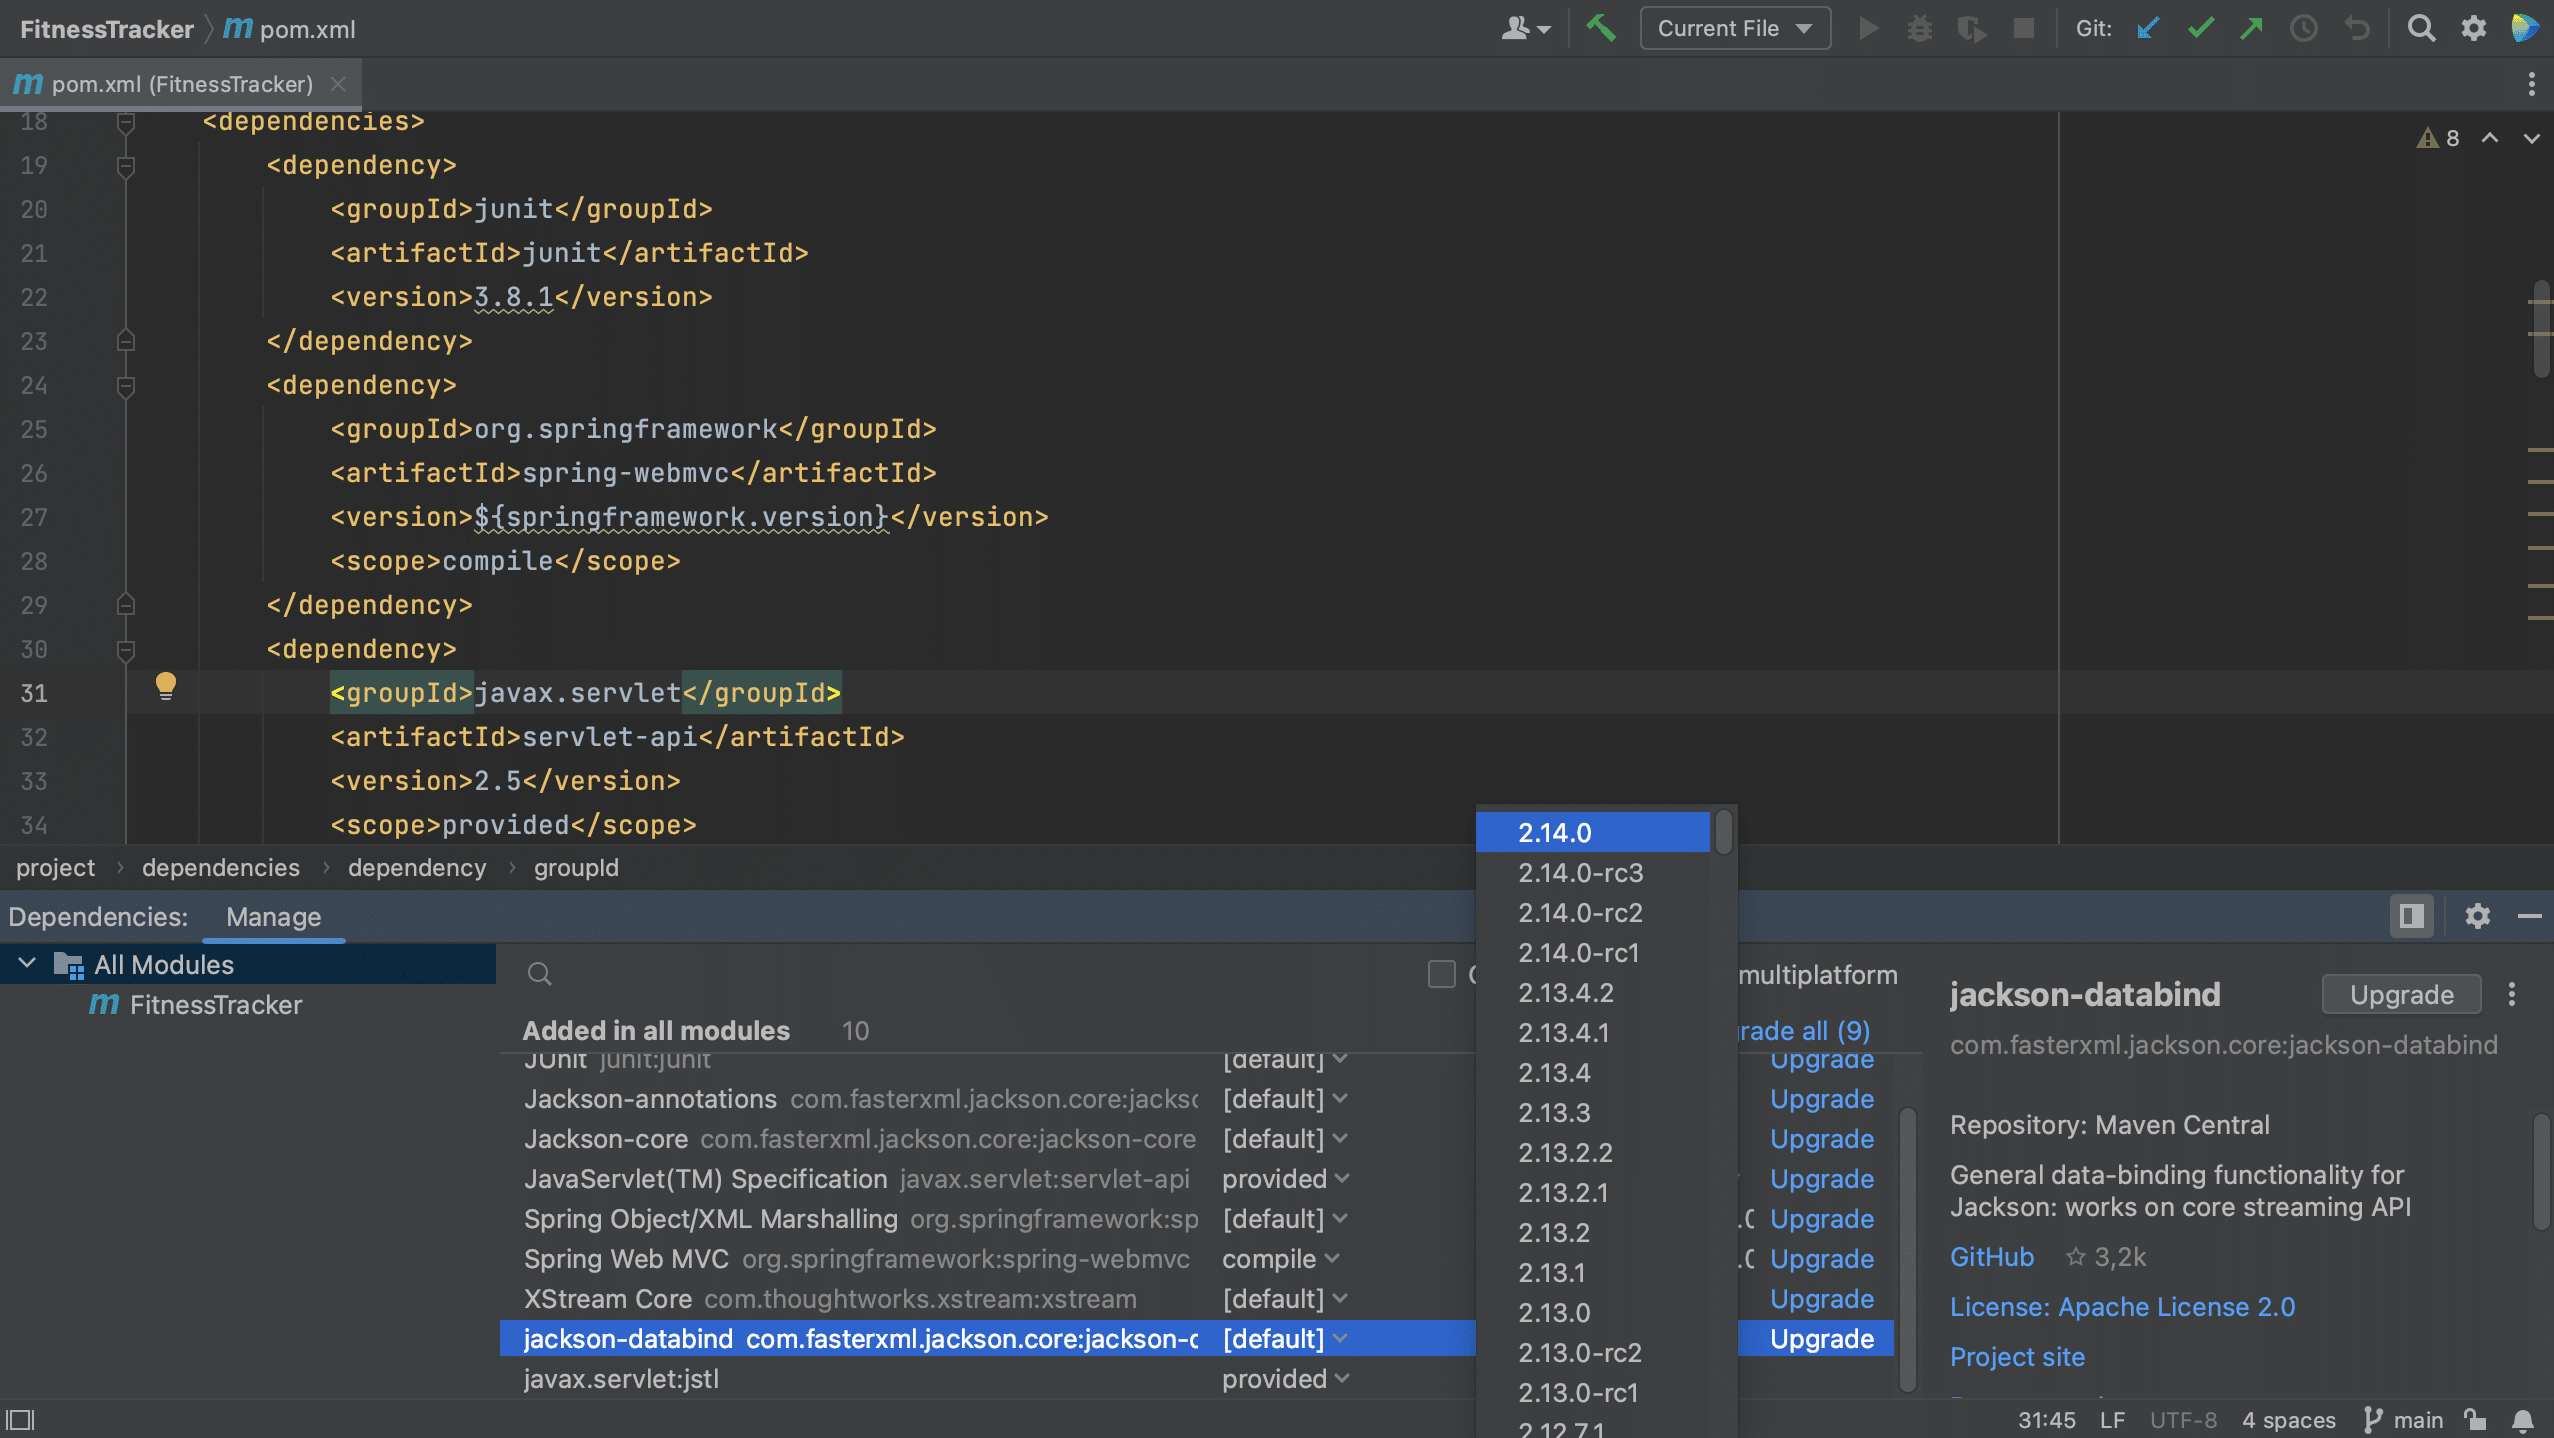
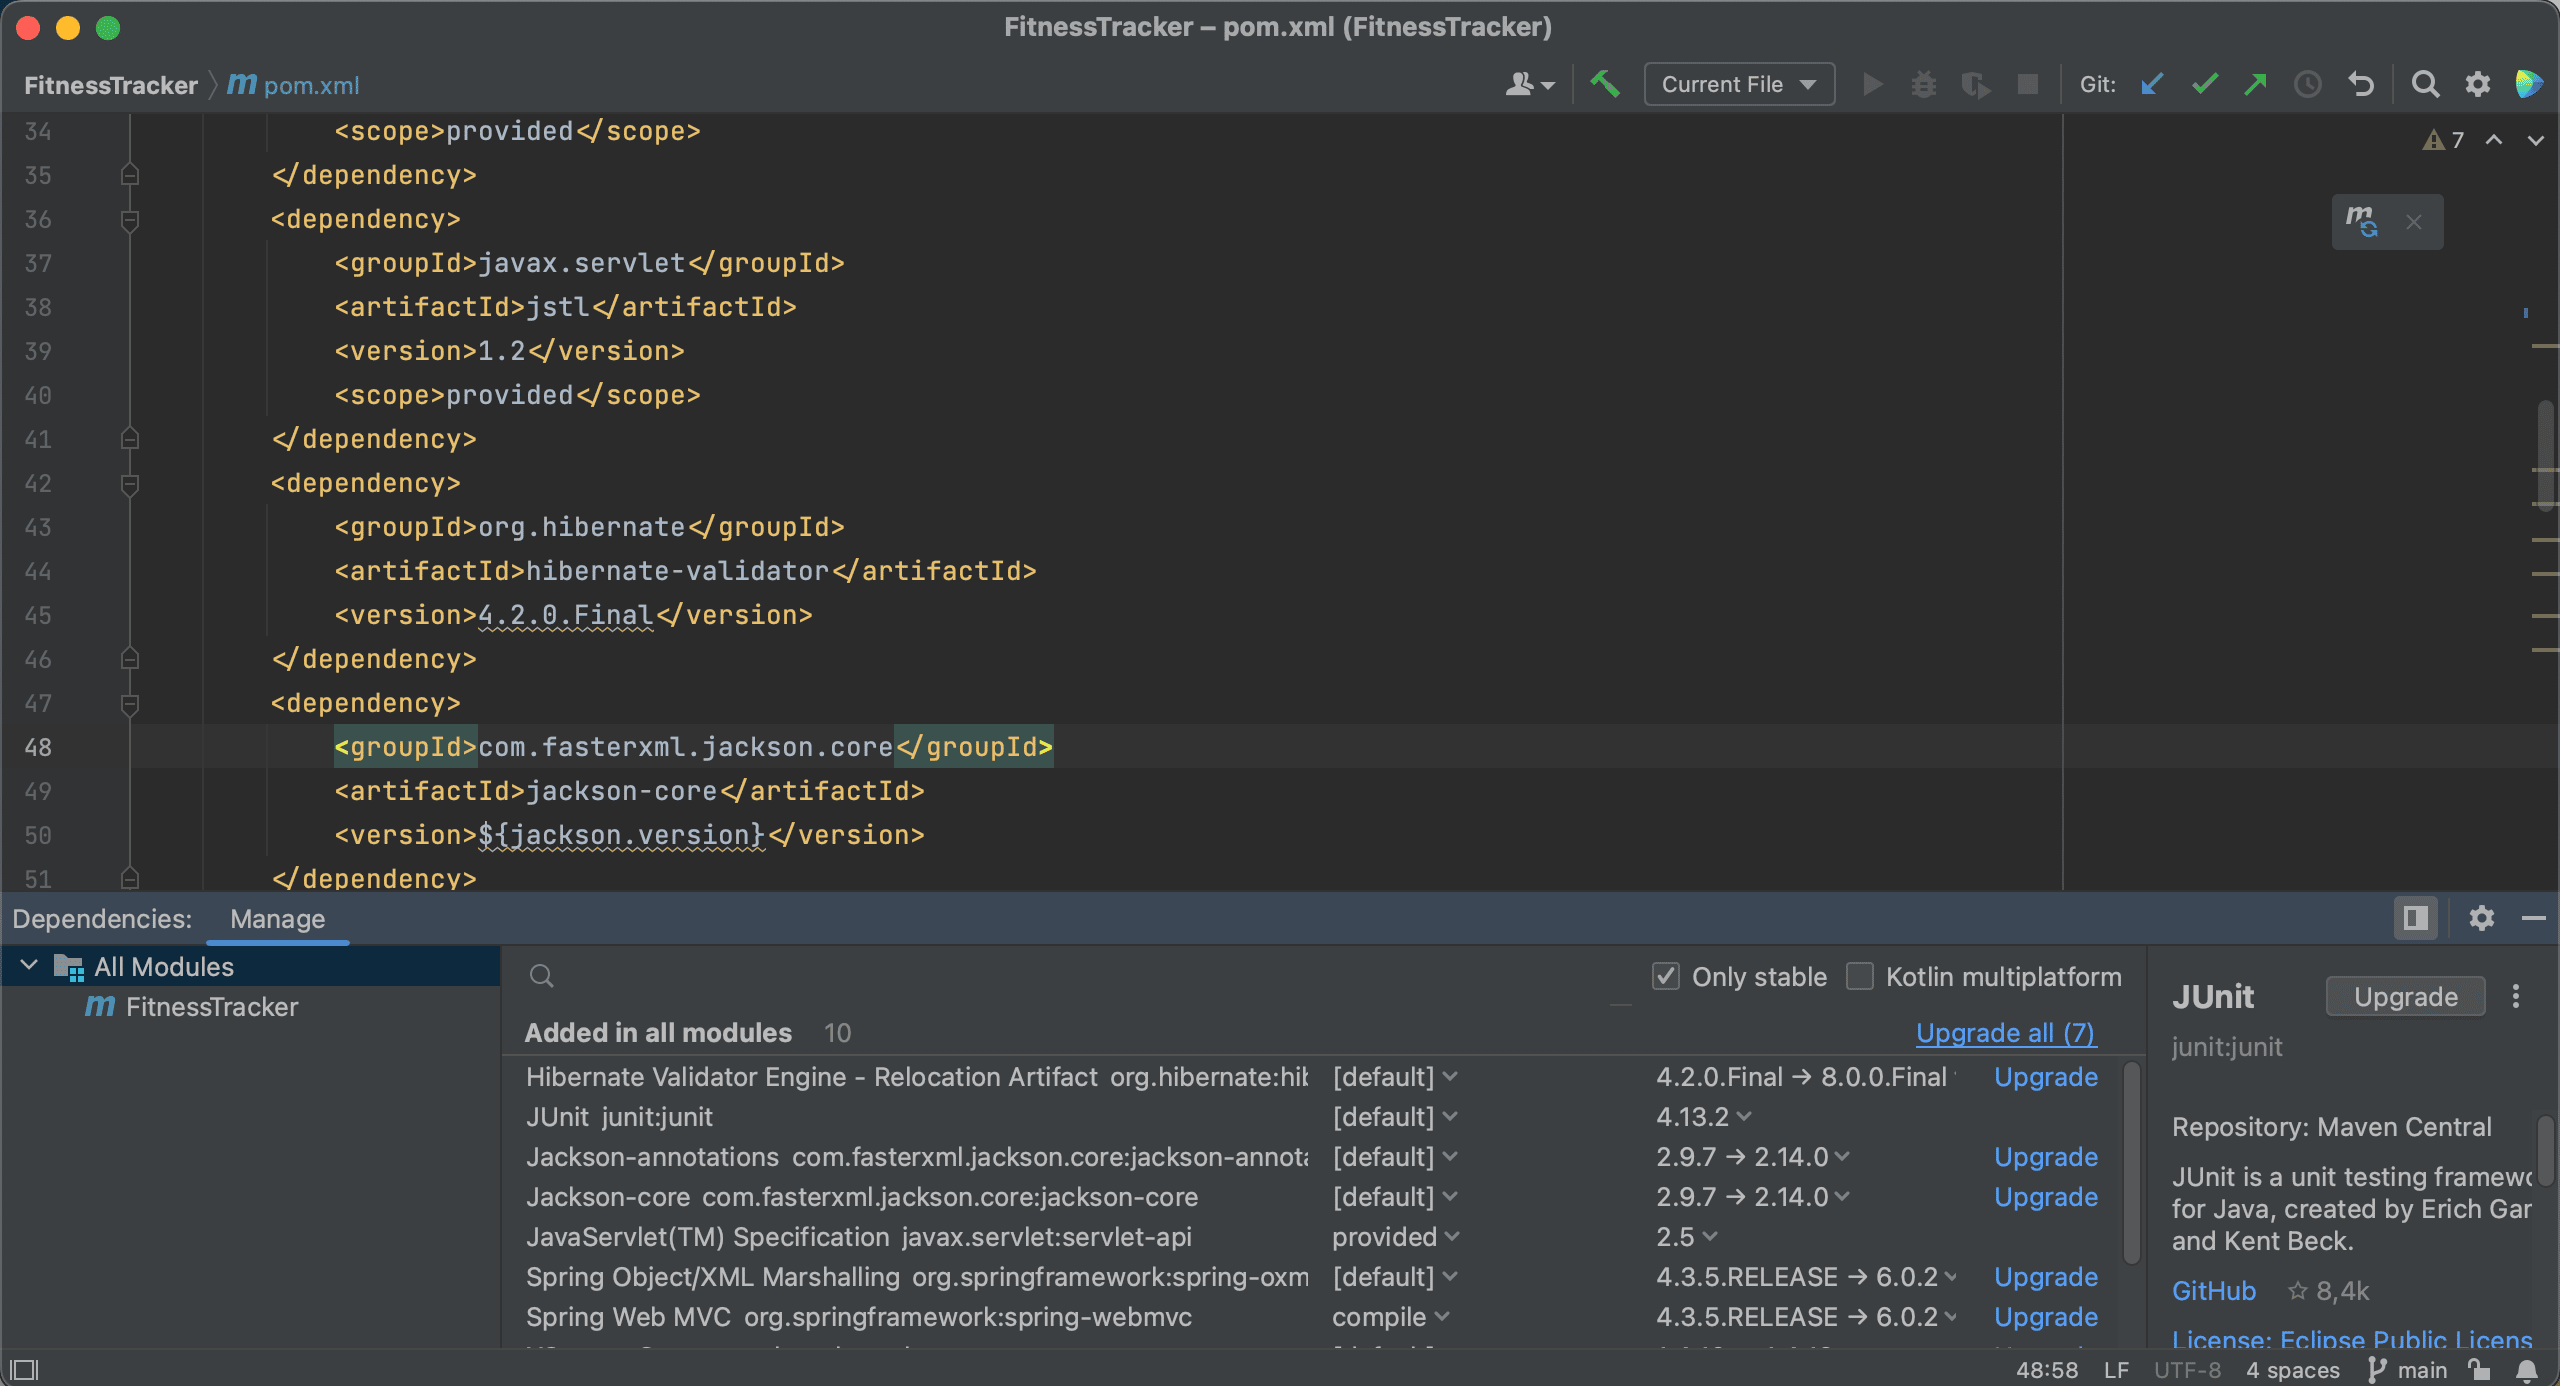
Next, let’s look for jackson-databind. We see that there are several versions available. Since we have selected Only stable, only stable versions are shown in the list.
If we uncheck this option, we see that the list of versions also includes the release candidates.
For production code, we probably want to use stable versions, so let’s select the Only stable checkbox again. With this option enabled, IntelliJ IDEA will exclude any dependencies that have no stable versions, and hide them from the list. Now we can select the latest stable version and add this to our project. Let’s also Load Maven Changes again.
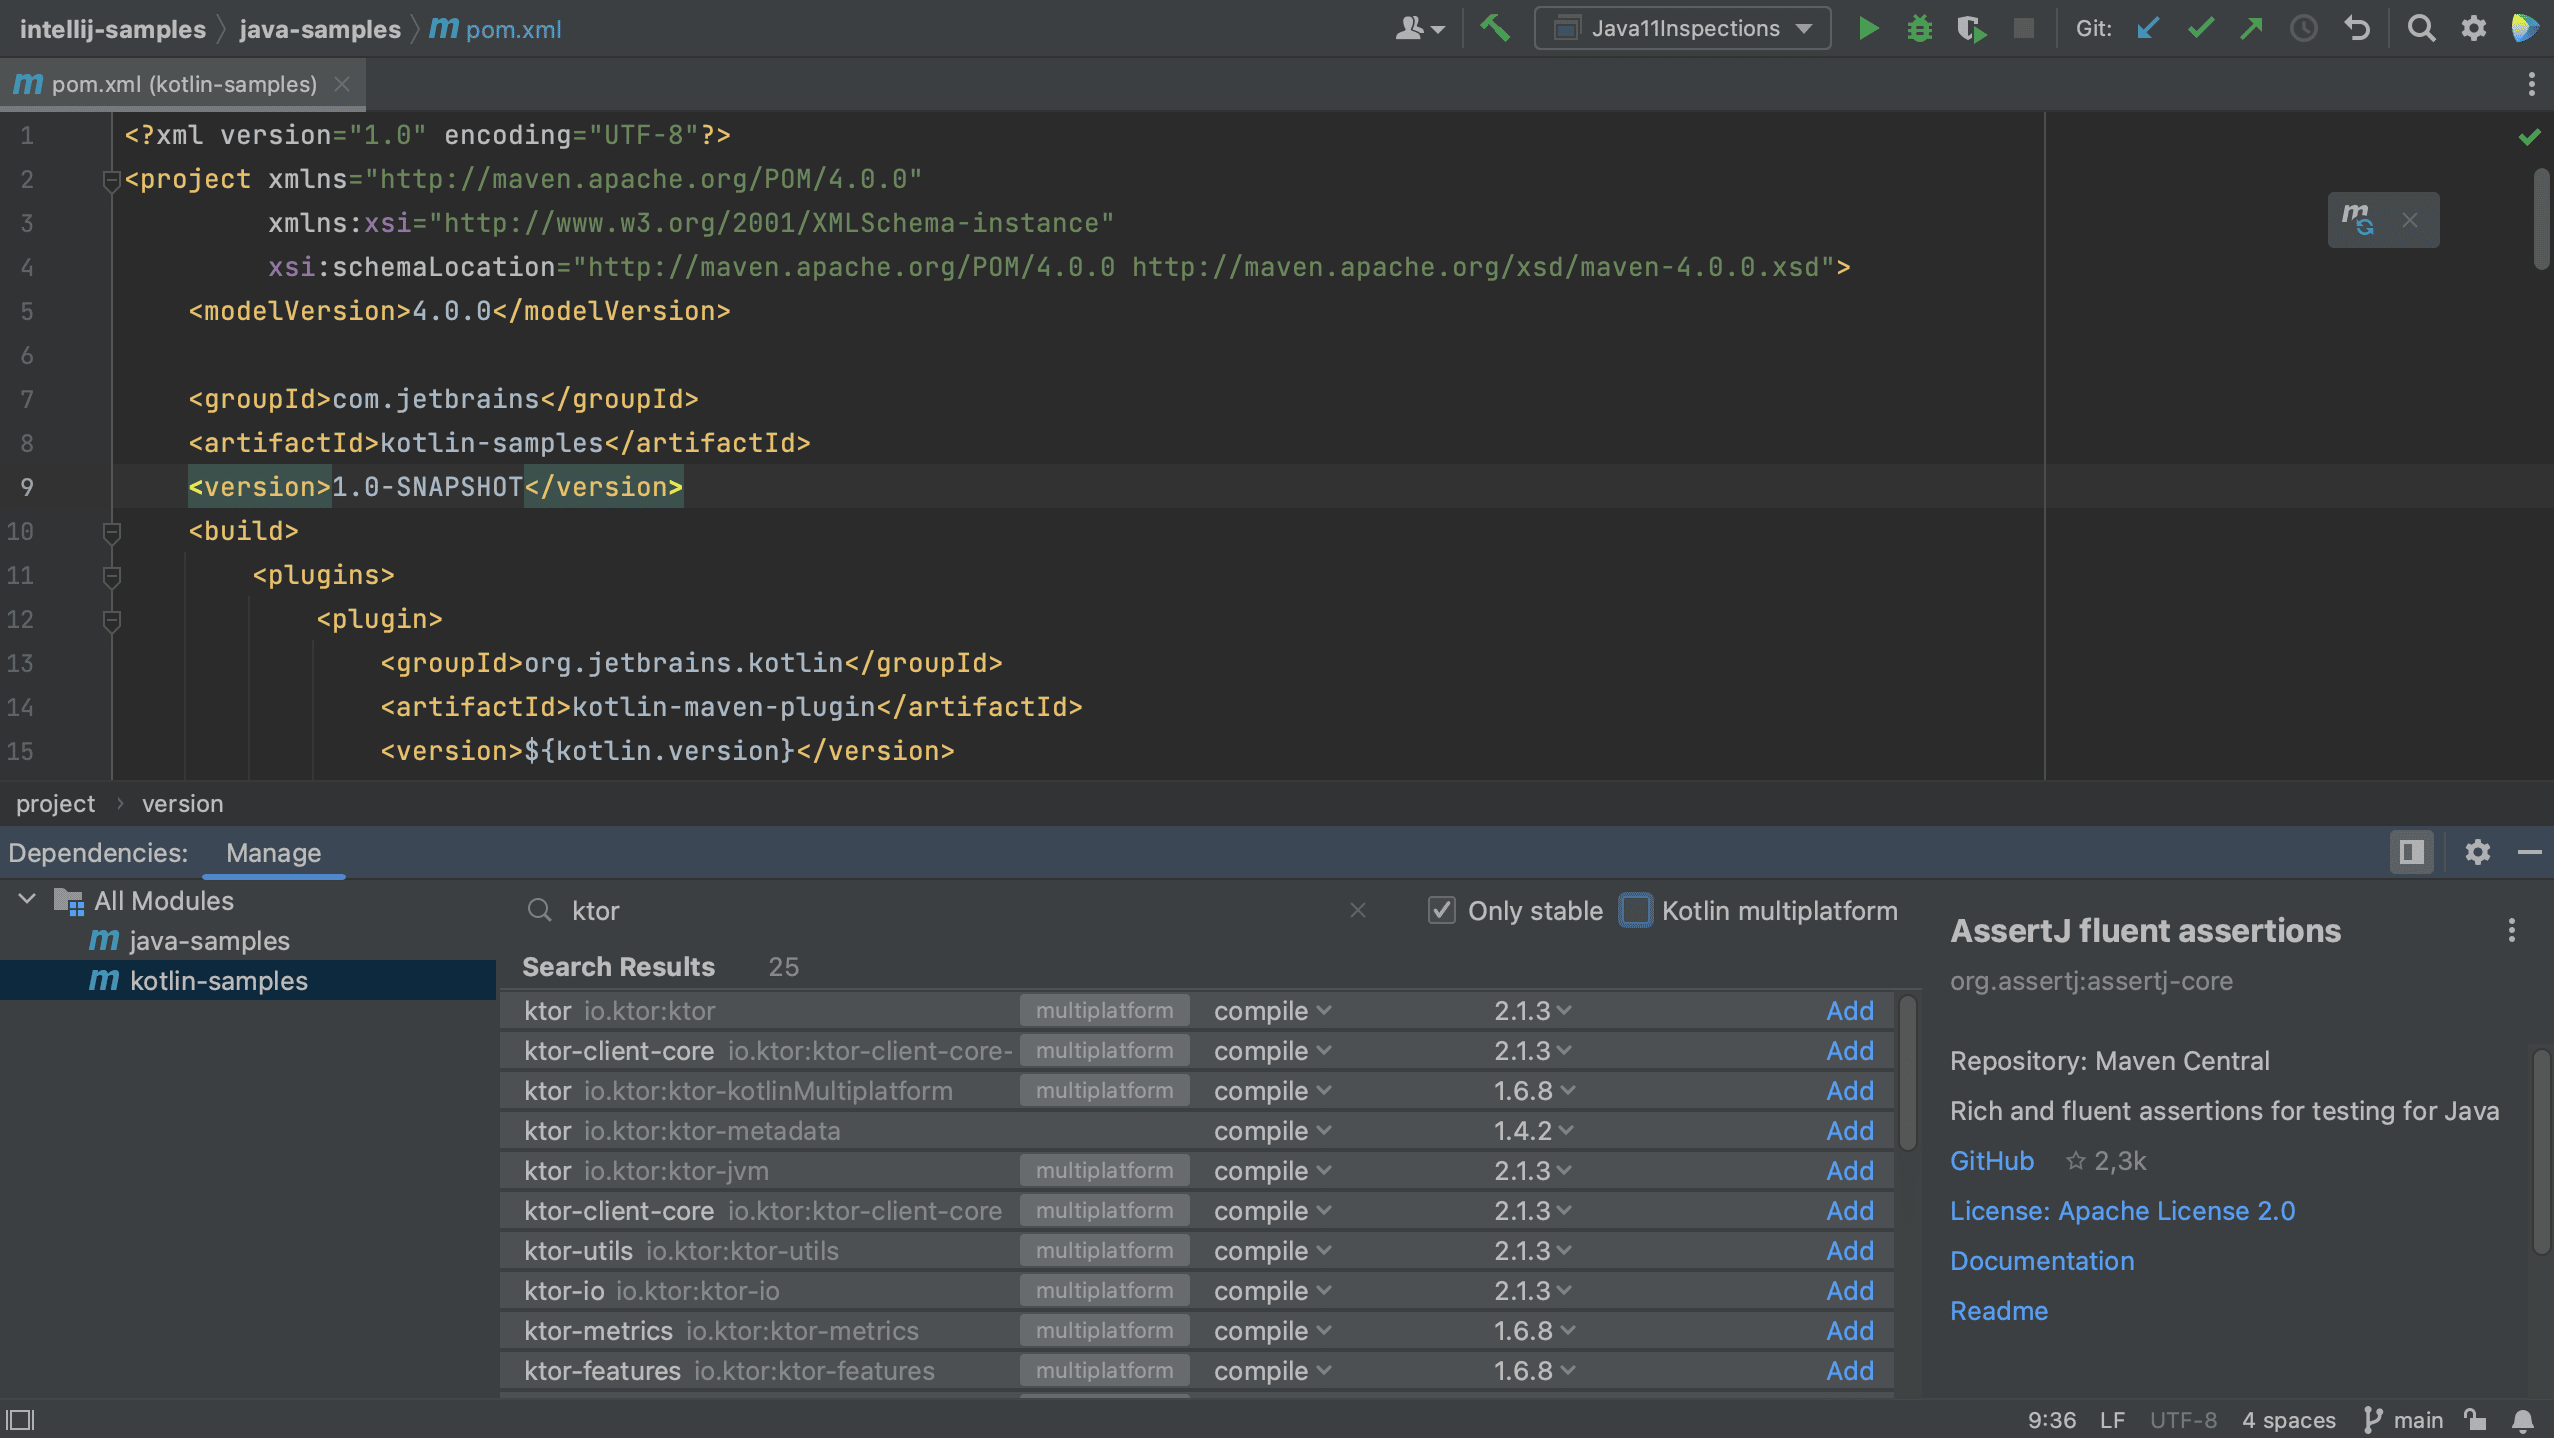
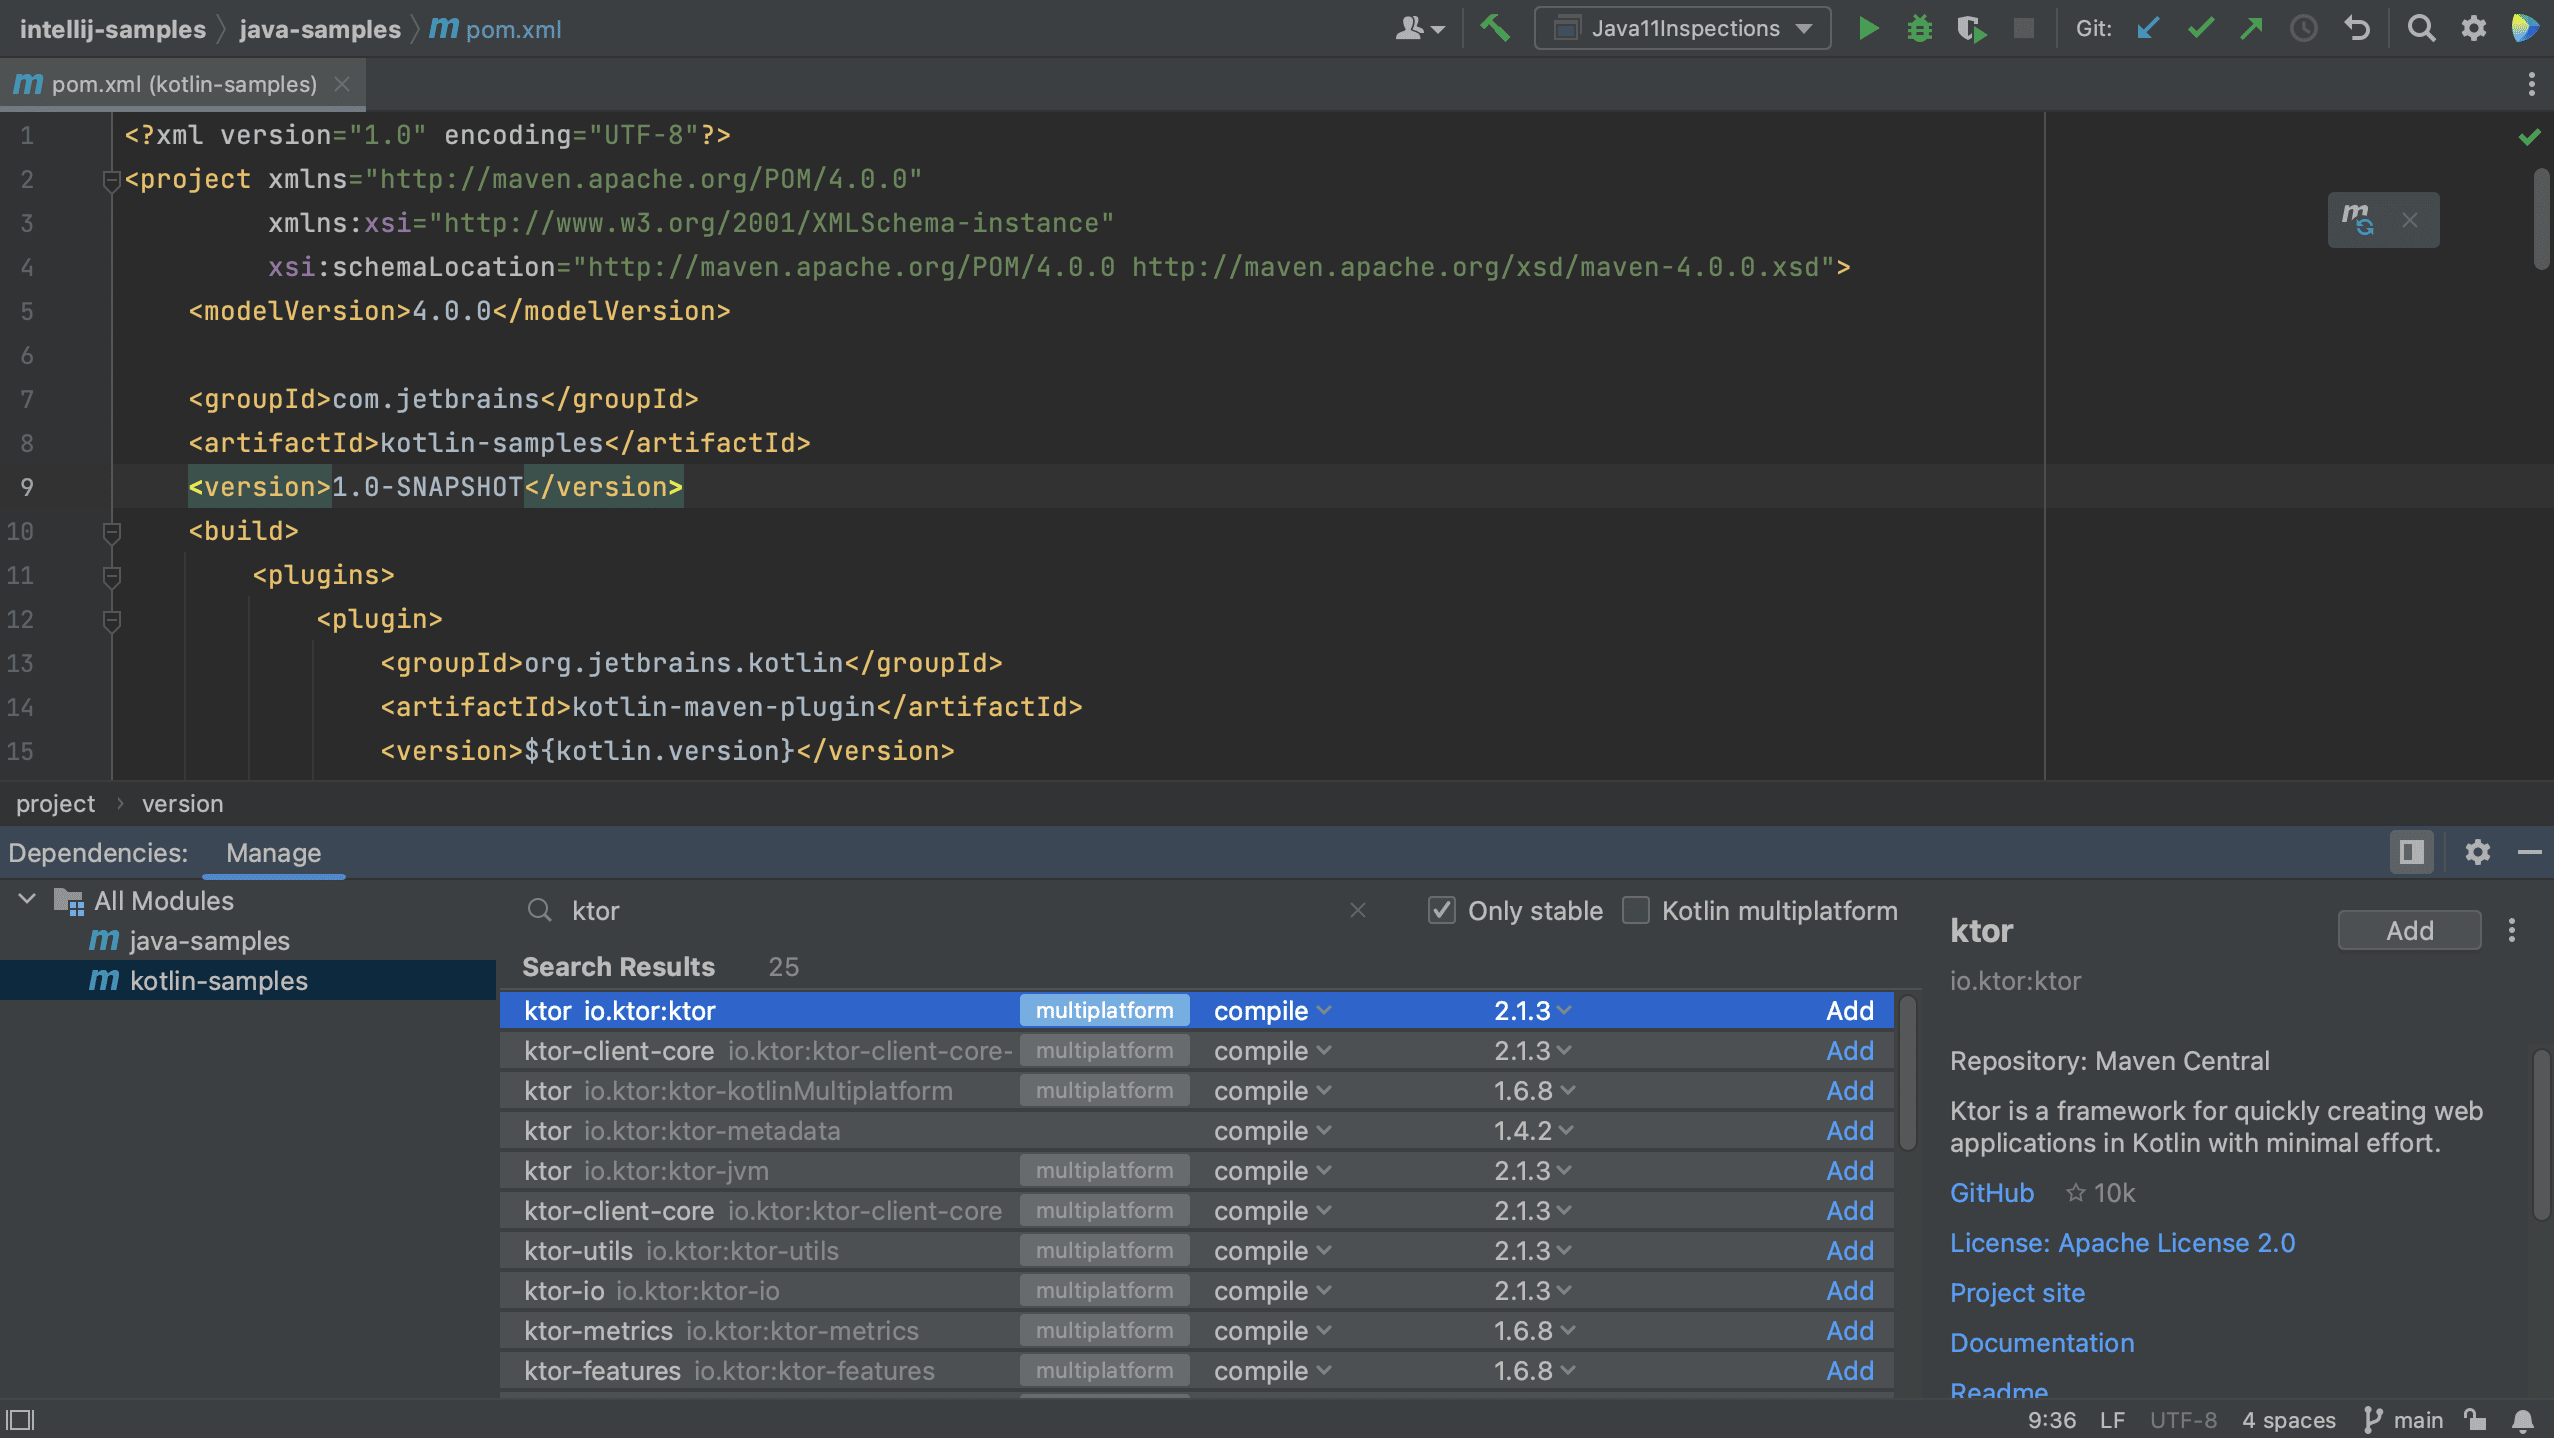
Finally, let’s also add a new dependency to the Kotlin module. Let’s switch to the Kotlin module and open the pom.xml for this module. Open the Dependencies Tool Window and search for Ktor.
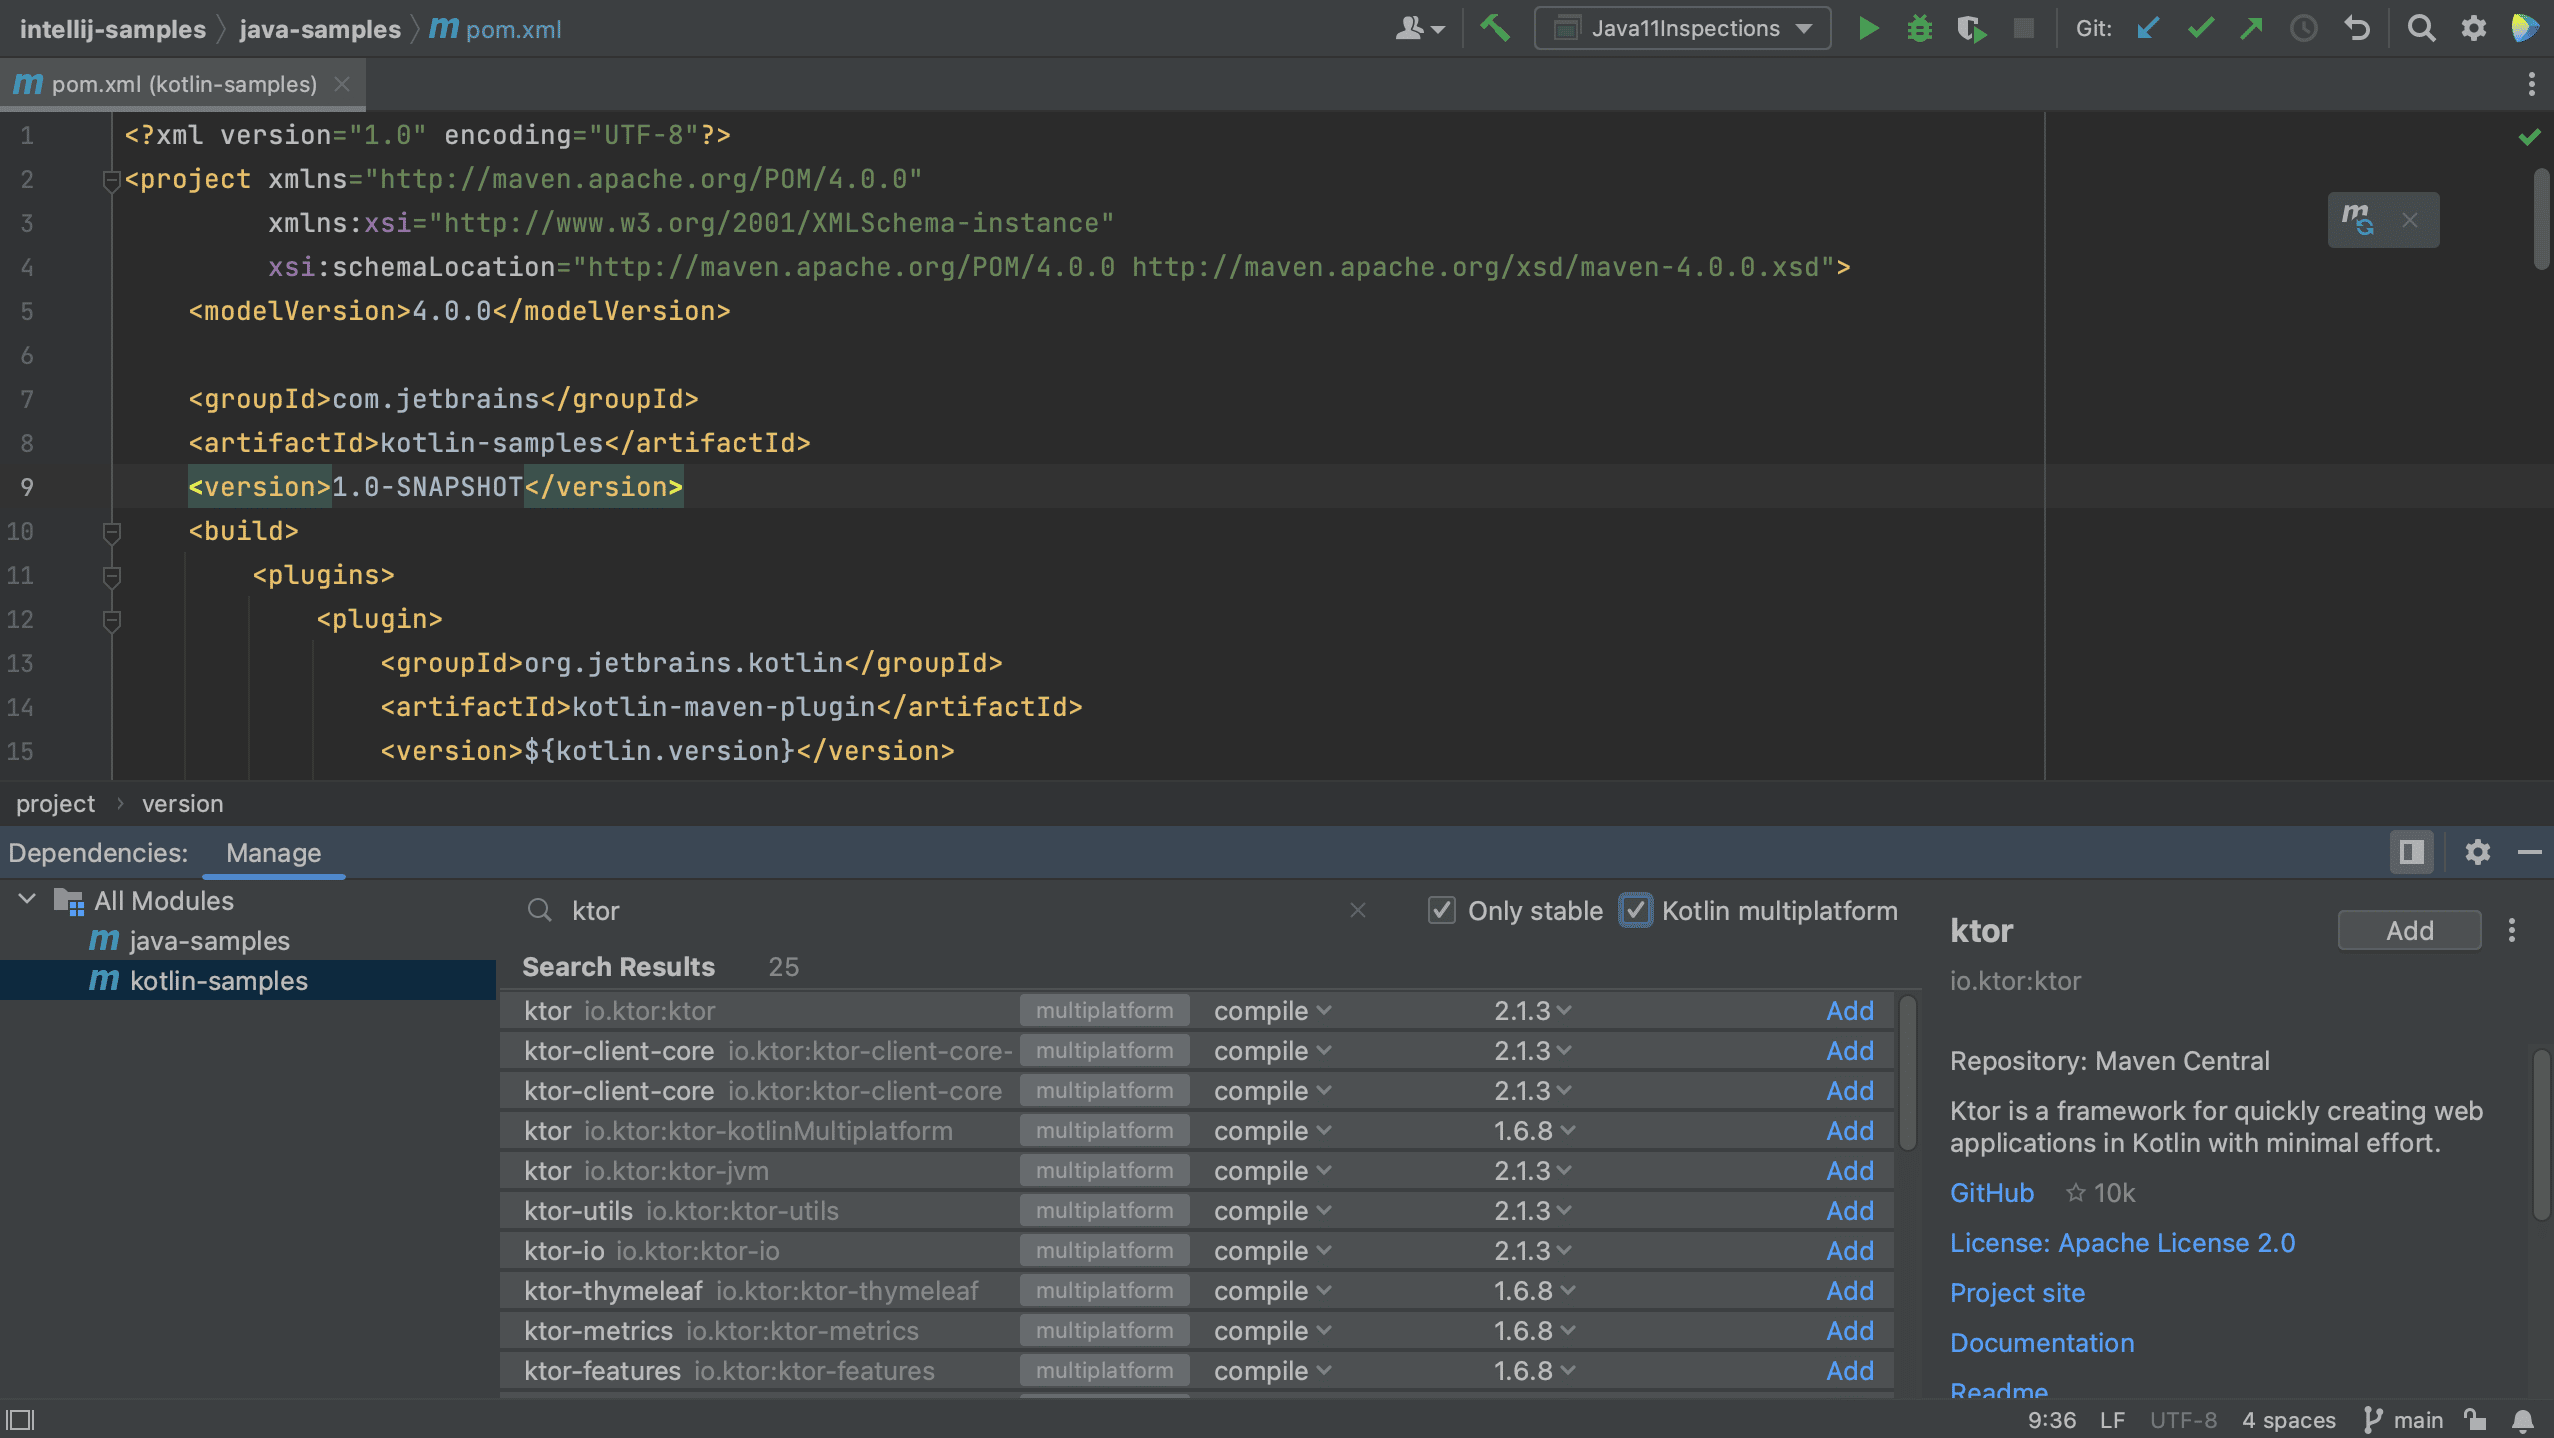
Notice that some dependencies are marked as Multiplatform.
If we want to see only Kotlin multiplatform dependencies, we can select the Kotlin multiplatform checkbox, as shown below.
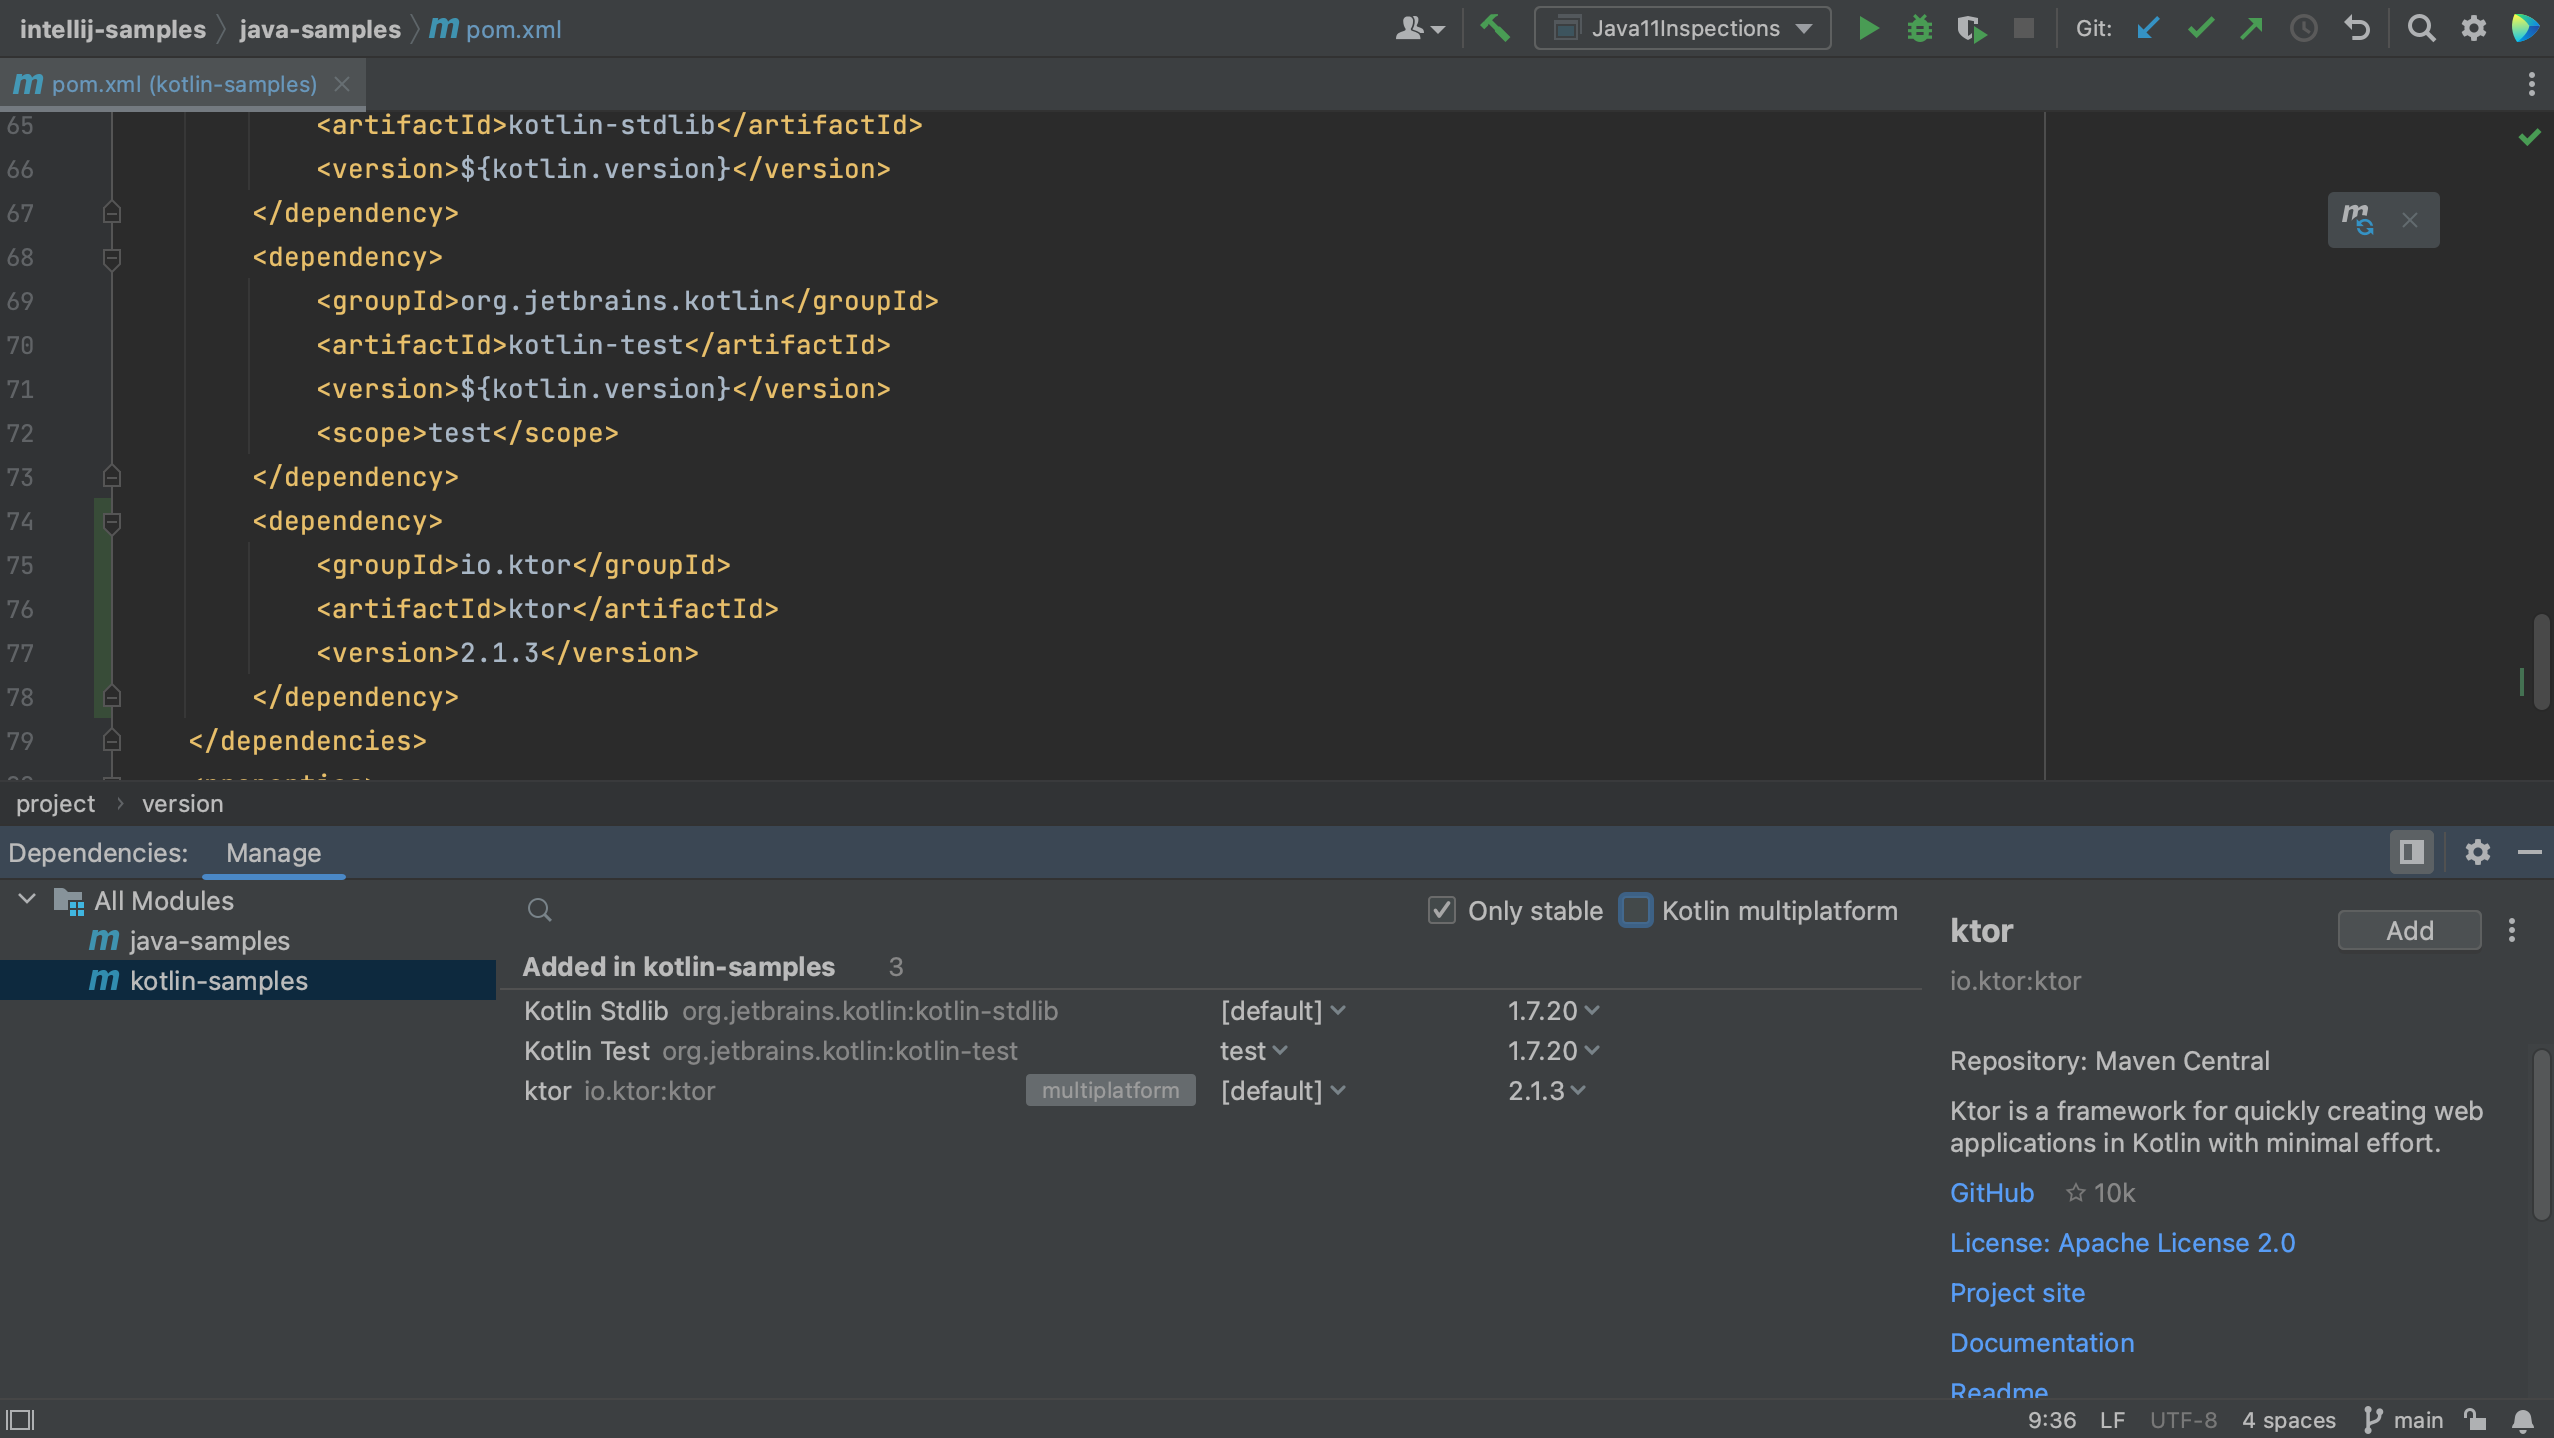
When we click Add to the right of the Ktor dependency, we see that Ktor is added to the list of dependencies and to the pom.xml for the Kotlin module.
Upgrade dependencies
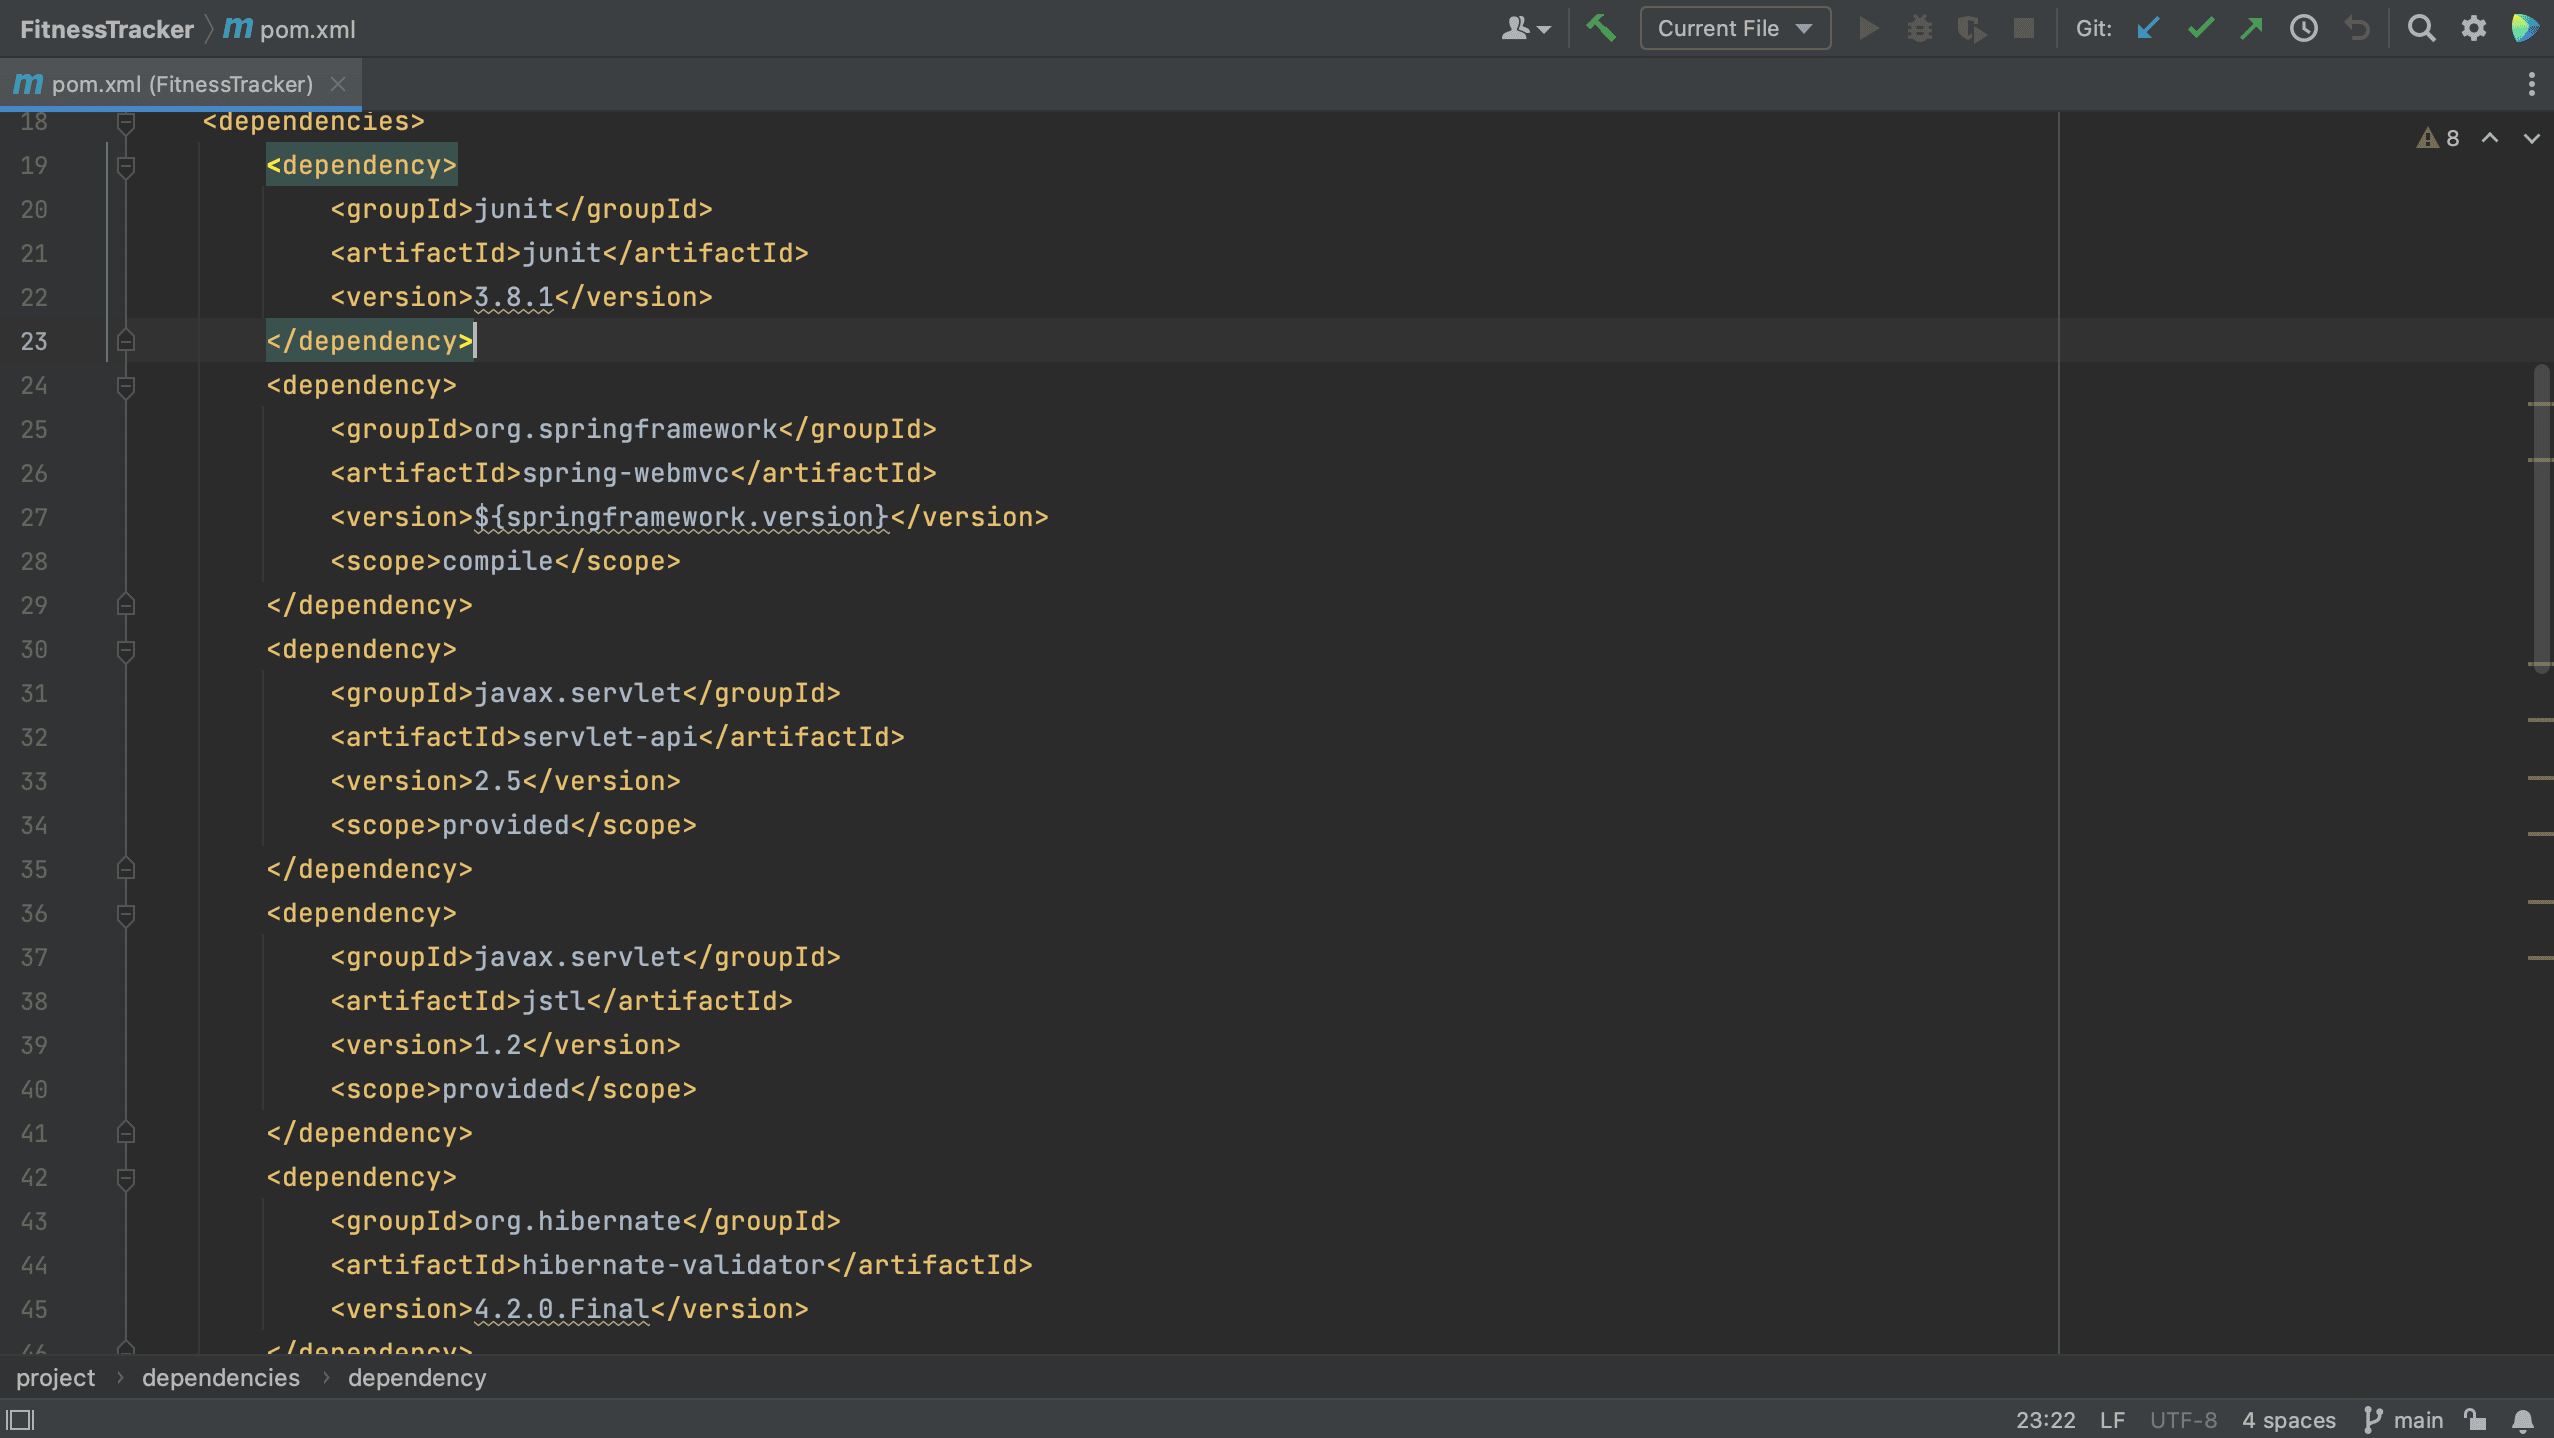
We will also need to keep our dependencies up to date. To show you how IntelliJ IDEA can help, we are using this extremely outdated project as an example. In the pom.xml below, we see that several dependencies are marked with squiggly lines underneath them.
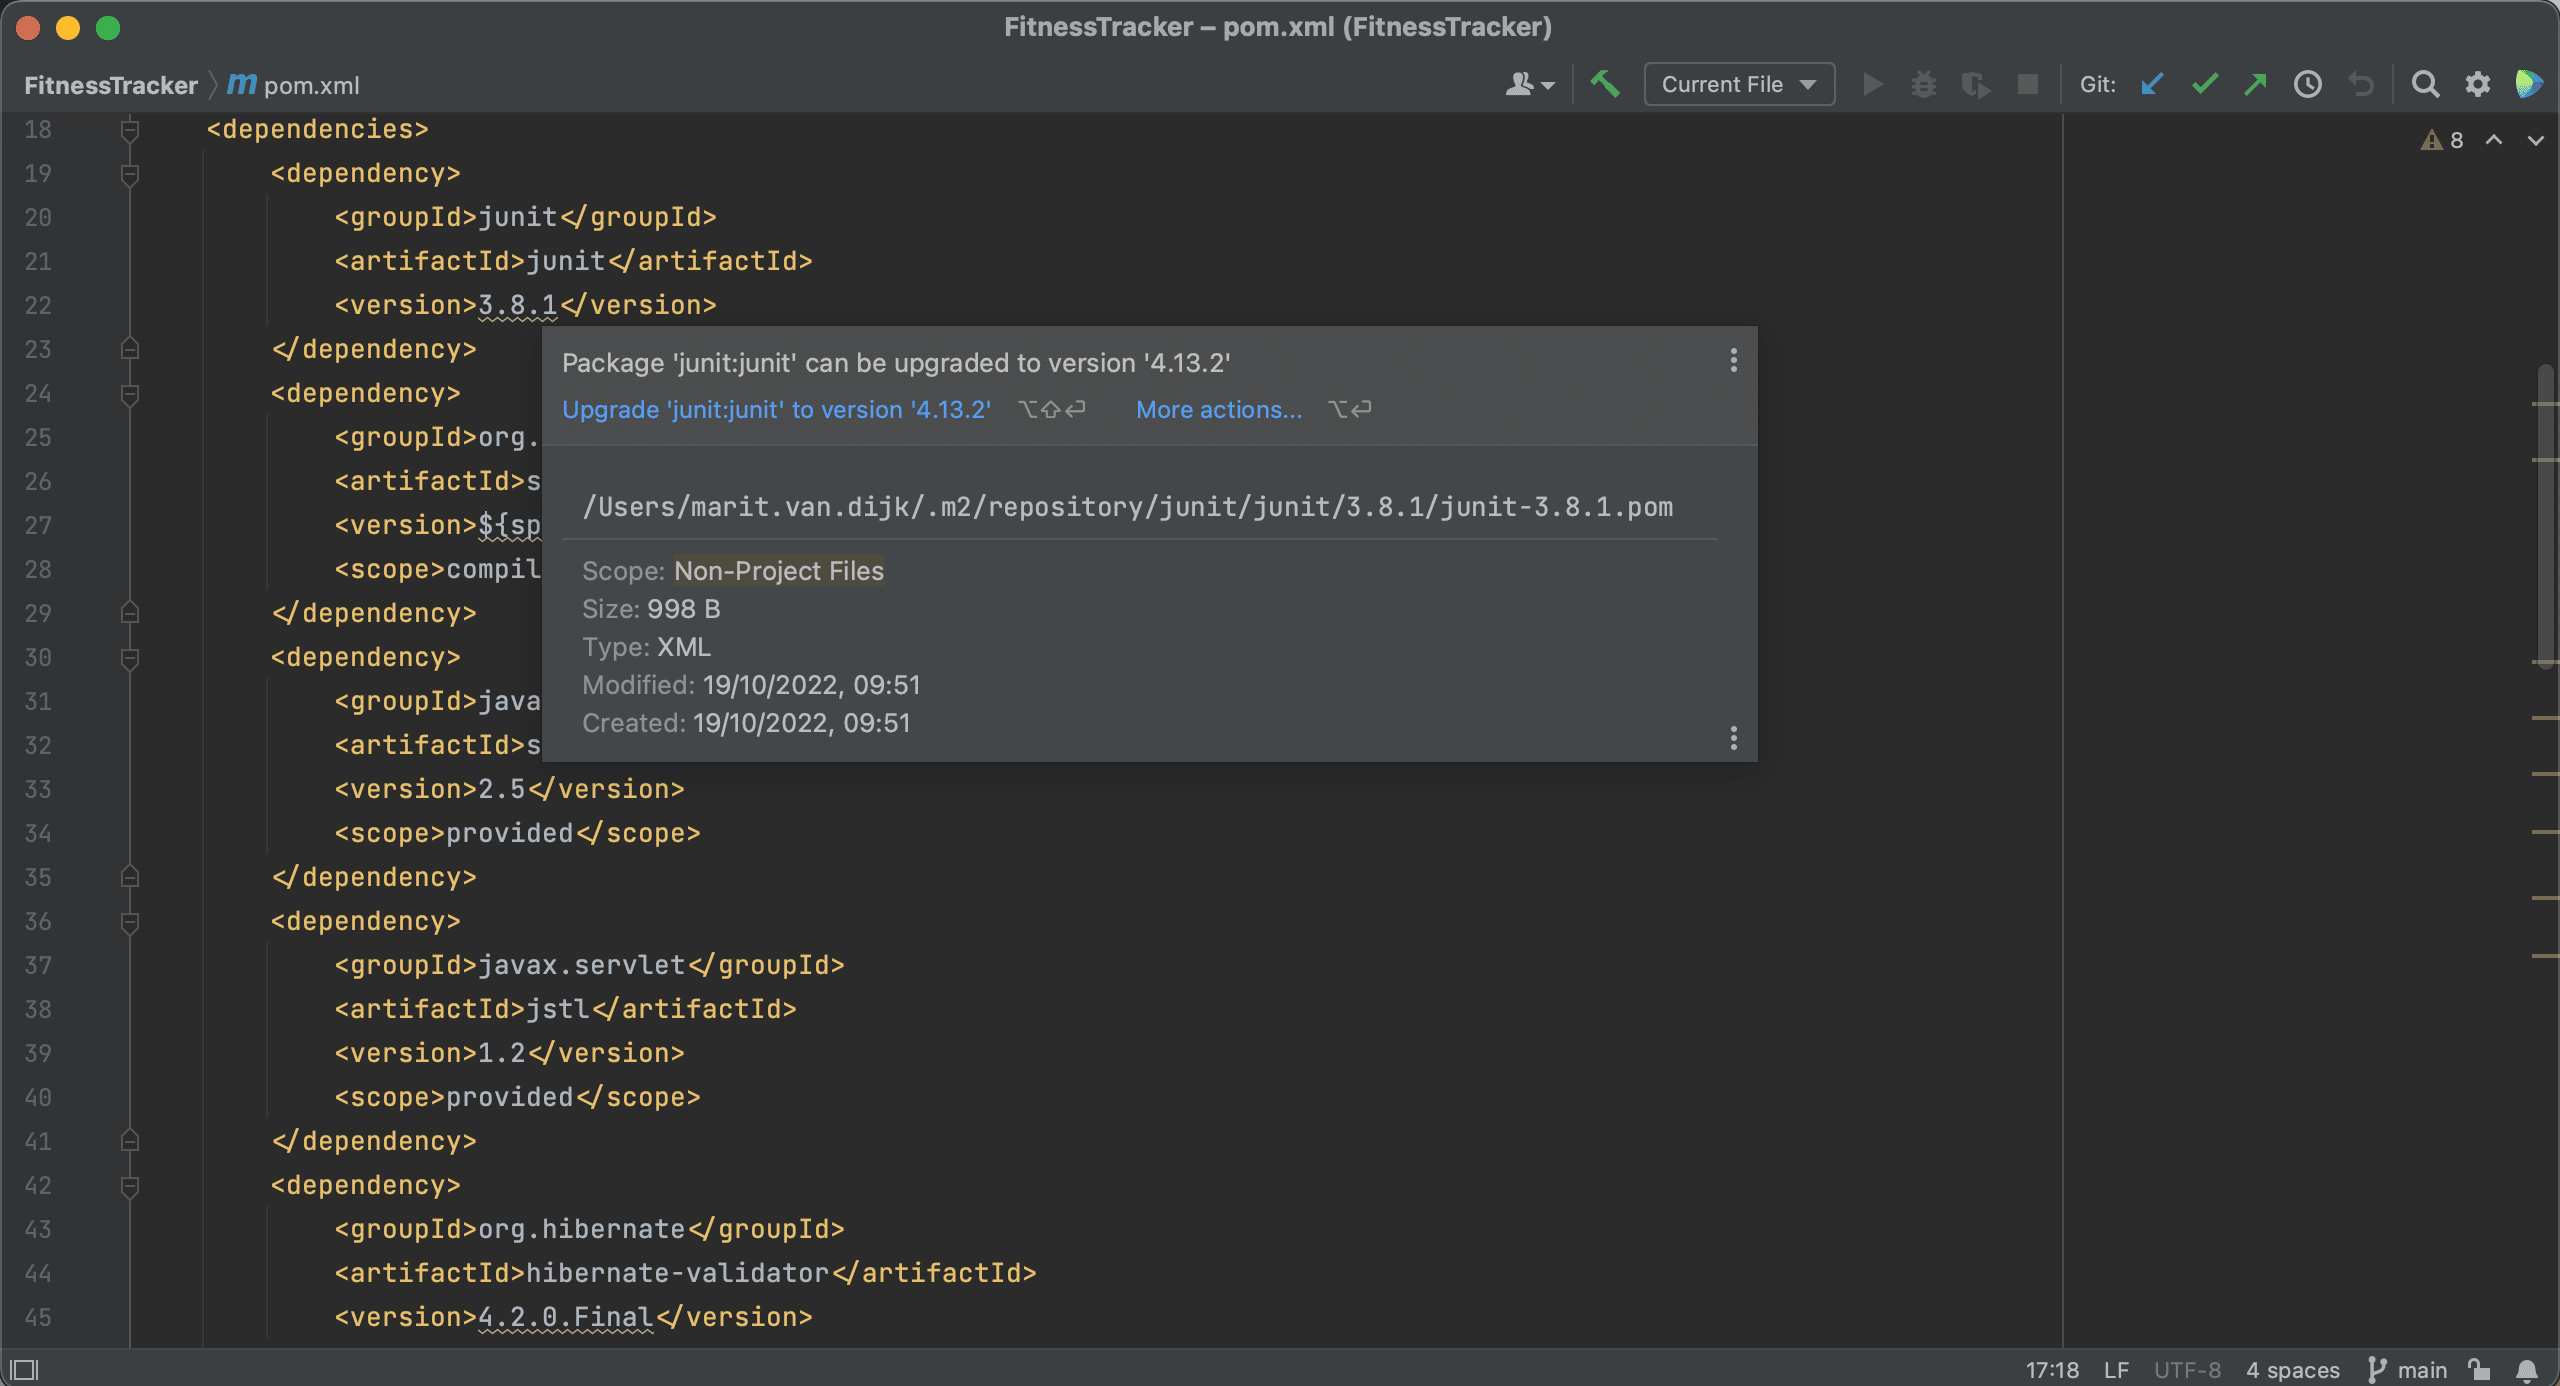
IntelliJ IDEA will show the suggestion to upgrade when we hover over the dependency, and we can click the suggestion to upgrade the dependencies.
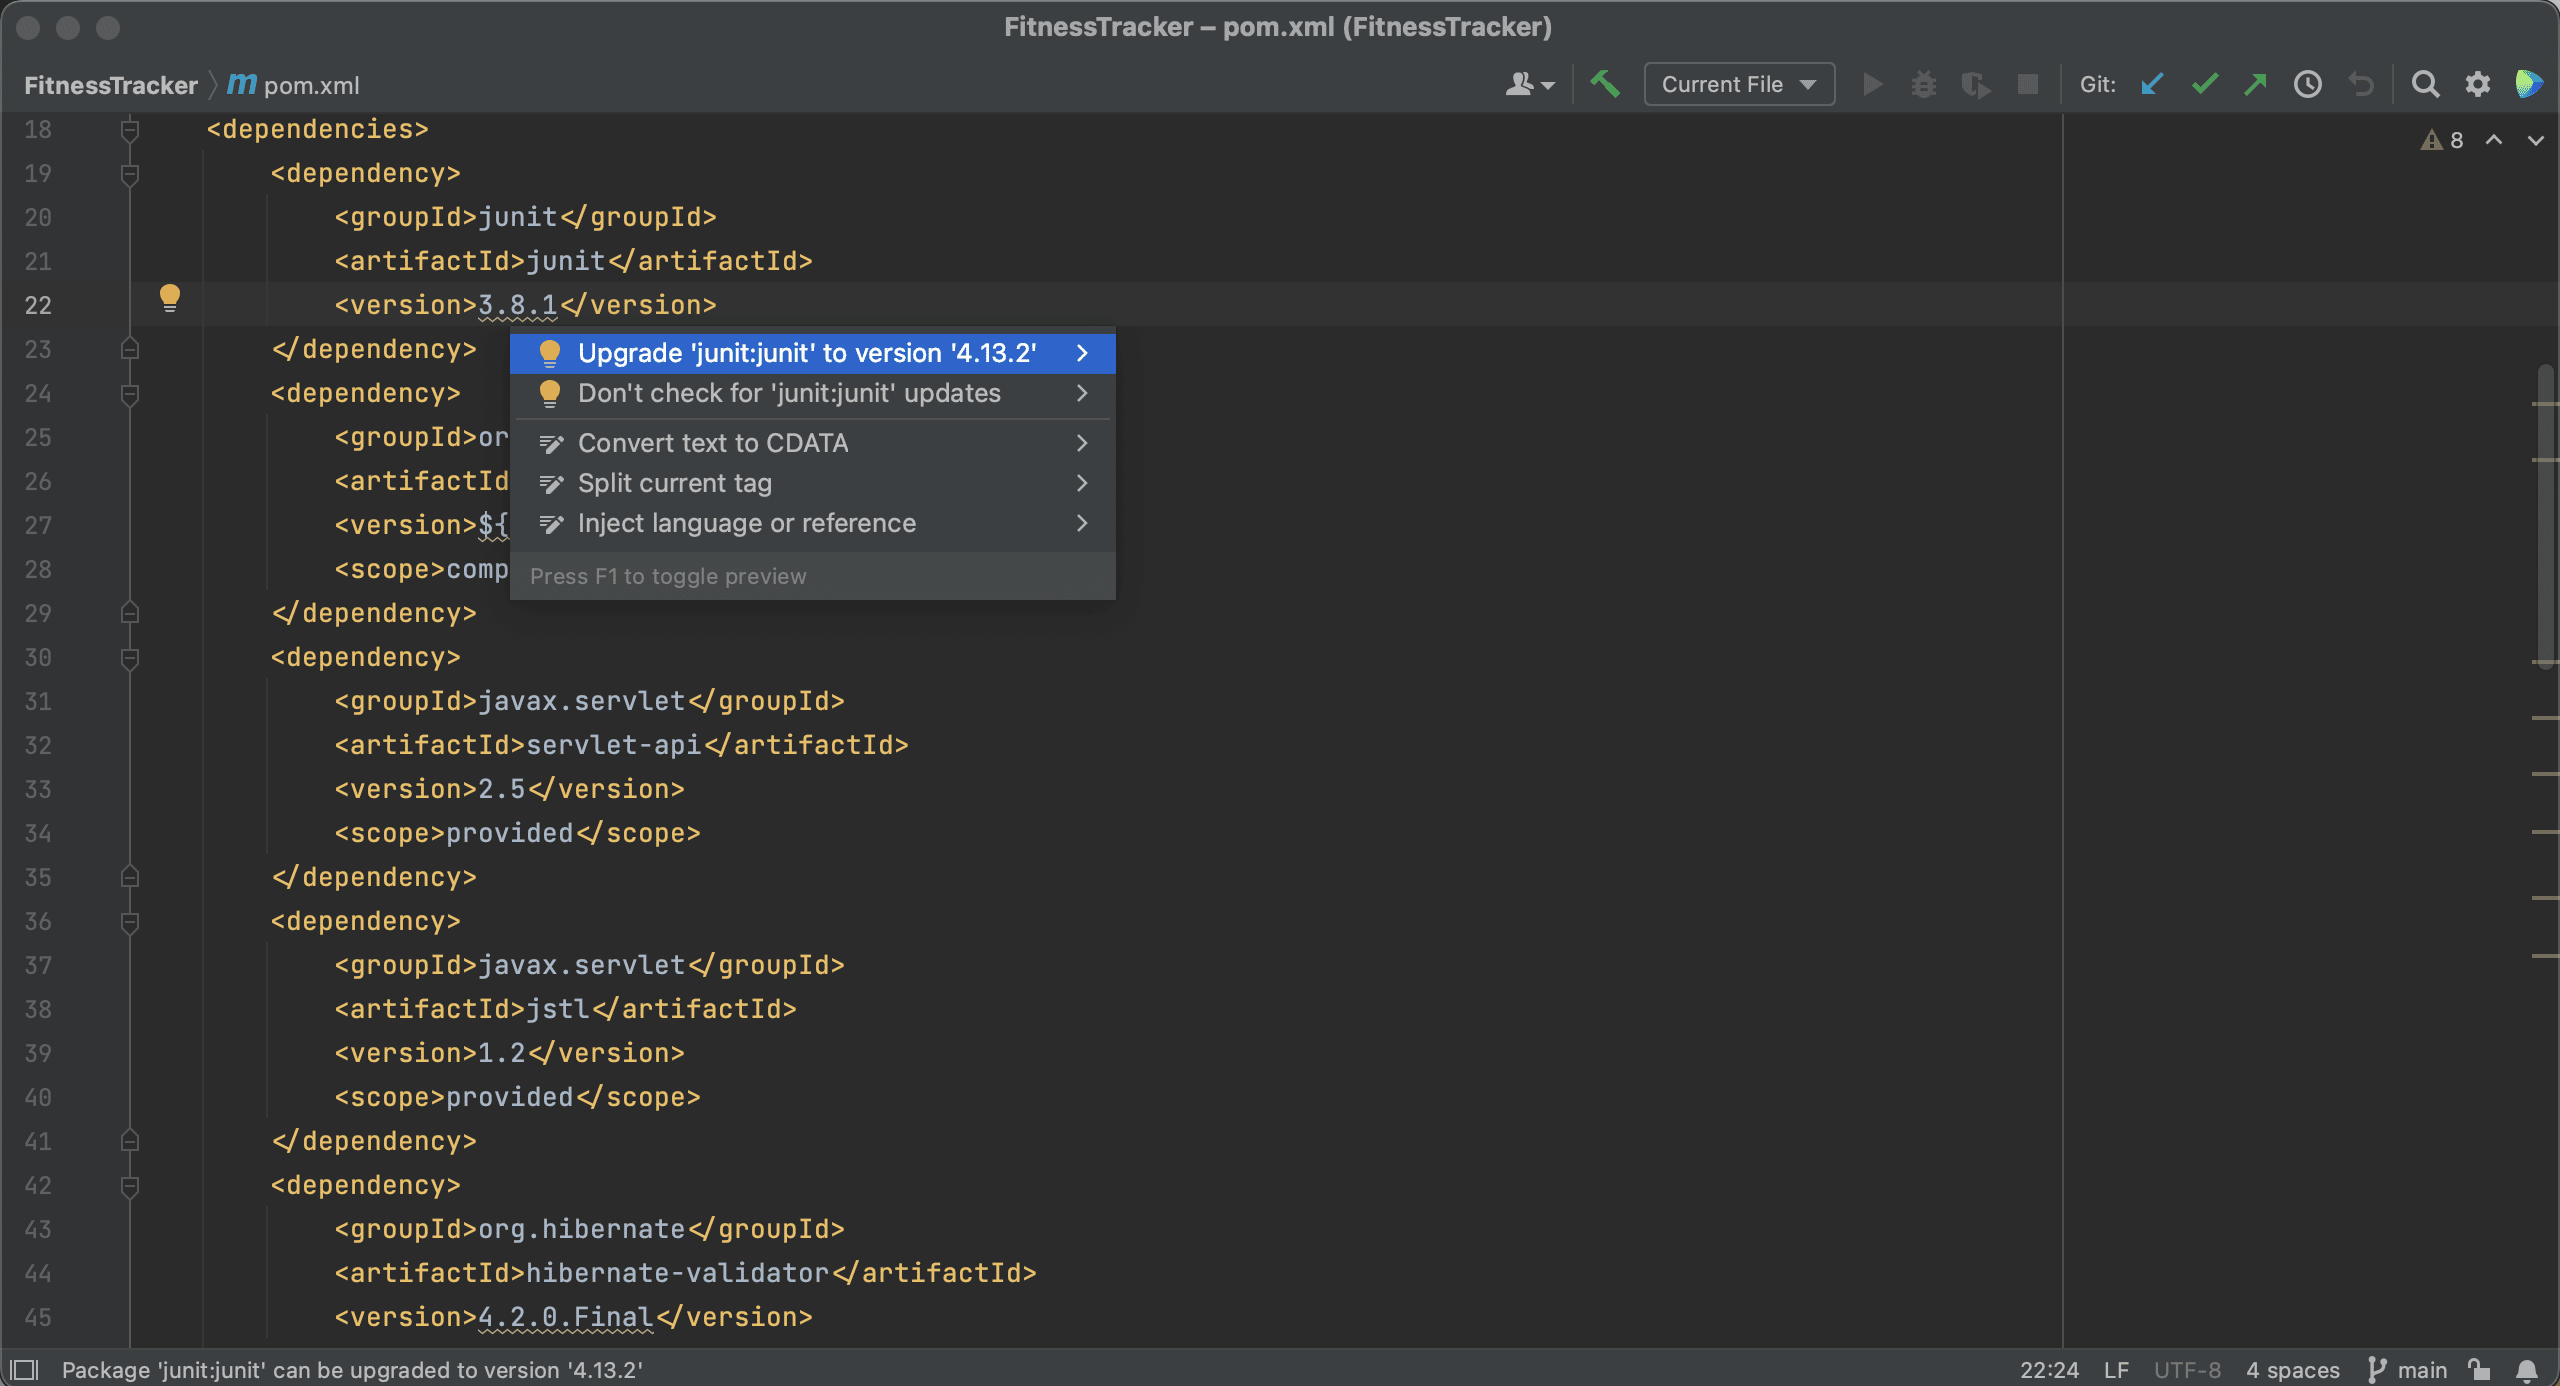
Alternatively, we can use Context Actions ⌥⏎ (on macOS) or Alt+Enter (on Windows & Linux) to upgrade these dependencies.
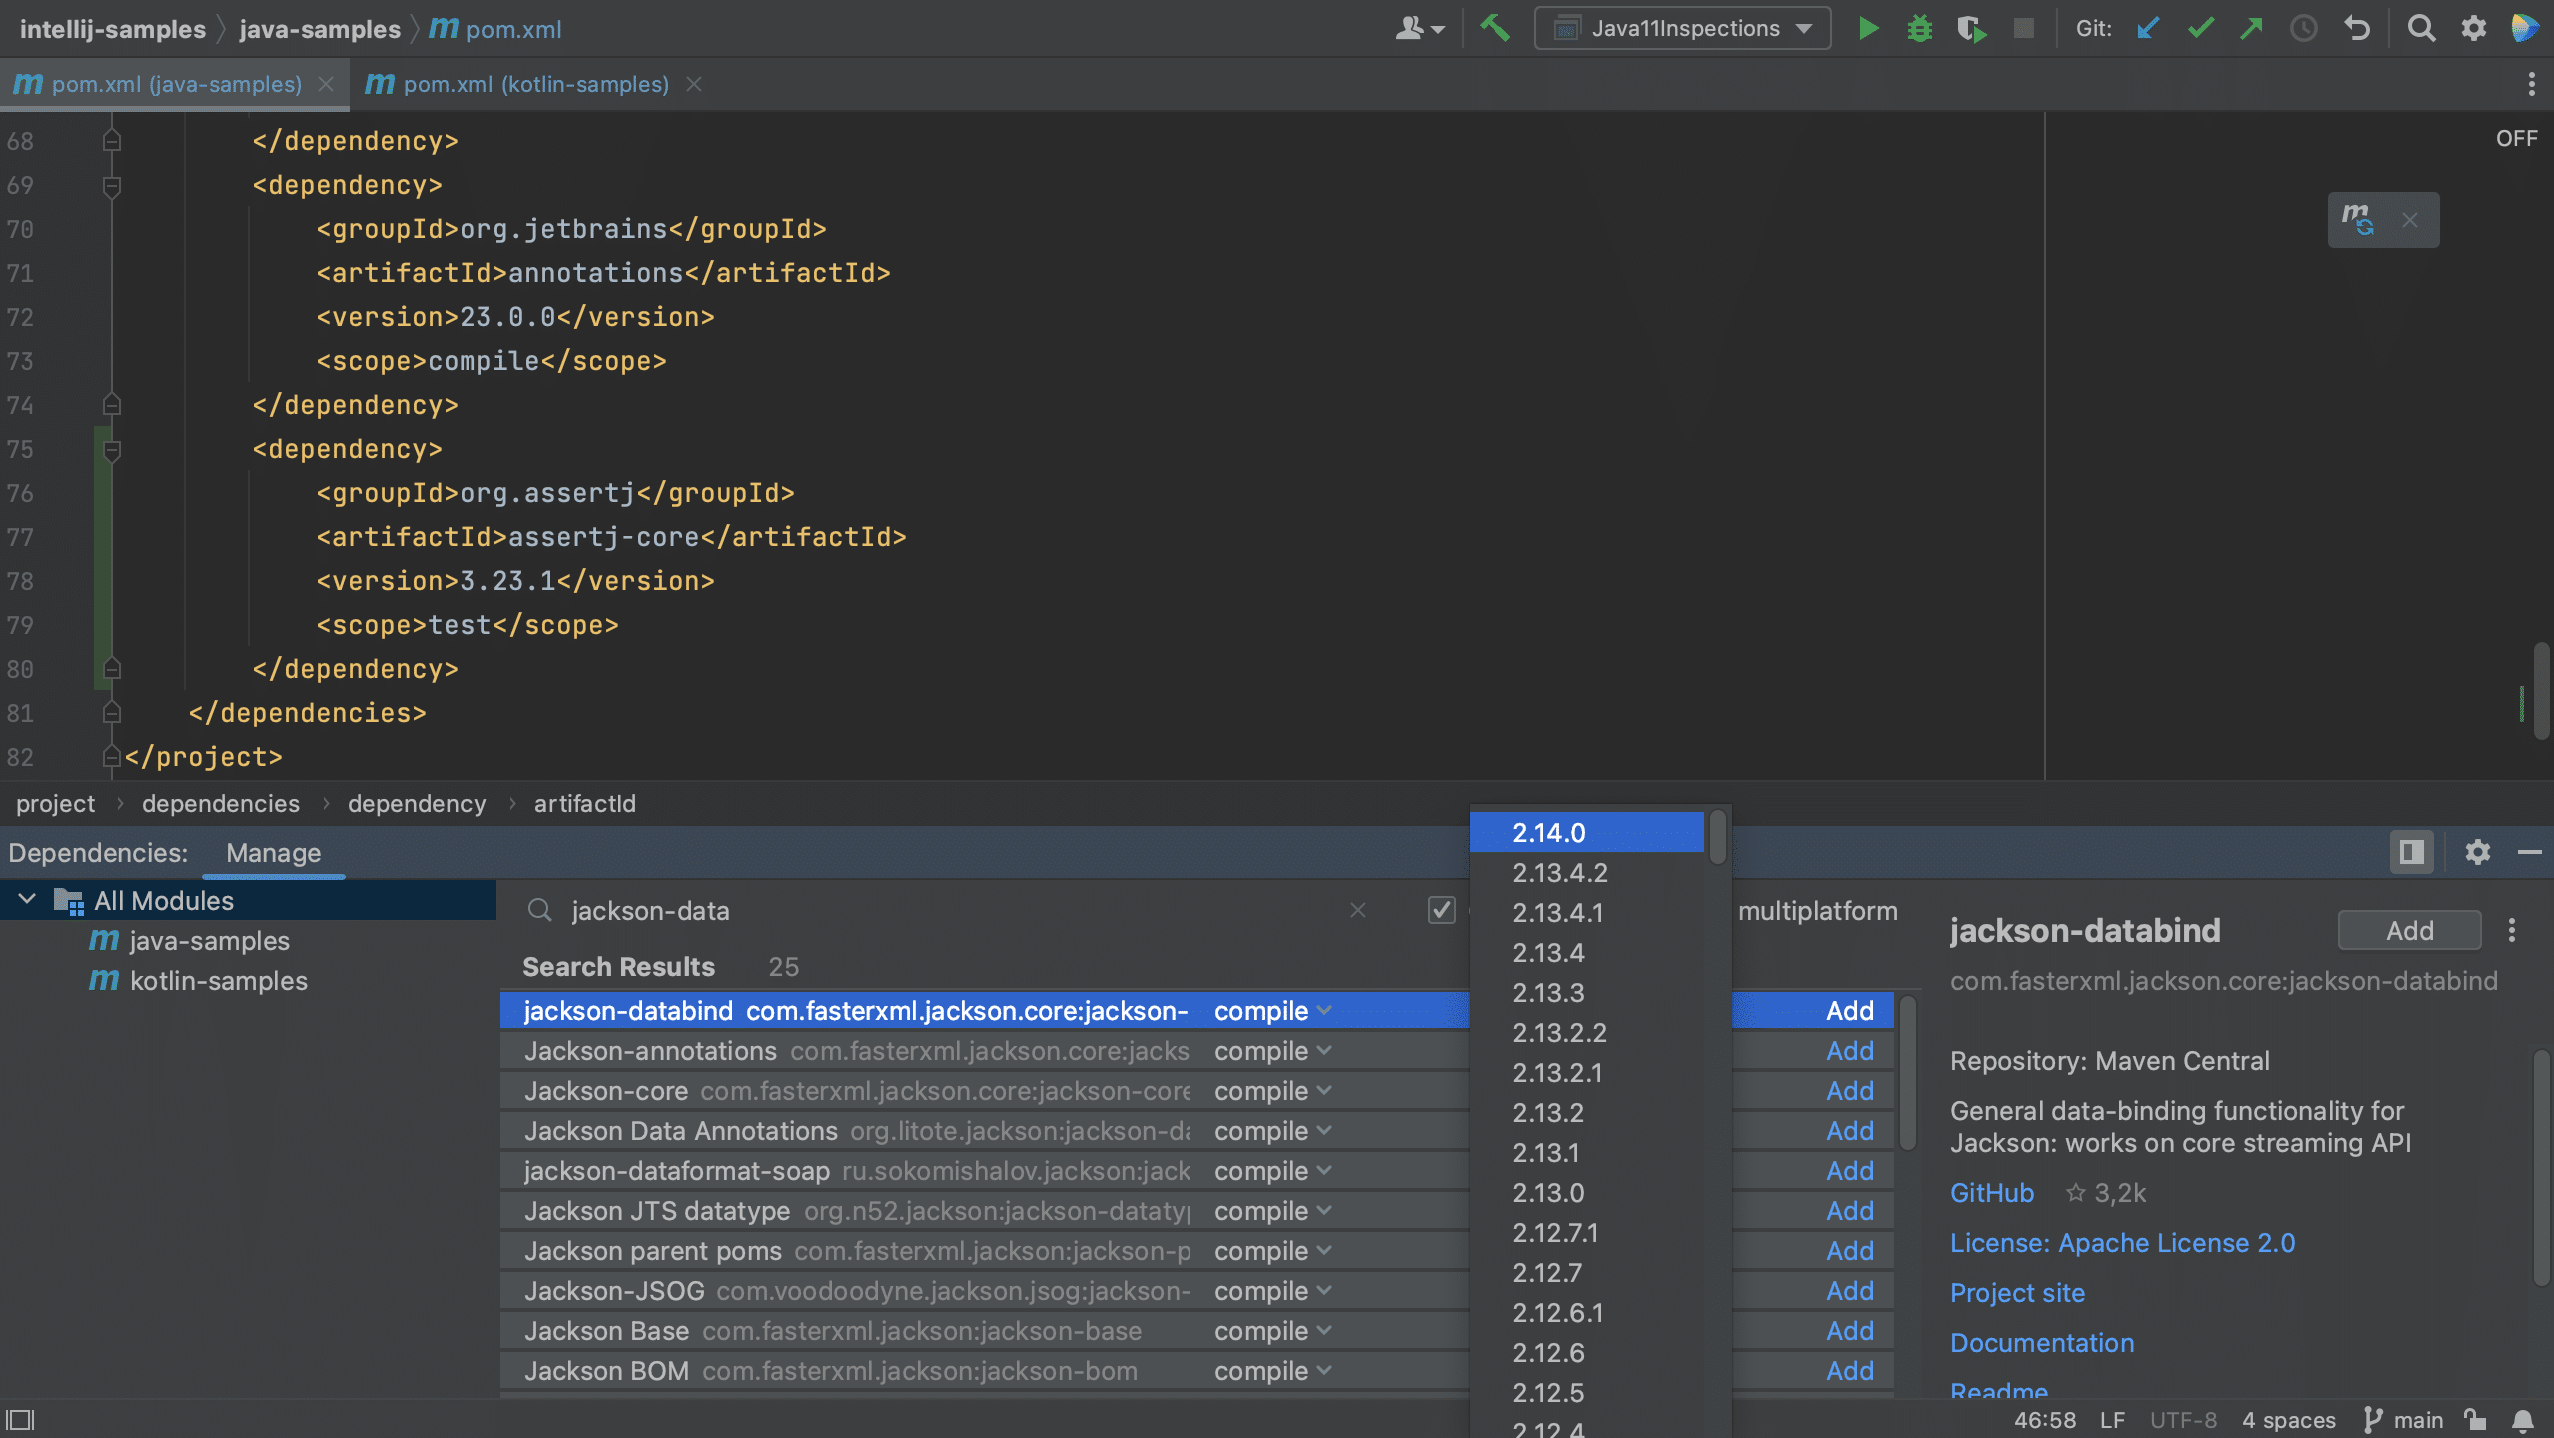
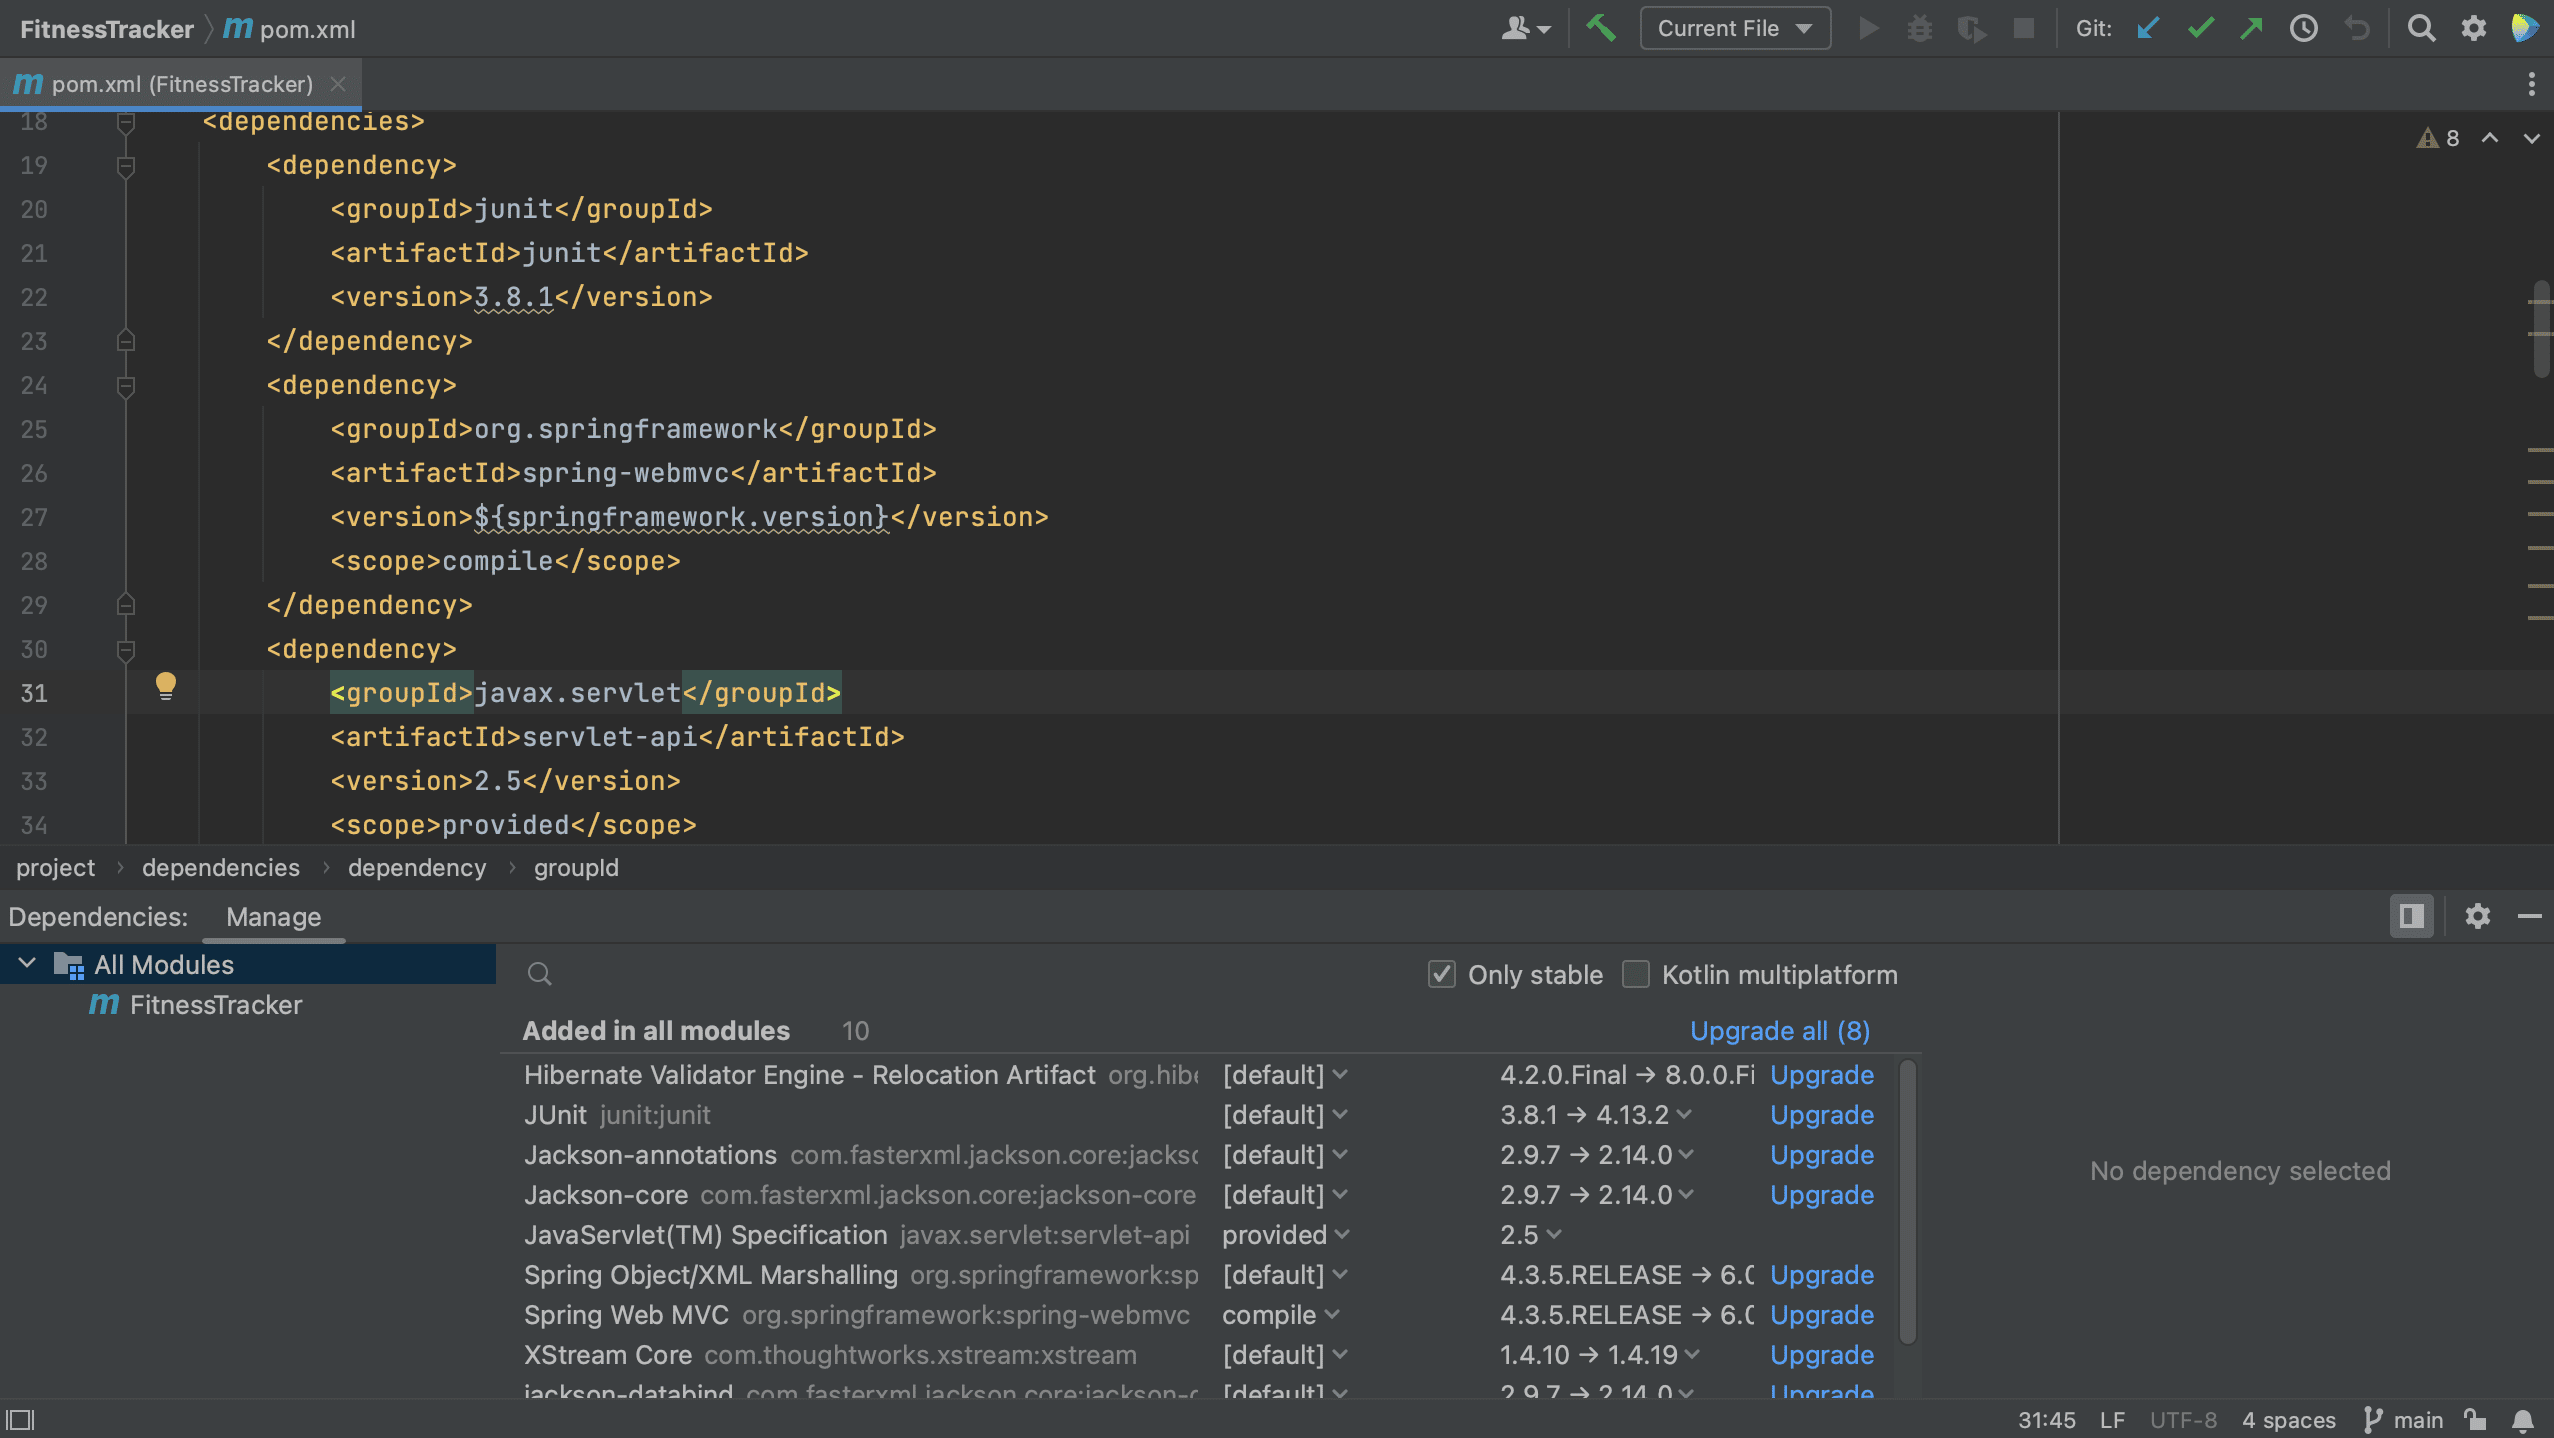
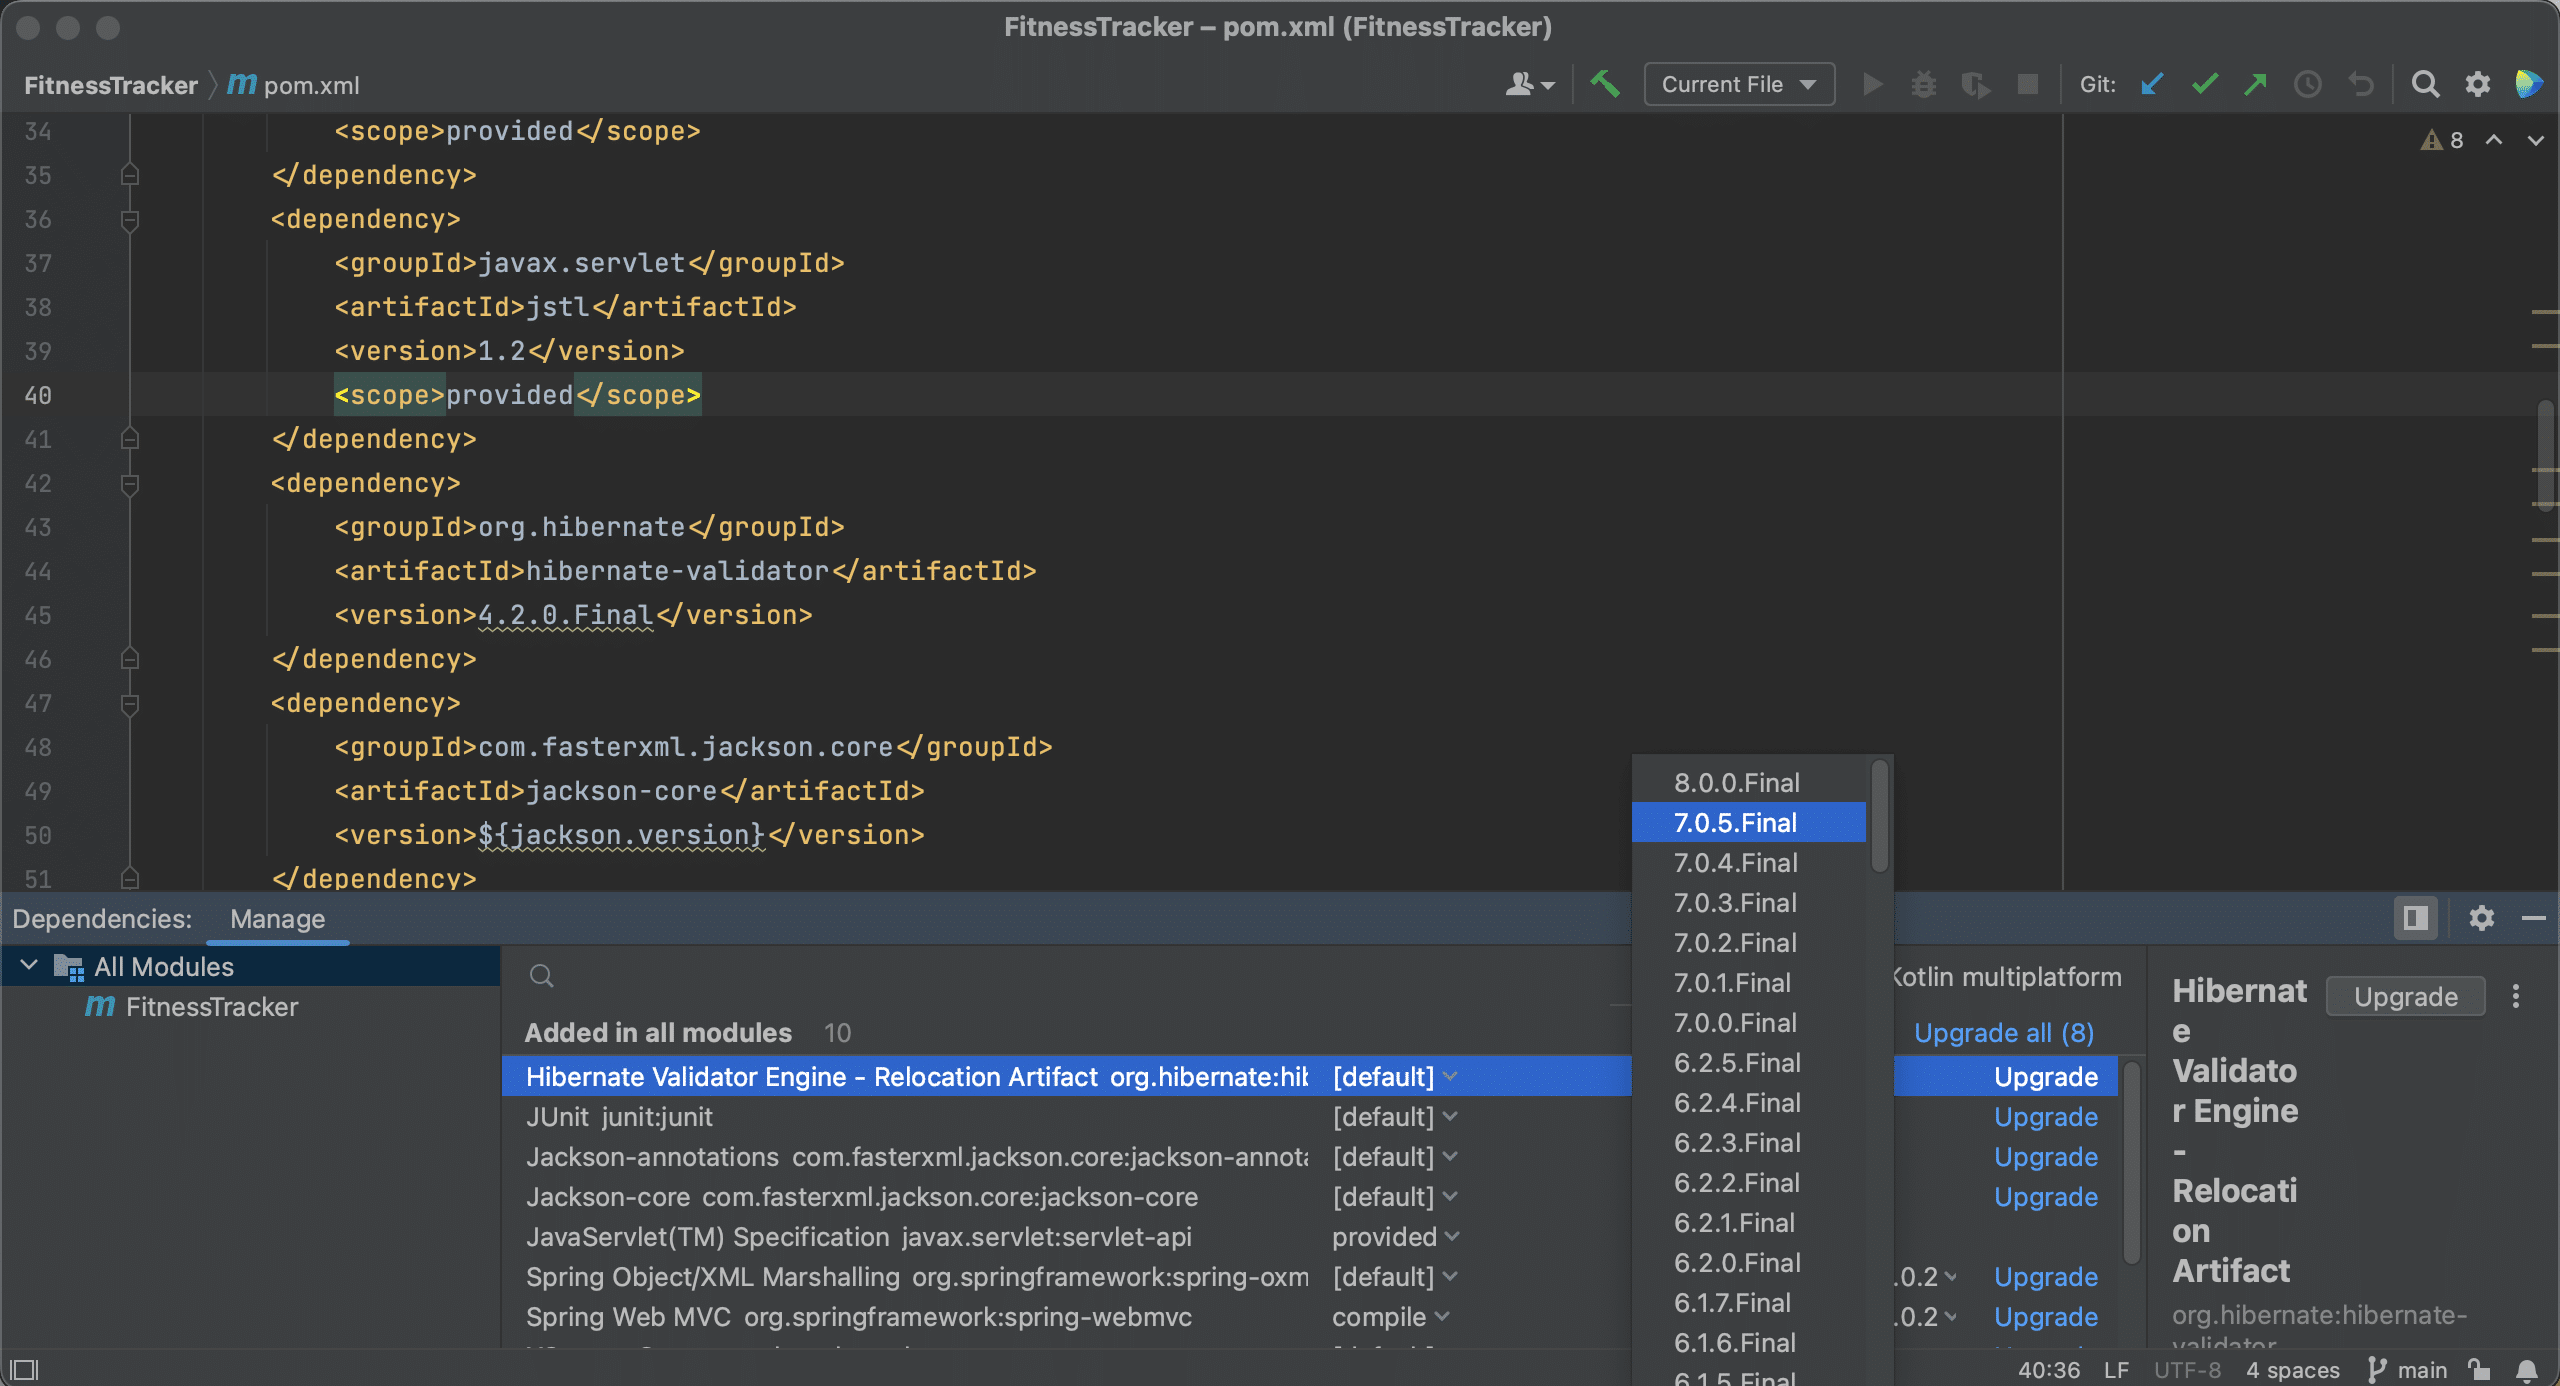
We can also upgrade our dependencies using the Dependencies tool window. The Dependencies tool window will tell us if there’s a newer version of a dependency, as we can see here.
We can choose the version to upgrade to by clicking on the version number in the list. Note that we don’t have to use the latest version.
We can also automatically upgrade a dependency to the latest version by clicking Upgrade for that particular dependency.
Or, we can even upgrade all our dependencies at once, by clicking the Upgrade all link.
Remove dependencies
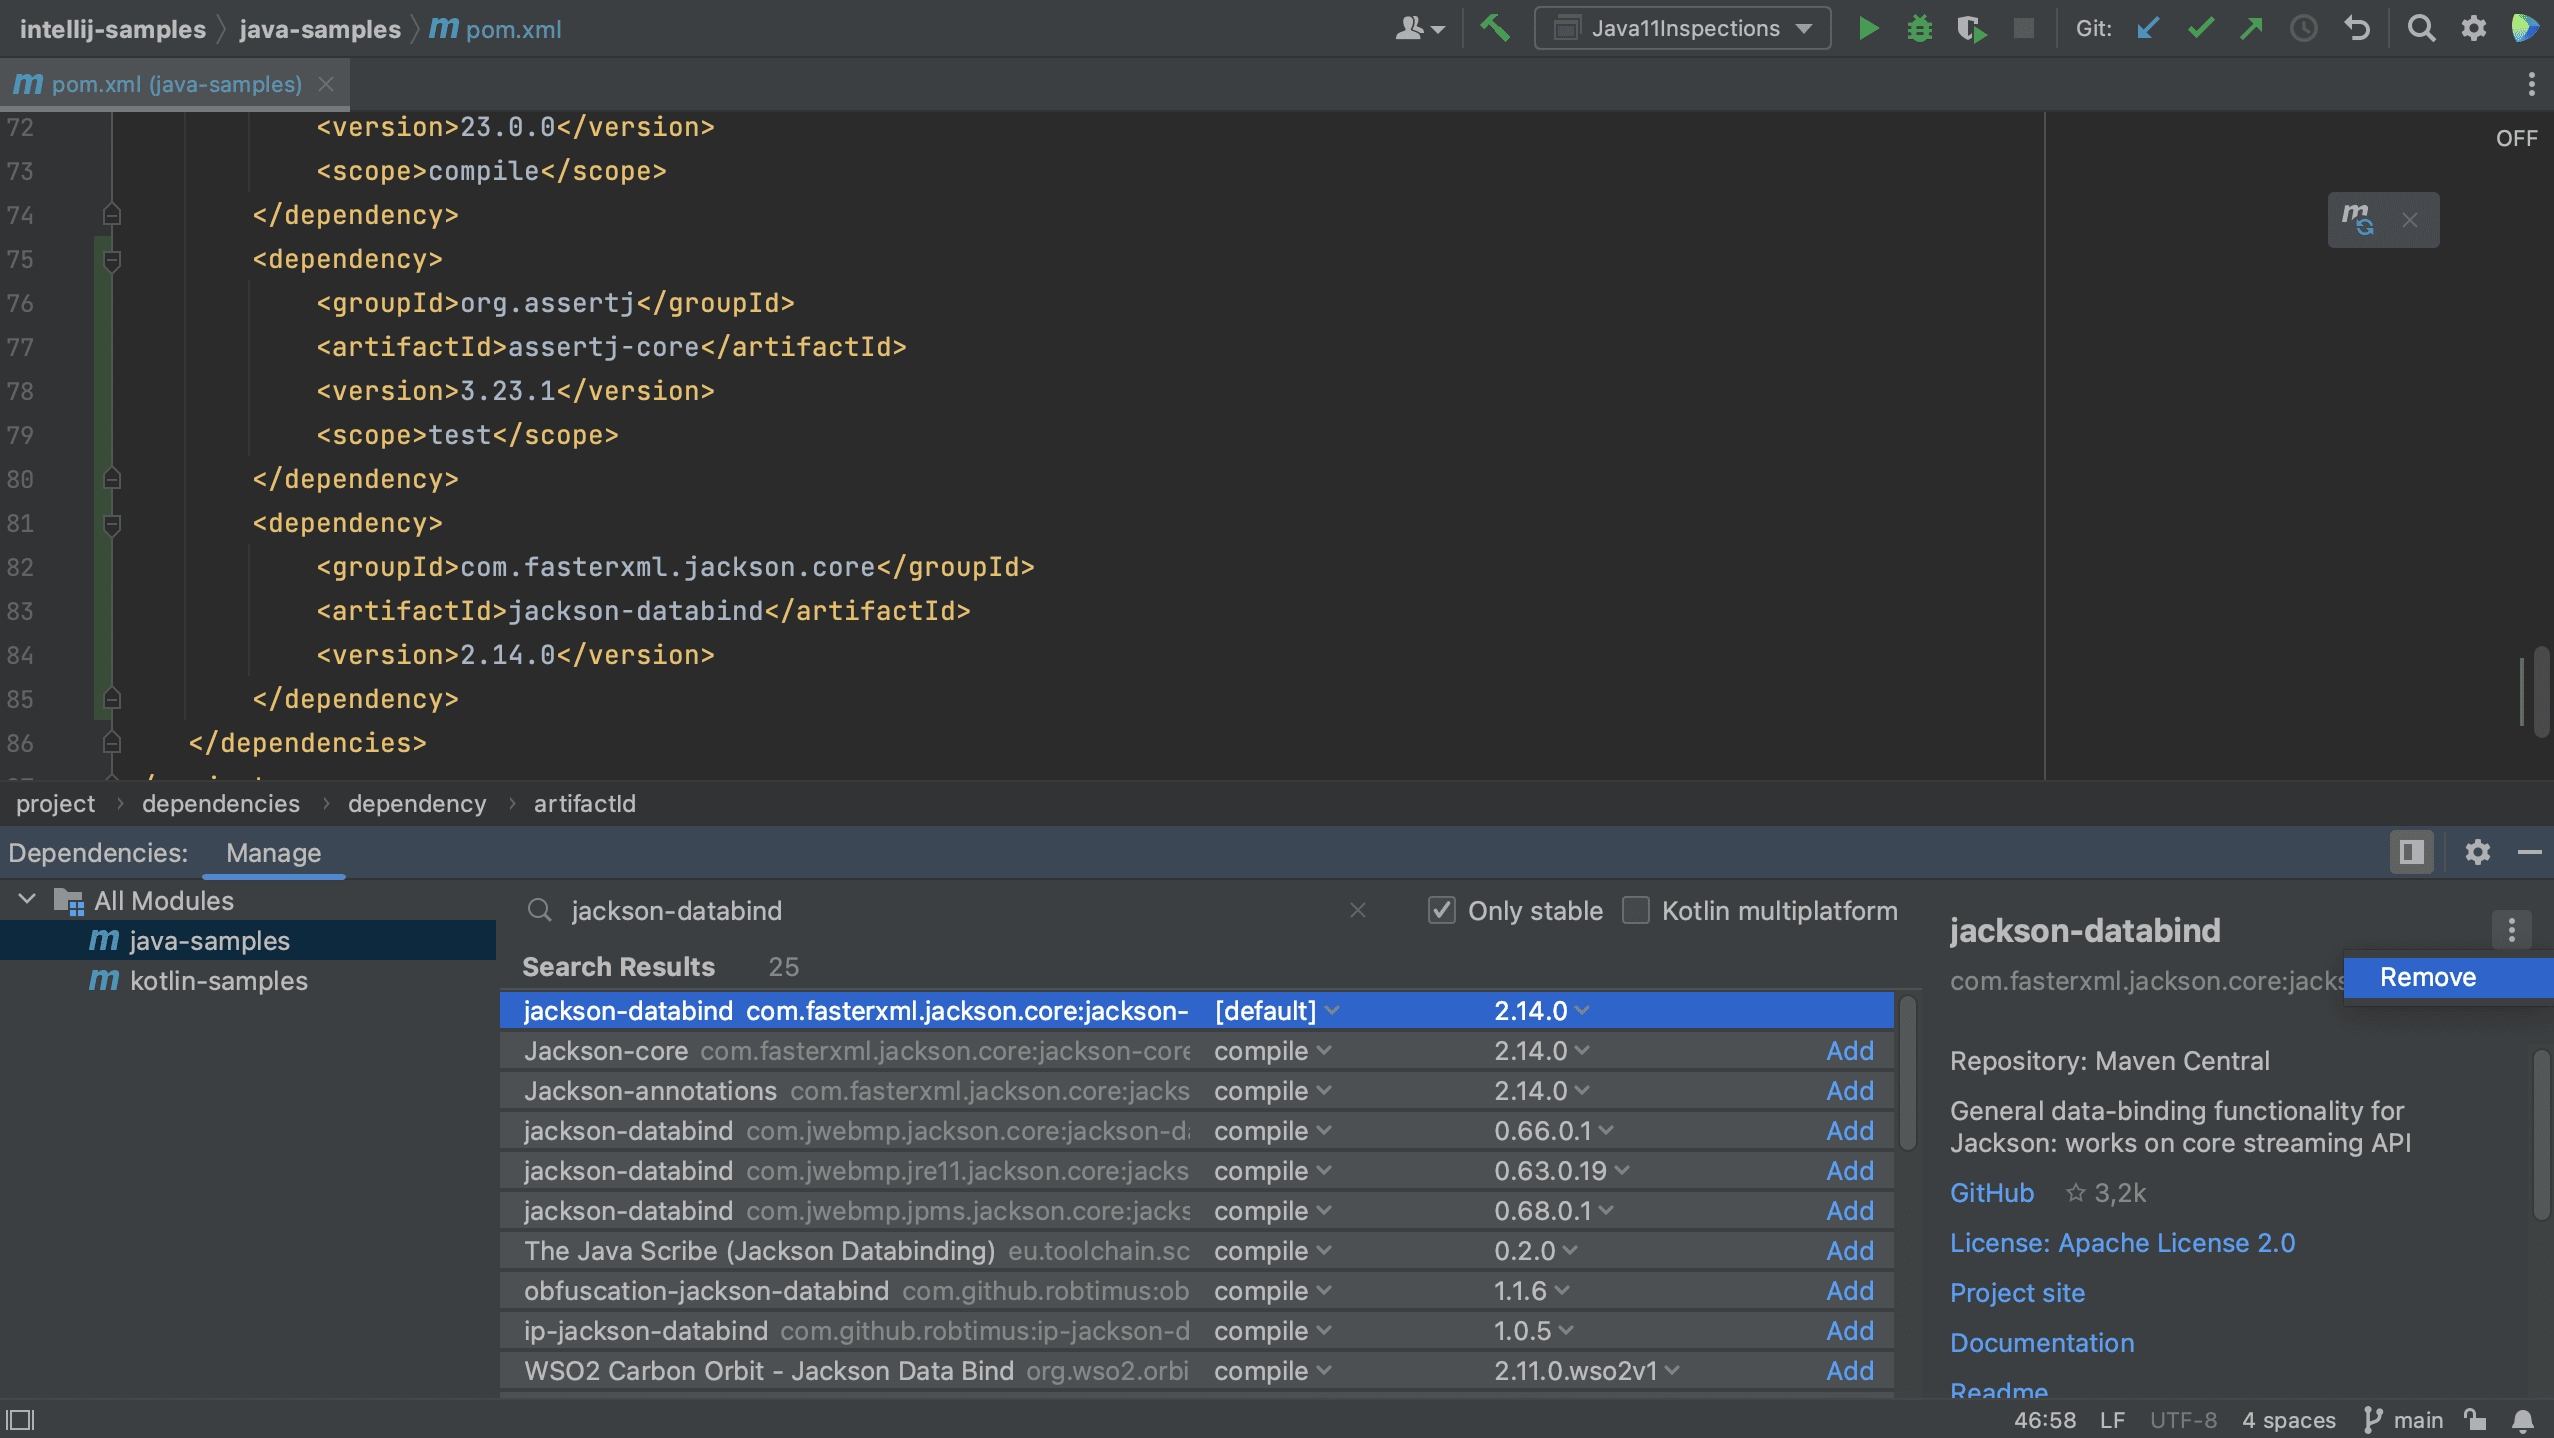
Finally, we can remove dependencies we no longer need. In the Dependencies tool window, let’s remove jackson-databind from the Java module. We select the dependency we want to remove (jackson-databind) and in the Dependency details pane on the right, click the More button (three dots) and select Remove.
We will see that the dependency is removed from the pom.xml and the dependency list. To remove a dependency from the whole project, select All Modules on the left.
Summary and Shortcuts
Now we know the different ways in which we can view our project’s dependencies in IntelliJ IDEA, and the different focus for each view.
IntelliJ IDEA Shortcuts Used
Here are the IntelliJ IDEA shortcuts that we used.
In this screencast, we’re going to take a look at managing dependencies in IntelliJ IDEA. We’ll look at different ways to add dependencies to your project, and how to add, update and remove dependencies using Package Search.
Used to determine whether a user is included in an A / B or Multivariate test.
18 months
_ga
ID used to identify users
2 years
_gali
Used by Google Analytics to determine which links on a page are being clicked
30 seconds
_ga_
ID used to identify users
2 years
_gid
ID used to identify users for 24 hours after last activity
24 hours
_gat
Used to monitor number of Google Analytics server requests when using Google Tag Manager
1 minute
_gac_
Contains information related to marketing campaigns of the user. These are shared with Google AdWords / Google Ads when the Google Ads and Google Analytics accounts are linked together.
90 days
__utma
ID used to identify users and sessions
2 years after last activity
__utmt
Used to monitor number of Google Analytics server requests
10 minutes
__utmb
Used to distinguish new sessions and visits. This cookie is set when the GA.js javascript library is loaded and there is no existing __utmb cookie. The cookie is updated every time data is sent to the Google Analytics server.
30 minutes after last activity
__utmc
Used only with old Urchin versions of Google Analytics and not with GA.js. Was used to distinguish between new sessions and visits at the end of a session.
End of session (browser)
__utmz
Contains information about the traffic source or campaign that directed user to the website. The cookie is set when the GA.js javascript is loaded and updated when data is sent to the Google Anaytics server
6 months after last activity
__utmv
Contains custom information set by the web developer via the _setCustomVar method in Google Analytics. This cookie is updated every time new data is sent to the Google Analytics server.


